background image

Montageanleitung  
Assembly Instructions  


FlexCube 


Schritt/ Step 

1-4


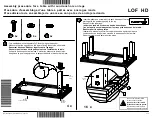
Edelstahlrahmen montieren/ Tube frame assembly   

Seite/ Page 

1-2


Schritt/ Step 

5-5 


Metallplatten einsetzen/ Panel assembly 


Seite/ Page 

3


Schritt/ Step 

6-6 


Einzel-Klapptür / Einzel-Schublade einsetzen/ 


Seite/ Page 

4


Single flip door / Drawers assembly  


Schritt/ Step 

6-6


Mehrere Klapptüren / Schubladen nebeneinander einsetzen /  Seite/ Page 

5


Multiple flip door / Drawers side by side assembly 
 

Schritt/ Step 

6-6   

Klapptüre mit Schloss zusammenbauen / 


Seite/ Page 

5-6


Flip door  with lock handle assembly  


Schritt/ Step 

6-6 


Klapptüre mit Schloss montieren /   


Seite/ Page 

6


Flip door  with lock handle assembly 
 

Schritt/ Step 

6-6   

Klapptüre 

ohne

 Schloss montieren/ 


Seite/ Page 7 

Flip door 

without

 lock handle assembly 


Schritt/ Step 

6-6


Klapptüre anschrauben / Screw flip door 


Seite/ Page 

 
Schritt/ Step 

7-7 


Schublade 

ohne 

Schloss montieren/ 


Seite/ Page 

Drawer  

without

 lock handle assembly 


Schritt/ Step 

7-7 


Schublade mit Schloss montieren /  


Seite/ Page 

10 

Drawer  with lock handle assembly 


Schritt/ Step

 7.1-7.4


Schublade zusammensetzen / Composed drawer 


Seite/ Page

 11


Schritt/ Step 

8-11


Schubladen einsetzen / Drawers assembly   


Seite/ Page 

12 


Tipps und Tricks: 


  Die beste Art die 

FlexCube

 Module zu montieren 

ist, wenn Sie bei Schritt 1 starten und sich 
vorarbeiten bis Schritt 12. 

  Die 

FlexCube

 Module lassen sich jeder Zeit 

umbauen. 


Für die perfekte Montage eignen sich 
Baumwollhandschuhe (in jedem Baumarkt 
erhältlich). Dies dient dazu, keine Kratzspuren 
und Fingerabdrücke zu hinterlassen. 


Tips: 


The best way to assemble any 

FlexCube 

modul, is to start from bottom to top. 


You can always disassemble the furniture in 
reverse order and create a new 

FlexCube 

Module. 


For the perfect fitting cotton gloves are 
suitable (available in each store). This 
serves to not leave some fingerprints and 
scratches 

Summary of Contents for FlexCube

Page 1: ...Seite Page 8 Schritt Step 7 7 Schublade ohne Schloss montieren Seite Page 9 Drawer without lock handle assembly Schritt Step 7 7 Schublade mit Schloss montieren Seite Page 10 Drawer with lock handle assembly Schritt Step 7 1 7 4 Schublade zusammensetzen Composed drawer Seite Page 11 Schritt Step 8 11 Schubladen einsetzen Drawers assembly Seite Page 12 Tipps und Tricks Die beste Art die FlexCube Mo...

Page 2: ...cture is extended use the connector K3 at this position Connector K2 use only at the very last element at same position Make sure that the screw hole arefacing down Build the frame according to the amount needed K2 K3 Stecken Sie den Edelstahlrahmen ins Fußteil Stellen Sie sicher dass alle Schrauben nach unten gerichtet sind Schrauben Sie die vertikalen Edelstahlrohre zusammen und ziehen Sie diese...

Page 3: ...s Prüfen Sie nun den Edelstahlrahmen mit der Wasserwaage Falls der Rahmen uneben ist korrigieren Sie die Fußteile von Hand durch eindrehen oder ziehen Sie diese mit dem Schraubenschlüssel an Diesen Schritt können Sie auch nach dem Einsatz der Metallplatten erledigen siehe Seite 3 Check if the frameworks is even by using a water level If the frameworks is uneven adjust the foot set accordingly by h...

Page 4: ...l der Metallplatten zuerst in den Edelstahlrahmen Danach die Schrauben in den horizontalen Edelstahlrahmen festschrauben wie unten abgebildet Press one side corner into the frame and then others pat the corner in one by one Insert supporting screws for 750 floor panels by screwdriver into horizontal tube 3 ...

Page 5: ...e cover cap Screw hinge on insert panel or middle panel 2 Einsteckplatte kann nur in Kombination mit Mitteltafel montiert werden Ziehen Sie nun die Schrauben an 2 Insert panel can only be mounted in combination with side panel middle panel Just use the screwdriver to fix the position 3 Klappen Sie nun die Einsteckplatte ein Schrauben Sie die Schraube der Einsteckplatte fest 3 Flip up the metal pla...

Page 6: ...werden Schrauben Sie die Klappe oben fest Pat the middle panel in to cover the insert panel The mounting middle panel is necessary if two or several doors or drawers are to be mounted next to one another Tight the screw with the screwdriver Klapptüre mit Schloss zusammenbauen Flip door with lock handle assembly Türbefestigung zerlegen Disassemble the flip door D Türbefestigungsvorrichtung flip doo...

Page 7: ...Verriegelung richtig zu montieren Disassemble the lock set and fix to the right position Mount front handle with lock according to the assembly instructions Den Verschluss wie auf dem Bild aufgeführt verschrauben Danach die mit D markierten Schrauben anziehen Tighten screw D after the middle parts of lock set is mounted Mount closure clamp according to the assembly instructions 6 ...

Page 8: ...ehen Sie nun auf der Rückseite den kleineren Ring an Ziehen Sie den Verschluss mit dem Werkzeug an Drehen Sie den zweiten Ring auf den Verschluss Turn out the both rings from the closure Insert the lock into the hole of the metal plate Drag this is now fixed with the installation tool Now screw in the second ring Schrauben Sie nun die Schrauben fest wie unten abgebildet Tighten the screws after th...

Page 9: ...n Schliessen Sie die Klapptüre und überprüfen Sie ob diese gerade ist Schrauben Sie nun wie unten abgebildet die Schrauben fest Turn out the hinges and fix with screw H on flip door do not screw tight Push in flip door adjust in tube frame so that it is even then pull out and now screw the door on tight Anschrauben der Abdeckklappe Screw cover cap to the hinge 8 ...

Page 10: ...e den Verschluss in die Öffnung der Metallplatte Drehen Sie nun auf der Rückseite den kleineren Ring an Ziehen Sie den Verschluss mit dem Werkzeug an Drehen Sie den zweiten Ring auf den Verschluss Turn out the both rings from the closure Insert the lock into the hole of the metal plate Drag this is now fixed with the installation tool Now screw in the second ring 9 ...

Page 11: ...montieren Drawer with lock handle assembly Montieren Sie das Steckschloss Set auf der Front der Metallplatte siehe Abbildung Mount the lock set to the drawer front according to the assembly instructions Schrauben Sie die Rückseite ebenfalls an Screw back also 10 ...

Page 12: ...hienen und ziehen Sie diese heraus 7 4 Die Schubladenfront nicht zu fest verschrauben 7 1 Buckle side left right to the bottom 7 2 Screw on drawer back 7 3 Pull up drawer as far it will go Press plastic side springs simultaneously up on the right and downwards on the left then remove drawer 7 4 Screw on drawer front do not screw tight Schieben Sie die Schiene in die mittlere Platte und schrauben S...

Page 13: ...embly Schieben Sie die Schublade bis es einklickt in die Schienen wie unten abgebildet Push in drawer adjust in tube frame so that it is even Schrauben Sie die Schublade wie unten abgebildet auf der Innenseite fest Pull out the drawer and now screw the front on tight 12 ...

Reviews: