872 Extension Module
Liquid handling – 2.872.0060
Manual
8.872.8003EN
Page 1: ...872 Extension Module Liquid handling 2 872 0060 Manual 8 872 8003EN...
Page 2: ......
Page 3: ...Metrohm AG CH 9101 Herisau Switzerland Phone 41 71 353 85 85 Fax 41 71 353 89 01 info metrohm com www metrohm com 872 Extension Module Liquid handling 2 872 0060 Manual 8 872 8003EN 06 2009 zst...
Page 4: ...entation is protected by copyright All rights reserved Although all the information given in this documentation has been checked with great care errors cannot be entirely excluded Should you notice an...
Page 5: ...nts and chemicals 4 1 4 5 Recycling and disposal 4 2 Overview of the instrument 5 2 1 Front 5 2 2 Rear 5 3 Functioning 6 3 1 10 port valve 6 3 2 Transfer tubing 8 3 3 Mixing vessel 9 3 4 Peristaltic p...
Page 6: ...8 7 1 2 Maintenance by Metrohm Service 38 7 1 3 Operation 38 7 1 4 Shutting down 39 7 2 Door 39 7 3 Peristaltic pump 39 7 3 1 Operation 39 7 3 2 Maintenance 40 7 4 Quality Management and validation wi...
Page 7: ...able of contents 872 Extension Module Liquid handling V 10 2 Quality Management Principles 48 10 3 Warranty guarantee 49 11 Accessories 50 11 1 Scope of delivery 50 11 2 Optional accessories 53 Index...
Page 8: ...11 Figure 9 Setup versions 13 Figure 10 Dismounting the bottle holder 14 Figure 11 Mounting the bottle holder 15 Figure 12 Removing the base tray 17 Figure 13 Mounting the base tray 18 Figure 14 Moun...
Page 9: ...s operated with MagIC Net software just like the IC instrument When it is connected to an 850 Professional IC instrument MagIC Net recognizes the extension module automatically and checks its function...
Page 10: ...describes the 872 Extension Module Liquid han dling its assembly and connection to the IC instrument as well as the installation operation and maintenance of the individual components Technical specif...
Page 11: ...This symbol marks additional information and tips 1 4 Safety instructions 1 4 1 General notes on safety WARNING This instrument may only be operated in accordance with the specifica tions in this doc...
Page 12: ...sed mainly in unattended operation then weekly inspections are manda tory 1 4 4 Flammable solvents and chemicals WARNING All relevant safety measures are to be observed when working with flammable sol...
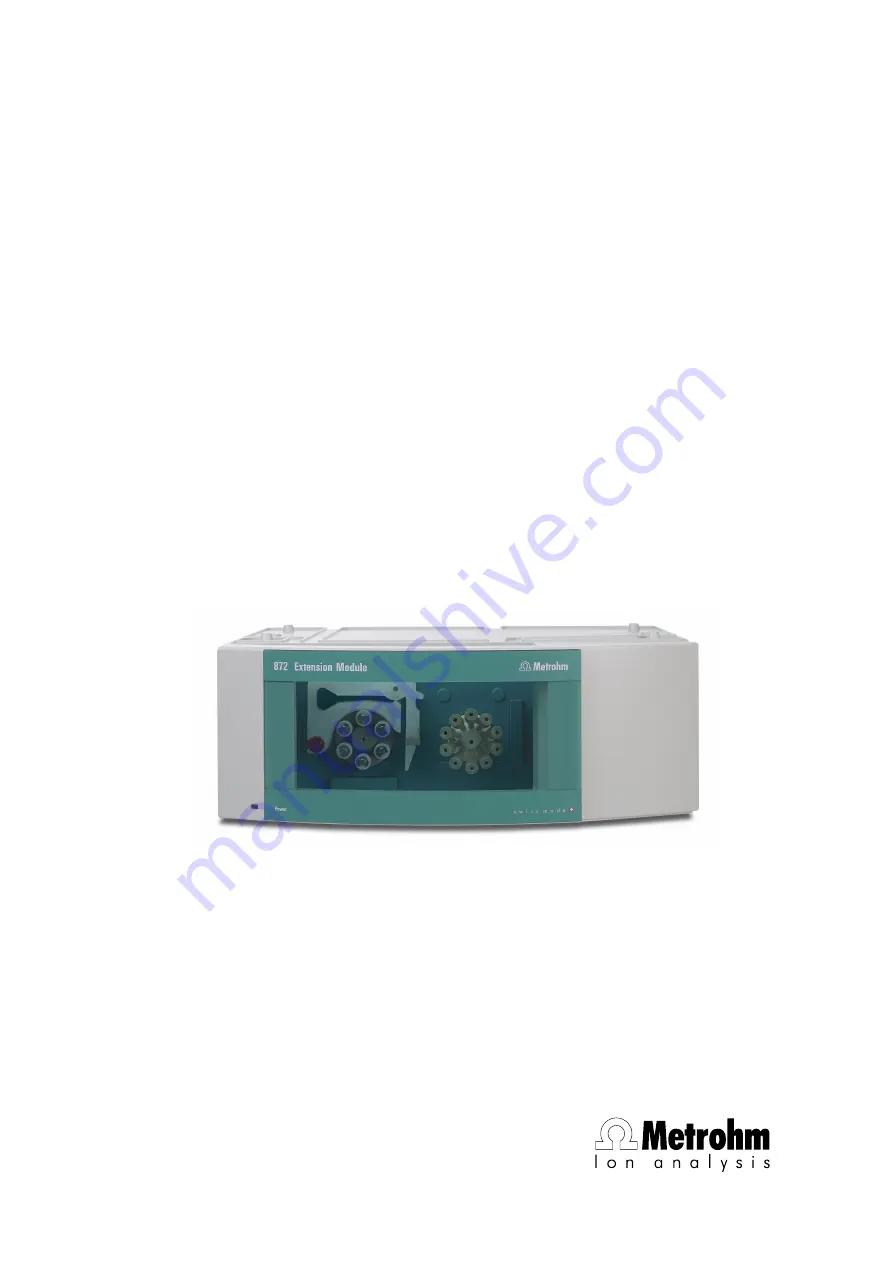
Page 13: ...ling 1 Standby indicator 2 Peristaltic pump 3 10 port valve 4 Injection valve 2 2 Rear In Out Made by Metrohm Herisau Switzerland 1 2 Figure 2 Rear 872 Extension Module Liquid handling 1 Connector In...
Page 14: ...1 2 3 4 5 6 7 8 9 10 11 12 13 Figure 3 10 port valve positions 1 Position 1 Connector for the connection to e g the injection valve in the extension module 2 Position 2 Connector for the connection to...
Page 15: ...n be defined as secured The secured position is moved to during switching only if it is the goal of the switching procedure If the secured position lies along the shortest route during a valve switch...
Page 16: ...For placing into the 6 2057 200 bottle holder The transfer tubing is connected by means of a connector 5 2 with the central position of the 10 port valve and by means of another connector 5 1 with a D...
Page 17: ...quid can be transported onward through the 10 port valve 1 2 3 Figure 6 6 2762 000 mixing vessel with cover 1 Cover for the 6 2762 010 mixing vessel With two connector openings 2 6 2762 000 mixing ves...
Page 18: ...gh the sample loop 7 4 on the injection valve 7 3 The desired volume is defined precisely by the size of the selected sample loop 1 2 3 4 5 6 9 10 7 8 1 2 3 4 Figure 7 Measuring volume Filling the sam...
Page 19: ...ension Module Liquid handling 11 1 2 3 4 5 6 9 10 7 8 1 2 3 4 5 6 Figure 8 Measuring volume Aspirating sample segment 1 Dosino 2 Injection valve 3 Container with transfer solution 4 10 port valve 5 Sa...
Page 20: ...have more than 4 identical components in common i e a maximum of 4 high pressure pumps a maximum of 4 peristaltic pumps a maximum of 4 injection valves a maximum of 4 suppressors MSM SPM incl BUT onl...
Page 21: ...xtension modules are used then they should all be installed in the same location if possible either above below or next to the IC instrument If this is not possible then the extension modules that are...
Page 22: ...ing the bottle holder 1 2 1 2 Figure 10 Dismounting the bottle holder 1 Cover stoppers 2 Cylinder screws Remove covering stoppers 10 1 Loosen the cylinder screws with a 6 2621 100 3 mm hexagon key Rem...
Page 23: ...ng the extension module Plug a 6 2156 060 cable into the connector In of the extension module and screw it tight Plug the other end of the cable into the Extension module con nector of the IC instrume...
Page 24: ...he IC instrument off and disconnect the mains cable 2 Clearing the bottle holder If there are bottles and other things on the bottle holder remove them 3 Disconnecting all connections on the rear of t...
Page 25: ...2 Removing the base tray 1 Base tray 2 Cylinder screws With washer 6 Mounting the base tray Tilt the extension module sideways and lay it down flat Attach base tray Slide the washers onto the cylinder...
Page 26: ...odule Plug a 6 2156 060 cable into the connector In of the extension module and screw it tight Plug the other end of the cable into the Extension module con nector of the IC instrument and screw it ti...
Page 27: ...lso the manual for the IC instru ment Connect the leak sensor see manual for the IC instrument Connect the USB cable Connect the MSB cable Plug in the mains cable 4 4 Setting up the extension module n...
Page 28: ...on module next to the IC instrument 20 872 Extension Module Liquid handling 1 2 2 Figure 14 Mounting the base tray 1 Base tray 2 Cylinder screws With washer Set up the extension module Optional Set up...
Page 29: ...g the extension module Plug a 6 2156 060 cable into the connector In of the extension module and screw it tight Plug the other end of the cable into the Extension module con nector of the IC instrumen...
Page 30: ...Connect the leak sensor cable of the IC instrument to the adapter Connect the leak sensor cable of the extension module to the adapter 7 Connecting the drainage tubings 1 2 3 4 5 Figure 16 Connecting...
Page 31: ...ug the other end of the drainage tubing 16 2 onto the drain age tubing connector 16 3 of the base tray Plug the drainage tubing 16 5 onto the drainage tubing connec tor 16 4 and guide the other end in...
Page 32: ...057 200 accessories 2 Hexagon key Part of the 6 2057 200 accessories 3 Centring pin Screwed in 3 Hanging up bottle holder Hang up the bottle holder 1 and slide it downwards 2 1 2 4 Equipping the bottl...
Page 33: ...bly 872 Extension Module Liquid handling 25 1 2 3 4 3 1 6 1562 160 transfer tubing 2 6 2057 200 bottle holder 3 6 1608 100 PE bottle 50mL content 4 6 2762 000 mixing vessel 50 mL content with 6 2762 0...
Page 34: ...tailed installation instructions for indi vidual components should you require such aids an installation diagram see Chapter 5 3 page 27 showing an example for a possible installation several chapters...
Page 35: ...struments are not shown in the diagram 1 2 3 4 5 6 9 10 7 8 1 2 3 9 7 4 5 10 6 9 5 9 9 9 9 8 Figure 17 Installation diagram 1 Connection to the Dosino 2 Connection transfer tubing 10 port valve The tr...
Page 36: ...Fix the other end of the capillary to the coupling on the transfer tubing 2 Connecting transfer tubing and Dosino Fix the capillary to the coupling of the transfer tubing Connect the other end of the...
Page 37: ...cording to the principle of displace ment The pump tubing is clamped between the rollers 18 3 and the tubing cartridge 18 5 During operation the peristaltic pump drive rotates the roller hub 18 2 so t...
Page 38: ...mp tubing 4 Tubing cartridge 6 2755 000 5 Contact pressure lever 6 Union nut 7 Adapter 8 Tubing olive Either with filter holder 6 2744 180 or without filter holder 6 2744 160 9 Pump tubing 6 1826 xx0...
Page 39: ...o the SPM a 6 2744 180 pump tubing connection with filter must be used Case A 6 2744 180 pump tubing connection with filter 1 2 3 Figure 20 Install pump tubing connection with filter 1 Union nut 2 Ada...
Page 40: ...Inserting the pump tubing Press the contact pressure lever all the way down Place the pump tubing in the tubing cartridge The stoppers 19 3 must snap into the corresponding holders of the tubing cartr...
Page 41: ...5 i e press it all the way down Switch on the peristaltic pump Raise the contact pressure lever one step at a time until liquid flows When liquid starts flowing raise the contact pressure lever by an...
Page 42: ...he transfer solution path Connect the transfer solution aspirating capillary to the connector 5 Connect the transfer solution outlet capillary to the connector 4 1 2 3 4 5 6 1 2 3 4 5 6 7 7 7 7 Figure...
Page 43: ...rew 22 7 to connector 3 Fasten the other end of the sample loop 22 2 with a second 6 2744 010 PEEK pressure screw 22 7 to connector 6 5 6 2 Mode of operation of the injection valve The injection valve...
Page 44: ...e sample loop to the waste container Position B In the position INJECT the Dosino aspirates the transfer solution through the sample loop to the 10 port valve If sample solution is to be found in the...
Page 45: ...stru ment Putting IC instrument into operation with extension mod ule 1 Start MagIC Net 2 Connect IC instrument to PC and switch on The extension module is recognized automatically by MagIC Net Additi...
Page 46: ...strument electronics In such cases the Metrohm Service must be informed Spillages of chemicals and solvents should be cleaned up immediately In particular the plug connections on the rear panel of the...
Page 47: ...polymethylmetacrylate It must never be cleaned with abrasive media or solvents CAUTION Never use the door as a handle 7 3 Peristaltic pump 7 3 1 Operation The pumping capacity of the peristaltic pump...
Page 48: ...ime in the respective alternate position Therefore replace the pump tubing periodically or when used perma nently approx every 4 weeks Selecting the pump tubing The pump tubing differs in material dia...
Page 49: ...on 6 1826 390 Pump tubing LFL yel low yellow 3 stop per PVC Tygon 1 37 mm For the sample solution in inline ultrafiltration 7 3 2 2 Pump tubing connection with filter The 6 2821 130 filters 24 2 shoul...
Page 50: ...idation documentation to provide help for carrying out the Installation Qualification IQ and the Operational Qualification OQ IQ and OQ are also offered as a service by the Metrohm agents In addition...
Page 51: ...Remedy Peristaltic pump insufficient or no delivery rate Peristaltic pump contact pressure too weak Correctly set contact pressure see Set flow rate page 33 Peristaltic pump filter blocked Replace th...
Page 52: ...tions Ambient tempera ture 25 C 3 C Instrument status 40 minutes in operation equilibrated 9 2 Instrument IC system Metal free IC system Material Painted polyurethane hard foam without CFCs fire class...
Page 53: ...port valve Connections 1 out of 10 Resistance to sol vents No restrictions Switching time typ 100 ms Pressure resistance 2 0 MPa 20 bar Valve function prevents damage at overpressure 9 6 Peristaltic p...
Page 54: ...es Auxiliary 1 DSUB plug 15 pin female 9 9 Safety specification Design testing EN IEC 61010 1 UL 61010 1 CSA C22 2 No 61010 1 Protection class III 9 10 Electromagnetic compatibility EMC Emission EN IE...
Page 55: ...06 EN IEC 61000 6 3 2004 EN 55022 CISPR 22 2006 Immunity EN IEC 61326 1 2006 EN IEC 61000 6 2 2005 EN IEC 61000 4 2 2001 EN IEC 61000 4 3 2002 EN IEC 61000 4 4 2004 Safety specifications EN IEC 61010...
Page 56: ...s to them The implementation of the ISO 9001 2000 quality management system is described in Metrohm s QM Manual which comprises detailed instruc tions on the following fields of activity Instrument de...
Page 57: ...rrors The warranty period is 36 months from the day of delivery for day and night operation it is 18 months The warranty remains valid on condition that the service is provi ded by an authorized Metro...
Page 58: ...no Description 1 1 872 0060 872 Extension Module Liquid handling 1 6 1562 160 Transfer tubing 15 mL 2 x M6 For liquid handling in ion chromatography To avoid contamination of the Dosino 5 6 1608 100...
Page 59: ...26 340 Pump tubing LFL black black 3 stoppers For the sample solution in inline dialysis 1 6 1831 010 PEEK capillary 0 25 mm i d 3 m For all IC components Material PEEK Outer diameter inches 1 16 Inne...
Page 60: ...g nozzle UNF 10 32 2 pieces Connection pressure screw and pump tubing 2 pieces For IC instru ments with peristaltic pumps 2 6 2744 070 Pressure screw short Short version With UNF 10 32 connection 5 pi...
Page 61: ...K 1 6 2744 200 Adapter UNF 10 32 outer M6 inner Connecting 1 16 in PEEK capillaries and transfer tubing M6 Material PEEK 1 6 2762 000 Mixing vessel 50 mL to Extension Module Liquid Handling 1 6 2762 0...
Page 62: ...IC Instruments 6 2103 170 Adaptor to Leak Sensor at Professional IC Adaptor to connect two leak sensors to one Professional IC instrument 6 2156 070 Cable Extension Module Professional IC 1 m Cable co...
Page 63: ...11 Accessories 872 Extension Module Liquid handling 55 Order no Description 6 9988 503 Validation Documentation for 850 English German CD...
Page 64: ...Front 5 Rear 5 M Maintenance Peristaltic pump 39 Material 45 O Operation Peristaltic pump 39 Optional accessories 53 Overview of the instrument 5 P Peristaltic pump Installation 30 Maintenance 39 Ope...