background image

Windows Driver 

Rev.  1.01 

-  25  - 

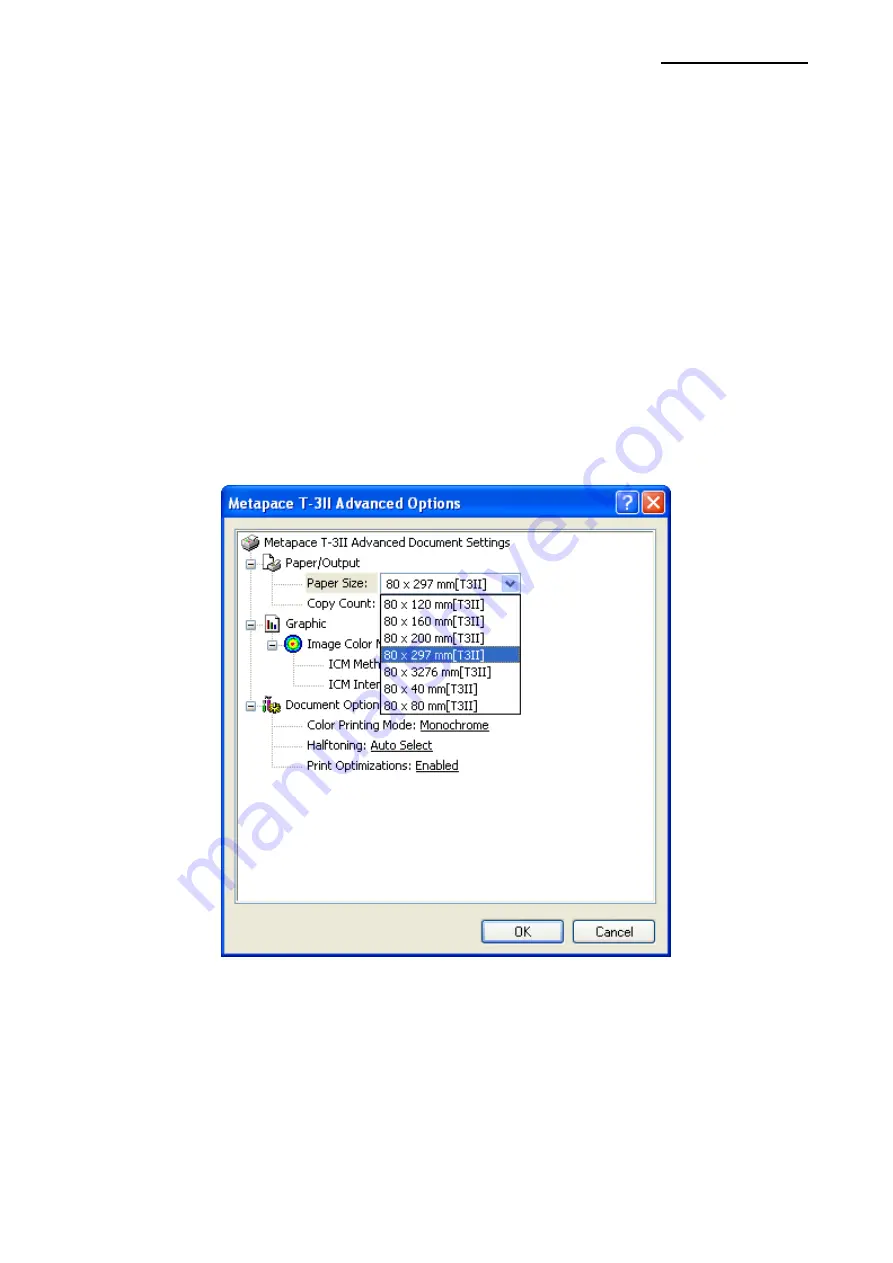
5-2 Paper size 

 
The following paper sizes can be selected with this Windows driver. 
 
80 

 40 mm[T3II] 

80 

 297 mm[T3II] 


80 

 80 mm[T3II] 

80 

 3276 mm[T3II] 


80 

 120 mm[T3II] 


80 

 160 mm[T3II] 


80 

 200 mm[T3II] 


Follow the instructions shown below to set the options. 
 
1) C

lick “Printing Preferences” in the “General” tab. 

 
2) C

lick “Advanced” in the “Paper/Quality” tab.   

 
3) Select a paper size in the list and then click 

“OK”. If you need a custom paper size, you 

can add it 

by clicking “New Paper Size” in the “Utilities” tab. 


Summary of Contents for T-3II

Page 1: ...Windows Driver Manual Metapace T 3II Thermal Printer Rev 1 01 http www metapace com ...

Page 2: ... Driver 23 5 1 Paper feed option 23 5 2 Paper size 25 5 3 NV Image Commands 26 5 4 Crop Macro 28 5 5 Barcodes 34 5 6 Cut Cash Drawer 37 5 7 Image Rotation 38 5 8 Utilities 39 5 8 1 New Paper Size 40 5 8 2 Unified POS Utility 41 5 8 3 Extended Special Functions 41 5 8 4 Journal Viewer 42 6 Windows Driver Specifications 44 6 1 Font 44 6 2 Special functions 46 6 2 1 Using Special Font Edit Utility 48...

Page 3: ...pported by this Windows driver Microsoft Windows XP 32bit 64bit Microsoft Windows Server 2003 32bit 64bit Microsoft Windows Embedded For Point Of Service Microsoft Windows Embedded POS Ready 2009 Microsoft Windows Vista 32bit 64bit Microsoft Windows Server 2008 32bit 64bit Microsoft Windows Server 2008R2 64bit Microsoft Windows 7 32bit 64bit Microsoft Windows 8 32bit 64bit 3 Windows Driver Prepara...

Page 4: ...dows Driver Installation 4 1 Installing on Windows XP Server 2003 4 1 1 Via Serial Port or Parallel Port 1 Double click the Windows Driver installation file 2 Click Next 3 Select a COM port or LPT port to be used and then click Next ...

Page 5: ... message box appears click Continue Anyway 5 Click Yes to reboot the PC 6 Open the printer properties window in the Windows OS Control Panel Printers and Faxes 7 In the Ports tab click Configure Port Pass this step if you are using a parallel port ...

Page 6: ...e printer The communication settings of the printer can be performed by conducting a self test Pass this step if you are using a parallel port 9 Click Print Test Page and check printing status Proper installation of the driver is indicated if the test page is printed normally ...

Page 7: ...Windows Driver Rev 1 01 7 4 1 2 Via USB Port 1 Double click the Windows Driver installation file 2 Click Next 3 Select USB and then click Next ...

Page 8: ...e following message box appears click Continue Anyway 5 Click OK 6 Turn off the printer and then turn it on 7 When the New Hardware Wizard appears for the installation of the Windows Driver select the option as shown below and click Next ...

Page 9: ...Windows Driver Rev 1 01 9 8 Click Next 9 When the following message box appears click Continue Anyway ...

Page 10: ...ick Finish 11 Open the printer properties window in the Windows OS Control Panel Printers and Faxes 12 Click Print Test Page and check printing status Proper installation of the driver is indicated if the test page is printed normally ...

Page 11: ...s Driver Rev 1 01 11 4 1 3 Via Ethernet Wireless LAN 1 Double click the Windows Driver installation file 2 Click Next 3 Select Ethernet Wireless LAN 4 Enter the IP address and port number and then click Next ...

Page 12: ...age box appears click Continue Anyway 6 Click Yes to reboot the PC 7 Open the printer properties window in the Windows OS Control Panel Printers and Faxes 8 In the Ports tab click Configure Port 9 Match the communication settings to those of the printer ...

Page 13: ...Windows Driver Rev 1 01 13 10 Click Print Test Page and check printing status Proper installation of the driver is indicated if the test page is printed normally ...

Page 14: ... 01 14 4 2 Installing on Windows VISTA Server 2008 7 8 4 2 1 Via Serial Port or Parallel Port 1 Double click the Windows Driver installation file 2 Click Next 3 Select a COM port or LPT port to be used and then click Next ...

Page 15: ...age box appears click Install 5 Click Yes to reboot the PC 6 Open the printer properties window in the Windows OS Control Panel Hardware and Sound Device and Printers 7 In the Ports tab click Configure Port Pass this step if you are using a parallel port ...

Page 16: ...he printer The communication settings of the printer can be performed by conducting a self test Pass this step if you are using a parallel port 9 Click Print Test Page and check printing status Proper installation of the driver is indicated if the test page is printed normally ...

Page 17: ...Windows Driver Rev 1 01 17 4 2 2 Via USB Port 1 Double click the Windows Driver installation file 2 Click Next 3 Select USB and then click Next ...

Page 18: ...Windows Driver Rev 1 01 18 4 When the following message box appears click Install 5 Click OK 6 Turn off the printer and then turn it on The printer driver will be installed automatically ...

Page 19: ... the printer properties window in the Windows OS Control Panel Hardware and Sound Device and Printers 8 Click Print Test Page and check printing status Proper installation of the driver is indicated if the test page is printed normally ...

Page 20: ...s Driver Rev 1 01 20 4 2 3 Via Ethernet Wireless LAN Port 1 Double click the Windows Driver installation file 2 Click Next 3 Select Ethernet Wireless LAN 4 Enter IP address and port number and then click Next ...

Page 21: ...x appears click Install 6 Click Yes to reboot the PC 7 Open the printer properties window in the Windows OS Control Panel Hardware and Sound Device and Printers 8 In the Ports tab click Configure Port 9 Match the communication settings to those of the printer ...

Page 22: ...Windows Driver Rev 1 01 22 10 Click Print Test Page and check printing status Proper installation of the driver is indicated if the test page is printed normally ...

Page 23: ...driver 5 1 Paper feed option The printer supports two paper sources Automatically Select Select the Receipt automatically Receipt Each page can be printed with various lengths Ticket Each page can be printed with the same length Follow the instructions shown below for setting options 1 Open the Printer Properties window for the corresponding OS ...

Page 24: ...Windows Driver Rev 1 01 24 2 Click Printing Preferences in the General tab 3 Select the desired setting in the Paper Quality tab ...

Page 25: ... 80 3276 mm T3II 80 120 mm T3II 80 160 mm T3II 80 200 mm T3II Follow the instructions shown below to set the options 1 Click Printing Preferences in the General tab 2 Click Advanced in the Paper Quality tab 3 Select a paper size in the list and then click OK If you need a custom paper size you can add it by clicking New Paper Size in the Utilities tab ...

Page 26: ...the printer The command functions available are as follows Start Doc Addition of NV Images and command at the beginning of the print job Start Page Addition of NV Images and command at the beginning of the print page End Page Addition of NV Images and command at the end of the print page End Doc Addition of NV Images and command at the end of the print job Follow the instructions shown below to se...

Page 27: ...F in the End Doc field and click OK 5 To print the NV image with the document select the NV image number in the memory and click OK Image print command changes when the image is downloaded into the printer using NV Image Tool in Unified POS Utility NV bit image Command FS p n m Hex 1C 70 m n NV Graphics Command GS L pL pH m fn kc1 kc2 x y Hex 1D 28 4C pL pH m fn kc1 kc2 x y ...

Page 28: ...anging address or telephone number from the application software 3 Image Macro function replaces certain text string with an image Follow the instructions shown below to set the options Crop 1 Open the Printer Properties window for the corresponding OS 2 Select the Crop Macro tab 3 To cut the space at the top of the receipt tick Top Crop Length checkbox and specify the length to cut 4 To cut the s...

Page 29: ...rinter Properties window for the corresponding OS 2 Select the Crop Macro tab 3 Tick Enable Text Macro to make this function enabled 4 When the Text Macro window comes up click Add Item and then specify texts in Change Text and Replace Text 5 Click OK ...

Page 30: ...Windows Driver Rev 1 01 30 Image Macro 1 Open the Printer Properties window for the corresponding OS 2 Select the Crop Macro tab 3 Tick Enable Image Macro to make this function enabled ...

Page 31: ...Windows Driver Rev 1 01 31 4 Click Add Image to add it to the image list 5 Assign an appropriate name for the image file to be added to the list and select a dithering type ...

Page 32: ...Windows Driver Rev 1 01 32 6 Click Add Text Key to set the text key and the image to replace the corresponding text key ...

Page 33: ...Windows Driver Rev 1 01 33 7 Click OK ...

Page 34: ...rs Codabar 20 40 60 80 Numeric 0 9 Symbols Letters A D Code39 20 40 60 80 Numeric 0 9 Symbols Letters A Z JAN13 EAN 20 40 60 80 Numeric 0 9 JAN8 EAN 20 40 60 80 Numeric 0 9 ITF 20 40 60 80 Numeric 0 9 UPC A 20 40 60 80 Numeric 0 9 UPC E 20 40 60 80 Numeric 0 9 Code93 20 40 60 80 ASCII CODE 0 127 Code128 20 40 60 80 ASCII CODE 0 127 Two Dimensional Barcodes The Windows driver supports the following...

Page 35: ...35 Follow the instructions shown below to use this function 1 Open the Printer Properties window for the corresponding OS 2 Select the Barcodes tab 3 Select a font name of barcodes a type of barcodes and then click Properties ...

Page 36: ... set the properties of barcodes such as width height and HRI options in Barcode Setting window 5 You can also set the properties of PDF417 and QR code in 2D Code Setting window 6 Click OK after setting the properties of 1d and 2d barcodes ...

Page 37: ...efore printing and after printing and can also set Cutting options the cutting option can be adjusted as follows No Cut There s no cutting after the end of printing Receipt A paper is cut by auto cutter Receipt No Feeds A paper is cut by auto cutter without paper feeding Form For long print jobs printed text is transferred and cut according to the Receipt option per selected paper size ...

Page 38: ... driver supports Rotation printing function for image data But rotating device font or barcode font is not supported and cannot be available in color printing mode Color printing mode will be changed to mono printing mode automatically if this function is used ...

Page 39: ...llowing utilities New Paper Size Defines a custom paper size Unified POS Utility Includes NV tool VMSM and command test editor Special Font Edit Defines a custom command for the special font named as FontControlA Journal Viewer Saves a copy of the printed receipt per print job ...

Page 40: ...ize 1 Click New Paper Size in the Utilities tab 2 Specify form name and set a valid width and height 3 Click Add Form to register a custom paper If the specified paper name already exists on the system you can update the paper s width and length ...

Page 41: ...1 4 Select the newly added paper size from the Advanced Option window 5 8 2 Unified POS Utility Refer to the Unified POS Utility manual contained in the CD for details 5 8 3 Extended Special Functions Refer to the section 6 2 1 ...

Page 42: ...be searched by printed date or by period with the Journal Viewer utility This function is supported only when the receipt is printed with image data and it does not support the receipts printed with device font or barcode Journal function is not supported in color printing mode Journal data will not be saved when you try to use this function in color printing mode 1 Tick Enable Journal to make thi...

Page 43: ...er Rev 1 01 43 3 The following window will be launched 4 Select the file from the list on the bottom and click Print to print the file 5 Click Search and set the conditions to search the journals by date or period ...

Page 44: ...7 FontB1x1 FontB1x1 Ext FontB1x1 255 9 x 17 7 FontB1x2 FontB1x2 Ext FontB1x2 255 9 x 34 13 5 FontB2x1 FontB2x1 Ext FontB2x1 255 18 x 17 7 FontB2x2 FontB2x2 Ext FontB2x2 255 18 x 34 13 5 FontB2x4 FontB2x4 Ext FontB2x4 255 18 x 68 27 FontB4x2 FontB4x2 Ext FontB4x2 255 36 x 34 13 5 FontB4x4 FontB4x4 Ext FontB4x4 255 36 x 68 27 FontB4x8 FontB4x8 Ext FontB4x8 255 36 x 136 54 5 FontB8x4 FontB8x4 Ext Fon...

Page 45: ... code support Code page 16 1252 Font size dot 12 x 48 Double height Point size 19 2 FontA1x2 Ext IBM expansion Character code support Code page 0 437 Font size dot 12 x 48 Double height Point size 19 3 FontA1x2 255 BUYER ONLY code support Code page 255 Font size dot 12 x 48 Double height Point size 19 ...

Page 46: ...cters above the bard code with FontA r Add HRI characters below the bard code with FontA s Add HRI characters above the bard code with FontB t Add HRI characters below the bard code with FontB u Turns white black reverse printing mode on v Turns white black reverse printing mode off w Align text to the left x Align text to the center y Align text to the right A Open Drawer 1 50ms driver pulse widt...

Page 47: ...peration instead of printing character 6 2 FontControl character function Printer font special function Function Point size point dot FontControl Open Drawer 1 2 Cut receipt Cut receipt without paper feeding Align left center right Print HT LF CR Print barcode Print NV bitmap image 9 5 12x24 ...

Page 48: ...A character function can be extended by using this utility You can define new commands in T3II ini file and the FontControlA character can be changed to arbitrary user setting character Range of 0x20 to 0x7F 1 Use the Special Font Utility in the Utility tab to edit the INI file ...

Page 49: ...indows Driver Rev 1 01 49 2 First specify print commands in Edit field he click Apply and then click OK to save the data to INI file 3 Click Apply and then OK to save the custom commands to the INI file ...

Page 50: ...driver with Visual Basic Sample codes shown here are copied to the installation directory when installing the Windows driver for your reference 7 1 1 Windows driver selection The following example code explains how to select the Metapace T 3II Windows driver For Each prnPrinter In Printers If prnPrinter DeviceName Metapace T 3II Then Set Printer prnPrinter Exit For End If Next ...

Page 51: ...FontSize 9 5 Printer FontName FontA1x1 Printer Print FontA1x1Test Printer EndDoc 7 1 3 Barcode printing The following example code explains how to print the barcode JAN8 EAN Print Bar Code Printer FontSize 20 Printer FontName JAN8 EAN Printer Print 1234567 Printer EndDoc 7 1 4 2 D barcode printing The following example code explains how to print the 2 D barcode PDF417 Print Two dimensional Codes P...

Page 52: ... select the printer Metapace T 3II Set paper size orientation margin etc Select the Page Setting from File menu and set paper size orientation and margin 7 2 2 Text printing Print the text from WordPad using the Windows driver of the printer 1 Select the font from the font selection box FontA1x1 2 Select the point size from the point selection box 9 5 3 Enter the text to print 4 Click the Print ic...

Reviews: