
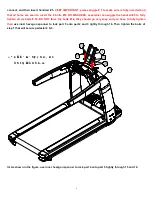
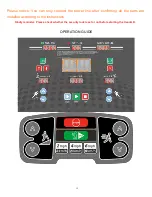


9
7
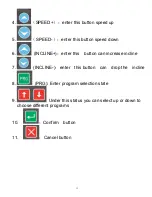
17
17
8
9
17
17
17
17
17
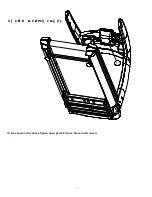
2
3
1
23
24
¡ ˘° ¢» ÁÕ ºÀ ˘ æ
£ ¨œ »≈ °ø ™
23∫ Õ
24£ ¨
π” √ Æ
◊ ÷¬ ›À øµ ∂Ω ´8∫ Õ
9
Õ ®π ˝23° ¢24∫ Õ
17À ¯Ω Ù
‘ ⁄2∫ Õ
3… œ
‘ Ÿ π” √ Æ
◊ ÷¬ ›À øµ ∂Ω ´7Õ ®π ˝17
À ¯Ω Ù
‘ ⁄1… œ
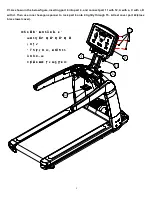
.
◊ Ó
∫ Û
◊ ∞
… œ
20£ ¨Ω ”… œ
µ Á‘ ¥œ fl.
20
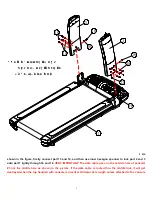
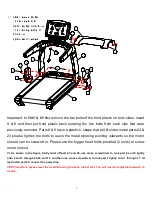
Important: to fit #9 & #8 first remove the two bolts of the front plastic on both sides, insert
9 & 8 and then put front plastic back securing the two bolts from each side that were
previously removed. Parts 8 & 9 have a plastic U shape that will fit under metal parts 24 &
23 please tighten the bolts to leave the metal opening pointing outwards so the motor
shroud can be screwed in. Please use the bigger head bolts provided (2 units) to screw
motor shroud.
VI. As shown in the figure, firstly twist off part 23 and 24, use cross screwdriver to lock part 8 and 9 tightly
onto 2 and 3 through 23,24 and 17, and then use cross screwdriver to lock part 7 lightly onto 1 through 17. At
last install part 20, connect the power line.
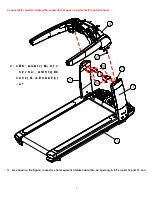
VERY important, please level the treadmill using the back rubber feet. You will need an adjustable wrench to
do this.