Section 6 - Storage
Page 94
90-899883272 MARCH 2008
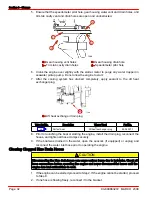
11. Turn off the water supply. Disconnect the water hose adapter from the blue drain hose
and the water hose.
12. Push down on the T‑handle to force the blue drain hoses down below their connection
points on the block.
13. Check for water draining from the blue drain hose. If the blue drain hose is still clogged,
shut off the bilge pump and reattach the blue drain hoses following the steps below.
The unit will need to be serviced by an authorized Mercury MerCruiser dealer.
a.
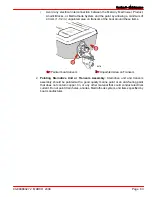
Pull the T‑handle until the quick connect fittings on the blue drain hoses are within
reach.
b.
Install the quick connect fittings on the bracket. Pull on the blue drain hoses to
ensure they are firmly connected.
c.
Push down on the T‑handle until seated.
14. If water is draining from the blue drain hose, continue with Step 4 of
Single Point Drain
System
.
Draining the Sterndrive
NOTE: This procedure is needed only for salty, brackish, mineral laden, or polluted water
applications; and for freezing temperatures or extended storage.
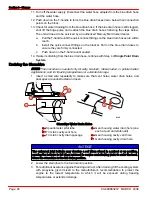
1. Insert a small wire repeatedly to make sure that vent holes, water drain holes, and
passages are unobstructed and open.
b
a
d
e
f
c
6146
Sterndrive Water Drain Holes
a -
Speedometer pitot tube
b -
Trim tab cavity vent hole
c -
Trim tab cavity drain passage
d -
Gear housing water drain hole (one
each at port and starboard)
e -
Gear housing cavity vent hole
f -
Gear housing cavity drain hole
NOTICE
The universal joint bellows may develop a set when stored in a raised or up position,
causing the bellows to fail when returned to service and allowing water to enter the boat.
Store the sterndrive in the full down position.
2. Lower the sterndrive to the full down/in position.
3. For additional assurance against freezing and rust, after draining, fill the cooling system
with propylene glycol mixed to the manufacturer's recommendation to protect the
engine to the lowest temperature to which it will be exposed during freezing
temperatures or extended storage
Summary of Contents for 3.0 MPI
Page 8: ...Page iv 90 899883272 MARCH 2008 ...
Page 26: ...Section 1 Warranty Notes Page 18 90 899883272 MARCH 2008 ...
Page 92: ...Section 5 Maintenance Notes Page 84 90 899883272 MARCH 2008 ...
Page 104: ...Section 6 Storage Notes Page 96 90 899883272 MARCH 2008 ...
Page 110: ...Section 7 Troubleshooting Notes Page 102 90 899883272 MARCH 2008 ...


