background image

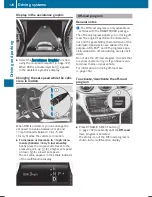
Reverse perpendicular parking with

steering input

:

Parking space marking

;

Yellow guide line for the vehicle width

including the exterior mirrors, at the cur-

rent steering wheel angle (dynamic)

X

Drive past the parking space and bring the

vehicle to a standstill.

X

Make sure that the rear view camera is

switched on (

Y

page 179).

The lane and the guide lines are shown.

X

While the vehicle is at a standstill, turn the

steering wheel in the direction of the park-

ing space until yellow guide line

;

reaches

parking space marking

:

.

X

Maintain the steering input and reverse

carefully.

:

Yellow guide line for the vehicle width

including the exterior mirrors, at the cur-

rent steering wheel angle (dynamic)

X

Stop the vehicle when it is almost exactly in

front of the parking space.

The white lane should be as close to parallel

with the parking space marking as possible.

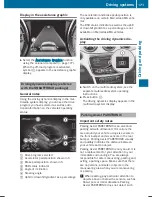
:

White guide line at the current steering

input

;

Parking space marking

X

Turn the steering wheel to the center posi-

tion while the vehicle is stationary.

:

Red guide line at a distance of approx-

imately 12 in (0.30 m) from the rear area

;

White guide line without steering input

=

End of parking space

X

Back up carefully until you have reached the

final position.

Red guide line

:

is then at end of parking

space

=

. The vehicle is almost parallel in

the parking space.

Driving systems

181

Dr

ivi

ng

an

d

parki

ng

Z

Summary of Contents for GLA 250 2019

Page 1: ...the vehicle s Operator s Manual you can obtain the complete multi media system Supplement from your authorized Mercedes Benz Center Digital form via the Internet You can find the Operator s Manual on the Mercedes Benz homepage Digital form as an App The Mercedes Benz Guides App is available for free on the Apple App store or Google Play Apple iOS Android Order no P156 0169 13 Part no 156 584 90 01...

Page 2: ...ware actions or disposal Notes on material damage alert you to dangers that could lead to damage to your vehicle i Practical tips or further information that could be helpful to you X This symbol indicates an instruction that must be followed X Several of these symbols in succes sion indicate an instruction with sev eral steps Y page This symbol tells you where you can find more information about ...

Page 3: ...se the Mercedes Benz Guides App Your Operator s Manual Digital form inside the vehicle The Digital Operator s Manual provides comprehensive and specifically adapted information on your vehicle s equipment and multimedia system It contains infor mative animations individual language settings and an intuitive search function Booklet inside the vehicle In addition to this manual and the afore mention...

Page 4: ...r rors 92 Correct driver s seat position 92 Seats 92 Steering wheel 97 Mirrors 98 Memory function 101 Lights and windshield wipers 102 Exterior lighting 102 Interior lighting 105 Replacing bulbs 106 Windshield wipers 109 Climate control 113 Overview of climate control systems 113 Operating the climate control sys tems 118 Air vents 123 Driving and parking 124 Notes on breaking in a new vehicle 124...

Page 5: ...ng 298 Fuses 301 Wheels and tires 304 Important safety notes 304 Operation 304 Winter operation 306 Tire pressure 307 Loading the vehicle 316 All about wheels and tires 319 Changing a wheel 325 Wheel and tire combinations 329 Emergency spare wheel 330 Technical data 332 Information regarding technical data 332 Vehicle electronics 332 Identification plates 333 Service products and filling capaci ti...

Page 6: ...ips 164 Function notes 158 Important safety notes 159 Setting a speed 162 Setting the specified minimum distance 162 Stopping 162 Storing a speed 161 Active Parking Assist Canceling 178 Detecting parking spaces 175 Display message 220 Exiting a parking space 177 General notes 174 Important safety notes 174 Parking 176 ADAPTIVE BRAKE 67 Additional speedometer 199 Additives engine oil 337 Address bo...

Page 7: ...tem see Digital Operator s Manual Authorized Mercedes Benz Center see Qualified specialist workshop Authorized workshop see Qualified specialist workshop AUTO lights Display message 216 see Lights Automatic car wash care 279 Automatic engine start ECO start stop function 129 Automatic engine switch off ECO start stop function 129 Automatic headlamp mode 102 Automatic transmission Accelerator pedal...

Page 8: ...elephony 246 Brake Assist System see BAS Brake Assist System Brake assistance see BAS Brake Assist System Brake fluid Display message 209 Notes 337 Brake force distribution see EBD electronic brake force distribution Brake lamp Replacing bulbs 108 Brake lamps Display message 215 Brakes ABS 60 BAS 61 Brake fluid notes 337 Display message 204 EBD 67 Hill start assist 128 HOLD function 165 Important ...

Page 9: ...safety notes 58 Rear doors 59 Children Special seat belt retractor 54 Children in the vehicle Important safety notes 53 Cigarette lighter 259 Cleaning Mirror turn signal 282 Climate control Air conditioning system 114 Automatic climate control dual zone 116 Controlling automatically 119 Cooling with air dehumidification 118 Defrosting the windows 121 Defrosting the windshield 120 General notes 113...

Page 10: ...m 157 Function notes 157 Important safety notes 157 Setting a speed 158 Storing and maintaining current speed 157 Cup holder Center console 257 Important safety notes 257 Rear compartment 258 Customer Assistance Center CAC 28 Customer Relations Department 28 D Dashboard see Cockpit Dashboard lighting see Instrument cluster lighting Data see Technical data Daytime running lamps Display message 216 ...

Page 11: ...ning function 62 EBD electronic brake force dis tribution 67 ESP Electronic Stability Pro gram 63 Important safety information 60 Overview 60 STEER CONTROL 67 Driving system Off road program 170 Parking assist PARKTRONIC 171 RACE START Mercedes AMG vehicles 167 Start off assist 166 Driving systems 360 camera 182 Active Parking Assist 174 AMG adaptive sport suspension system 168 ATTENTION ASSIST 18...

Page 12: ...rgency release Driver s door 76 Vehicle 76 Emergency spare wheel General notes 331 Important safety notes 330 Removing 331 Emergency Tensioning Devices Activation 51 Engine Check Engine warning lamp 238 Display message 217 ECO start stop function 129 Engine number 334 Irregular running 131 Jump starting 295 Starting important safety notes 126 Starting problems 131 Starting the engine with the Smar...

Page 13: ...ing Flat tire MOExtended tires 288 Preparing the vehicle 287 TIREFIT kit 289 see Emergency spare wheel Floormats 272 Fog lamps Switching on off 103 Frequencies Mobile phone 332 Two way radio 332 Front fog lamps Display message 215 Switching on off 103 Front passenger seat Folding the backrest forward back 252 Fuel Additives 336 Consumption statistics 192 Displaying the current consump tion 192 Dis...

Page 14: ...hing on off 104 Hill start assist 128 HOLD function Activating 166 Activation conditions 165 Deactivating 166 Display message 219 Function notes 165 Home address see also Digital Operator s Man ual 242 Hood Closing 274 Display message 228 Important safety notes 273 Opening 273 Horn 31 Hydroplaning 152 I Ignition key see SmartKey Ignition lock see Key positions Immobilizer 67 Indicator lamp Replaci...

Page 15: ...idelines 250 Locking see Central locking Locking doors Automatic 76 Emergency locking 77 From inside central locking but ton 75 Locking centrally see Central locking Locking verification signal on board computer 200 Low beam headlamps Display message 214 Replacing bulbs 107 Switching on off 103 Lubricant additives see Additives engine oil Lumbar support Adjusting the 4 way lumbar sup port 96 M M S...

Page 16: ...play Function notes 191 Permanent display 199 Multifunction steering wheel Operating the on board com puter 189 Overview 33 Multimedia system Switching on and off 243 Music files see also Digital Operator s Man ual 242 N Navigation Entering a destination 244 Menu on board computer 193 see also Digital Operator s Man ual 242 Notes on breaking in a new vehi cle 124 O Occupant Classification System O...

Page 17: ...r Operation Digital Operator s Manual 24 Operator s Manual Vehicle equipment 26 Outside temperature display 188 Overhead control panel 38 Override feature Rear side windows 59 P Paint code number 333 Paintwork cleaning instructions 280 Panic alarm 39 Panorama roof with power tilt sliding panel Important safety notes 87 Operating 88 Operating the roller sunblinds for the sliding sunroof 89 Problem ...

Page 18: ...or s Man ual 242 Radio wave reception transmis sion in the vehicle Declaration of conformity 27 Rain closing feature panorama roof with power tilt sliding panel 89 REACH Regulation 28 Reading lamp 105 Rear compartment Setting the air vents 123 Rear fog lamp Display message 215 Replacing bulbs 108 Switching on off 103 Rear lamps see Lights Rear seat Adjusting the angle of the backr ests 254 Rear se...

Page 19: ...elines 285 Roof load maximum 339 Route guidance see also Digital Operator s Man ual 242 S Safety Children in the vehicle 53 see Occupant safety Safety system see Driving safety systems SD card Inserting 249 Inserting removing 248 Removing 249 SD memory card see also Digital Operator s Man ual 242 Search Send see also Digital Operator s Man ual 242 Seat Correct driver s seat position 92 Seat belts ...

Page 20: ...ing feature 84 Important safety information 83 Opening closing 84 Problem malfunction 86 Resetting 86 Reversing feature 83 SIRIUS services see also Digital Operator s Man ual 242 Situation dependent braking assistance Function notes 63 Sliding sunroof see Panorama roof with power tilt sliding panel SmartKey Changing the battery 72 Changing the programming 71 Checking the battery 72 Convenience clo...

Page 21: ...x 251 Important safety information 250 Map pockets 252 Stowage net 252 Stowage net 252 Summer opening see Convenience opening feature Summer tires 306 Sun visor 258 Suspension setting AMG adaptive sport suspension system 168 SVHC Substances of Very High Concern 28 Switching air recirculation mode on off 122 Switching on media mode Via the device list 248 T Tachometer 188 Tail lamps see Lights Tail...

Page 22: ...arting 314 Warning lamp 241 Warning message 313 TIREFIT kit 289 Important safety notes 289 Storage location 287 Tire pressure not reached 291 Tire pressure reached 291 Tires Aspect ratio definition 324 Average weight of the vehicle occupants definition 323 Bar definition 323 Changing a wheel 325 Characteristics 323 Checking 304 Curb weight definition 324 Definition of terms 323 Direction of rotati...

Page 23: ...eye 299 Removing the towing eye 299 Towing Permitted towing methods 300 Towing a trailer ESP Electronic Stability Pro gram 66 Towing away Important safety guidelines 298 Installing the towing eye 299 Notes for 4MATIC vehicles 301 Removing the towing eye 299 Transporting the vehicle 300 With both axles on the ground 300 With the front axle raised 299 Towing eye 287 Traction system see ETS 4ETS Elec...

Page 24: ...icle Vehicle data Roof load maximum 339 Vehicle data off road driving Approach departure angle 340 Maximum gradient climbing abil ity 340 Vehicle dimensions 339 Vehicle emergency locking 77 Vehicle identification number see VIN Vehicle identification plate 333 Vehicle tool kit 287 Ventilation Setting the vents 123 Video Operating the DVD 195 see also Digital Operator s Man ual 242 VIN Seat 334 Typ...

Page 25: ...dshield washer system Adding washer fluid 276 Important safety notes 338 Windshield wipers Display message 228 Problem malfunction 112 Rear window wiper 110 Replacing the wiper blades 110 Switching on off 109 Winter driving Slippery road surfaces 153 Snow chains 307 Winter operation General notes 306 Winter tires M S tires 306 Wiper blades Cleaning 282 Important safety notes 110 Replacing rear win...

Page 26: ...iva ted for safety reasons while driving Operation Calling up the Digital Operator s Manual X Press the Ø button in the center con sole The overview relating to the vehicle appears X Select the Operator s Manual menu item by turning 3 or pressing 7 the control ler X Confirm 7 the message about the warning and safety notes The basic menu for the Digital Operator s Manual appears Operating the Digit...

Page 27: ...aintain a safe dis tance from the vehicle in front Ravoid frequent sudden acceleration and braking Rchange gear in good time and use each gear only up to Ô of its maximum engine speed Rswitch off the engine in stationary traffic Rkeep an eye on the vehicle s fuel con sumption Environmental concerns and recom mendations Wherever the Operator s Manual requires you to dispose of materials first try t...

Page 28: ...se consult an authorized Mercedes Benz Center The Operator s Manual and Maintenance Booklet are important documents and should be kept in the vehicle Service and vehicle operation Maintenance Always bring the Maintenance Booklet with you when taking the vehicle to an authorized Mercedes Benz Center Your customer service advisor will enter every service into your Main tenance Booklet on your behalf...

Page 29: ...hicle is jeopardized There is a risk of an accident Make sure that all objects in the vehicle are stowed correctly and that they cannot enter the driver s footwell Install the floormats securely and as specified in order to ensure sufficient clearance for the pedals Do not use loose floormats and do not place floor mats on top of one another If the engine is switched off and equip ment on the diag...

Page 30: ...rect operation of your vehicle and possible damage to the vehicle Damage to the vehicle which is caused by violation of these notes is not covered by the Mercedes Benz implied warranty or the new or used vehicle warranty QR code for rescue card The QR codes are secured in the fuel filler flap and on the opposite side on the B pillar In the event of an accident rescue services can use the QR code t...

Page 31: ...he Mercedes me connect Terms and Conditions Event data recorders USA only This vehicle is equipped with an event data recorder EDR This vehicle is equipped with an event data recorder EDR The main pur pose of an EDR is to record in certain crash or near crash like situations such as an air bag deployment or hitting a road obstacle data that will assist in understanding how a vehi cle s systems per...

Page 32: ...on governs As of Feb ruary 2013 13 states have enacted laws relat ing to EDRs Information on copyright General information Information on license for free and open source software used in your vehicle and its electronic components is available on the fol lowing website http www mercedes benz com opensource Registered trademarks RBluetooth is a registered trademark of Bluetooth SIG Inc RDTS is a re...

Page 33: ...ever 134 B Parking Assist PARKTRONIC warning display 173 C Overhead control panel 38 Function Page D Climate control systems 113 E Ignition lock 125 F Adjusts the steering wheel 97 G Cruise control lever 157 H Electric parking brake 146 I Light switch 102 J Diagnostics connection 27 K Opens the hood 273 Cockpit 31 At a glance ...

Page 34: ...ning 233 Braking 232 USA only J Canada only Turn signals 104 Function Page Multifunction display 191 Tachometer 188 6 Restraint system 40 ü Seat belt not fastened 230 M SPORT handling mode Mercedes AMG vehicles 236 R Rear fog lamp 103 N Fog lamps 103 Check Engine 238 h Tire pressure monitor 241 A Coolant temperature gauge 189 Warning and indicator lamps Coolant too hot cold 238 B Fuel level indica...

Page 35: ... off voice operated control for naviga tion or the Voice Control System i In vehicles with multimedia system Audio 20 you can find further information Ron the multimedia system in the Digital Operator s Manual Ron voice controlled navigation in the man ufacturer s operating instructions i In vehicles with multimedia system COMAND you can find further information Ron the multimedia system in the Di...

Page 36: ...djusts the exhaust flap of the AMG performance exhaust system right side 130 Ã Downhill Speed Regu lation 169 c Parking Assist PARKTRONIC 173 Function Page A è ECO start stop func tion 129 B Hazard warning lamps 104 C PASSENGER AIRBAG indica tor lamps 40 D DYNAMIC SELECT button 132 å Mercedes AMG vehi cles ESP 65 E Activates the driving dynam ics display vehicles with the ON OFFROAD package 171 34...

Page 37: ...htray 259 Cigarette lighter 259 Socket 260 Stowage compartment 250 Cup holder 257 Cup holder 257 Function Page Stowage compartment with Media Interface 250 A Multimedia system control ler see Digital Operator s Manual Center console 35 At a glance ...

Page 38: ...Stowage compartment 250 Selector lever 136 Manual gearshifting perma nent setting 140 Function Page DYNAMIC SELECT controller 133 A Cup holder 257 B Stowage compartment with Media Interface 250 C Multimedia system control ler see Digital Operator s Manual 36 Center console At a glance ...

Page 39: ... Adjusts the seats electri cally 94 A 7 Z ö Adjusts and folds the exte rior mirrors in out electri cally 98 Function Page B W Opens closes the side windows 84 C n Activates deactivates the override feature for the side windows in the rear passenger compartment 59 D q Opens the cargo com partment 79 Door control panel 37 At a glance ...

Page 40: ...ton 263 A Rear view mirror 99 B Sets the compass 271 C Buttons for the garage door opener 268 D G Emergency call SOS button 261 Function Page E F Breakdown assistance call button 263 F Eyeglasses compartment 251 G 3 Opens closes the panorama roof with power tilt sliding panel with roller sunblinds 88 H c Switches the front interior lighting on 105 I p Switches the left hand reading lamp on off 105...

Page 41: ... the correct driver s seat position Y page 92 You also have to make sure that an air bag can inflate properly if deployed Y page 44 An air bag supplements a correctly worn seat belt As an additional safety device the air bag increases the level of protection for vehicle occupants in the event of an accident For example if in the event of an accident the protection offered by the seat belt is suffi...

Page 42: ...red in a qualified specialist workshop as soon as possible PASSENGER AIR BAG indicator lamp PASSENGER AIR BAG ON indicator lamp and PASSENGER AIR BAG OFF indicator lamp are part of the Occupant Classifica tion System OCS The indicator lamps display the status of the front passenger front air bag RPASSENGER AIR BAG ON lights up for 60 seconds subsequently both indicator lamps are off PASSENGER AIR ...

Page 43: ...e vehicle occu pants during an accident If the front passenger seat is not occupied do not engage the seat belt tongue in the buckle on the front passenger seat Other wise in the event of an accident the Emer gency Tensioning Device and the side impact air bag in addition to other systems may be triggered and have to be replaced Important safety notes The use of seat belts and child restraint sys ...

Page 44: ...isible e g due to splinters of glass Modified or dam aged seat belts may tear or fail e g in an accident Modified Emergency Tensioning Devices could accidentally trigger or fail to deploy when necessary This poses an increased risk of injury or even fatal injury Never modify the seat belts Emergency Ten sioning Devices belt anchorages and inertia reels Make sure that the seat belts are undamaged n...

Page 45: ...ways observe the Loading guidelines for securing objects lug gage or loads Y page 250 Fastening and adjusting the seat belts Observe the safety notes on the seat belt Y page 41 and the notes on correct use of seat belts Y page 42 Basic illustration X Adjust the seat Y page 92 The seat backrest must be in an almost upright position X Pull the seat belt smoothly from the belt outlet X Engage seat be...

Page 46: ... all airbags are deployed in an accident The various airbags work independently of each other Y page 51 However no system available today can com pletely eliminate injuries and fatalities It is also not possible to rule out a risk of injury caused by an airbag due to the high speed at which the airbag must be deployed Important safety notes G WARNING If you do not sit in the correct seat position ...

Page 47: ...no heavy sharp edged or fragile objects are in the pockets of your clothing Store such objects in a suitable place G WARNING If you modify the cover of an air bag or affix objects such as stickers to it the air bag can no longer perform its intended function There is an increased risk of injury Never modify the cover of an air bag or affix objects to it G WARNING Sensors to control the air bags ar...

Page 48: ...l injury You should only use seat covers that have been approved for the respective seat by Mercedes Benz Front side impact air bags and rear side impact air bags deploy next to the outer bolster of the seat backrest When deployed the side impact air bag offers additional thorax protection It also offers additional pelvis protection for occupants in the front seats However it does not protect the ...

Page 49: ...their back against the seat backrest Rwith their feet resting on the floor if possi ble If the front passenger does not observe these conditions OCS may produce a false classifi cation e g because the front passenger Rtransfers their weight by supporting them selves on a vehicle armrest Rsits in such a way that their weight is raised from the seat cushion If it is absolutely necessary to install a...

Page 50: ...isabled It will not be deployed in the event of an accident and cannot perform its intended protective function A person in the front passenger seat could then for exam ple come into contact with the vehicle s interior especially if the person is sitting too close to the dashboard This poses an increased risk of injury or even fatal injury When the front passenger seat is occupied always ensure th...

Page 51: ...install the child restraint system on a suitable rear seat RThe front passenger seat is occupied by a person of smaller stature e g a teenager or small adult the PASSENGER AIR BAG OFF indicator lamp either lights up and remains lit after the self test depending on the result of the classification or alternatively goes out If the PASSENGER AIR BAG OFF indicator lamp is off move the front passenger ...

Page 52: ...on is seated properly with a cor rectly fastened seatbelt Rthe front passenger seat has been moved as far back as possible If the PASSENGER AIR BAG OFF indicator lamp remains lit when it should not the front passenger seat must not be used Do not install a child restraint system on the front passenger seat Have the Occupant Classification System OCS checked and repaired immediately at a qualified ...

Page 53: ...ackrest of the front passenger seat If necessary adjust the position of the front passenger seat X Make sure that the seat cushion length is fully retracted X When installing the child restraint system make sure that the seat belt is tight Do not pull the seat belt tight using the front passenger seat adjustment This could result in the seat belt and the child restraint system being pulled too tig...

Page 54: ... collision the restraint system control unit evaluates impor tant physical data relating to vehicle decelera tion or acceleration such as Rduration Rdirection Rintensity Based on the evaluation of this data the restraint system control unit triggers the Emer gency Tensioning Devices during a head on or rear end collision An Emergency Tensioning Device can only be triggered if Rthe ignition is swit...

Page 55: ...nd independently of whether the front passenger seat is occupied REmergency Tensioning Devices if the sys tem determines that deployment can offer additional protection in this situation RWindow curtain air bags on the driver s and front passenger side in certain situations when the vehicle rolls over if the system determines that deployment can offer addi tional protection to that provided by the...

Page 56: ...erly Particular attention must be paid to children Observe the safety notes on the seat belt Y page 41 and the notes on correct use of seat belts Y page 42 A booster seat may be necessary to achieve proper seat belt positioning for children over 40 lbs 18 kg until they reach a height where a three point seat belt can be properly fas tened without a booster seat Special seatbelt retractor G WARNING...

Page 57: ...replace damaged covers with genuine cov ers G WARNING If the child restraint system is installed incorrectly or is not secured it can come loose in the event of an accident heavy braking or a sudden change in direction The child restraint system could be thrown about striking vehicle occupants There is an increased risk of injury possibly even fatal Always install child restraint systems prop erly...

Page 58: ...Also secure the child restraint system with the Top Tether belt if available Regularly check that the permissible gross weight of the child together with the child restraint system is still maintained Always comply with the manufacturer s instal lation and operating instructions for the child restraint system used Before every trip make sure that the LATCH type ISOFIX child restraint system is eng...

Page 59: ...lt with two belt straps route one Top Tether belt to the left and one to the right past the side of head restraint All vehicles X Install the LATCH type ISOFIX child restraint system with Top Tether Always comply with the child restraint system man ufacturer s installation instructions when doing so X Hook Top Tether hook of Top Tether belt into Top Tether anchorage Make sure that RTop Tether hook...

Page 60: ...traint system must not touch the roof or be subjected to a load by the head restraint Adjust the angle of the seat backrest and the head restraint position accordingly Always make sure that the shoul der belt strap is correctly routed from the vehi cle belt outlet to the shoulder belt guide on the child restraint system The shoulder belt strap must be routed forward and down from the vehicle belt ...

Page 61: ...rom the outside X To activate press the child proof lock lever up in the direction of arrow X Make sure that the child proof locks are working properly X To deactivate press the child proof lock lever down in the direction of arrow Override feature for the rear side win dows X To activate deactivate press button If indicator lamp is lit operation of the rear side windows is disabled Operation is o...

Page 62: ...that the wheels do not lock when you brake This allows you to continue steering the vehi cle when braking The ABS warning lamp in the instrument cluster lights up when the ignition is switched on It goes out when the engine is running ABS works from a speed of about 5 mph 8 km h regardless of road surface condi tions ABS works on slippery surfaces even when you only brake gently Important safety n...

Page 63: ...r the warning tone autonomous braking can be initiated in critical situations If you apply the brake yourself in a critical situation Active Brake Assist supports you with a situation dependent brake boosting effect Important safety notes Detection of hazardous situations can be par ticularly impaired if RThere is dirt on the sensors or anything else covering the sensors RThere is snow or heavy ra...

Page 64: ...light up in the instrument cluster X Brake immediately in order to increase the distance from the vehicle in front or X Take evasive action provided it is safe to do so Due to the nature of the system particularly complicated but non critical driving conditions may also cause the system to display a warn ing With the help of the radar sensor system the distance warning function can detect obsta cl...

Page 65: ...e is detected in front of your vehi cle Situation dependent braking assistance is then deactivated Important safety notes i Observe the Important safety notes sec tion for driving safety systems Y page 60 G WARNING Active Brake Assist does not react Rto persons bicycles motorcycles or ani mals Rto approaching vehicles Rto cross traffic Ron bends As a result Active Brake Assist cannot inter vene in...

Page 66: ...9 If the å ESP OFF warning lamp lights up continuously ESP is deactivated If the ESP warning lamp and the å warning lamp are lit continuously ESP is not available due to a malfunction Observe the information on warning lamps Y page 235 and display messages which may be shown in the instrument cluster Y page 204 Only use wheels with the recommended tire sizes Only then will ESP function properly Ch...

Page 67: ...is it activated if you brake firmly with assistance from ESP RSTEER CONTROL is no longer active RESP still provides support when you brake firmly Deactivating activating ESP Mercedes AMG vehicles Important safety notes i Observe the Important safety notes sec tion Y page 60 You can select between the following states of ESP RESP is activated RSPORT handling mode is activated RESP is deactivated G ...

Page 68: ...tter traction on loose surfa ces RESP still provides support when you brake firmly Characteristics when ESP is deactiva ted If ESP is deactivated and one or more wheels start to spin the ESP warning lamp in the instrument cluster does not flash In such situations ESP will not stabilize the vehicle If you deactivate ESP RESP no longer improves driving stability REngine torque is no longer limited a...

Page 69: ...raking comfort In addition to the braking function ADAPTIVE BRAKE also has the HOLD function Y page 165 and hill start assist Y page 128 STEER CONTROL General information STEER CONTROL helps you by transmitting a noticeable steering force to the steering wheel in the direction required for vehicle stabiliza tion This steering assistance is provided in particu lar if Rboth right wheels or both left...

Page 70: ... remove the Start Stop button from the ignition lock Y page 125 X Insert the SmartKey into the ignition lock The alarm is stopped X To stop the alarm using KEYLESS GO grasp the outside door handle The Smart Key must be outside the vehicle The alarm is stopped or X Press the Start Stop button on the dash board The SmartKey must be inside the vehicle The alarm is stopped The alarm is not stopped eve...

Page 71: ...e SmartKey Rwith electronic devices e g a mobile phone or another SmartKey Rwith metallic objects e g coins or metal foil Rinside metallic objects e g a metal case Vehicles with KEYLESS GO start function do not keep the SmartKey in the cargo com partment Otherwise the SmartKey may not be detected e g when starting the engine using the Start Stop button SmartKey functions To lock the vehicle F To o...

Page 72: ...SmartKey determines whether a valid Smart Key is in the vehicle This occurs for example Rwhen starting the engine Rwhile driving Rwhen the external door handles are touched Rduring convenience closing X To unlock the vehicle touch the inner sur face of the door handle X To lock the vehicle touch sensor sur face or Make sure that you do not touch the inner surface of the door handle X Convenience c...

Page 73: ...the inner sur face of the door handle on the front passenger door or the rear door X To lock centrally touch the outer sensor surface on one of the door handles X To restore the factory settings press and hold the and buttons simultane ously for approximately six seconds until the battery check lamp flashes twice Y page 72 Mechanical key General notes If the vehicle can no longer be locked or unlo...

Page 74: ...egard for the environment National guidelines must be observed during disposal In California see www dtsc ca gov HazardousWaste Perchlorate index cfm Mercedes Benz recommends that you have the battery replaced at a qualified specialist workshop Checking the battery X Press the or button The battery is working properly if battery check lamp lights up briefly The battery is discharged if battery che...

Page 75: ...e vehicle again using the SmartKey s remote control function Point the tip of the SmartKey at the driver s door handle from close range and press the or button If this does not work X Check the SmartKey battery Y page 72 and replace it if neces sary Y page 72 X Unlock Y page 76 or lock Y page 77 the vehicle using the mechanical key There is interference from a powerful source of radio waves X Vehi...

Page 76: ...ing the mechanical key X Have the vehicle and SmartKey checked at a qualified specialist workshop The engine cannot be started using the Smart Key The on board voltage is too low X Switch off non essential consumers e g seat heating or interior lighting and try to start the engine again If this does not work X Check the starter battery and charge it if necessary Y page 294 or X Jump start the vehi...

Page 77: ...Digital Vehicle Key if the Digital Vehicle Key function is activated via Mercedes me connect You should preferably place luggage or loads in the cargo compartment Observe the load ing guidelines Y page 250 Unlocking and opening doors from the inside X To unlock and open a front door pull door handle If the door is locked locking knob pops up The door is unlocked and opens X To unlock a rear door p...

Page 78: ...d been previously unlocked only the door which has been opened from the inside is unlocked Automatic locking feature X To deactivate press and hold button for approximately five seconds until a tone sounds X To activate press and hold button for approximately five seconds until a tone sounds If you press one of the two buttons and do not hear a tone the relevant setting has already been selected T...

Page 79: ...nsert mechanical key into the SmartKey Y page 72 i If you lock the vehicle as described above the fuel filler flap is not locked The anti theft alarm system is not armed Cargo compartment Important safety notes G WARNING Parts of the body could become trapped during automatic closing of the tailgate Moreover people e g children may be standing in the closing area or may enter the closing area duri...

Page 80: ...ased with the emergency release from the inside Tailgate obstruction detection with reversing feature On vehicles with an EASY PACK tailgate the tailgate is equipped with automatic obstacle recognition with a reversing feature If a solid object blocks or restricts the tailgate when automatically opening or closing this proce dure is stopped If the tailgate is stopped dur ing the closing process th...

Page 81: ... on the tailgate G DANGER Combustion engines emit poisonous exhaust gases such as carbon monoxide Exhaust gases can enter the vehicle interior if the tailgate is open while the engine is running especially if the vehicle is in motion There is a risk of poisoning Always switch off the engine before opening the tailgate Never drive with the tailgate open The tailgate swings upwards and to the rear w...

Page 82: ...YLESS GO Fur ther information on deactivating and activat ing KEYLESS GO Y page 70 General notes With KEYLESS GO and HANDS FREE ACCESS you can open or close the tailgate or stop the procedure without using your hands This is useful if you have your hands full To do this make a kicking movement under the bumper with your foot Observe the following points RCarry your KEYLESS GO key about your per so...

Page 83: ...e tailgate opening procedure has been stopped Rkick your foot under the bumper again and the tailgate will close Opening closing automatically from inside Important safety notes G WARNING Parts of the body could become trapped during automatic closing of the tailgate Moreover people e g children may be standing in the closing area or may enter the closing area during the closing process There is a...

Page 84: ...ully pull the handle on the outside of the tailgate again after it has stopped automatically This does not delete the stored position Activating X To open the tailgate pull the handle on the tailgate X To stop the opening procedure at the desired position Rpress the closing button in the tailgate or Rpull the handle on the outside of the tail gate again or Rpress the tailgate button on the SmartKe...

Page 85: ...G While opening the side windows body parts could become trapped between the side window and the door frame as the side win dow moves There is a risk of injury Make sure that nobody touches the side window during the opening procedure If somebody becomes trapped release the switch or pull the switch to close the side window again G WARNING While closing the side windows body parts in the closing a...

Page 86: ...d release it Automatic operation is started X To close manually pull the corresponding switch and hold it X To close fully pull the switch beyond the pressure point and release it Automatic operation is started X To interrupt automatic operation press pull the corresponding switch again i If you press pull the switch beyond the point of resistance automatic operation is started in the correspondin...

Page 87: ...re for RThe side window Y page 83 RThe panorama roof with power tilt sliding panel Y page 88 RThe roller sunblind Y page 89 Using the SmartKey X Vehicles with KEYLESS GO or KEYLESS GO start function for the following opera tions point the tip of the SmartKey at the handle on the driver s door The SmartKey must be close to the driver s door handle i Vehicles with KEYLESS GO or KEYLESS GO start func...

Page 88: ...old the switch for an additional second If the side window opens again slightly X Immediately pull the corresponding switch on the door control panel until the side win dow is completely closed Y page 84 X Hold the switch for an additional second X If the respective side window remains closed after the button is released then it has been set correctly If this is not the case repeat the steps above...

Page 89: ... the following section the term sliding sun roof refers to the panorama roof with power tilt sliding panel G WARNING While opening and closing the sliding sun roof body parts in close proximity could become trapped There is a risk of injury Make sure that no body parts are in close proximity during the opening and closing procedures If somebody becomes trapped Rrelease the switch immediately or Rd...

Page 90: ...of G WARNING The reverse function does not react in par ticular Rto soft light and thin objects e g fingers Rover the last 1 6 in 4 mm of the closing path Rwhile adjusting Rwhen closing the sliding sunroof again manually immediately after automatic reversing This means that the reversing feature can not prevent someone being trapped in these situations There is a risk of injury Make sure that no b...

Page 91: ...tion in the power supply The panorama roof with power tilt sliding panel remains raised at the rear in order to allow ventilation of the vehicle interior If the panorama roof with power tilt sliding panel is obstructed while being closed by the rain closing feature it opens again slightly The rain closing feature is then deactivated The panorama roof with power tilt sliding panel does not close if...

Page 92: ...tch again After opening the panorama roof with power tilt sliding panel the roller sunblind automati cally closes slightly This reduces drafts in the vehicle interior Resetting the panorama roof with power tilt sliding panel or the roller sunblind Reset the panorama roof with power tilt slid ing panel or the roller sunblind if the panorama roof with power tilt sliding panel or the roller sunblind ...

Page 93: ... the cause If the panorama roof with power tilt sliding panel is obstructed dur ing closing and reopens again slightly X Immediately after it blocks pull the 3 switch down again to the point of resistance until the panorama roof with power tilt sliding panel is closed The panorama roof with power tilt sliding panel is closed with more force If the panorama roof with power tilt sliding panel is obs...

Page 94: ...is routed across the center of your shoulder and across your hips in the pelvic area i Further related subjects RAdjusting the seats manually Y page 94 RAdjusting the seats electrically Y page 94 RAdjusting the steering wheel manually Y page 97 RFastening the seat belt correctly Y page 43 RAdjusting the rear view mirror and exte rior mirrors Y page 98 RVehicles with a memory function sav ing the s...

Page 95: ...in particular could accidentally press the electrical seat adjustment buttons and become trapped There is a risk of injury While moving the seats make sure that your hands or other body parts do not get under the lever assembly of the seat adjustment system To prevent damage to the seats and the seat heating observe the following notes RDo not spill liquids onto the seats Dry the seats as soon as ...

Page 96: ...Release lever again Make sure that you hear the seat engage in position Backrest angle X Relieve the pressure on the backrest X Turn handwheel A forwards or backwards Seat height X Pull handle upwards or push it down repeatedly until the seat has reached the desired height Seat cushion angle X Adjust the angle so that your thighs are lightly supported X Turn handwheel forwards or backwards Seat cu...

Page 97: ...ft adjustment adjust the head restraint so that it is as close as possible to your head General notes For vehicles with sports seats you cannot adjust the front head restraints or the outer rear head restraints Adjusting the head restraints manually Adjusting the head restraint height X To raise pull the head restraint up to the desired position X To lower press release catch in the direction of t...

Page 98: ...side bolsters of the seat cush ion wider press button Adjusting the side bolsters of the seat backrest X To set the side bolsters of the seat back rest narrower press button X To set the side bolsters of the seat back rest wider press button Switching the seat heating on off Switching on off G WARNING Repeatedly switching on the seat heating can cause the seat cushion and backrest pads to become v...

Page 99: ...u do not need such as the rear window defroster or interior lighting Once the battery is sufficiently charged the seat heating will switch back on automatically Steering wheel Important safety notes G WARNING You could lose control of your vehicle if you do the following while driving Radjust the driver s seat head restraint steering wheel or mirrors Rfasten the seat belt There is a risk of an acc...

Page 100: ...e driver s seat head restraint steering wheel or mirrors Rfasten the seat belt There is a risk of an accident Adjust the driver s seat head restraint steering wheel and mirror and fasten your seat belt before starting the engine G WARNING The exterior mirror on the front passenger side reduces the size of the image Visible objects are actually closer than they appear This means that you could misj...

Page 101: ...n board com puter Y page 200 X Turn the SmartKey to position 1 in the igni tion lock Y page 125 X Briefly press Folding the exterior mirrors in or out automatically This function is only available in Canada If the Fold in mirrors when locking function is activated in the on board computer Y page 200 Rthe exterior mirrors fold in automatically as soon as you lock the vehicle from the out side Rthe ...

Page 102: ...ou can see the rear wheel on that side as soon as you engage reverse gear You can store this position Button for the driver s side exterior mirror Button for the front passenger side exte rior mirror Button for the exterior mirror setting Memory button M X Make sure that the vehicle is stationary X Turn the SmartKey to position 2 in the igni tion lock or start the engine Y page 125 X Press button ...

Page 103: ...ou and lock the vehicle This also applies for the Digital Vehicle Key if the Digital Vehicle Key function is activated via Mercedes me connect The memory function can be used at any time e g even when the SmartKey is not in the igni tion lock Storing settings With the memory function you can store up to three different settings e g for three different people The following settings are stored as a ...

Page 104: ...light exception poor visibility due to weather conditions such as fog snow or spray RWith the SmartKey in position 1 in the igni tion lock the parking lamps are switched on or off automatically depending on the bright ness of the ambient light RWith the engine running if you have activa ted the Daytime Running Lights Daytime Running Lights function via the on board computer the daytime run ning la...

Page 105: ...lamps turn the SmartKey to position 2 in the ignition lock or start the engine X Turn the light switch to L or à X Press the N button The green N indicator lamp in the instru ment cluster lights up X To switch off the fog lamps press the N button The green N indicator lamp in the instru ment cluster goes out Rear fog lamp The rear fog lamp improves visibility of your vehicle for the traffic behind...

Page 106: ...u ment cluster goes out X To switch on the high beam flasher pull the combination switch in the direction of arrow Hazard warning lamps X To switch on the hazard warning lamps press button All turn signals flash If you now switch on a turn signal using the combination switch only the turn signal lamp on the correspond ing side of the vehicle will flash X To switch off the hazard warning lamps pres...

Page 107: ...lamp on or off c Switches the front interior lighting on v Switches the rear interior lighting on or off Switches the front interior lighting automatic interior lighting control off A p Switches the right hand front reading lamp on or off B Switches the automatic interior lighting control on Rear compartment control panel Vehicles with a panorama roof with power tilt sliding panel p Switches the r...

Page 108: ...he glass tube with your bare hands If necessary clean the glass tube when cold with alcohol or spirit and rub it off with a lint free cloth Protect bulbs from moisture during operation Do not allow bulbs to come into contact with liquids Replace only the bulbs listed Y page 106 Have the bulbs that you cannot change your self replaced at a qualified specialist work shop If you require assistance re...

Page 109: ... halogen head lamps X Remove the cover in the front wheel hous ing Y page 107 X Turn housing cover counter clockwise and remove it X Turn bulb holder counter clockwise and pull out X Pull the bulb out of bulb holder X Insert the new bulb into bulb holder X Insert bulb holder and turn it clockwise X Press on housing cover and turn it to the right X Replace the cover in the front wheel housing Y pag...

Page 110: ...ase knob counter clockwise and remove side trim panel X To close insert side trim panel and turn release knob clockwise Right hand side trim panel You must open the side trim panel in the cargo compartment before you can replace the bulbs in the tail lamps X To open release right hand trim panel at the top and fold it down in the direction of the arrow X To close replace side paneling Tail lamps D...

Page 111: ...ndshield can scratch the glass if wiping takes place when the windshield is dry If it is necessary to switch on the windshield wipers in dry weather conditions always use washer fluid when operating the windshield wipers If the windshield wipers leave smears on the windshield after the vehicle has been washed in an automatic car wash wax or other residues may be the reason for this Clean the winds...

Page 112: ...er blades Important safety notes G WARNING If the windshield wipers begin to move while you are changing the wiper blades you could be trapped by the wiper arm There is a risk of injury Always switch off the windshield wipers and ignition before changing the wiper blades To avoid damaging the wiper blades make sure that you touch only the wiper arm of the wiper Never open the hood tailgate if a wi...

Page 113: ...iper blade into the wiper arm in the direction of arrow X Slide catch in the direction of arrow until it engages in the locking position with a noticeable click X Make sure that the wiper blade is seated correctly X Fold the wiper arm back onto the wind shield X Remove protective film of the service indicator on the tip of the wiper blade If the color of the service indicator changes from black to...

Page 114: ...back onto the rear win dow Problems with the windshield wipers Problem Possible causes consequences and M M Solutions The windshield wipers are jammed Leaves or snow for example may be obstructing the windshield wiper movement The wiper motor has been deactivated X For safety reasons you should remove the SmartKey from the ignition lock X Remove the cause of the obstruction X Switch the windshield...

Page 115: ...tion switched off Y page 122 Always keep the ventilation flaps behind the side trim panel in the cargo compartment clear Y page 108 Otherwise the vehicle will not be ventilated correctly i Ventilate the vehicle for a brief period dur ing warm weather e g using the conveni ence opening feature Y page 84 This will speed up the cooling process and the desired interior temperature will be reached more...

Page 116: ...2 A Sets the airflow Y page 120 B Switches cooling with air dehumidification on off Y page 118 C Switches the rear window defroster on off Y page 122 Canada only Sets the temperature Y page 119 Defrosts the windshield Y page 120 Sets the air distribution Y page 120 Switches air recirculation mode on off Y page 122 A Sets the airflow Y page 120 114 Overview of climate control systems Climate contro...

Page 117: ... use the Windshield defrosting func tion briefly until the windshield is clear again ROnly use air recirculation mode briefly e g if there are unpleasant outside odors or when in a tunnel The windows could other wise fog up since no fresh air is drawn into the vehicle in air recirculation mode RIf you change the settings of the climate control system the climate status display appears for approxim...

Page 118: ...isplay C Switches air recirculation mode on off Y page 122 D Activates deactivates climate control Y page 118 E Sets the temperature right Y page 119 F Activates or deactivates maximum cooling Y page 121 G Switches cooling with air dehumidification on off Y page 118 H Reduces the airflow Y page 120 I Switches the rear window defroster on off Y page 122 J Switches the ZONE function on off Y page 12...

Page 119: ... the à and buttons The indicator lamps in the à and buttons light up RSet the temperature to 72 22 ROnly use the Windshield defrosting func tion briefly until the windshield is clear again ROnly use air recirculation mode briefly e g if there are unpleasant outside odors or when in a tunnel The windows could other wise fog up since no fresh air is drawn into the vehicle in air recirculation mode R...

Page 120: ...ise to position 0 Y page 114 Dual zone automatic climate control X Turn the SmartKey to position 2 in the igni tion lock Y page 125 X To activate press the à button The indicator lamp in the à button lights up Airflow and air distribution are set to automatic mode or X Press the button The indicator lamp in the button goes out The previously selected settings are restored X To deactivate press the...

Page 121: ... To activate press the à button The indicator lamp in the à button lights up Automatic air distribution and airflow are activated X To switch to manual mode press the É or Ë button or X Press the K or I button The indicator lamp in the à button goes out Automatic air distribution and airflow are deactivated Setting the temperature Air conditioning system You can set the temperature for the entire ...

Page 122: ...side and footwell vents i Regardless of the air distribution setting airflow is always directed through the side air vents The side air vents can only be closed if the adjusters are turned clockwise until they engage Setting the air distribution X Turn the SmartKey to position 2 in the igni tion lock Y page 125 X Press the É or Ë button repeatedly until the desired symbol appears in the dis play S...

Page 123: ... turn temperature control counter clockwise or clockwise Y page 114 Dual zone automatic climate control turn temperature control or E counter clock wise or clockwise Y page 116 MAX COOL maximum cooling The MAX COOL function is only available in vehicles for the USA MAX COOL is only operational when the engine is running X To activate press the Ù button The indicator lamp in the button lights up X ...

Page 124: ... windows can fog up more quickly in particular at low temperatures Only use air recirculation mode briefly to prevent the windows from fog ging up The operation of air recirculation mode is the same for all control panels Activating deactivating X Turn the SmartKey to position 2 in the igni tion lock Y page 125 X To activate press the e button The indicator lamp in the e button lights up Dual zone...

Page 125: ...fety notes G WARNING Very hot or very cold air can flow from the air vents This could result in burns or frost bite in the immediate vicinity of the air vents There is a risk of injury Make sure that all vehicle occupants always maintain a sufficient distance to the air out lets If necessary redirect the airflow to another area of the vehicle interior In order to ensure the direct flow of fresh ai...

Page 126: ...in good time After 1 000 miles 1 500 km you can increase the engine speed gradually and bring the vehicle to full speed You should also observe these notes on break ing in if the engine or parts of the drive train on your vehicle have been replaced Always observe the maximum permissible speed Driving Important safety notes G WARNING Objects in the driver s footwell can restrict the pedal travel or...

Page 127: ... vehicle and the SmartKey determines whether a valid Smart Key is in the vehicle This occurs for example when starting the engine When you insert the Start Stop button into the ignition lock the system needs approx imately two seconds recognition time You can then use the Start Stop button Pressing the Start Stop button several times in succession corresponds to the different SmartKey positions in...

Page 128: ...emoving the Start Stop button You can remove the Start Stop button from the ignition lock and start the vehicle as nor mal using the SmartKey You can only switch between Start Stop but ton mode and SmartKey operation when the vehicle is stationary You must also engage park position j X Remove Start Stop button from ignition lock You do not have to remove the Start Stop but ton from the ignition lo...

Page 129: ...his mode for starting the engine operates inde pendently of the ECO start stop automatic engine start function You can start the engine if a valid SmartKey is in the vehicle Switch off the engine and always take the SmartKey with you when leav ing the vehicle even if you only leave it for a short time Pay attention to the important safety notes X Depress the brake pedal and keep it depressed X Pre...

Page 130: ...parking lock be deactivated All vehicles except Mercedes AMG vehi cles if you do not depress the brake pedal the DIRECT SELECT lever can still be moved but the parking lock remains engaged Mercedes AMG vehicles if you do not depress the brake pedal the selector lever can still be moved but the parking lock remains engaged At transmission fluid temperatures below Ò4 Ò20 you can only shift out of po...

Page 131: ... deactivated Rthe outside temperature is within the range that is suitable for the system Rthe engine is at normal operating tempera ture Rthe set temperature for the vehicle interior has been reached Rthe battery is sufficiently charged Rthe system detects that the windshield is not fogged up when the air conditioning sys tem is switched on Rthe hood is closed Rthe driver s door is closed and the...

Page 132: ...icator lamp is off the ECO start stop function has been deactivated manually or as the result of a malfunction The engine will then not be switched off automatically when the vehicle stops AMG Performance exhaust system Mercedes AMG vehicles You can choose between different AMG Per formance exhaust system volumes using the position of the exhaust flap Each time you start the engine with the Smart ...

Page 133: ...mps in the instrument cluster go out X Try to start the engine again Avoid excessively long and frequent attempts to start the engine as these will drain the battery If the engine does not start after several attempts X Consult a qualified specialist workshop The engine does not start You cannot hear the starter motor The on board voltage is too low because the battery is too weak or discharged X ...

Page 134: ...swerve Observe the permissible towing methods Y page 300 and the notes on towing with both axles on the ground Y page 300 DYNAMIC SELECT button all vehi cles except Mercedes AMG vehicles Use the DYNAMIC SELECT button to change the drive program Depending on the drive pro gram selected the following vehicle character istics will change Rthe drive engine and transmission manage ment Rthe sound of th...

Page 135: ...liding mode Each time you start the engine with the Smart Key or the Start Stop button drive program C is activated For further information about starting the engine see Y page 126 X Turn DYNAMIC SELECT controller as many times as necessary until the desired drive program is selected The selected drive program appears in the multifunction display After five seconds the display goes out and the sym...

Page 136: ...in the multifunc tion display Y page 134 Transmission position and drive pro gram display The current transmission position and drive program appear in the multifunction display Transmission position display Gear Drive program display The arrows in the transmission position display show how and into which transmission posi tions you can shift using the DIRECT SELECT lever If the transmission posit...

Page 137: ...art stop function Y page 129 Shifting to neutral N G WARNING If children are left unsupervised in the vehi cle they could Roperate the vehicle s equipment Additionally children could set the vehicle in motion if for example they Rrelease the parking brake Rshift the automatic transmission out of park position j Rstart the engine There is a risk of an accident and injury Never leave children or ani...

Page 138: ...arking lock k Reverse gear i Neutral h Drive Transmission position and drive pro gram display The current transmission position and drive program appear in the multifunction display Transmission position display Drive program display If the transmission position display in the mul tifunction display is not working you should pull away carefully to check whether the desired transmission position is...

Page 139: ...le is sta tionary A Neutral Do not shift the transmission to i while driving The automatic trans mission could otherwise be dam aged No power is transmitted from the engine to the drive wheels Releasing the brakes will allow you to move the vehicle freely e g to push it or tow it If ESP is deactivated or faulty shift the transmission to position i if the vehicle is in danger of skidding e g on icy...

Page 140: ... transmission shifts back up Mercedes AMG vehicles it is only possible to use kickdown in the automatic drive pro gram and the temporary manual drive program M When manual drive program M is perma nently activated kickdown is not possible For further information on kickdown in manual drive program M Y page 142 Rocking the vehicle free Shifting back and forth between transmission positions h and k ...

Page 141: ...he vehicle speed Rperforming regular adaptation functions When you depress the brake pedal gliding mode is deactivated depending on pedal pressure When you activate cruise control or Active Distance Assist DISTRONIC gliding mode is not available Mercedes AMG vehicles Drive program I Individual In drive program I the following properties of the drive program can be selected Rthe drive engine manage...

Page 142: ...t stop function is not available Manual gearshifting General notes You can change gear yourself using the steer ing wheel paddle shifters The transmission must be in position h to do this Depending on which steering wheel paddle shifter is pulled the automatic transmission immediately shifts into the next gear down or up if permitted Mercedes AMG vehicles to use manual shift ing you have two optio...

Page 143: ...elerate the automatic trans mission automatically shifts up in order to prevent engine damage X To shift down pull steering wheel paddle shifter The automatic transmission shifts down to the next gear Automatic down shifting occurs when coast ing If the engine exceeds the maximum engine speed when shifting down the automatic transmission protects against engine dam age by not shifting down Shift r...

Page 144: ...d kickdown is not possi ble Problems with the transmission Problem Possible causes consequences and M M Solutions The transmission has problems shifting gear The transmission is losing oil X Have the transmission checked at a qualified specialist workshop immediately The acceleration ability is deteriorating The transmission no longer shifts into all of the gears Reverse gear can no longer be enga...

Page 145: ...ith a gasoline engine Do not switch on the igni tion if you accidentally refuel with the wrong fuel Otherwise the fuel will enter the fuel system Even small amounts of the wrong fuel could result in damage to the fuel sys tem and the engine Notify a qualified spe cialist workshop and have the fuel tank and fuel lines drained completely Overfilling the fuel tank could damage the fuel system Take ca...

Page 146: ...of fuel filler flap X Completely insert the filler neck of the fuel pump nozzle into the tank hook in place and refuel X Only fill the tank until the pump nozzle switches off i Do not add any more fuel after the pump stops filling for the first time Otherwise fuel may leak out Closing the fuel filler flap X Replace the cap on the filler neck and turn clockwise until it engages audibly X Close the ...

Page 147: ...kshop Parking Important safety notes G WARNING Flammable material such as leaves grass or twigs may ignite if they come into contact with hot parts of the exhaust system or exhaust gas flow There is a risk of fire Park the vehicle so that no flammable mate rials come into contact with parts of the vehicle which are hot Take particular care not to park on dry grassland or harvested grain fields G W...

Page 148: ...e instrument cluster go out If the driver s door is closed this is the same as key position 1 If the driver s door is open this is the same as key position g i e the SmartKey having been removed If you switch the engine off with the transmis sion in position k or h the automatic trans mission shifts to i automatically With the SmartKey if you then open the driv er s door or the front passenger doo...

Page 149: ...electric parking brake is applied the red F USA only or Canada only indicator lamp lights up in the instru ment cluster The electric parking brake can also be applied when the SmartKey is removed X To release pull handle The red F USA only or Canada only indicator lamp in the instrument clus ter goes out The electric parking brake can only be released Rif the SmartKey is in position 1 or 2 in the ...

Page 150: ...lamp in the instrument clus ter flashes When the vehicle has been braked to a stand still the electric parking brake is applied Parking the vehicle for a long period If you leave the vehicle parked for longer than four weeks the battery may be damaged by exhaustive discharging If you leave the vehicle parked for longer than six weeks the vehicle may suffer damage as a result of lack of use X Visit...

Page 151: ...out adequate ventilation Certain engine systems are designed to keep the level of poisonous components in exhaust fumes within legal limits These systems only work at peak efficiency if they are serviced exactly in accordance with the manufacturer s specifications Always have work on the engine carried out at a qualified specialist workshop Mercedes Benz recom mends that you use an authorized Merc...

Page 152: ...ngs and prevailing conditions The ECO display border lights up The ECO display does not indicate the actual fuel consumption The additionally achieved range displayed under Bonus fr Start Bonus fr Start does not indicate a fixed consumption reduction In addition to driving style the actual con sumption is affected by other factors such as RLoad RTire pressure RCold start RChoice of route RActive e...

Page 153: ...the vehicle in front After driving on a wet road or having the vehi cle washed brake firmly while paying attention to the traffic conditions This will warm up the brake discs thereby drying them more quickly and protecting them against corrosion Limited braking performance on salt treated roads If you drive on salted roads a layer of salt resi due may form on the brake discs and brake pads This ca...

Page 154: ...thickness You can measure the break pad lining thick ness using a test gage Color coding green or red on the test gage allows you to determine whether the brake pad lining thickness is still sufficient The test gage is in the vehicle docu ment wallet in the glove box Front wheel Rear wheel X Bring the vehicle and wheels into a suitable position so that you can attach test gage A X Secure the vehic...

Page 155: ...e clear of snow To ensure an adequate supply of fresh air open a window on the side of the vehicle that is not facing into the wind Have your vehicle winter proofed at a qualified specialist workshop at the onset of winter Drive particularly carefully on slippery road surfaces Avoid sudden acceleration steering and braking maneuvers Do not use cruise control or Active Distance Assist DISTRONIC If ...

Page 156: ...or in total brake failure and also in increased wear and tear The brak ing characteristics change depending on the material entering the brakes Clean the brakes after driving off road If you detect a reduced braking effect or grinding noises have the brake system checked in a qualified specialist workshop as soon as possible Adapt your driving style to the different braking character istics Drivin...

Page 157: ...ehicle after driving off road have the vehicle checked immediately at a qualified specialist work shop X Deactivate off road program Y page 132 X Deactivate DSR Y page 169 X Clean the headlamps and rear lights and check for damage X Clean the front and rear license plates X Clean the wheels and tires with a water jet and remove any foreign objects X Clean the wheels wheel housings and the vehicle ...

Page 158: ...at the wheels are gripping RAvoid high engine speeds except when driv ing on sandy and muddy routes with high driving resistance RUse the left hand steering wheel paddle shifter to shift to a lower gear appropriate to the gradient RUse the left hand steering wheel paddle shifter to shift into a lower gear in good time on long and steep downhill gradients Hill start assist will aid you when pulling...

Page 159: ...period The speed indicated in the speedometer may differ slightly from the speed stored Important safety notes If you fail to adapt your driving style cruise control can neither reduce the risk of an acci dent nor override the laws of physics Cruise control cannot take into account the road traffic and weather conditions Cruise control is only an aid You are responsible for the dis tance to the ve...

Page 160: ...km h increments briefly press the cruise control lever up to the pres sure point for a higher speed or down for a lower speed i Cruise control is not deactivated if you depress the accelerator pedal For example if you accelerate briefly to overtake cruise control adjusts the vehicle s speed to the last speed stored after you have finished overtaking Deactivating cruise control There are several wa...

Page 161: ...following two conditions 1 This device may not cause interference and 2 This device must accept any interference received including interference that may cause undesired operation of the device Removal tampering or altering of the device will void any warranties and is not permitted Do not tamper with alter or use in any non approved way Any unauthorized modification to this device could void the ...

Page 162: ...ormation In particular the detection of obstacles can be impaired if RThere is dirt on the sensors or anything else covering the sensors RThere is snow or heavy rain RThere is interference by other radar sources RThere are strong radar reflections for exam ple in parking garages If Active Distance Assist DISTRONIC no longer detects a vehicle in front Distance Pilot DISTRONIC may unexpectedly accel...

Page 163: ...s from the current speed the vehicle acceler ates or decelerates If you do not know the stored speed the vehicle could accelerate or brake unexpectedly There is a risk of an accident Pay attention to the road and traffic condi tions before calling up the stored speed If you do not know the stored speed store the desired speed again X Briefly pull the cruise control lever towards you X Remove your ...

Page 164: ... is activated the transmission is shifted automati cally to position j if Rthe driver s seat belt is not fastened and the driver s door is open Rthe engine is switched off unless it is auto matically switched off by the ECO start stop function The electric parking brake is applied automati cally if Active Distance Assist DISTRONIC is active when the vehicle is stationary and Ra system malfunction ...

Page 165: ...ssist Active Distance Assist Off Off message appears on the multifunction dis play for approximately five seconds i The last speed stored remains stored until you switch off the engine Active Distance Assist DISTRONIC is not deactivated if you depress the accelerator pedal Active Distance Assist DISTRONIC is automati cally deactivated if Ryou engage the electric parking brake or if the vehicle is ...

Page 166: ...ll initially see the stored speed for approximately five seconds when you activate Active Distance Assist DISTRONIC Vehicle in front if detected Specified minimum distance to the vehicle in front adjustable Your vehicle Active Distance Assist DISTRONIC active text only appears when the cruise control lever is actuated X Select the Assistance Graphic Assistance Graphic function using the on board c...

Page 167: ...he HOLD function deactivated when you depress the accelerator pedal to pull away Important safety notes G WARNING If the vehicle is only braked using the HOLD function the vehicle may roll away in the fol lowing situations when you leave the vehi cle Rif there is a malfunction in the system or in the voltage supply Rif the HOLD function is deactivated by depressing the accelerator pedal or brake p...

Page 168: ... HOLD function is activated when the vehicle is stationary and Ra system malfunction occurs Rthe power supply is insufficient Start off Assist except Mercedes AMG vehicles Important safety notes G WARNING If you use start off assist individual wheels may start to spin and the vehicle may skid If ESP is deactivated there is a greater dan ger of skidding and having an accident Make sure that no pers...

Page 169: ...message appears in the multifunction display X Release both steering wheel paddle shifters i If the activation conditions are no longer fulfilled RACE START is canceled The RACE START Not Possible See Opera RACE START Not Possible See Opera tor s Manual tor s Manual message appears in the mul tifunction display X To cancel pull the left steering wheel pad dle shifter Y page 140 or X To confirm pul...

Page 170: ...vehicle are more comfortable Select this mode if you favor a more comfortable driv ing style but also when driving fast on straight roads e g highways X Press button again so that indicator lamp goes out You have selected Comfort mode The AMG Suspension System COMFORT AMG Suspension System COMFORT message appears in the multifunction dis play 4MATIC Never tow the vehicle with one axle raised This ...

Page 171: ...front for vehicle speed for braking in good time and for staying in your lane You are always responsible for keeping control of the vehicle and for assessing whether the downhill gradient can be managed DSR may not always be able to keep to the set speed depending on road surface and tire conditions Select a set speed suitable for the prevailing conditions and when necessary apply the brakes manua...

Page 172: ...of the multifunction display Off road program General notes i The Off road program is only available on vehicles with the ON OFFROAD package The off road program assists you in driving off road The engine s performance characteris tics and the gearshifting characteristics of the automatic transmission are adapted for this purpose ABS ESP and ETS programs espe cially adapted to off road driving are...

Page 173: ...AMG vehicles Activating the driving dynamics dis play X Switch on the multimedia system see the separate multimedia system operating instructions X Press button The driving dynamics display appears in the multimedia system display Parking Assist PARKTRONIC Important safety notes Parking Assist PARKTRONIC is an electronic parking aid with ultrasound It monitors the area around your vehicle using si...

Page 174: ...count obstacles located Rbelow the detection range such as persons animals or objects Rabove the detection range e g overhanging loads tail sections or loading ramps of trucks Sensors in the front bumper left hand side example The sensors must be free from dirt ice or slush They can otherwise not function cor rectly Clean the sensors regularly taking care not to scratch or damage them Y page 282 R...

Page 175: ...ay is active when the engine is running Transmission posi tion Warning display h Front area activated k i or the vehi cle is rolling back wards Rear and front areas activated j No areas activated One or more segments light up as the vehicle approaches an obstacle depending on the vehicle s distance from the obstacle In addi tion warning tones are issued When the distance to the obstacle is suffici...

Page 176: ...e Active steering intervention and brake application can assist you during parking and when exiting a parking space You can also still use Parking Assist PARKTRONIC Y page 171 Important safety notes Active Parking Assist is merely an aid It is not a replacement for your attention to your imme diate surroundings You are always responsi ble for safe maneuvering parking and exiting a parking space Ma...

Page 177: ...ly Active Parking Assist does not support you parking in spaces at right angles to the direc tion of travel if Rtwo parking spaces are located directly next to one another Rthe parking space is directly next to a low obstacle such as a low curb Ryou park forwards Active Parking Assist does not support you parking in spaces that are parallel or at right angles to the direction of travel if Rthe par...

Page 178: ...n good time X Stop the vehicle when the parking space symbol shows the desired parking space in the instrument cluster X Shift the transmission to position k The Start Parking Assist Start Parking Assist Yes OK Yes OK No No message appears on the multifunction display X To cancel the procedure press the button on the multifunction steering wheel or pull away or X To park using Active Parking Assis...

Page 179: ...tarting position as it is maneuvered into the parking space Ra maneuvering distance of at least 3 3 ft 1 0 m must be available Active Parking Assist can only assist you with exiting a parking space if you have parked the vehicle parallel to the direction of travel using Active Parking Assist i If Active Parking Assist detects obstacles Active Parking Assist brakes automatically while the vehicle i...

Page 180: ...A warning tone sounds The parking symbol disappears and the multifunction display shows the Active Parking Assist Can Active Parking Assist Can celed celed message When Active Parking Assist is canceled you must steer and brake again yourself If a system malfunction occurs the vehicle is braked to a standstill To drive on depress the accelerator again Rear view camera General notes Rear view camer...

Page 181: ...after driving forwards a short distance The inner segments of the warning indicator are displayed in red if there is a complete sys tem failure The indicator lamp in the PARKTRONIC button lights up If the system fails at the rear of the vehicle Rthe rear segments are shown in red when backing up Rthe rear segments are hidden when driving forwards Messages in the multimedia system display The rear ...

Page 182: ...Reverse parking function Backing up straight into a parking space without steering input White guide line without steering input vehicle width including the exterior mirrors static Yellow guide line for the vehicle width including the exterior mirrors at the cur rent steering wheel angle dynamic Yellow guide line at a distance of approx imately 3 ft 1 0 m from the rear area Red guide line at a dis...

Page 183: ...llow guide line for the vehicle width including the exterior mirrors at the cur rent steering wheel angle dynamic X Stop the vehicle when it is almost exactly in front of the parking space The white lane should be as close to parallel with the parking space marking as possible White guide line at the current steering input Parking space marking X Turn the steering wheel to the center posi tion whi...

Page 184: ...d you shift the transmission from position h or k to i you see the previous view in the COMAND dis play The dynamic guidelines are hidden When you shift between transmission posi tions h and k you see the previously selec ted front or rear view Important safety notes The 360 camera is only an aid It is not a replacement for your attention to your immedi ate surroundings You are always responsible ...

Page 185: ... camera or Ra split screen with top view and the image from the rear view camera For further information on the COMAND con troller see the digital COMAND operating instructions Activating the 360 camera using reverse gear The 360 camera images can be automatically displayed by engaging reverse gear X Make sure that the SmartKey is in position 2 in the ignition lock X Make sure that the Activation ...

Page 186: ...n a bar dis play in five levels from high to low RIf ATTENTION ASSIST is unable to calculate the attention level and cannot output a warning the System Suspended System Suspended message appears The bar display then changes the display such as when you are driving at a speed below 37 mph 60 km h or above 125 mph 200 km h Activating ATTENTION ASSIST X Activate ATTENTION ASSIST using the on board co...

Page 187: ...serve the traffic conditions care fully and maintain a safe lateral distance Blind Spot Assist is only an aid It may fail to detect some vehicles and is no substitute for attentive driving Always ensure that there is sufficient distance to the side for other road users and obstacles i USA only This device has been approved by the FCC as a Vehicular Radar System The radar sensor is intended for use...

Page 188: ...ndicator lamp goes out if reverse gear is engaged In this event Blind Spot Assist is no longer active The brightness of the indicator warning lamps is adjusted automatically according to the ambient light Collision warning If a vehicle is detected in the monitoring range of Blind Spot Assist and you switch on the cor responding turn signal a double warning tone sounds Red warning lamp flashes If t...

Page 189: ...cle in front is too short and thus the lane markings cannot be detected Rthe lane markings change quickly e g lanes branch off cross one another or merge Rthe road is narrow and winding Rthere are highly variable shade conditions on the roadway Switching on Lane Keeping Assist X Switch on Active Lane Keeping Assist using the on board computer to do so select Standard Standard or Adaptive Adaptive ...

Page 190: ...matically controls the brightness of the multi function display In daylight the displays in the instrument cluster are not illuminated The lighting in the instrument cluster in the displays and the controls in the vehicle interior can be adjusted using the brightness control knob The brightness control knob is located on the bottom left of the instrument cluster Y page 32 X Turn the brightness con...

Page 191: ...If the coolant temperature is over 248 120 do not continue driving The engine will otherwise be damaged The coolant temperature gage is in the instru ment cluster on the right hand side Y page 32 The H marking in the coolant temperature gauge corresponds to a coolant temperature of approximately 248 120 Under normal operating conditions and at the correct coolant level the coolant temperature gaug...

Page 192: ...In the Tel Tel Telephone menu switches to the telephone book and starts dialing the selected number Press briefly RBack RVehicles with Audio 20 switches off voice operated control for navigation see the manufacturer s operating instructions RVehicles with COMAND switches off the Voice Control System see the separate operating instructions RHides display messages or calls up the last Trip Trip menu...

Page 193: ...ndation when shifting manually Y page 140 RjActive Parking Assist Y page 174 RCRUISE CRUISE Cruise control Y page 157 Rè ECO start stop function Y page 129 Rë HOLD function Y page 165 RDSR DSR Downhill Speed Regulation Y page 169 Menus and submenus Menu overview Using the or button on the steering wheel open the menu bar Operating the on board computer Y page 189 Depending on the equipment install...

Page 194: ...The ECO display is not available in Mercedes AMG vehicles X Press the or button on the steer ing wheel to select the Trip Trip menu X Press the 9 or button to select ECO DISPLAY ECO DISPLAY If the ignition remains switched off for longer than four hours the ECO display will be auto matically reset For more information on the ECO display see Y page 149 Displaying the range and current fuel consumpt...

Page 195: ...R From Start trip computer R From Reset trip computer RECO display If you reset the values in the ECO display the values in the From Start trip computer are also reset If you reset the values in the From Start trip computer the values in the ECO dis play are also reset Navigation system menu Displaying navigation instructions In the Navi Navi menu the multifunction display shows navigation instruc...

Page 196: ...s may be added Lane not recommended you will not be able to complete the next change of direction if you stay in this lane Recommended lane and new lane during a change of direction in this lane you will be able to complete the next two changes of direction without changing lane Other status indicators of the naviga tion system The navigation system displays additional information and the vehicle ...

Page 197: ...ers support this function If track information is stored on the audio device or medium the multifunction display will show the number and title of the track Video DVD operation You can only operate DVD videos in the Audio Audio menu in vehicles with COMAND X Switch on COMAND and select DVD Video see the Digital Operator s Manual X Press the or button on the steer ing wheel to select the Audio Audi...

Page 198: ...press and hold the 9 or button for longer than one second Rapid scrolling stops when you release the button or reach the end of the list X If only one telephone number is stored for a name press the 6 or a button to start dialing or X If there is more than one number for a particular name press the 6 or a button to display the numbers X Press the 9 or button to select the number you want to dial X...

Page 199: ...g snow chains Rin deep snow Ron sand or gravel Deactivating activating ESP in Mercedes AMG vehicles Y page 65 For further information about ESP see Y page 63 X Start the engine X Press the or button on the steer ing wheel to select the DriveAssist DriveAssist menu X Press 9 or to select ESP ESP X Press a to confirm The current selection appears X To activate deactivate press the a button again ESP...

Page 200: ...save the setting When Lane Keeping Assist is activated the multifunction display shows the lane mark ings as bright lines in the assistance graphic For further information about Lane Keeping Assist see Y page 186 Service menu Depending on the equipment installed in the vehicle you have the following options in the Serv Serv menu RCalling up display messages in message memory Y page 203 RRestarting...

Page 201: ...e speed display is an alternative to your speedometer X Press the or button on the steer ing wheel to select the Sett Sett menu X Press the or 9 button to select the Instrument Cluster Instrument Cluster submenu X Press a to confirm X Press the or 9 button to select the Permanent Display Permanent Display function The current setting Outside Temperature Outside Temperature or Speedometer km h Spee...

Page 202: ...hicle and then open the driver s or front passenger door the exterior mirrors fold out again If you have switched on the Auto Mirror Auto Mirror Folding Folding function and you fold in the exterior mirrors using the button on the door Y page 99 they will not fold out automati cally The exterior mirrors can then only be fol ded out using the button on the door X Press the or button on the steer in...

Page 203: ...he following information and functions Rthe digital speedometer Rthe gear indicator Rthe drive system setting Rthe suspension mode Rthe transmission position Rthe ESP Electronic Stability Program sta tus X Press the or button on the steer ing wheel to select the AMG AMG menu X Press 9 repeatedly until SETUP appears RACE TIMER Displaying and starting RACE TIMER Lap RACE TIMER The RACE TIMER is only...

Page 204: ... off the engine the RACE TIMER is reset to 0 after 30 seconds All laps are deleted You cannot delete individual stored laps If you have stopped 16 laps the current lap does not have to be reset X Reset the current lap X Press a to confirm Reset Reset Reset Race Timer Reset Race Timer appears in the multi function display X Press the button to select Yes Yes and press the a button to confirm All la...

Page 205: ...rity display messages Once the causes of the high priority display messages have been rectified the corresponding display messages are also deleted When you stop and park the vehicle please observe the notes on RHOLD function Y page 165 RParking Y page 145 Hiding display messages X Press the a or button on the steering wheel The multifunction display hides the display message The multifunction dis...

Page 206: ...f skidding and an accident X Carefully drive on a suitable stretch of road making gentle steer ing movements at speeds of above 12 mph 20 km h If the display message disappears the functions mentioned above are available again If the multifunction display still shows the display message X Drive on carefully X Visit a qualified specialist workshop immediately Inoperative See Inoperative See Operato...

Page 207: ... a suitable distance making slight steering move ments at a speed above 12 mph 20 km h If the display message disappears the functions mentioned above are available again If the multifunction display still shows the display message X Drive on carefully X Visit a qualified specialist workshop immediately Inoperative See Inoperative See Operator s Manual Operator s Manual ESP BAS the HOLD function a...

Page 208: ...Release the Parking Brake the Parking Brake The red F USA only or Canada only indicator lamp lights up You attempted to release the electric parking brake while the igni tion was switched off X SmartKey turn the SmartKey to position 1 in the ignition lock X KEYLESS GO switch on the ignition F USA only Canada only Please Release Please Release Parking Brake Parking Brake The red F USA only or Canad...

Page 209: ... workshop The red F USA only or Canada only indicator lamp flashes and the yellow warning lamp lights up The electric parking brake is malfunctioning To release X Switch off the ignition and turn it back on X Release the electric parking brake manually To apply X Switch off the ignition and turn it back on X Apply the electric parking brake manually If the red F USA only or Canada only indicator l...

Page 210: ...functioning It is not possible to apply the electric parking brake manually X Shift the transmission to position j as the electric parking brake is not applied automatically X Visit a qualified specialist workshop F USA only Canada only Parking Brake Inop Parking Brake Inop erative erative The yellow warning lamp lights up The red F USA only or Canada only indicator lamp flashes for about ten seco...

Page 211: ...attention to road and traffic conditions Do not continue driving under any circumstances X Secure the vehicle against rolling away Y page 145 X Consult a qualified specialist workshop X Do not add brake fluid This does not correct the malfunction Check Brake Pad Check Brake Pad Wear Wear The brake pads linings have reached their wear limit X Visit a qualified specialist workshop G Inoperative Inop...

Page 212: ...operative Active Brake Assist is unavailable due to a malfunction Situation dependent braking assistance may also have failed X Visit a qualified specialist workshop immediately Radar Sensors Radar Sensors Dirty See Opera Dirty See Opera tor s Manual tor s Manual The radar sensor system is malfunctioning Possible causes are Rdirt on sensors Rheavy rain or snow Rwhen driving on inter urban roads wi...

Page 213: ...it a qualified specialist workshop immediately 6 Rear Left Malfunc Rear Left Malfunc tion Service tion Service Required Required or Rear Rear Right Malfunction Right Malfunction Service Required Service Required The rear left hand or right hand restraint system is malfunctioning The 6 warning lamp also lights up in the instrument cluster G WARNING The air bags or Emergency Tensioning Devices may e...

Page 214: ...g Seat unoccupied and ignition switched on Ra self diagnosis is carried out The PASSENGER AIR BAG OFF and PASSENGER AIR BAG ON indicator lamps must light up simultaneously for approximately six seconds Rthe PASSENGER AIR BAG OFF indicator lamp must then light up and remain lit after the self diagnosis If the indicator lamp is on OCS Occupant Classification System has deactivated the front passenge...

Page 215: ...e weight The system might otherwise detect the additional weight and interpret the seat occupant s weight as greater than it actually is X Keep the seat unoccupied close the front passenger door and switch on the ignition X Observe the PASSENGER AIR BAG indicator lamps in the center console and the multifunction display and check the following Seat unoccupied and ignition switched on Ra self diagn...

Page 216: ... workshop b Check Left Low Check Left Low Beam Beam or Check Check Right Low Beam Right Low Beam The left or right hand low beam headlamp is defective X Check whether you are permitted to replace the bulb yourself Y page 106 or X Visit a qualified specialist workshop b Check Rear Left Check Rear Left Turn Signal Turn Signal or Check Rear Right Check Rear Right Turn Signal Turn Signal The rear left...

Page 217: ...t Fog Lamp Check Left Fog Lamp or Check Right Fog Check Right Fog Lamp Lamp The left or right hand fog lamp is faulty X Visit a qualified specialist workshop b Rear Fog Lamp Rear Fog Lamp The rear fog lamp is faulty X Check whether you are permitted to replace the bulb yourself Y page 106 or X Visit a qualified specialist workshop b Check Front Left Check Front Left Parking Lamp Parking Lamp or Ch...

Page 218: ...time Running Light time Running Light The left or right hand daytime running lamp is faulty X Check whether you are permitted to replace the bulb yourself Y page 106 or X Visit a qualified specialist workshop b Malfunction See Malfunction See Operator s Manual Operator s Manual The exterior lighting is malfunctioning X Visit a qualified specialist workshop b Auto Lamp Function Auto Lamp Function I...

Page 219: ...ing tone also sounds G WARNING Do not drive when your engine is overheated This can cause some fluids which may have leaked into the engine compartment to catch fire Steam from the overheated engine can also cause serious burns which can occur just by opening the hood There is a risk of injury X Pull over and stop the vehicle safely and switch off the engine paying attention to road and traffic co...

Page 220: ...d and traffic conditions X Secure the vehicle against rolling away Y page 145 X Observe the instructions in the display message See Oper See Oper ator s Manual ator s Manual X Consult a qualified specialist workshop 4 Check Engine Oil Check Engine Oil At Next Refueling At Next Refueling The engine oil level has dropped to the minimum level A warning tone also sounds Avoid longer journeys when ther...

Page 221: ... has detected fatigue or a lack of concentration on the part of the driver A warning tone also sounds X If necessary take a break During long journeys take regular breaks in good time so you get enough rest À Attention Assist Attention Assist Inoperative Inoperative ATTENTION ASSIST is inoperative X Visit a qualified specialist workshop à Inoperative Inoperative DSR Downhill Speed Regulation is de...

Page 222: ...ntly Unavaila ble See Operator s ble See Operator s Manual Manual Blind Spot Assist is temporarily inoperative Possible causes are Rthe radar sensor system is temporarily inoperative e g due to electromagnetic radiation emitted by nearby TV or radio stations or other sources of electromagnetic radiation Rthe radar sensor system is outside the operating temperature range The yellow 9 indicator lamp...

Page 223: ...istance Active Distance Assist Off Assist Off Active Distance Assist DISTRONIC was deactivated Y page 163 If it was not deactivated by the driver a warning tone also sounds Active Distance Active Distance Assist Now Availa Assist Now Availa ble ble Active Distance Assist DISTRONIC is operational again after having been temporarily unavailable You can now reactivate Active Dis tance Assist DISTRONI...

Page 224: ...st mph mph A condition for activating Active Distance Assist DISTRONIC has not been met X Check the activation conditions for Active Distance Assist DISTRONIC Y page 160 Cruise Control Cruise Control Inoperative Inoperative Cruise control is malfunctioning A warning tone also sounds X Visit a qualified specialist workshop Cruise Control Cruise Control mph mph RA condition for activating cruise con...

Page 225: ... the tires and if necessary follow the instructions for a flat tire Y page 287 X Check the tire pressures and if necessary correct the tire pres sure X Restart the tire pressure loss warning system when the tire pres sure is correct Y page 311 Check Tire Pres Check Tire Pres sure Then Restart sure Then Restart Run Flat Indicator Run Flat Indicator Canada only The tire pressure loss warning system ...

Page 226: ...rning Tire Mal function function USA only The tire pressure in one or more tires has dropped suddenly The wheel position appears in the multifunction display G WARNING Driving with a flat tire poses a risk of the following hazards Ra flat tire affects the ability to steer or brake the vehicle Ryou could lose control of the vehicle Rcontinued driving with a flat tire will cause excessive heat build...

Page 227: ...uences and M M Solutions Depress Brake to Depress Brake to Start Engine Start Engine You have attempted to start the engine with the transmission in position i without depressing the brake pedal X Depress the brake pedal To Deselect P or To Deselect P or N Depress Brake N Depress Brake and Start Engine and Start Engine You attempted to shift the transmission to position k or h with out starting th...

Page 228: ... Only Shift to P when Vehicle is when Vehicle is Stationary Stationary The vehicle is moving X Pull over and stop the vehicle safely as soon as possible paying attention to road and traffic conditions X Shift the transmission to position j To Engage Trans To Engage Trans miss Position R miss Position R First Depress the First Depress the Brake Brake You have attempted to shift from position h or i...

Page 229: ...re you switch off the engine X Before leaving the vehicle apply the electric parking brake Trans Oil Overhea Trans Oil Overhea ted Drive on with ted Drive on with Care Care Mercedes AMG vehicles the transmission oil has overheated Manual drive program p and the temporarily active manual drive program are no longer available The engine power output is reduced X Allow the vehicle to cool down 4matic...

Page 230: ... you are able to apply the extra force required If you are able to steer safely X Drive on carefully X Visit a qualified specialist workshop immediately If you are unable to steer safely X Do not drive on X Consult a qualified specialist workshop Phone No Service Phone No Service Your vehicle is outside the network provider s transmitter receiver range X Wait until the mobile phone operational rea...

Page 231: ...d off The SmartKey is not in the ignition lock A warning tone sounds X Take the SmartKey with you when you leave the vehicle  Key Not Detected Key Not Detected red display message The SmartKey is not in the vehicle A warning tone also sounds If the engine is switched off you can no longer lock the vehicle cen trally or start the engine X Pull over and stop the vehicle safely as soon as possible p...

Page 232: ...ms carry out a self diagnosis when the ignition is switched on Therefore some indi cator and warning lamps may light up or flash temporarily This behavior is non critical These indicator and warning lamps only indicate a malfunction if they light up or flash after start ing the engine or whilst driving Safety Seat belts Warning indicator lamp N N Signal type Possible causes consequences and M M So...

Page 233: ... lamp flashes and an intermittent audible warning sounds The driver or front passenger has not fastened their seat belt The vehicle is being driven faster than 15 mph 25 km h or has briefly been driven faster than 15 mph 25 km h X Fasten your seat belt Y page 43 The warning lamp goes out and the intermittent warning tone ceases There are objects on the front passenger seat The vehicle is being dri...

Page 234: ...ot continue driving under any circumstances X Secure the vehicle against rolling away Y page 145 X Consult a qualified specialist workshop X Observe the additional display messages in the multifunction display J N USA only J Canada only the red brake system warning lamp is lit while the engine is running A warning tone also sounds There is not enough brake fluid in the brake fluid reservoir G WARN...

Page 235: ...could therefore lock if you brake hard for example The steerability and braking characteristics may be severely affected The brak ing distance in an emergency braking situation can increase If ESP is not operational ESP is unable to stabilize the vehicle There is an increased risk of skidding and an accident X Observe the additional display messages in the multifunction display X Drive on carefull...

Page 236: ...unctions mentioned above are available again when the warning lamp goes out If the warning lamp is still on X Observe the additional display messages in the multifunction display X Drive on carefully X Visit a qualified specialist workshop immediately N The yellow ABS warning lamp is lit while the engine is running A warning tone also sounds EBD is malfunctioning Therefore ABS BAS Active Brake Ass...

Page 237: ...f ESP is not operational ESP is unable to stabilize the vehicle There is an increased risk of skidding and an accident X Observe the additional display messages in the multifunction display X Drive on carefully X Visit a qualified specialist workshop immediately N The yellow ESP warning lamp flashes while the vehicle is in motion ESP or traction control has intervened because there is a risk of sk...

Page 238: ... running SPORT handling mode is activated G WARNING When SPORT handling mode is switched on ESP is unable to stabilize the vehi cle There is an increased risk of skidding and an accident X Only switch to SPORT handling mode in accordance with the conditions described in the Activating deactivating ESP section Y page 65 å N The yellow ESP and ESP OFF warning lamps are lit while the engine is run ni...

Page 239: ...ing lamp is still on X Observe the additional display messages in the multifunction display X Drive on carefully X Visit a qualified specialist workshop immediately F N F USA only Canada only the red indicator lamp for the electric parking brake flashes or lights up and or the yellow warning lamp for the elec tric parking brake lights up X Observe the additional display messages in the multifuncti...

Page 240: ...he nearest gas station æ N The yellow reserve fuel warning lamp flashes while the vehicle is in motion In addition the Check Engine warning lamp may light up The fuel filler cap is not closed correctly or the fuel system is leaking X Check that the fuel filler cap is correctly closed X If the fuel filler cap is not correctly closed close the fuel filler cap X If the fuel filler cap is closed visit...

Page 241: ...rive to the nearest qualified specialist workshop X Avoid heavy loads on the engine as you do so e g driving in mountainous ter rain and stop and go traffic N The red coolant warning lamp comes on while the engine is running A warn ing tone also sounds The coolant temperature has exceeded 248 120 The airflow to the engine radiator may be blocked or the coolant level may be too low G WARNING The en...

Page 242: ...tems Warning indicator lamp N N Signal type Possible causes consequences and M M Solutions N The red distance warning lamp lights up while the vehicle is in motion A warning tone also sounds You are approaching a vehicle or a stationary obstacle in your line of travel at too high a speed X Be prepared to brake immediately X Pay careful attention to the traffic situation You may have to brake or ta...

Page 243: ...raking maneuvers Pay attention to the traffic conditions as you do so X Secure the vehicle against rolling away Y page 145 X Observe the additional display messages in the multifunction display X Check the tires and if necessary follow the instructions for a flat tire Y page 287 X Check the tire pressure Y page 311 X If necessary correct the tire pressure h N The yellow tire pressure monitor warni...

Page 244: ...ation announcements are intended to direct you while driving without diverting your attention from the road and driving Please always use this feature instead of con sulting the map display for directions Looking at the icons or map display can distract you from traffic conditions and driving and increase the risk of an accident This equipment complies with FCC radiation exposure limits set forth ...

Page 245: ...tion announcements Rin hands free mode during an active call Switching the sound on or off X Press the 8 button on the control panel If the audio output is switched off the sta tus line will show the 8 symbol If you switch the media source or set the volume the sound is automatically switched on i Navigation announcements will be heard even if the sound is muted Functions The multimedia system has...

Page 246: ...avigation mode Important safety notes G WARNING If you operate information systems and com munication equipment integrated in the vehicle when driving you may be distracted from the traffic situation You could also lose control of the vehicle There is a risk of an accident Only operate this equipment when the traffic situation permits If you are not sure that this is possible park the vehicle payi...

Page 247: ...see locations for which route guidance has already been car ried out X Enter the city The G symbol the location is contained on the digital map multiple times X To switch to the list slide the 5 control ler X Select the location If available the ZIP code is shown If there are different ZIP codes available for the location the corresponding digits are dis played with an X X X Enter the street and h...

Page 248: ...g on the mobile phone authorization either takes place by means of Secure Simple Pairing or by entering a pass key The multimedia system automatically makes the procedure that is relevant for your mobile phone available The mobile phone is always connected automatically after authori zation Further information on using a mobile phone with the multimedia system see the Digital Operator s Manual If ...

Page 249: ...ce name see the man ufacturer s operating instructions If the mobile phone supports the PBAP Phone Book Access Profile and MAP Message Access Profile Bluetooth profiles the follow ing information is transmitted after you con nect the main telephone RPhone book RCall lists RText messages and e mail i Further information on suitable mobile phones can be found at http www mercedes benz com connect i ...

Page 250: ...ymbols in the device manager The symbols are shown in color depending on their use Symbol Explanation Mobile phone connected to the multimedia system Main telephone with full range of functions Additional telephone for incom ing calls in two telephone mode Media mode General notes If you wish to play external media sources the appropriate media mode must already be turned on Further information on...

Page 251: ...ages The side with the con tacts must face down Removing an SD card X Press the SD card The SD card is ejected X Remove the SD card Connecting USB devices X Connect the USB device to the USB port There are two USB ports in the stowage space under the armrest X Select the media source Y page 248 Operating system 249 Multimedia system Z ...

Page 252: ...cified on the vehicle iden tification plate on the B pillar of the driver s door RThe cargo compartment is the preferred place to carry objects RPosition heavy loads as far forward as possi ble and as low down in the cargo compart ment as possible RThe load must not protrude above the upper edge of the seat backrests RAlways place the load against the rear or front seat backrests Make sure that th...

Page 253: ...n the cargo compartment Observe the loading guidelines Y page 250 Stowage compartments in the front Glove box X To open pull handle and open glove box flap X To close fold glove box flap upwards until it engages There is a pen holder at the top of the glove box flap Eyeglasses compartment X To open press marking Make sure that the eyeglasses compartment is always closed while the vehicle is in mot...

Page 254: ...g on the vehicle s equipment there may be an open stowage space above the stowage compartment Parcel nets Stowage nets are located Rin the front passenger footwell Ron the back of the driver s and the front passenger seat Ron the left and right hand side in the cargo compartment Observe the loading guidelines Y page 250 and the safety notes regarding stowage spaces Y page 250 Folding backrest on t...

Page 255: ...f the rear bench seat rear seat and seat backrest are not engaged they could fold forwards e g when braking suddenly or in the event of an accident RThe vehicle occupant would thereby be pushed into the seat belt by the rear bench seat rear seat or by the seat back rest The seat belt can no longer offer the intended level of protection and could even cause injuries RObjects or loads in the trunk c...

Page 256: ...t hand or right hand release han dle of the seat backrest forward Corresponding seat backrest is released X Fold backrest forward X Move the driver s or front passenger seat back if necessary X Insert the seat belt into seat belt holder Folding the rear seat backrest back Make sure that the seat belt does not become trapped when folding the rear seat backrest back Otherwise it could be dam aged X ...

Page 257: ...ers RPad sharp edges for protection Cargo tie down rings Bag hook G WARNING The bag hooks cannot restrain heavy objects or items of luggage Objects or items of lug gage could be flung around and thereby hit vehicle occupants when braking or abruptly changing directions There is a risk of injury Only hang light objects on the bag hooks Never hang hard sharp edged or fragile objects on the bag hooks...

Page 258: ... X Place the cargo compartment floor on side flaps Roof carrier Important safety notes G WARNING When you load the roof the center of gravity of the vehicle rises and the usual driving characteristics as well as steering and brak ing change The vehicle tilts more severely when cornering and may react more slug gishly to steering input If you exceed the maximum roof load the driving characteristics...

Page 259: ...touch the hot heating elements of the cup holder Always make sure that chil dren cannot access the hot heating ele ments of the cup holder Never leave chil dren unsupervised in the vehicle G WARNING If you transport objects in the vehicle inte rior and these are not adequately secured they could slip or be flung around and thereby strike vehicle occupants In addi tion cup holders open stowage spac...

Page 260: ...ar seat armrest Do not sit on or support your body weight on the rear seat armrest when it is folded down as you could otherwise damage it Close the cup holder before folding the rear seat armrest up Otherwise the cup holder could be damaged X Fold down the rear seat armrest X To open press the front of cup holder or Cup holder or extends automatically X To close slide cup holder or back until it ...

Page 261: ...resulting compartment for stowage Rear compartment ashtray X To open pull cover out by its top edge X To remove pull insert by recess in the direction of arrow until it audibly releases X Lift insert up and out X To install the insert install insert from above into the holder and press down until it engages Cigarette lighter G WARNING You can burn yourself if you touch the hot heating element or t...

Page 262: ...over press the lower section of the cover The stowage compartment opens X Lift up the cover of the socket Socket in the rear passenger compart ment center console X Pull the cover out by the top of the handle edge X Lift up the cover of the socket Socket in the cargo compartment X Lift up the cover of socket Mercedes me connect General notes A license agreement must be in place in order to activat...

Page 263: ...ttons continues to light up red after the system self diagnosis SOS button F Roadside Assistance call button ï MB Info call button RAfter the system self diagnosis the Inoper Inoper ative ative or Service Not Activated Service Not Activated mes sage appears in the multifunction display If a malfunction is indicated as outlined above the system may not operate as expected In the event of an emergen...

Page 264: ...tomatically established between the Customer Assistance Center and the vehicle occupants RIf the vehicle occupants are responsive the Mercedes Benz Customer Assistance Center attempts to get more information on the emergency RIf there is no response from the vehicle occupants an ambulance is immediately sent to the vehicle If no voice connection can be established to the Mercedes Benz Customer Ass...

Page 265: ...cedes Benz Customer Assistance Cen ter either sends a qualified Mercedes Benz technician or makes arrangements for your vehicle to be transported to the nearest Mercedes Benz Service Center You may be charged for services such as repair work and or towing You can obtain further information from your Mercedes me connect manual i The system has not been able to initiate a Roadside Assistance call if...

Page 266: ...ive calls The indicator lamp of the respective button flashes until the call is ended An emergency call can only be terminated by the Mercedes Benz Customer Assistance Cen ter All other calls can be ended by pressing Rthe button on the multifunction steer ing wheel Rthe corresponding button in the multimedia system to end the voice call i When a call is initiated the audio system is muted The mobi...

Page 267: ...on The destination address is loaded into the vehicle s navigation system A display message appears asking whether navigation should be started X Select Yes Yes by turning cVd or sliding XVY the controller and confirm with W The system calculates the route and subse quently starts the route guidance with the address entered i If you select No No the address can be saved in the address book i If yo...

Page 268: ...rcedes Benz Customer Assistance Center together with your PIN The Mercedes Benz Customer Assistance Center then tries to locate the system The Mercedes Benz Customer Assistance Center contacts you and the local law enforcement agency if the vehicle is located However only the law enforcement agency is informed of the location of the vehicle i If the anti theft alarm system is activated for longer ...

Page 269: ...ard slot on the multimedia sys tem before saving the route A route can be prepared and sent either by a customer service representative or via the Mercedes me connect portal on the Internet Each route can include up to 20 way points Once a route has been received by the naviga tion system you will see the route name route name has been saved to memory card Do has been saved to memory card Do you w...

Page 270: ...arage Do not leave the engine running while programming Certain garage door drives are incompatible with the integrated garage door opener If you have difficulty programing the integrated garage door opener contact a Mercedes Benz Service Center Alternatively you can call the following tele phone assistance services RUSA Mercedes Benz Customer Assistance Center at 1 800 FOR MERCedes RCanada Custom...

Page 271: ...em Several attempts might be neces sary You should test every position for at least 25 seconds before trying another posi tion Synchronizing the rolling code Pay attention to the Important safety notes Y page 268 If the garage door system uses a rolling code you will also have to synchronize the garage door system with the integrated garage door opener in the rear view mirror To do this you will n...

Page 272: ...upported The transmitter fre quency can usually be found on the back of remote control A for the garage door drive The integrated garage door opener is com patible with devices that have units which operate in the frequency range of 280 to 433 MHz RReplace the batteries in garage door remote control A This increases the likelihood that garage door remote control A will transmit a strong and precis...

Page 273: ...imately three seconds The magnetic field zone currently selected appears in compass display X To select the magnetic field zone push a round pen into opening until the desired magnetic field zone is selected If after a few seconds the display in com pass display changes direction the mag netic field zone has been selected Calibrating the compass Notes In order to calibrate the compass correctly do...

Page 274: ...ts in the vehicle are stowed correctly and that they cannot enter the driver s footwell Install the floormats securely and as specified in order to ensure sufficient clearance for the pedals Do not use loose floormats and do not place floor mats on top of one another X Slide the seat back X To install place the floormat in the foot well X Press safety catch knobs onto retain ers X To remove pull t...

Page 275: ...reach into the area where there is a risk of danger from moving components such as the fan rotation area Rremove jewelry and watches Rkeep items of clothing and hair for exam ple away from moving parts G WARNING The ignition system and the fuel injection system work under high voltage If you touch components which are under voltage you could get an electric shock There is a risk of injury Never to...

Page 276: ...nding on your driving style the vehicle consumes up to 0 9 US qt 0 8 liters of oil per 600 miles 1 000 km The oil consumption may be higher than this when the vehicle is new or if you frequently drive at high engine speeds Depending on the engine the oil dipstick may be in a different location When checking the oil level Rpark the vehicle on a level surface Rthe engine should be switched off for a...

Page 277: ...onents described in the following G WARNING If engine oil comes into contact with hot components in the engine compartment it may ignite There is a risk of fire and injury Make sure that engine oil is not spilled next to the filler neck Let the engine cool down and thoroughly clean the engine oil off the components before starting the engine H Environmental note When adding oil take care not to sp...

Page 278: ...ne or the engine cooling system X Park the vehicle on a level surface Only check the coolant level when the vehi cle is on a level surface and the engine has cooled down X Turn the SmartKey to position 2 in the igni tion lock Y page 125 X Check the coolant temperature display in the instrument cluster The coolant temperature must be below 104 40 X Turn the SmartKey to position g Y page 125 in the ...

Page 279: ...ce and service intervals in the Maintenance Book let You can obtain further information from an authorized Mercedes Benz Center or at http www mbusa com USA only i The ASSYST PLUS service interval display does not show any information on the engine oil level Observe the notes on the engine oil level Y page 274 The multifunction display shows a service message for several seconds e g RService A in ...

Page 280: ... Rin particularly dusty conditions or if air recirculation mode is frequently used In these or similar operating conditions have the interior filter engine air cleaner engine oil and oil filter for example changed more fre quently Under arduous operating conditions the tires must be checked more often Further information can be obtained at a qualified spe cialist workshop e g an authorized Mercede...

Page 281: ...y pre wash it before cleaning it in an automatic car wash After using an automatic car wash wipe off wax from the windshield and the wiper blades This will prevent smears and reduce wiping noises caused by residue on the windshield i Vehicles with decorative film select a wash program without hot wax at the auto matic car wash Washing by hand In some countries washing by hand is only allowed at sp...

Page 282: ...id with a moist cloth and clear water X Use tar remover to remove tar stains X Use silicone remover to remove wax If water no longer forms beads on the paint surface use the paint care products recom mended and approved by Mercedes Benz This is the case approximately every three to five months depending on the climate conditions and the care product used If dirt has penetrated the paint surface or...

Page 283: ...Cleaner cleaning product which has been approved and recommended by Mercedes Benz should be used when dirt has penetrated the decorative film surface or the decorative film has become dull The manufacturer can provide you with infor mation on special care and cleaning products Laminated surfaces may exhibit optical differ ences to surfaces which were not protected by a decorative film when the dec...

Page 284: ...ot clean wiper blades too often and do not rub them too hard Otherwise the graphite coating could be damaged This could cause wiper noise Hold the wiper arm securely when folding back The windshield could be damaged if the wiper arm smacks against it suddenly X Fold the windshield wiper arms away from the windshield X Carefully clean the wiper blades with a damp cloth X Fold the windshield wiper a...

Page 285: ... bathroom cleaner or wheel cleaner Mercedes AMG vehicles with black tail pipes black chrome trims must not be pol ished with a chrome polish as this will cause them to lose their black shine For optimal care the faceplates should be rubbed with a lightly oiled cloth after every car wash Com mercially available engine oils and care oils are suitable for use For heavier soiling you can apply a fine ...

Page 286: ...ts Do not use solvent based cleaning agents such as tar remover wheel cleaners pol ishes or waxes There is otherwise a risk of damaging the surface Do not use chrome polish on trim pieces The trim pieces have a chrome look but are mostly made of anodized aluminum and can lose their shine if chrome polish is used Use a damp lint free cloth instead when cleaning the trim pieces If the chrome plated ...

Page 287: ...he type of dirt and how long it has been there Rclean DINAMICA covers with a damp cloth Make sure that you wipe entire seat sections to avoid leaving visible lines Cleaning the seat belts G WARNING Seat belts can become severely weakened if bleached or dyed This could cause the seat belts to tear or fail for instance in the event of an accident This poses an increased risk of injury or fatal injur...

Page 288: ... Do not use a laundry dryer B Do not dry clean C This is a class 2 vest RThe reflective safety jackets meet the requirements defined by the legal standard only if the correct size is used and if the reflective safety jackets are cor rectly fastened RBefore use ensure that the reflective safety jackets are clean and intact The special properties may otherwise be compromised RThe reflective safety j...

Page 289: ...essor i Example equipment and country specific variations possible Vehicles with a tire change tool kit X Open the tailgate X Lift the cargo compartment floor up Y page 256 X Remove the tire change tool kit The tire change tool kit contains RJack RLug wrench RPair of gloves RFolding wheel chock Flat tire Preparing the vehicle Your vehicle may be equipped with RMOExtended tires tires with run flat ...

Page 290: ... or tire pressure monitor USA only If a pressure loss warning message appears in the multifunction display Robserve the instructions in the display mes sages Y page 223 Rcheck the tire for damage Rif driving on observe the following notes The driving distance possible in run flat mode is approximately 50 miles 80 km when the vehicle is partially laden When the vehicle is fully laden it is approxim...

Page 291: ... driven at very low tire pressures or on a flat tire There is a risk of an accident Do not drive the vehicle Contact a qualified specialist workshop G WARNING The tire sealant is harmful and causes irrita tion It must not come into contact with your skin eyes or clothing or be swallowed Do not inhale TIREFIT fumes Keep tire sealant away from children There is a risk of injury If you come into cont...

Page 292: ...ockets Y page 260 X Turn the SmartKey to position 1 in the igni tion lock Y page 125 X Press on and off switch on the tire infla tion compressor to I The tire inflation compressor is switched on The tire is inflated First tire sealant is pumped into the tire The pressure can briefly rise to approx imately 500 kPa 5 bar 73 psi Do not switch off the tire inflation com pressor during this phase X Let...

Page 293: ...rt of the TIREFIT sticker must be affixed to the instrument clus ter in the driver s field of vision If a tire pressure of 180 kPa 1 8 bar 26 psi has been attained after five minutes X Switch off the tire inflation compressor X Unscrew the filler hose from the valve of the faulty tire Note that tire sealant may escape when you unscrew the filler hose X USA only Stow the tire sealant bottle and the...

Page 294: ...SP Electronic Stability Program The operating safety of your vehicle may be restricted You could lose control of the vehicle for example Rwhen braking Rin the event of abrupt steering maneuvers and or when the vehicle s speed is not adapted to the road conditions There is a risk of an accident In the event of a short circuit or a similar incident contact a qualified specialist work shop immediatel...

Page 295: ...at a qualified specialist workshop Comply with the service intervals in the Maintenance Booklet or contact a qualified specialist workshop for more information You should have all work involving the bat tery carried out at a qualified specialist workshop In the exceptional case that it is necessary for you to disconnect the battery yourself make sure that Rswitch off the engine and remove the Smar...

Page 296: ...olding the exterior mirrors in out automatically by folding the mirrors out once Y page 99 Charging the battery G WARNING During charging and jump starting explosive gases can escape from the battery There is a risk of an explosion Particularly avoid fire open flames creating sparks and smoking Ensure there is suffi cient ventilation while charging and jump starting Do not lean over a battery G WA...

Page 297: ...lways use the battery technology originally instal led Switching between the battery technol ogies is not permitted For safety reasons Mercedes Benz recommends that you only use batteries which have been tested and approved for your vehicle by Mercedes Benz RUse detachable parts such as breather hoses angled connecting pieces or terminal covers from the battery which is to be replaced RMake sure t...

Page 298: ...arge the battery Let the battery thaw first The service life of a thawed out battery may be shorter The starting characteristics can be impaired particularly at low temperatures Have the thawed out battery checked at a qualified specialist workshop Do not start the vehicle using a rapid charging device If your vehicle s battery is discharged the engine can be jump started from another vehicle or f...

Page 299: ...t X If the battery is fully discharged leave the battery that is being used to jump start connected for a few minutes before attempting to start This charges the battery slightly X Start the engine X Before disconnecting the jumper cables let the engine run for several minutes X First remove the jumper cables from ground point A and negative terminal then from positive terminal and positive termin...

Page 300: ...le deactivate these systems in the following or similar sit uations Rwhen towing the vehicle Rin the car wash Make sure that the electric parking brake is released If the electric parking brake is faulty visit a qualified specialist workshop Only secure the tow rope or tow bar at the towing eyes Otherwise the vehicle could be damaged Do not use the towing eyes for recovery purposes as this could d...

Page 301: ...87 X Press the mark on cover inwards in the direction of the arrow X Take cover off the opening X Screw in the towing eye clockwise to the stop Removing the towing eye X Unscrew and remove the towing eye X Attach cover to the bumper and press until it engages X Place the towing eye in the stowage well beneath the cargo compartment floor in the cargo compartment Y page 287 X Vehicles with the TIREF...

Page 302: ...e brake pedal X Release the electric parking brake X Switch on the hazard warning lamps Y page 104 i In order to signal a change of direction when towing the vehicle with the hazard warning lamps switched on use the combi nation switch as usual In this case only the indicator lamps for the direction of travel flash After resetting the combination switch the hazard warning lamp starts flashing agai...

Page 303: ...correct amperage Only use fuses that have been approved for Mercedes Benz vehicles and which have the correct fuse rating for the system con cerned Only use fuses marked with an S Otherwise components or systems could be damaged Make sure that no moisture can enter the fuse box when the cover is open When closing the cover make sure that it is lying correctly on the fuse box Moisture seeping in or...

Page 304: ...pen the hood X Use a dry cloth to remove any moisture from the fuse box X To open open clamps X Fold up cover in the direction of the arrow and remove it X To close check whether the seal is lying correctly in cover X Insert cover at the back into openings on the fuse box X Fold down cover X Hook clamps into the fuse box and close X Close the hood Fuse box in the front passenger foot well X To ope...

Page 305: ...rds Fuse allocation chart is located on the lower right hand side of cover X To close insert cover on the left hand side of the fuse box into the retainer Cover engages in the retainers X Fold down cover until clamps lock audibly X Fold back perforated floor covering X Install the floormats Fuses 303 Roadside Assistance Z ...

Page 306: ...329 You can ask for information regarding permit ted wheel tire combinations at an authorized Mercedes Benz Center Information on tire pressure can be found Ron the Tire and Loading Information placard on the B pillar on the driver s side Y page 316 Rin the tire pressure table in the fuel filler flap Y page 144 Runder Tire pressure Y page 307 Operation Information on driving Check the tire pressur...

Page 307: ...r able to dissipate water This increases the risk of hydroplaning when the road surface is wet particularly when the vehicle s speed is not adapted to the road conditions There is a risk of an accident When the tire pressure is too high or too low tires may wear differently at different points on the tire tread Therefore regularly check the tire tread depth and the condition of the tread across th...

Page 308: ...alist workshop at the onset of winter Observe the notes in the Changing a wheel section Y page 325 Driving with summer tires At temperatures below 45 7 summer tires lose elasticity and therefore traction and braking power Change the tires on your vehi cle to M S tires Using summer tires at very cold temperatures could cause cracks to form thereby damaging the tires permanently Mercedes Benz cannot...

Page 309: ... that is not snow covered RLocal regulations may restrict the use of snow chains Observe the appropriate regu lations if you wish to mount snow chains RDo not exceed the maximum permissible speed of 30mph 50 km h RIf snow chains are installed you cannot use Active Parking Assist Y page 176 You may wish to deactivate ESP when pulling away with snow chains installed This allows the wheels to spin in...

Page 310: ... recommended tire pressures for cold tires The recommended tire pressures are valid for the maximum permissible load and up to the maximum permissible vehicle speed Tire pressure table The tire pressure table is on the inside of the fuel filler flap It shows the tire pressure for all tires permitted at the factory for this vehicle see illustration example The tire pressure table contains the recom...

Page 311: ...icles equipped with the electronic tire pressure monitor the tire pressure can be checked in the on board com puter The tire temperature and pressure increase when the vehicle is in motion This is depend ent on the driving speed and the load Therefore you should only correct tire pres sures when the tires are cold The tires are cold Rif the vehicle has been parked with the tires out of direct sunl...

Page 312: ...den loss of tire pressure e g from a for eign object that has penetrated the tire Observe the notes on tire pressure Y page 307 Information on air pressure for the tires on your vehicle can be found Ron the vehicle s Tire and Loading Informa tion placard on the B pillar Rin the tire pressure table in the fuel filler flap Y page 144 Rin the Tire pressure section Checking tire pressures manually To ...

Page 313: ... Before restarting make sure that the tire pressures are set properly on all four tires for the respective operating conditions The recommended tire pressure can be found on the Tire and Loading Information placard on the B pillar Additionally a tire pressure table is attached to the fuel filler flap The tire pressure loss warning system can only give reliable warnings if you have set the correct ...

Page 314: ...TPMS is not a substitute for proper tire maintenance and it is the driv er s responsibility to maintain correct tire pressure even if underinflation has not reached the level to trigger illumination of the TPMS low tire pressure telltale Your vehicle has also been equipped with a TPMS malfunction indicator to indicate when the system is not operating properly The TPMS malfunction indicator is comb...

Page 315: ...s two way radios that may be being operated in or near the vehicle Checking the tire pressure electroni cally X Make sure that the SmartKey is in position 2 in the ignition lock Y page 125 X Press or on the steering wheel to select the Serv Serv menu X Press the 9 or button to select Tire Pressure Tire Pressure X Press the a button The current tire pressure of each tire is shown in the multifuncti...

Page 316: ...arious operating conditions in the tire pres sure table inside the fuel filler flap Y page 144 X Make sure that the tire pressure is correct on all four wheels X Make sure that the SmartKey is in position 2 in the ignition lock Y page 125 X Press or on the steering wheel to select the Serv Serv menu X Press the 9 or button to select Tire Pressure Tire Pressure X Press the a button The multifunctio...

Page 317: ... trie Canada applicables aux appareils radio exempts de Country Radio type approval number license L exploitation est authorisee aux deux conditions suivantes 1 L appareil ne doit pas produire de brouillage et 2 L autisatuer de l appareil doit accepter tout brouillage radioelectrique subi meme si le brouillage est susceptible d en compromettre le fonctionne ment WARNING Changes or modifications no...

Page 318: ... gross vehicle weight rating It is made up of the vehicle weight all vehicle occu pants the fuel and the cargo You can also find information about the maximum gross axle weight rating on the front and rear axle The maximum gross axle weight rating is the maximum weight that can be carried by one axle front or rear axle Never exceed the maximum load or the maxi mum gross axle weight rating for the ...

Page 319: ...er and passengers from XXX kilo grams or XXX lbs X Step 4 The resulting figure equals the avail able amount of cargo and luggage load capacity For example if the XXX amount equals 1400 lbs and there will be five 150 lb passengers in your vehicle the amount of available cargo and luggage load capacity is 650 lbs 1400 750 5 x 150 650 lbs X Step 5 Determine the combined weight of luggage and cargo be...

Page 320: ...80 kg Ò 150 lbs 68 kg 1350 lbs 612 kg Vehicle identification plate Even if you have calculated the total cargo carefully you should still make sure that the gross vehicle weight rating and the gross axle weight rating are not exceeded Details can be found on the vehicle identification plate on the B pillar on the driver s side of the vehicle Y page 316 Permissible Gross Vehicle Weight Rating GVWR ...

Page 321: ... how ever and may depart significantly from the norm due to variations in driving habits ser vice practices and differences in road charac teristics and climate Traction G WARNING The traction grade assigned to this tire is based on straight ahead braking traction tests and does not include acceleration cornering hydroplaning or peak traction characteristics Avoid wheelspin This can lead to damage...

Page 322: ...ion load bearing capacity and speed rating Y page 320 D Load index Y page 322 E Tire name The markings described above are on the tire in addition to the tire name sales designation and the manufacturer s name i Tire data is vehicle specific and may devi ate from the data in the example Tire size designation load bearing capacity and speed rating G WARNING Exceeding the stated tire load bearing ca...

Page 323: ... Load index Y page 322 Speed rating speed rating B specifies the approved maximum speed of the tire i Tire data is vehicle specific and may devi ate from the data in the example Regardless of the speed rating always observe the speed limits Drive carefully and adapt your driving style to the traffic conditions Summer tires Index Speed rating Q up to 100 mph 160 km h R up to 106 mph 170 km h S up t...

Page 324: ...m any qualified specialist workshop Load index In addition to the load bearing index load index may be imprinted after the letters that identify speed rating on the sidewall of the tire Speed rating Y page 320 RIf no specification is given no text as in the example above represents a standard load SL tire RXL or Extra Load represents a reinforced tire RLight Load represents a light load tire RC D ...

Page 325: ...facture For example a tire that is marked with 3208 was manufactured in week 32 in 2008 i Tire data is vehicle specific and may devi ate from the data in the example Tire characteristics This information describes the type of tire cord and the number of layers in sidewall and under tire tread i Tire data is vehicle specific and may devi ate from the data in the example Definition of terms for tire...

Page 326: ...ght of a fully loaded vehicle the weight of the vehicle including all accessories occu pants fuel luggage and the drawbar nose weight if applicable The gross vehicle weight rating is specified on the vehicle identification plate on the B pillar on the driver s side Maximum loaded vehicle weight The maximum weight is the sum of Rthe curb weight of the vehicle Rthe weight of the accessories Rthe loa...

Page 327: ...load bearing capacity of a tire Traction Traction is the result of friction between the tires and the road surface Treadwear indicators Narrow bars tread wear bars that are distrib uted over the tire tread If the tire tread is level with the bars the wear limit of á in 1 6 mm has been reached Occupant distribution The distribution of occupants in a vehicle at their designated seating positions Tot...

Page 328: ...ting a wheel Preparing the vehicle X Stop the vehicle on solid non slippery and level ground X Apply the electric parking brake manually X Bring the front wheels into the straight ahead position X Shift the transmission to position j X Switch off the engine X Vehicles without KEYLESS GO remove the SmartKey from the ignition lock X Vehicles with KEYLESS GO start func tion or KEYLESS GO open the dri...

Page 329: ...ing changed It must not be used for performing maintenance work under the vehicle RAvoid changing the wheel on uphill and downhill slopes RBefore raising the vehicle secure it from rolling away by applying the parking brake and inserting wheel chocks Do not disen gage the parking brake while the vehicle is raised RThe jack must be placed on a firm flat and non slip surface On a loose surface a lar...

Page 330: ...heel bolts hub threads can cause the wheel bolts to come loose As a result you could lose a wheel while driving There is a risk of accident Never oil or grease wheel bolts In the event of damage to the threads contact a quali fied specialist workshop immediately Have the damaged wheel bolts or hub threads replaced renewed Do not continue driving G WARNING If you tighten the wheel bolts or wheel nu...

Page 331: ...k to its initial position X Stow the jack and the rest of the vehicle tools in the vehicle again X Mercedes AMG vehicles and vehicles with AMG Line use the cover of the outer sill X Check the tire pressure of the newly moun ted wheel and adjust it if necessary Observe the recommended tire pressure Y page 307 Canada only as long as you are driving with the emergency spare wheel mounted the tire pre...

Page 332: ... on recommended tire pres sures under various operating conditions Y page 307 Check tire pressures regularly and only when the tires are cold Comply with the mainte nance recommendations of the tire manufac turer in the vehicle document wallet Notes on the vehicle equipment always equip the vehicle Rwith tires of the same size on a given axle left and right Rwith the same type of tire summer tires...

Page 333: ...nted the tire pressure loss warning system cannot function reliably Only restart the tire pressure loss warning system when the defective wheel has been replaced with a new wheel Vehicles with tire pressure monitor USA only after an emergency spare wheel has been mounted the system may still display the tire pressure of the removed wheel for a few minutes The value displayed for the mounted emerge...

Page 334: ...ructions for installation and use of two way radios are not observed In particular the following requirements must be complied with Ronly approved wavebands may be used Robserve the maximum permissible output in these wavebands Ronly approved antenna positions may be used Excessive levels of electromagnetic radiation may cause damage to your health and the health of others Using an exterior antenn...

Page 335: ...ncies in the 380 410 MHz frequency band and a maximum transmission output of up to 2 W trunked radio system Tetra RMobile phones 2G 3G 4G There is no restriction for antenna positions on the outside of the vehicle for the following fre quency bands RTrunked radio system Tetra R70 cm waveband R2G 3G 4G Identification plates Vehicle identification plate with vehicle identification number VIN X Open ...

Page 336: ...keep service products out of the reach of children H Environmental note Dispose of service products in an environ mentally responsible manner Service products include the following RFuels RLubricants e g engine oil transmission oil RCoolant RBrake fluid RWindshield washer fluid RClimate control system refrigerant Components and service products must match Only use products recommended by Mercedes ...

Page 337: ... come into contact with fuel Tank capacity Model Total capa city Models with 4MATIC 14 8 US gal 56 0 l All other models 13 2 US gal 50 0 l Model Of which reserve Mercedes AMG vehicles Approx 2 1 US gal 8 0 l All other models Approx 1 6 US gal 6 0 l Gasoline Fuel grade Do not use diesel to refuel vehicles with a gasoline engine Do not switch on the igni tion if you accidentally refuel with the wron...

Page 338: ...n on refueling Y page 143 Additives Operating the engine with fuel additives added later can lead to engine failure Do not mix fuel additives with fuel This does not include additives for the removal and prevention of residue buildup gasoline must only be mixed with additives recommended by Mercedes Benz Comply with the instruc tions for use on the product label More information about recommended ...

Page 339: ...es Benz in accordance with MB Freigabe or MB Approval 331 0 Information about approved brake fluid can be obtained at any qualified specialist workshop or on the Internet at http bevo mercedes benz com i Have the brake fluid regularly replaced at a qualified specialist workshop and the replacement confirmed in the Maintenance Booklet Coolant Important safety notes G WARNING If antifreeze comes int...

Page 340: ...s G WARNING Windshield washer concentrate is highly flammable If windshield washer concentrate gets onto hot components of the engine or the exhaust system it can ignite There is a risk of fire and injury Make sure that windshield washer concen trate is not spilled in the vicinity of the filler neck Only MB SummerFit and MB WinterFit washer fluid should be mixed together The spray nozzles may othe...

Page 341: ...ble standards PAG oil part number A Type of refrigerant Symbols advise you about RPossible dangers RHaving service work carried out at a quali fied specialist workshop Filling capacities Mercedes AMG vehicles Capacity Refrigerant 23 6 0 4 oz 670 10 g PAG oil 4 2 oz 120 g All other models Capacity Refrigerant 22 9 0 4 oz 650 10 g PAG oil 4 2 oz 120 g Vehicle data General notes Please note that for ...

Page 342: ...ilable at time of going to print Approach and depar ture angles when the vehicle is loaded and ready to drive When the vehicle is loaded and ready to drive it has a full tank all fluids have been refilled and the driver is in the vehicle For further information about approach depar ture angles see Y page 156 Maximum gradient climbing capabil ity Note that the vehicle s gradient climbing capa bilit...

Page 343: ...nt wheels have a tendency to spin 4ETS recogni zes this and brakes the wheels accordingly The rear wheel torque is increased making it easier to drive off For further information about the maximum gradient climbing ability see Y page 156 Vehicle data for off road driving 341 Technical data Z ...

Page 344: ...342 ...

Page 345: ...343 ...

Page 346: ...344 ...

Reviews: