SECTION 3
OPERATING PRINTER
36
E
Position Feeder/Entry Sensor Assembly
Printer is equipped with a repositionable assembly that contains the Feeder Sensor and Entry Sensor.
Feeder Sensor is used to measure/monitor media length and to control when the next piece of media is fed.
Entry Sensor detects the leading edge of the media as it enters into the Print Engine area.
This sensor assembly must be manually positioned over the path of media being fed.
1.
To reposition Feeder/Entry Sensor.
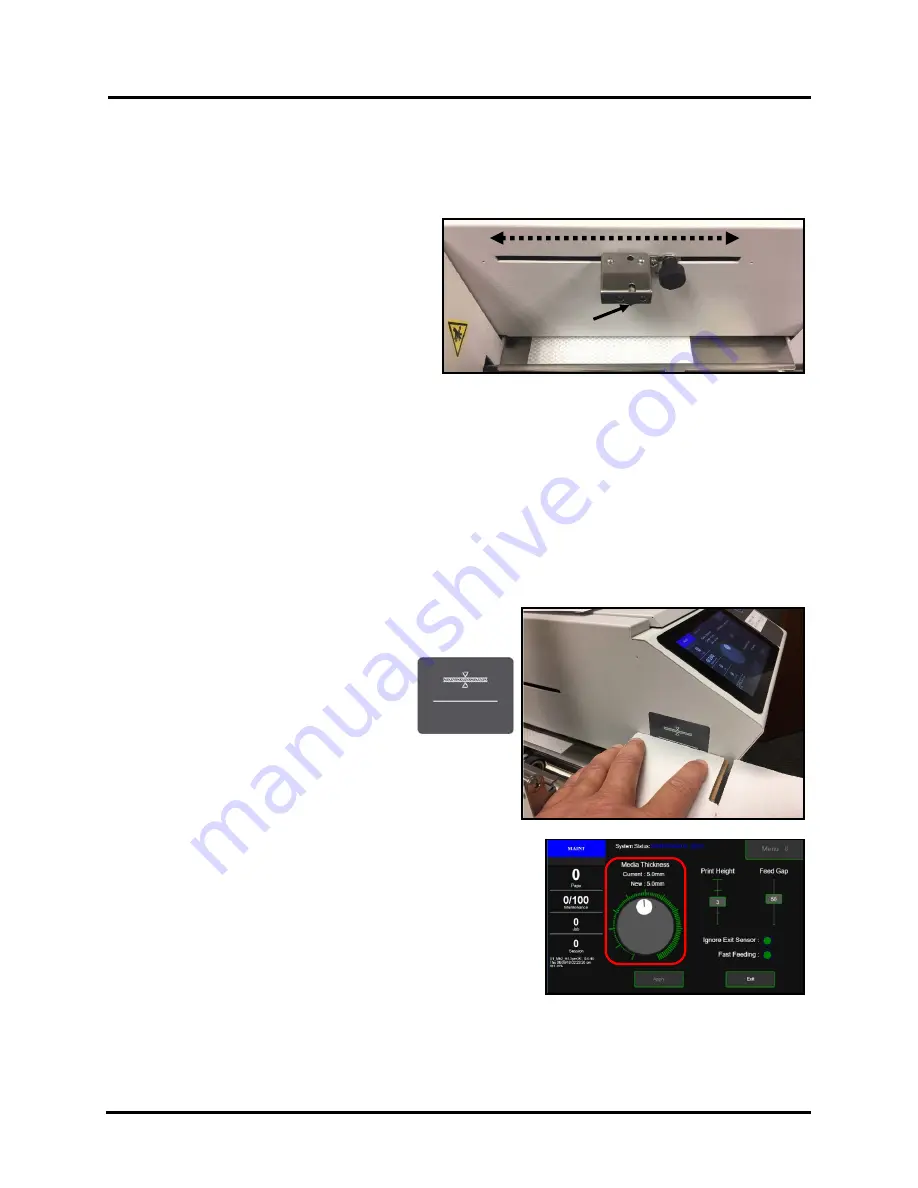
Loosen the locking knob and slide Sensor
Assembly to align with location where
media will be fed into Print Engine. Pointer
[E]
on sensor assembly; depicts sensor
beam location.
Tip:
Position sensor assembly to avoid
holes in media and or areas on surface of
media that may cause sensing issues. For example: When running “window envelopes” try to position
Media Entry Sensor so the “window” does not travel under sensor beams. External light sources may cause
a problem with media sensing. To identify a problem caused by external light sources; try covering the area
above the Feeder/Entry Sensor assembly to block external light from hitting reflector.
NOTICE
: If this sensor assembly isn’t positioned properly (media not passing under sensor beams) the printer will
likely feed a single piece. Then stop, with media inside Print Engine area, and display “
Paperpath_Feed_Timeout
”.
If this issue occurs you will need to: Tap “Menu” and select “Setup”. From the “Setup” menu select “Run Path”.
This should clear all media from the paper transport section. Once media is clear from this area tap “Stop Path”.
Reposition the Feeder/Entry Sensor Assembly so it aligns with the location where media will be fed under the
sensors. Then tap “Menu” and select “Job”. From the “Job” menu tap “Resume”, to resume the job.
Adjust Media Thickness
Before you will be able to successfully run media through the
printer; you will need to adjust the Clamshell height to
accommodate the thickness of your media.
A reference line, for assisting with the media
thickness adjustment process, is provided on the
clamshell frame; as shown here.
Procedure:
1.
Place a single piece of your media onto the operator side
frame and push it lightly up-against the media thickness
reference line decal.
NOTE
: If using multi-page or puffy media; compress the
media (press down lightly on the surface of the media) to
reveal the compressed thickness of the media.
2.
Using Media Thickness control, from the printer’s
Touchscreen, adjust to a value that places the bottom of the
white reference line even with the top surface of your
compressed media; as shown in image above.
Please see “Media Thickness” found in the section titled
“Touchscreen Menu Choices and Features” for details on
accessing and using this feature.
NOTE
: This procedure is meant to provide an approximate
Media Thickness adjustment that will allow the media to successfully pass through the printer.
However some experimentation (fine-adjustment, usually less than 0.5mm up/down) may be necessary to
optimize media feeding.
Summary of Contents for Quadient Rena MACH 6
Page 1: ...Digital Color Inkjet Printer MACH 6 User Guide...
Page 131: ......
Page 132: ...2 1 2020 Quadient April 9 2020...


