ADVANCED SPOILERBOARD KIT
HOW TO FACE THE BOARDS AND PLACE THE INSERTS
Page 1: ...ADVANCED SPOILERBOARD KIT HOW TO FACE THE BOARDS AND PLACE THE INSERTS...
Page 2: ...d verify that you ve received everything This written tutorial is organized in three chapters 1 Facing the spoilerboard 2 Drilling the holes for the inserts 3 Placing the inserts SPOILERBOARD KIT INTR...
Page 3: ...1 1 Switch on the control unit of the CNC router 2 Press the Home button STEP 01 HOMING THE MACHINE 1 FACING THE BOARDS...
Page 4: ...1 Press the XY button to define the current position as the X0 Y0 working coordinates STEP 02 DEFINING THE WORKING COORDINATES 1 FACING THE BOARDS...
Page 5: ...1 Remove the endmill in place 2 Place the 8mm collet inside the clamping nut and insert the 25mm endmill 3 Tighten the clamping nut with the spanner STEP 03 CHANGING THE ENDMILL 1 FACING THE BOARDS...
Page 6: ...1 Place the crocodile clip on the endmill shaft 2 Place the probing device underneath the endmill 3 Press on the Tool measure length button STEP 04 MEASURING THE TOOL LENGTH 1 FACING THE BOARDS...
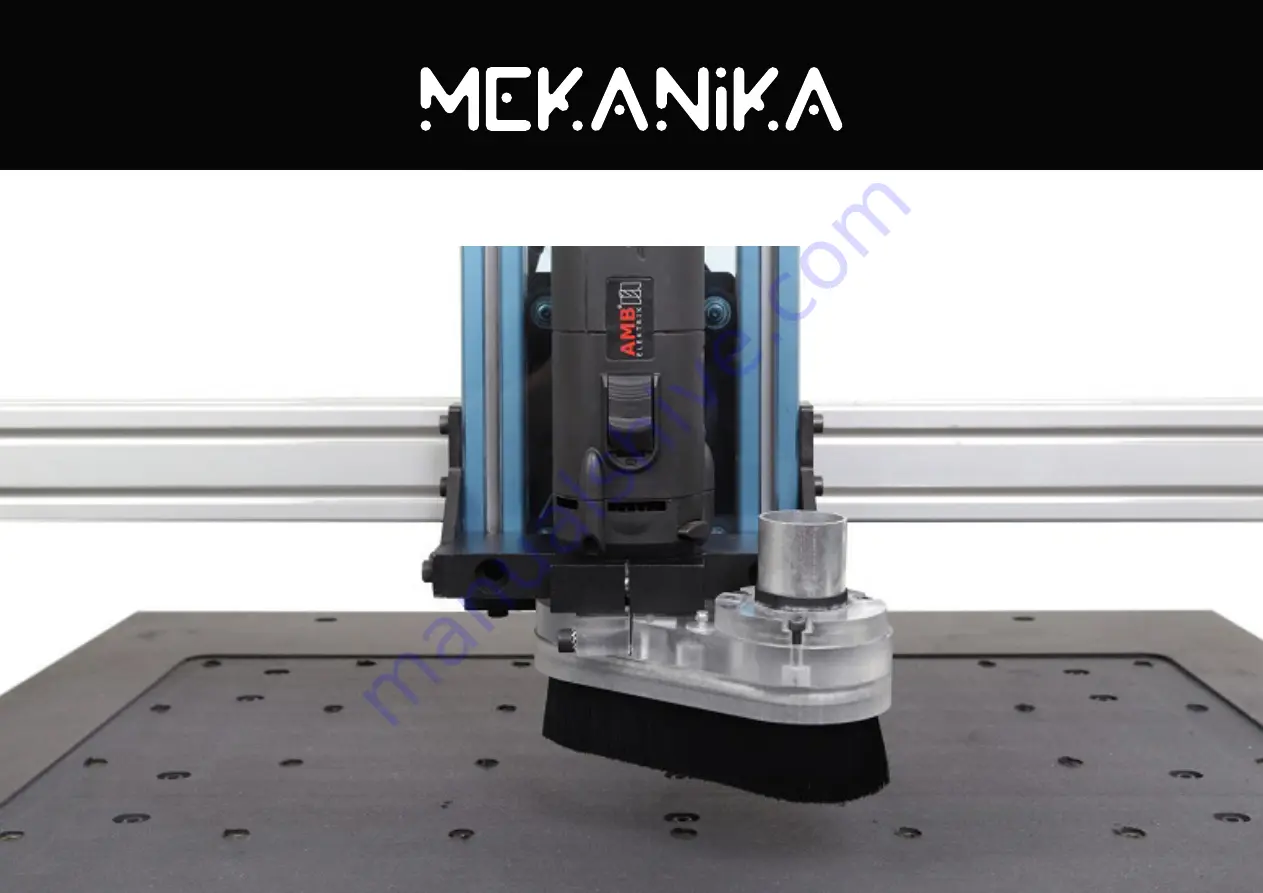
Page 7: ...tion we highly recommend placing the Mekanika Dust shoe To install it properly please refer to the relevant documentation on our support page STEP 05 INSTALLING THE DUST SHOE DO NOT SWITCH ON THE SPIN...
Page 8: ...pport page 2 Load them on your control unit with a USB key or using the Shared folder of the Raspberry Pi 3 Press the Open G code button 4 Open the Facing Endmill 25 that corresponds to your Evo model...
Page 9: ...1 2 STEP 07 SWITCHING ON THE SPINDLE 1 Set the rotation speed on 6 2 Switch on the spindle 1 FACING THE BOARDS...
Page 10: ...1 FACING THE BOARDS STEP 08 MILLING 1 Press the Play button WEAR SOME SECURITY GLASSES AND EAR PROTECTIONS...
Page 11: ...machine to the front with the Y arrow button 4 If the spoilerboard hasn t been milled over its entire surface go back to STEP 05 to make a new tool measure length on the milled surface and repeat the...
Page 12: ...1 Remove the 25mm endmill 2 Place the 8mm endmill and let it stick out of 25mm at least STEP 01 CHANGING THE ENDMILL 2 DRILLING THE HOLES...
Page 13: ...NG THE HOLES 1 Place the crocodile clip on the endmill 2 Place the probing device underneath the endmill 3 Press on the Tool measure length button STEP 02 MEASURING THE TOOL LENGTH PLACE THE PROBING D...
Page 14: ...2 DRILLING THE HOLES 1 Press the Open Gcode button 2 Open the Holes Endmill 8 that corresponds to your Evo model S M or L STEP 03 LOADING THE GCODE...
Page 15: ...DRILLING THE HOLES STEP 04 SWITCHING ON THE SPINDLE 1 Set the rotation speed on 4 2 Switch on the spindle WEAR SOME SECURITY GLASSES AND EAR PROTECTIONS NO NEED TO INSTALL THE DUST SHOE FOR THIS OPER...
Page 16: ...2 DRILLING THE HOLES STEP 05 MILLING 1 Press the Play button...
Page 17: ...RTS 1 Gently place the inserts as vertical as possible thanks to the 6mm hex key included in the EVO kit 2 Tighten the inserts until the flanged part touches the surface of the board 3 PLACING THE INS...