English
Manual of use and maintenance
0476
piezo smart
Page 1: ...English Manual of use and maintenance 0476 piezo smart ...
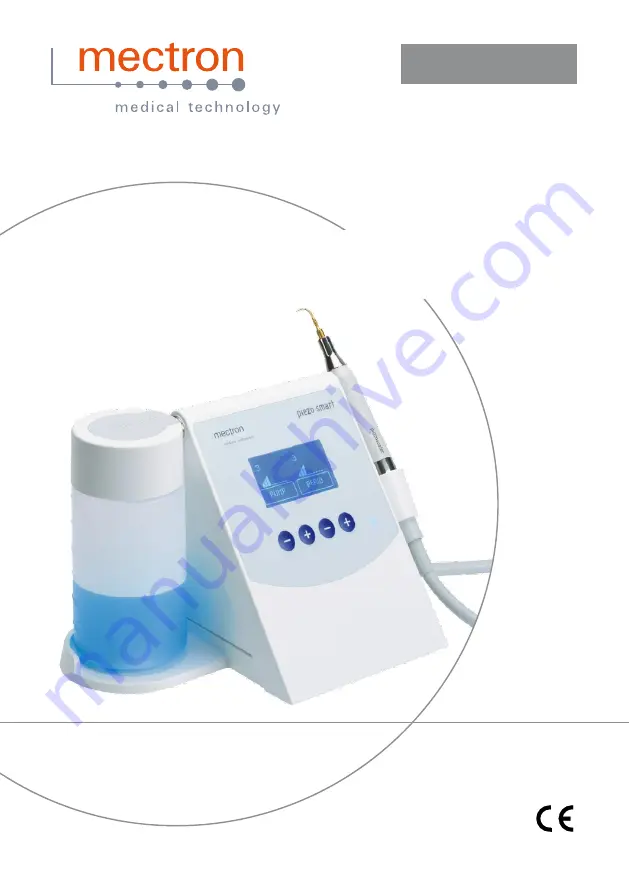
Page 2: ...g state of the art technology The device has an automatic tuning circuit that offsets wear of the inserts so that maximum efficiency is ensured at all times The handpiece which can be autoclave sterilised at 135 C has a titanium resonator and Is unbreakable The piezosmart can use the optional Starlight p curing lamp for dental composites The lamp is connected to the scaler cord The device recognis...
Page 3: ...erator DANGER Cleaning disinfection and sterilisation of new or repaired products All new or repaired products are delivered in non sterile conditions All new or repaired products should therefore be cleaned disinfected and sterilised before being used for any treatments fol lowing the instructions provided under point 06 0 closely DANGER Infection control In order to censure maximum safety for bo...
Page 4: ...ece is engraved on the grey connector of the handpiece Fig 2 Ref A 02 0 Testing 02 1 Testing of the equipment Each component of all equipment manufactured by MECTRON is thoroughly checked and tested During the testing procedure the components are subjected to a number of work cycles The tests highlight any malfunctioning due to faulty components This procedure ensures proper functioning and reliab...
Page 5: ...where the device is installed and used must comply with the applicable standards and with the relevant electrical safety requirements DANGER Do not install the equipment anywhere where there is a risk of explosions The equipment must not be used in places where there is an inflammable atmosphere anaesthetic mixtures oxygen etc DANGER Install the device in a place where it will be protected from bl...
Page 6: ...hown in Fig 4 It must click audibly into place 4 Pass the longer end of the tube of the pump through the hole shown in Fig 4 Ref B 5 Plug the tube into the connector shown in Fig 4 Ref D 04 3 Connection of the device 1 Plug the pedal into its socket on the housing of the device Fig 4 Ref F 2 Plug the power cable into its connector on the housing of the device Fig 4 Ref G then plug the other end in...
Page 7: ...or the bottle on the device is clean Fig 6 Ref E WARNING Make sure that the O rings on the connection are not damaged Fig 6 Ref E 1 Holding the bottle at an angle of 45 Fig 6 Ref F fit it onto the device Fig 6 Ref E by means of the coupling on the cap Fig 5 Ref D 2 Fit the bottle snugly onto the coupling 3 Turn the bottle downwards into a vertical position Fig 6 Ref F 04 6 Removing the bottle from...
Page 8: ...vice 1 Press one of the 4 keys on the front panel and hold it down for at least 3 seconds 2 The device will switch off NOTE If the device is not used for at least 5 minutes i twill switch off automatically NOTE If the device is not switched off correctly when it is switched on again the message WARNING 35 will appear on the display for a few seconds 05 3 Description of the display and functions Th...
Page 9: ... a correct use of the device it is necessary to press the pedal and start the device without placing the insert on the part to be treated This will enable the electronic circuit to recognise the best point of resonance of the insert without interferences so as to achieve optimum performance Contact with the part to be treated or with other surfaces before starting the device could cause the trippi...
Page 10: ... with one containing water demineralised water is recommended 2 Place the handpiece over a bowl to collect the liquid that will come out during the cleaning cycle 3 To activate the CLEAN function use the key to set the power level to less than 1 Fig 7 Ref B The wording clean and the associated status bar will appear on the display Fig 8 Ref C NOTE If you have selected the Clean function by mistake...
Page 11: ...5 Autoclave sterilisation of the inserts 1 Clean each insert preferably in an ultrasound tank and rinse with distilled water 2 Dry the insert 3 Disinfect the insert using a mild disinfectant solution with a neutral pH and dry it thoroughly WARNING Before starting the sterilisation cycle make sure that the insert is completely dry also internally To do this blow air through the hollow part with the...
Page 12: ...ooting If the device does not seem to be working correctly read the instructions again and then check the following table PROBLEM POSSIBLE CAUSE SOLUTION The device will not switch on The blue LED is off Fig 7 Rif G The power supply unit is not properly connected to the mains outlet or to the device The power supply unit and or is out of use or the internal fuse is blown Make sure that the power s...
Page 13: ...f the cannuled type The pump output is on zero The bottle for the liquid is empty The bottle containing the liquid is not correctly installed The tubes of the pump are not correctly installed The insert is clogged The handpiece is clogged Use a cannulated insert Increase the output of the pump Replace the bottle with a full one See points 04 6 and 04 5 Check the connections of the tubes Unstop the...
Page 14: ...ing time 20 ms Alarms A warning appears on the front panel display Se sections Safety and alarm circuits Troubleshooting Operating conditions From 10 C to 40 C Relative humidity from 30 to 75 Transport and storage conditions From 10 C to 70 C Relative humidity from 10 to 90 Air pressure P 500hPa 1060hPa Weight and measurements 0 92 Kg L W H 228 x 146 x 146 mm 12 1 Electromagnetic compatibility EN ...
Page 15: ...e in the electromagnetic environment specified below The customer or the user of the PIEZO SMART should assure that it is used in such an environment Immunity test IEC 60601 test level Complian ce level Electromagnetic environment Guidance Conducted RF IEC 61000 4 6 Radiated RF IEC 61000 4 3 3 Veff 150 kHz to 80 MHz 3 V m 80 MHz to 2 5 GHz 3 Vrms 3 V m Portable and mobile RF communications equipme...
Page 16: ...the equipment is used for purposes other than that for which it is intended If the equipment is not used in accordance with all the instructions and requirements described in this manual If the wiring system in the room where the equipment is used does not comply with the applicable standards and appropriate requirements If the wiring system in the room where the equipment is used does not comply ...
Page 17: ...Via Loreto 15 A 16042 Carasco Ge Italy Tel 39 0185 35361 Fax 39 0185 351374 www mectron com e mail mectron mectron com Rivenditore Reseller Wiederverkäufer Revendeur Revendedor piezo smart V GB Rev 02 del 24 07 2007 ...