4/8/16Ch H.264 Network DVR Series- Ver2.2
110
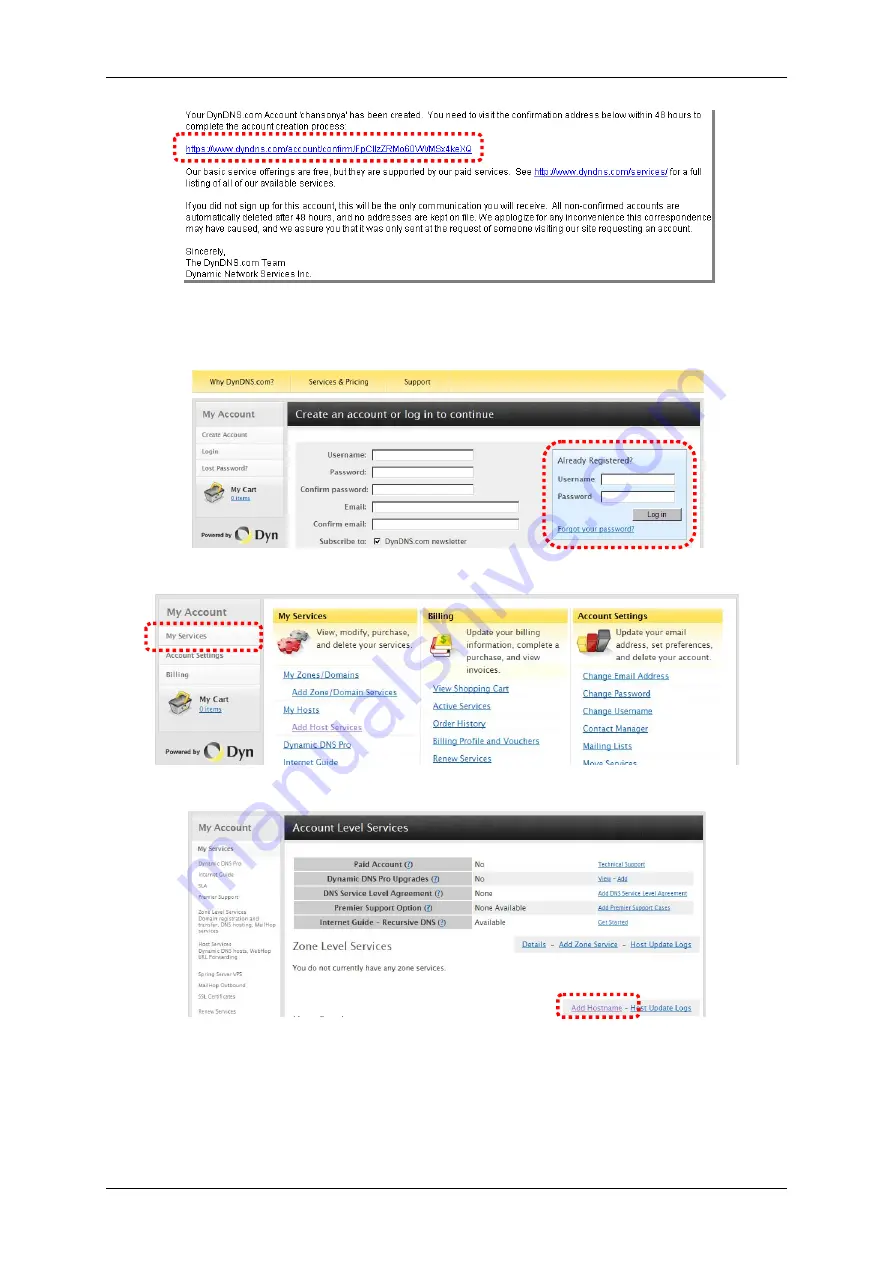
7.2.3 Login and Host Service
Step 1
Log-in by entering the Username and Password of your account.
Step 2
Click on
My Service
to get a host name
Step 3
Double click on
Add New Hostname
to create a new host address.
Step 4
Specify the host name for the DVR. You will use this name later to
configure the DynDNS settings on your DVR. Click on
Add to Cart
.
Summary of Contents for dvr
Page 1: ...4 8 16Ch H 264 Network DVR Series Ver2 2 4 8 16 Channel H 264 Network DVR Series User Guide ...
Page 2: ...4 8 16Ch H 264 Network DVR Series MU Ver2 2 ii ...
Page 8: ...4 8 16Ch H 264 Network DVR Series MU Ver2 2 viii ...
Page 12: ......
Page 13: ...4 8 16Ch H 264 Network DVR Series MU Ver2 3 1 Chapter 1 1 Overview ...
Page 23: ...4 8 16Ch H 264 Network DVR Series MU Ver2 3 11 Chapter 2 2 Installation ...
Page 39: ...27 Chapter 3 3 Getting Started ...
Page 97: ...85 Chapter 4 4 Playback and Data Backup ...
Page 109: ...4 8 16Ch H 264 Network DVR Series MU Ver2 3 97 Chapter 5 5 PTZ Control ...
Page 114: ...102 Chapter 6 6 System Information ...
Page 118: ...106 Chapter 7 7 Network Connectivity ...
Page 125: ...4 8 16Ch H 264 Network DVR Series MU Ver2 3 113 Chapter 8 8 PC Viewer ...
Page 140: ...4 8 16Ch H 264 Network DVR Series Ver2 2 128 Chapter 9 9 Remote Viewers ...


