background image

- 2 -

13483

CAUTION

Wear approved hearing protection, 
foot protection, eye protection and 
head protection.

STOP

Read the Operating Instructions 
before operating this piece of 
equipment.

Keep unauthorized and untrained 
people away from this 
equipment.

ROTATING & MOVING PARTS!

Make sure all guards and safety 
devices are in place.

Failure to comply could result in serious 

bodily injury.

SHUT OFF

 the motor before servic-

ing or cleaning. 

DO NOT RUN

 in an enclosed area.  

The engine produces carbon 
monoxide, a 

POISONOUS GAS

.

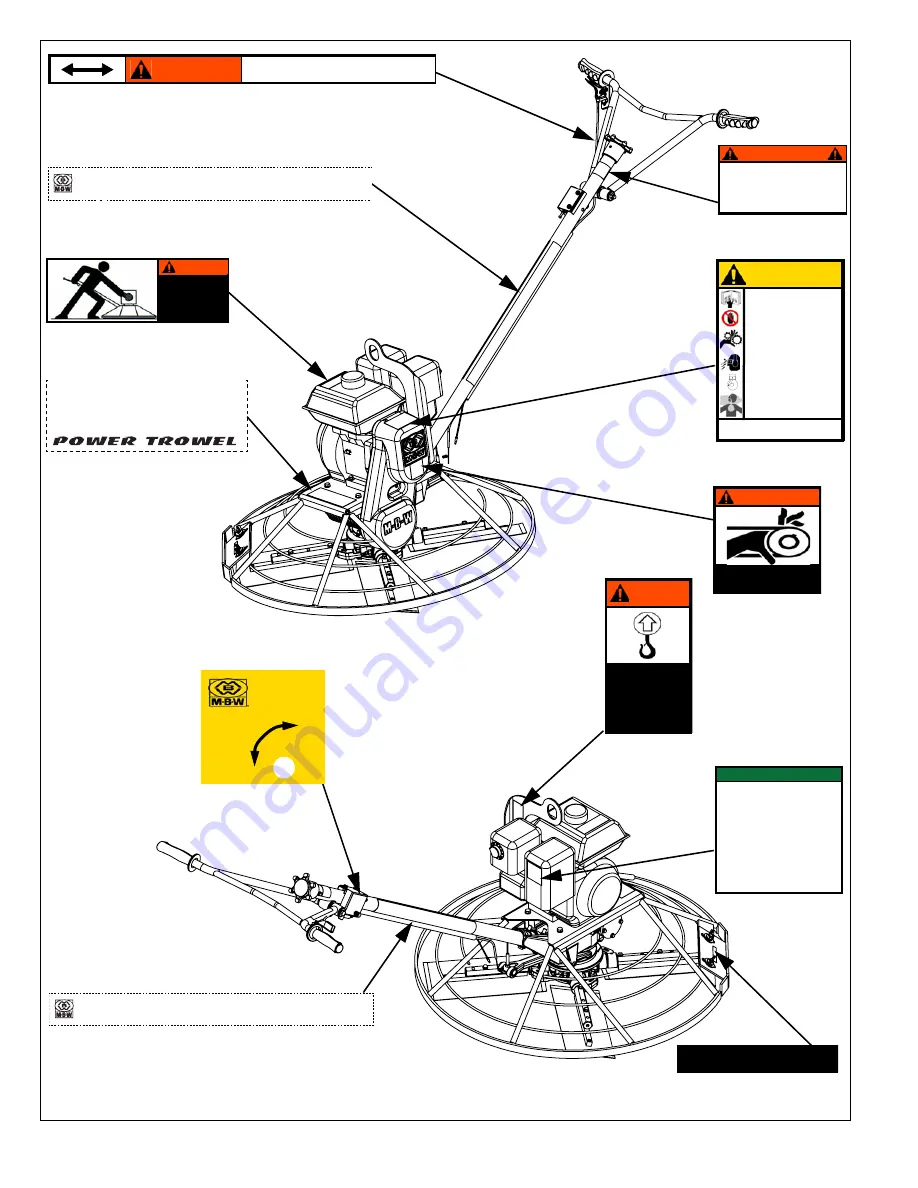
Safety Decals (Decal Kit #19975)

12265

01260

19961

01449

05950

19970

19961

13483

19971

12267


M-B-W INC.

P.O. Box 440, Slinger, WI 53086
USA * ENGLAND

01260

OFF

ON

S

A

F

E

T

Y

SW

ITCH

19961

MBW POWER TROWEL

WARNING

When lifting attach 
proper safety chains to 
hook.
Approximate weight
F46 Models:  
300 lbs. (136 kg)
F36 Models: 
200 lbs. (91 kg)

01449


OPERATING INSTRUCTIONS

1. Check engine oil and trowel gearbox oil.

2. Open fuel valve, put engine switch on.

3. Put SAFETY SWITCH in ON position; set 

throttle to idle position.

4. Choke engine. A warm engine may not need to 

be choked.

5. Starting engine: Place one hand on trowel 

handle and other hand on engine starter rope. 
NEVER place foot on guard ring. Pull starter 
rope.

6. Open choke, allow engine to warm up at idle.

7. Position throttle for various operating 

conditions.

8. TO STOP: Return throttle to idle position,  put 

safety switch to off position. Close fuel valve.

19970

19961

MBW POWER TROWEL

ROTATING PARTS

 can crush and cut. Keep 

hands away!

19971

WARNING


!"
#!$

19791

WARNING

OPERATION OF THIS EQUIPMENT MAY 
CREATE SPARKS THAT CAN START FIRES 
AROUND DRY VEGETATION. A SPARK 
ARRESTER MAY BE REQUIRED. THE 
OPERATOR SHOULD CONTACT LOCAL FIRE 
AGENCIES FOR LAWS OR REGULATIONS 
RELATING TO FIRE PREVENTION 

19791

19962

F36/4

19962 - 36”
19963 - 46”

Summary of Contents for F36/4

Page 1: ...chrane Street Bolton BL3 6BN England Phone 01204 387784 Fax 01204 387797 MBW France S A R L Z A d Outreville 11 rue Jean Baptiste N ron 60540 BORNEL France Phone 33 0 3 44 07 15 96 Fax 33 0 3 44 07 41...

Page 2: ...Fluid Levels 7 Engine Maintenance 7 Engine Oil 7 Engine Speed 7 Cleaning 7 Lubrication 7 Lifting 8 Storage 8 Changing Trowel Blades 8 Setting Tilt Arm Carriage Bolt Height 8 Service 9 Torque Chart 9 S...

Page 3: ...CALIFORNIA PROPOSITION 65 WARNING Engine exhaust and some of its constituents are known in the state of California to cause cancer birth defects and other reproductive harm WARNING...

Page 4: ...evere electrical shocks Avoid contacting these units or their wiring SAFE DRESS Do not wear loose clothing rings wristwatches etc near machinery NOISE PROTECTION Wear OSHA specified hearing protection...

Page 5: ...t F46 Models 300 lbs 136 kg F36 Models 200 lbs 91 kg 01449 OPERATING INSTRUCTIONS 1 Check engine oil and trowel gearbox oil 2 Open fuel valve put engine switch on 3 Put SAFETY SWITCH in ON position se...

Page 6: ...Y BE REQUIRED THE OPERATOR SHOULD CONTACT LOCAL FIRE AGENCIES FOR LAWS OR REGULATIONS RELATING TO FIRE PREVENTION Safety Decals Constant Force Pitch Handle 16168 CONSTANT FORCE PITCH 16167 WARNING Spr...

Page 7: ...3 169cc EX21 Robin 12 9 in3 211cc GX270 Honda 16 5 in3 270cc GX390 Honda 23 7 in3 389cc EX21 Robin 12 9 in3 211cc EX27 Robin 16 2 in3 265cc GX390 Honda 23 7 in3 389cc Engine Speed 3400 rpm 3400 rpm 34...

Page 8: ...eck the oil level in the trowel gearbox Refer to the Maintenance section of this manual AIR CLEANER Check to make sure the element is in good condition and properly installed Clean or replace filter e...

Page 9: ...o idle position 2 Turn trowel safety switch to OFF 3 Close the fuel valve WARNING Always stop the engine before Adding fuel Leaving the equipment unattended for any amount of time Before making any re...

Page 10: ...ed draining reinstall the plug and clean any spilled oil from the trowel Engine Speed The engine speed is factory preset according to the Specifications section Do not tamper with the governor setting...

Page 11: ...ment refer to the Setting Tilt Arm Carriage Bolt Height section Setting Tilt Arm Carriage Bolt Height 1 Remove ALL the tilt arms from the spider 2 Remove the blades from all the arms Wear protective g...

Page 12: ...haft 14 9 Remove key 15 and retaining ring 2 from shaft 10 Press remaining bearing 3 off of shaft 11 Remove the four flange bolts 23 and the bearing cap 20 Discard the shim gasket 10 and the o ring 17...

Page 13: ...d apply pressure towards gearbox 7 Rotate the worm shaft and check for end play and gear backlash 18 Remove the bearing cap and install the proper shims 10 for no back lash no end play 19 Remove cover...

Page 14: ...26 Install handle on trowel Standard Handle Pitch Cable Replacement Refer to Handle Assembly page 22 1 Remove handle assembly from trowel 2 Remove switch assembly 11 It is not necessary to disconnect...

Page 15: ...ousing or shaft Blades Replace when the edges become sharp or uneven Finish blades can be reversed Bushings Trowel Arm Replace if the trowel arm can be moved up and down more than 3 4 inch 19 mm at th...

Page 16: ...untry Their sales engineers are available for professional consultation If you cannot locate an M B W distributor in your area contact MBW Inc or one of our Sales Branches listed below When ordering r...

Page 17: ...14 Gearbox Assembly...

Page 18: ...10 12 05396 ROD PIVOT 1 13 05521 GEAR WORM 1 14 05523 SHAFT OUTPUT 1 15 05524 KEY 5 16 SQUARE x 1 11 16 LONG 1 16 06037 VALVE RELIEF 1 17 06392 O RING 2 18 11075 SEAL INPUT SHAFT 1 19 19637 WORM SHAFT...

Page 19: ...16 Spider Assembly...

Page 20: ...05968 CAPLUG set of 12 4 4 14 06459 BUSHING SPLIT 8 8 15 06755 TILT ARM 36 includes 17 21 4 07850 TILT ARM 46 includes 17 21 4 16 07870 STABILIZER 4 ARM 1 17 17190 CARRIAGE BOLT SPECIAL 3 8 16 x 1 1...

Page 21: ...18 127 86 21 21 25 52 1 Drive Assembly...

Page 22: ...OK TROWEL Foe engines 5 7 hp 1 1 1 19372 LIFTHOOK TROWEL Foe engines 9 13 hp 1 1 13 19666 BELT GUARD BACK PLATE ASSEMBLY Inclues item 15 1 1 1 1 1 14 19668 BELT GUARD FRONT COVER 1 1 1 1 1 15 19804 CL...

Page 23: ...20 7 58 7 58 Guard Assembly...

Page 24: ...4 19659 EDGER 36 1 19938 EDGER 46 1 5 F0203HTB HEX TAP BOLT 8 x 3 8 LG HONDA GX160 ONLY 2 6 F051812HCS HEX HEAD CAP SCREW 5 16 18 x 1 1 2 F46 4HD only 4 7 F05LW LOCK WASHER 5 16 4 8 F05SW FLAT WASHER...

Page 25: ...22 Handle Assembly...

Page 26: ...19 07877 CASING 1 20 11742 HANDLE BAR 1 21 16047 SELF TAP SCREW 1 4 20 x 1 2 2 22 F042003FWS FWLS 1 4 20 x 3 8 ZP 1 23 F042006HCS HHCS 1 4 20 x 3 4 ZP 2 24 F0420ELN ELASTIC LOCKNUT 1 4 20 2 25 F04LW L...

Page 27: ...24 Constant Force Handle Assembly...

Page 28: ...2 COVER 2 27 16373 CABLE CLEVIS 1 28 16374 CONSTANT FORCE SPRING 1 29 16375 BEARING SPOOL 1 30 F0312SP SPIROL PIN 3 6 x 1 1 2 3 31 F042003PMS PHMS 1 4 20 x 3 8 ZP 2 32 F042004FWS FWLS 1 4 20 x 1 2 4 3...

Page 29: ...LTS 5 This warranty does not cover the cost of transportation and other expenses which may be connected with warranty service but not specifically mentioned herein 6 This warranty does not cover any u...

Reviews:

Related manuals for F36/4