MBW 473 Manual English V5.0
45
6.3 Application Integration
The 473 is suitable for many applications over the humidity and temperature ranges detailed in Sec-
tion 9
‘Specifications’. When installing the measuring head into a system, the operating temperature of
the measuring head and the mirror cooling capacity must be carefully considered. A high measuring
head temperature will limit the lowest frost/dew point that can be reached; from a head temperature of
20 °C, the mirror cooling capacity is approximately 50 °C. This means that the lowest frost point with a
head temperature of 20 °C will be approximately -30 °C. If the mirror cooling is at its maximum capaci-
ty but cannot cool the mirror to at least a few degrees below the dew/frost point, the dew point or head
temperature will display a constant value above the actual dew/frost point and the Dew Density on the
status line will remain at 0 (zero).
Since the principle of dew point measurement requires the mirror to be cooled to a temperature where
condensation forms, the transfer of heat is important in order to attain the best measurement capabil-
ity. If the body of the measuring head is in contact with other surfaces, these may cause additional
heating or cooling which are either useful or detrimental to measurement performance, so always take
time to consider the thermal properties of the measuring head and any items in its environment and
their possible effects.
The following application examples are included to show some of the most common applications of
the 473. In all cases, temperature effects are discussed and there may be similar implications in your
system.
Climatic Chamber Validation
A widely used method for validating or calibrating the working volume of a climatic chamber is to use a
chilled mirror to measure dew point temperature of the chamber environment. In combination with
single or multiple point temperature measurement, %RH values can be derived. Multiple temperature
measurement in a chamber is of
ten referred to as ‘mapping’, and this method is described in
IEC 60068.
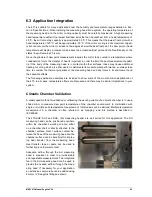
The 473-SH2, SH3 and SHX, (SH measuring heads) are well suited for this application. The SH
measuring head can be positioned anywhere
within the chamber
’s working volume, either
on a chamber shelf or directly attached to the
chamber surface. Direct surface contact be-
tween the base of the measuring head and the
chamber surface can be beneficial for improv-
ing heat transfer from the measuring head.
Heat transfer tape or paste can be used to
further improve thermal contact.
Adequate airflow through the SH measuring
head is important in order to provide stable
and repeatable measurements. The integrated
fan in the SH measuring head can be used to
provide the needed airflow through the meas-
uring head. If necessary for your application,
an extension sample tube can be added using
6mm or ¼” Swagelok fittings as shown.
Summary of Contents for 473-RP2
Page 1: ...Operation and Maintenance Manual V5 0 Dew Point Mirror 473...
Page 2: ......
Page 4: ...ii MBW 473 Manual English V5 0...
Page 8: ...2 MBW 473 Manual English V5 0...
Page 10: ...4 MBW 473 Manual English V5 0...
Page 14: ...8 MBW 473 Manual English V5 0 SH2 SHX Fan Fan...
Page 30: ...24 MBW 473 Manual English V5 0...
Page 68: ...62 MBW 473 Manual English V5 0...
Page 69: ...MBW 473 Manual English V5 0 63 11 Drawings 11 1 Display Unit Side View...
Page 70: ...64 MBW 473 Manual English V5 0 Front View Back View...
Page 71: ...MBW 473 Manual English V5 0 65 11 2 Measuring Heads RP2 SH2...
Page 72: ...66 MBW 473 Manual English V5 0 SHX SH3...
Page 73: ...MBW 473 Manual English V5 0 67...
Page 74: ...68 MBW 473 Manual English V5 0...


