Operator’s Guide and
Installation Instructions
GMR-LED
AM/FM/USB/Bluetooth
®
Multimedia Controller
for Off-Road and Marine
1/
2/INT
3/RPT
4/RDM
Source
Page 1: ...Operator s Guide and Installation Instructions GMR LED AM FM USB Bluetooth Multimedia Controller for Off Road and Marine 1 2 INT 3 RPT 4 RDM Source ...
Page 2: ...iary RCA Stereo Preamp Input Weather Band Radio Composite Video Camera Input Composite Video Output AM FM Weather band Section USA Frequency FM87 9 107 9MHz AM530 1710kHz Europe Frequency FM87 5 108MHz AM522 1620kHz NOAA NWR Weather Band Frequency 162 400 162 550MHz Intermediate AM FM Frequency 10 7MHz Intermediate Frequency Rejection 50dB Noise Limit Sensitivity 5uV USB AUX Bluetooth Audio Sectio...
Page 3: ...Connector Orange Illumination Purple White Reverse AM FM Antenna AUX Input SUB Outputs FRONT Preamp Outputs REAR Preamp Outputs Camera Input CVBS Video Output Mirrors Unit s Screen Black Chassis Ground Blue Amp Turn On Works with ZONE Control Note See wiring chart on next page for connection tips wire colors and functions Also note preamp level output connections if using external amplifiers and Z...
Page 4: ... Their frequency range is controlled by the low pass crossover and the subwoofer level control Both are found in SETTINGS See Page 18 We recommend starting with 100Hz for the low pass crossover point The unit offers a zone control feature to balance sound levels between different zones The front and or rear RCA outputs using external amplifiers are one zone The source unit s built in power is the ...
Page 5: ... a 9 32 nut driver or deep socket The threaded holes are located just above the wiring harness in the heatsink Thread two of the supplied 9 32 mounting nuts upside down on the bolts The flat surface of the nut will sit flush with the inside of the mounting bracket to allow spacing if needed Insert the source unit through the mounting hole opening Be sure to allow enough depth for wiring to be secu...
Page 6: ... tied up once the installation is complete Ensure the source unit is level Mark four 4 holes using an awl straight pick tool or 1 16 1 5mm drill bit to make the markings DO NOT DRILL THROUGH WITH THE SOURCE UNIT IN PLACE Remove the source unit and gently drill the four 4 marked locations for mounting holes using a drill with a 1 16 1 5mm drill bit Re insert the source unit in the opening Gently in...
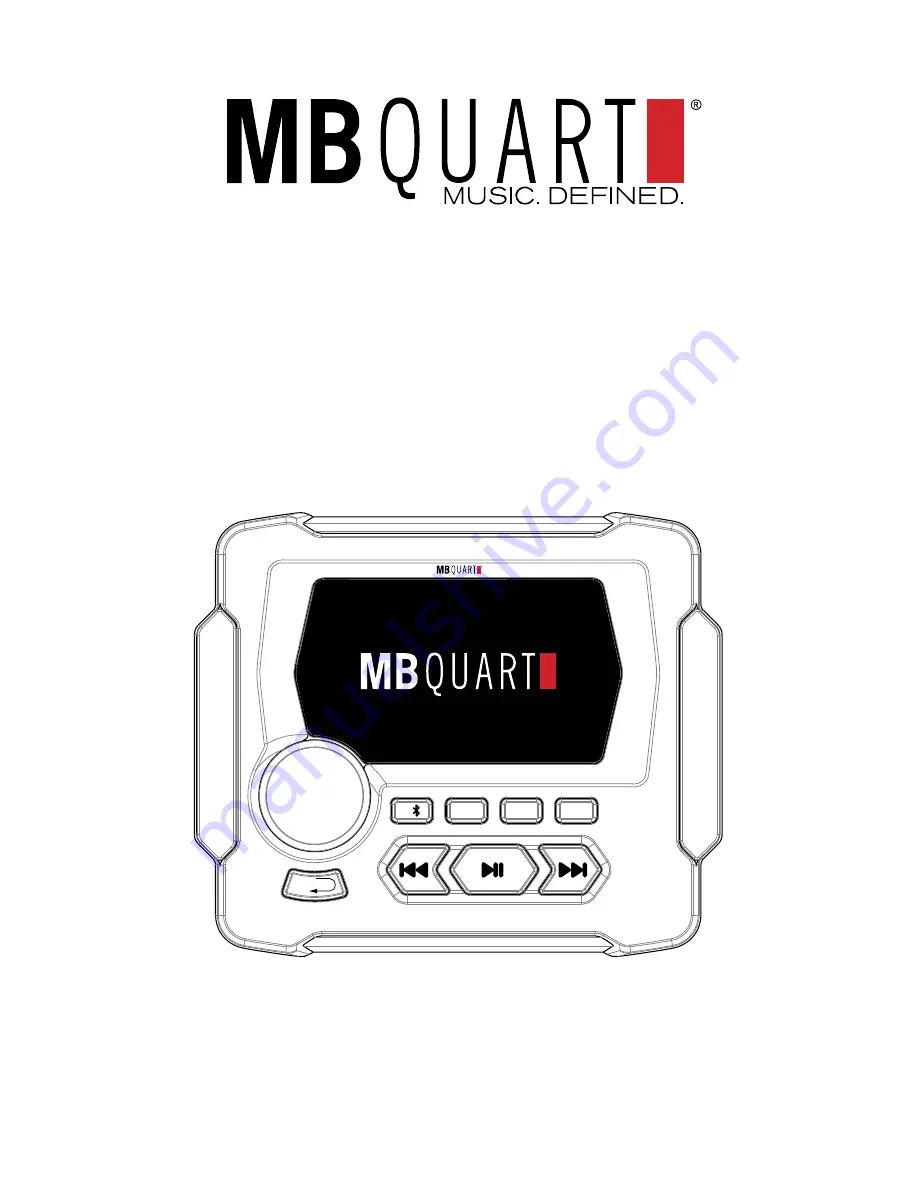
Page 7: ...the SOURCE button to display the source selection menu wheel See next page for details Also functions as the back button in a SETTINGS menu such as EQ Audio Zone Volume Clock Adjust Backlight etc 1 Button Preset 1 for AM FM pairing on Bluetooth source 2 INT Button Preset 2 for AM FM No other function 3 RPT Button Preset 3 for AM FM Repeat play 1 or all on USB source 4 RDM Button Preset 4 for AM FM...
Page 8: ...selection menu Step 1 Rotate Selector Knob to choose a source or settings Press Selector Knob once to complete source selection menu Step 3 Step 2 1 2 INT 3 RPT 4 RDM Source Source Note On USB source the unit auto selects USB input whenever a device is plugged in All other sources must be selected by the user When select ing Bluetooth a device must be first paired to playback audio ...
Page 9: ...s the center of the knob to either adjust the parameter directly or enter the sub menu and adjust by scrolling and pressing the center of the knob again A complete list of each paramater and its variables is listed on the following page Use the SOURCE button to go back to the previous screen Continue using the SOURCE button to exit AM or FM setup 1 2 INT 3 RPT 4 RDM Source After selecting AM or FM...
Page 10: ...tores presets in memory STEREO Choose STEREO or MONO Recommended to set to MONO for AM as AM radio signal is broadcast in mono Settings Choices for FM PRESETS This function shows stored FM presets 1 6 on FM1 FM2 or FM3 Only presets 1 4 have front panel quick access buttons without using this menu SAVE PRESETS This function stores FM presets in spaces 1 6 Only presets 1 4 have front panel quick acc...
Page 11: ...e AM and FM setup menus but note that 5 and 6 are only accessible through the menu not the front panel buttons Press the center button to mute the AM or FM source Press again to unmute or simply rotate the volume control knob Weather Band Operation Select the Weather icon on the Source Menu wheel Press the or buttons less than 1 second to manually seek weather band stations one frequency step at a...
Page 12: ...rce The screen will show BT Disconnected Ensure the Bluetooth functionality on the mobile device is enabled and supports A2DP audio streaming Scan for MB QUART in the Bluetooth list on the mobile device Select MB QUART and the connection will then be made automatically A BLUETOOTH Loading screen will appear briefly as the mobile device s song info and album art are transfered to the multimedia sou...
Page 13: ... controller has the Bluetooth source selected The multimedia controller should automatically begin playing where the mobile device last left off of the music player s song or playlist If the unit does not automatically begin playing press the center button to play the Bluetooth source The play symbol will display when music is playing The time elapsed in the song play is also displayed on the scre...
Page 14: ... automatically begin playing press the center button to play the USB source Press again to mute and pause the song Press again to resume playback or simply rotate the volume control knob Press the or buttons more than 1 second to manually fast forward or rewind within a song Press the same button again to stop the fast forward or rewind function Press the or buttons less than 1 second to automatic...
Page 15: ...s until it is engaged The RPT sequence of button presses is as follows The RDM Shuffle sequence of button presses is as follows USB Smartphone RPT and RDM With a smartphone connected to the USB input users see no icons When a function is active the screen displays a text message of the mode above 3 RPT button The default status of RPT and RDM Shuffle are both off The RPT sequence of button presses...
Page 16: ...osite video output Connect the camera per the camera manufacturers recommendations Connect a 12 volt trigger typically a reverse gear signal to the unit s purple white wire This automatically triggers the camera screen when active It should supply 12 volts to trigger User can also manually select the Camera source from the menu 1 2 INT 3 RPT 4 RDM Source After selecting AUX in the source menu begi...
Page 17: ...he Selector Volume knob to select the 8 band graphic EQ Navigate each EQ band by turning the knob and select the band by pushing the knob Adjust each band as desired then push the knob again to move to another band Use the SOURCE button to close the EQ screen when complete and return to the main menu Clock Mode Access the clock mode menu to adjust 12 hour USA and 24 hour Europe World clock Verify ...
Page 18: ...t screen when complete and return to the main menu Version This menu reports the software version in the unit No settings or changes are available to the user AUDIO Settings Sub Menu Access the Audio menu and the following adjustments are available SUB Frequency Adjust the low pass crossover for the SUB preamp green RCA outputs The choices are 80Hz 100Hz and 120Hz SUB Level Adjust the relative vol...
Page 19: ...creen when complete and return to the main menu Factory Reset This setting resets the unit to its factory defaults Be cautious when entering this menu if you don t want to manually reset all your preferences such as radio presets EQ sub level crossover backlighting etc Video Output Feature The multimedia controller features a composite video output that mirrors the same information on the unit s s...
Page 20: ... Power Front Speakers 4 Speaker System using Built in Power Multimedia Controller Rear Speakers 4 Channel Amp Front and Rear RCAs Front Speakers Amplified System with Subwoofers Multimedia Controller Rear Speakers Subwoofer Amp SUB Green RCAs Subwoofers ...
Page 21: ...peakers Interior Cabin Speakers Dual Zone Ski Boat System Multimedia Controller 4 Channel Amp Front and Rear RCAs using ZONE Control Front and Rear Built in Power Wakeboard Tower Speakers Interior Cabin Speakers Dual Zone Ski Boat System with Subwoofers Multimedia Controller Subwoofer Amp SUB Green RCAs ...
Page 22: ...or RCA output distortion 1 Volume may be up too much on external device 1 Lower volume on external device until distortion goes away External amplifiers have low signal input Gain too high hiss 1 Zone control is turned down too far 1 Increase zone control level to provide more signal level to amplifiers Bluetooth can t won t connect 1 Mobile device has BT switched off 2 Mobile device is not discov...
Page 23: ...Notes ...
Page 24: ...arrants this product to the original consumer purchaser to be free from defects in material and workmanship for a period of one 1 year from the date of purchase Maxxsonics USA Inc will at it s discretion repair or replace defective products during the warranty period Componentsthatprovetobedefectiveinmaterialsandworkmanshipunderproperinstallation and use must be returned to the original authorized...