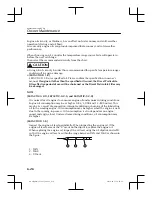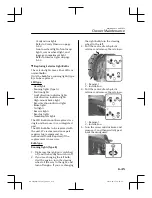
3. Insert a tape-wrapped flathead
screwdriver into the gap and slide it
in the direction of the arrow.
4. Twist the flathead screwdriver in the
direction of the arrow and remove
the upper cover.
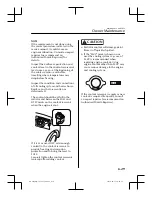
5. Remove the cap using the
tape-wrapped flathead screwdriver.
6. Remove the battery using
tape-wrapped flathead screwdriver.
7. Insert a new battery into the
transmitter so that the positive pole
is facing up.
8. Install the cap.
9. Install the upper cover.
10.Insert the tabs of the lower cover
into the slots of the transmitter and
install the lower cover.
Maintenance and Care
Owner Maintenance
6-40
CX-30_8HQ1-EE-19I_Edition2_new
2019-10-17 16:47:52
Summary of Contents for CX-30 2020
Page 4: ...CX 30_8HQ1 EE 19I_Edition2_new 2019 10 17 16 47 52 ...
Page 80: ...MEMO 2 62 CX 30_8HQ1 EE 19I_Edition2_new 2019 10 17 16 47 52 ...
Page 148: ...MEMO 3 68 CX 30_8HQ1 EE 19I_Edition2_new 2019 10 17 16 47 52 ...
Page 408: ...MEMO 4 260 CX 30_8HQ1 EE 19I_Edition2_new 2019 10 17 16 47 52 ...
Page 588: ...MEMO 7 76 CX 30_8HQ1 EE 19I_Edition2_new 2019 10 17 16 47 52 ...
Page 669: ...10 Index 10 1 CX 30_8HQ1 EE 19I_Edition2_new 2019 10 17 16 47 52 ...
Page 680: ...10 12 CX 30_8HQ1 EE 19I_Edition2_new 2019 10 17 16 47 52 ...

