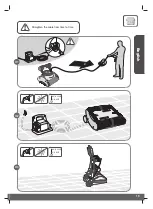
6
EXIT
BACK
ENTER
SEND
EXIT
BACK
ENTER
SEND
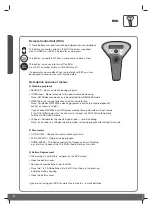
Remote Control Unit (RCU)
1) These buttons are used for switching between menus and options.
This button is used to switch on the RCU, to select a required
menu, to SEND or to SET a parameter or a program.
This button is used to EXIT from a menu or move back a step.
This button is also used to turn off the RCU.
Press EXIT a number of times until RCU turns off.
If a parameter was modified, then just before final EXIT you may
be required to send your new set of parameters.
Description and use of menus
2) Cleaning programs
• REGULAR – Floor and walls cleaning program.
• ULTRAclean – Slower movement for special thorough cleaning.
Note: ULTRAclean mode can only be selected from REGULAR mode.
• WATERline – For special attention to walls and water line.
Note: For efficient WATERline cleaning program, position the handle diagonally
exactly as shown in [Fig B].
If you choose WATERline or ULTRAclean modes, these parameters will not remain
in the DOLPHIN memory for the next cycle. Instead, the DOLPHIN automatically
switches to REGULAR mode.
• LAPpool – Suitable for this specific type of pool – narrow and long.
Note: If you choose a LAPpool cleaning mode, set the pool length after setting this mode.
3) Parameters
• CYCLE-TIME – Choose the most suitable cycle time.
• POOL-LENGTH – Program the pool length.
• CLIMB-EVERY – This option controls the frequency of wall climbing
e.g.: at which frequency the DOLPHIN should climb on the walls.
4) Battery Replacement
If the massage “Low Battery” appears on the RCU screen:
• Open the battery cover.
• Remove all used batteries from the RCU.
• Place two 1.5 V AAA batteries into the RCU as shown in the drawing
inside the battery housing.
• Close the battery cover.
If you are not using your RCU for more than 6 months - remove batteries.
RCU
Summary of Contents for MTC6 DELUXE 5
Page 2: ...Operating Instructions 1 14...
Page 4: ...2 3 Ph A B C Click 4 Caddy Assembly...
Page 5: ...3 English 5 A B C 7 6 C B A 12mm 0 47inch Click...
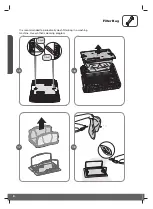
Page 11: ...9 English Click Click 19 20 21 Filter Bag...
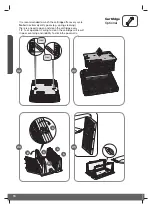
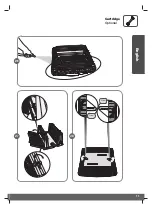
Page 13: ...11 English Click Click 26 27 28 English Cartridge Optional...
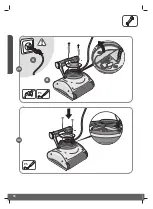
Page 14: ...12 Ph Ph B A 29 30...
Page 16: ...14 Optional EXIT BACK ENTER SEND Optional...
Page 17: ...15 Instructions d op ration 14 29...
Page 19: ...17 Fran ais Montage du Caddy 3 Ph A B C Click 4...
Page 20: ...18 5 A B C 7 6 C B A 12mm 0 47inch Click...
Page 26: ...24 Click Click 19 20 21 Filter Bag...
Page 28: ...26 26 28 27 Click Click Cartridge Optional...
Page 29: ...27 Fran ais Ph 30 Ph B A 29...
Page 31: ...29 Fran ais Optional EXIT BACK ENTER SEND Optional...
Page 32: ...30 Instrucciones operativas 31 44...
Page 34: ...32 Montaje del Caddy 3 Ph A B C Click 4...
Page 35: ...33 Espa ol 5 A B C 7 6 C B A 12mm 0 47inch Click...
Page 41: ...39 Espa ol 19 20 Click Click Filter Bag 21...
Page 43: ...41 Espa ol Click Click 26 27 28 Cartridge Optional...
Page 44: ...42 Ph 30 Ph B A 29...
Page 46: ...44 Optional EXIT BACK ENTER SEND Optional...
Page 47: ......
Page 48: ......


