background image

13

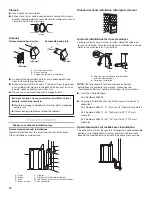
level Dryer

Check the levelness of the dryer. Check levelness first side to 

side, then front to back.

If the dryer is not level, prop up the dryer using a wood block. 

Use a wrench to adjust the legs up or down and check again  

for levelness.

noTE:

 It might be necessary to level the dryer again after it is 

moved into its final position.

Connect Vent

1.

  Using a 4" (102 mm) clamp, connect vent to exhaust outlet 

in dryer. If connecting to existing vent, make sure the vent is 

clean. The dryer vent must fit over the dryer exhaust outlet 

and inside the exhaust hood. Check that the vent is secured 

to exhaust hood with a 4" (102 mm) clamp.

2.

  Move dryer into its final location. Do not crush or kink vent. 

3.

  Once the exhaust vent connection is made, remove the 

corner posts and cardboard.

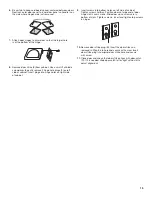
Complete Installation

1.

  Check that all parts are now installed. If there is an extra part, 

go back through the steps to see which step was skipped.

2.

  Check that you have all of your tools.

3.

  Dispose of/recycle all packaging materials.

4.

  Check the dryer’s final location. Be sure the vent is not 

crushed or kinked.

5.

  Check that the dryer is level. See “Level Dryer.”

6. 

For power supply cord installation, plug into an outlet.  

For direct wire installation, turn on power.

7.

  Remove the protective film on the console and any tape 

remaining on the dryer.

8.

  Wipe the dryer drum interior thoroughly with a damp cloth  

to remove any dust.

9.

  Read “Dryer Use” in the Dryer User Instructions.

10.

 Set the dryer on a full heat cycle (not an air cycle) for  

20 minutes and start the dryer.

If the dryer will not start, check the following:

Controls are set in a running or “On” position.


Start button has been pushed firmly.


Dryer is plugged into an outlet and/or electrical supply  


is on.

Household fuse is intact and tight, or circuit breaker has 


not tripped.

Dryer door is closed.


Determine vent path:

Select the route that will provide straightest and most direct  


path outdoors.
Plan the installation to use the fewest number of elbows and 


turns.
When using elbows or making turns, allow as much room  


as possible.
Bend vent gradually to avoid kinking.


Use as few 90° turns as possible.


Determine vent length and elbows needed for  
best drying performance:

Use following Vent system chart to determine the elbow and 


hood combinations acceptable to use.

noTE:

 Do not use vent runs longer than those specified  

in the Vent System Chart. Exhaust systems longer than those 

specified will:

Shorten life of dryer.


Reduce performance, resulting in longer drying times    


and increased energy usage.

The Vent system chart provides venting requirements that will 

help achieve best drying performance.

Vent System Chart

number 

90° turns or 

elbows

Type of vent

Box/louvered 

hoods

Angled hods

0

Rigid metal

64 ft. (20 m)

58 ft. (17.7 m)

1

Rigid metal

54 ft. (16.5 m)

48 ft. (14.6 m)

2

Rigid metal

44 ft. (13.4 m)

38 ft. (11.6 m)

3

Rigid metal

35 ft. (10.7 m)

29 ft. (8.8 m)

4

Rigid metal

27 ft. (8.2 m)

21 ft. (6.4 m)

Vent System Chart (long Vent models only)

number 90° turns 

or elbows

Type of vent

Box, louvered,  

or angled 

hoods

0

Rigid metal

120 ft. (36.6 m)

1

Rigid metal

110 ft. (33.5 m)

2

Rigid metal

100 ft. (30.5 m)

3

Rigid metal

90 ft. (27.4 m)

4

Rigid metal

80 ft. (24.4 m)

5

Rigid metal

70 ft. (21.3 m)

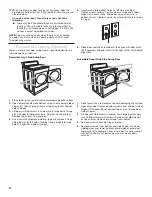
Install Vent System

1.

  Install exhaust hood. Use caulking compound to seal exterior 

wall opening around exhaust hood.

2.

  Connect vent to exhaust hood. Vent must fit inside exhaust 

hood. Secure vent to exhaust hood with 4" (102 mm) clamp.

3.

  Run vent to dryer location. Use the straightest path possible. 

See “Determine vent path” in “Plan Vent System.” Avoid 90º 

turns. Use clamps to seal all joints. Do not use duct tape, 

screws, or other fastening devices that extend into the interior 

of the vent to secure vent, because they can catch lint.

Summary of Contents for Centennial MEDC500

Page 1: ...m 13 Level Dryer 14 Connect Vent 14 Complete Installation 14 Reverse Door Swing Optional 14 Electric Dryer Installation Instructions 29 Wide Models U S A Only Para obtener acceso al manual de uso y cuidado en español o para obtener información adicional acerca de su producto visite www whirlpool com Tenga listo su número de modelo completo Puede encontrar el número de modelo y de serie dentro de l...

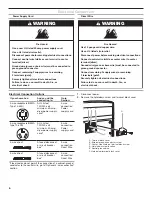
Page 2: ...instructions are not followed Your safety and the safety of others are very important We have provided many important safety messages in this manual and on your appliance Always read and obey all safety messages This is the safety alert symbol This symbol alerts you to potential hazards that can kill or hurt you and others All safety messages will follow the safety alert symbol and either the word...

Page 3: ... supply cord rated 120 240 volt minimum The cord should be type SRD or SRDT and be at least 4 ft 1 22 m long The wires that connect to the dryer must end in ring terminals or spade terminals with upturned ends A UL listed strain relief Location Requirements You will need A location allowing for proper exhaust installation See Venting Requirements A separate 30 amp circuit If you are using power su...

Page 4: ...his dryer is suitable for mobile home installations The installation must conform to the Manufactured Home Construction and Safety Standard Title 24 CFR Part 3280 formerly the Federal Standard for Mobile Home Construction and Safety Title 24 HUD Part 280 Mobile home installations require Metal exhaust system hardware which is available for purchase from your dealer Special provisions must be made ...

Page 5: ...he terminal block the dryer cabinet is isolated from the neutral conductor A 4 wire power supply connection must be used when the dryer is installed in a location where grounding through the neutral conductor is prohibited Grounding through the neutral is prohibited for 1 new branch circuit installations 2 mobile homes 3 recreational vehicles and 4 areas where local codes prohibit grounding throug...

Page 6: ...s gold Securely tighten all electrical connections Failure to do so can result in death fire or electrical shock Electrical Connection Options If your home has And you will be connecting to Go to Section 4 wire receptacle NEMA Type 14 30R A UL listed 120 240 volt minimum 30 amp dryer power supply cord 4 wire connection Power supply cord 3 wire receptacle NEMA type 10 30R A UL listed 120 240 volt m...

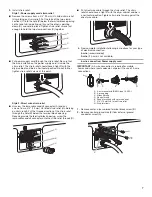
Page 7: ...strain relief Put the threaded section of the strain relief through the hole B below the terminal block opening Reaching inside the terminal block opening screw the removable conduit connector onto the strain relief threads C A B C Put direct wire cable through the strain relief The strain relief should have a tight fit with the dryer cabinet and be in a horizontal position Tighten strain relief s...

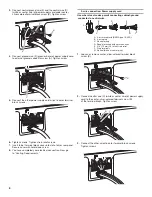
Page 8: ...own screw 8 You have completed your electrical connection Now go to Venting Requirements 3 wire connection Power supply cord Use where local codes permit connecting cabinet ground conductor to neutral wire A B D C E F G A 3 wire receptacle NEMA type 10 30R B 3 wire plug C Neutral prong D Spade terminals with upturned ends E 3 4 19 mm UL listed strain relief F Ring terminals G Neutral white or cent...

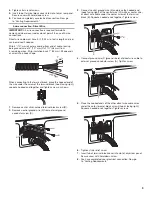
Page 9: ...rew of the terminal block hook facing right squeeze hooked end together and tighten screw as shown 1 Remove center silver colored terminal block screw B 2 Remove neutral ground wire E from external ground conductor screw A E A B 3 Connect neutral ground wire E and place the hooked end hook facing right of the neutral wire C white or center wire of direct wire cable under the center screw of the te...

Page 10: ...ew B hook facing right Squeeze hooked end together Tighten screw C B 3 Place the hooked ends of the other direct wire cable wires under the outer terminal block screws hooks facing right Squeeze hooked ends together Tighten screws 4 Tighten strain relief screw 5 Insert tab of terminal block cover into slot of dryer rear panel Secure cover with hold down screw 6 You have completed your electrical c...

Page 11: ...g the toll free number listed on the cover of the Dryer User Instructions For more information see the Assistance or Service section of the Dryer User Instructions Rigid metal vent For best drying performance rigid metal vents are recommended Rigid metal vent is recommended to avoid crushing and kinking Flexible metal vent Flexible metal vents are acceptable only if accessible for cleaning Flexibl...

Page 12: ...nstallations are possible A B B C D E F G H A Dryer E Clamps B Elbow F Rigid metal or flexible metal vent C Wall G Vent length necessary to connect elbows D Exhaust hood H Exhaust outlet Standard exhaust installation with rigid metal vent Alternate installations for close clearances Venting systems come in many varieties Select the type best for your installation Two close clearance installations ...

Page 13: ...t and tight or circuit breaker has not tripped Dryer door is closed Determine vent path Select the route that will provide straightest and most direct path outdoors Plan the installation to use the fewest number of elbows and turns When using elbows or making turns allow as much room as possible Bend vent gradually to avoid kinking Use as few 90 turns as possible Determine vent length and elbows n...

Page 14: ...rom cabinet 4 Use a small flat blade screwdriver to gently remove 4 hinge hole plugs D on left side of cabinet Insert plugs into hinge holes on right hand side of cabinet 5 Insert screws into bottom holes on left side of cabinet Tighten screws halfway Position door so large end of door hinge slot is over screws Slide door up so screws are in bottom of slots Tighten screws Insert and tighten top sc...

Page 15: ...hinge holes on right side of cabinet 9 Insert screws into bottom holes on left side of cabinet Tighten screws halfway Position door so large end of door hinge slot is over screws Slide door up so screws are in bottom of slots Tighten screws Insert and tighten top screws in hinges 10 Remove door strike plug B Insert the door strike you removed in Step 8 into hole and secure with screw Insert door s...

Page 16: ...16 W10300459A W10296137A SP 2009 12 09 All rights reserved Printed in U S A ...

Reviews: