

Indoor
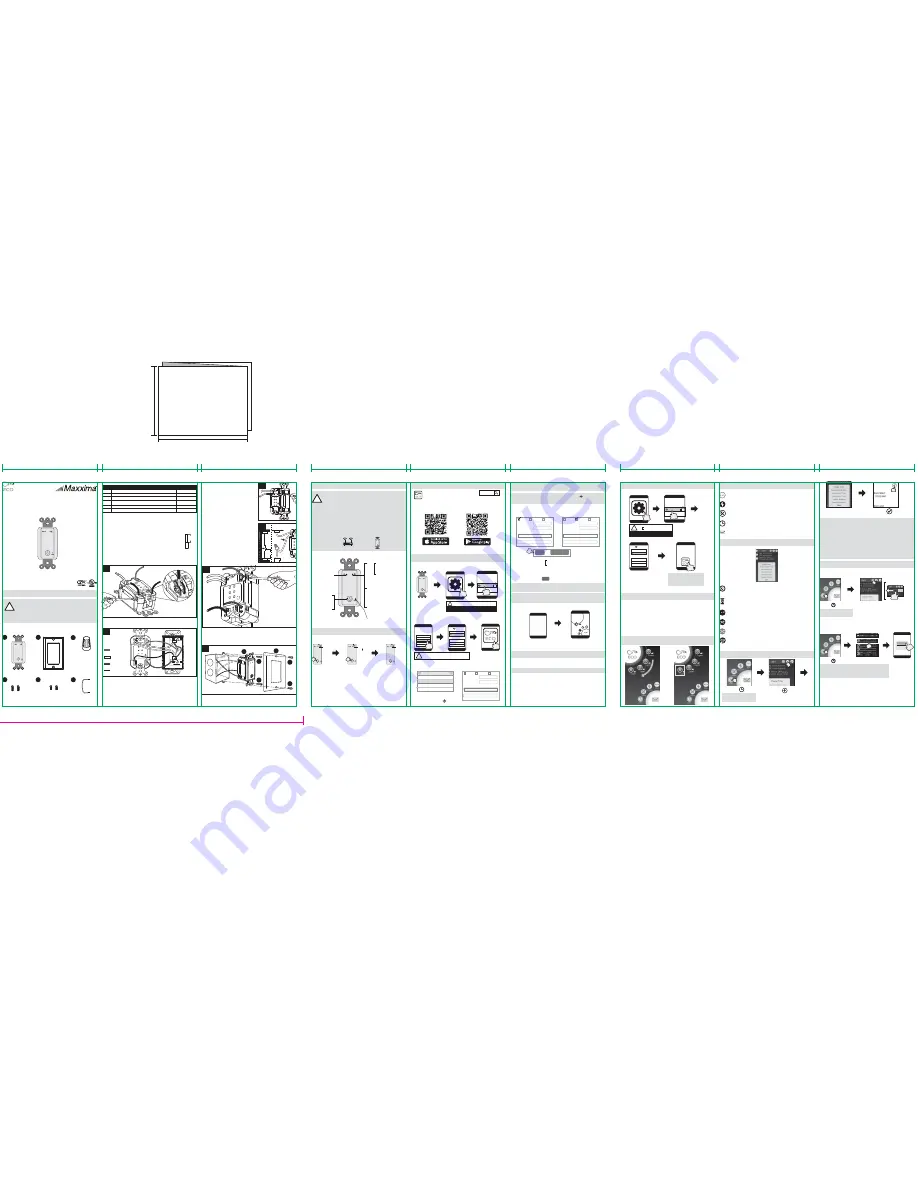
Wi-Fi In-Wall Switch
MEW-S150DW
INSTRUCTION GUIDE
125Vac, 60Hz, 15A Resistive,
15A General Use, 1000W Tungsten,
500VA Electronic Ballast,
120Vac, 60Hz, 8.3A Ballast, 1/2HP.
INSTALLING
Warning:
To avoid fire and/or shock, turn off power. Make sure
the power is off before wiring. If you are unsure or uncomfortable
with installation, contact a licensed electrician.
SETUP INSTRUCTION
RESET THE Wi-Fi IN-WALL SWITCH
SMARTPHONE SETUP
ADD MULTI Wi-Fi IN-WALL SWITCH TO THE APP
ADD MULTIPLE USERS TO ECO PLUGS
EXPLORE THE ECO PLUGS APP ICONS
EXPLORE THE TIMER FUNCTION
SWITCH BUTTON:
DEFAULT RESET
Press to turn
ON/OFF
This is how you perform a factory reset of the Wi-Fi In-Wall switch
STEP
1
Press and hold the
power button Insert
a non-conducting
stick into the RESET
hole, then release it
STEP
2
Hold the power button until
the Wi-Fi In-Wall indicator
light TURNS OFF, then
release the button.
STEP
3
Finished! You can
now start setting up
the ECO Plugs APP
with the Wi-Fi In-Wall
ECO Plugs
DOWNLOAD THE ECO PLUGS APP:
You can download the ECO Plugs App from either the Apple APP
Store (iPhone) or the Google Play Store (Android)
Scan the QR Codes below or search for ‘ECO Plugs’
STEP 1
STEP 2
Turn on
Well installed Switch
Repeat the steps below for each additional user
Your phone
Tap the
Wi-Fi/WLAN icon
Wi-Fi/WLAN
on
Your phone
Wi-Fi
Xyz95
xrgtg4
Home
Home Router
Your phone
Tap the
ECO Plugs APP
*ONLY IF YOU HAVE MORE THAN ONE Wi-Fi DEVICES PROGRAMMED
ON THE ECO PLUGS APP:
You can choose which Wi-Fi Devices (EX: Light 1,
Light 2, Light 3, etc.) you want to control by sliding the desired icon to the lower
left position.
The Wi-Fi Devices name (EX: Light 1, Light 2, etc.) will change color from
white
to
yellow
. The chosen device is now able to be programmed or edited; such as
changing timer settings, setting security settings, updating the cloud service, etc.
READ ALL INSTRUCTIONS
before using the Wi-Fi In-Wall Switch.
RECOMMENDATION:
The closer the Wi-Fi In-Wall Switch is
located to a WiFi router during set-up, the better the signal
strength will be for initial configuration and subsequent
programming.
Mac address:
If your router identifies by Mac address, please
key in the code number shown in the code label of the unit.
i.e., 3x:2x:7x:0x:Cx:Cx
!
!
...
Wi-Fi Home Router
CAUTION! INDOOR USE ONLY! RISK OF ELECTRIC SHOCK.
Use this product only in dry, indoor locations.
RESET
blinking
blinking
blinking
OFF
Package Contents:
A
B
D
F
C
QUANTITY
DESCRIPTION
PART
1
1
A
D
Switch
0.748 in. - 2
Mounting screws (Wall box)
E
0.33 in. - 2
Mounting screws (Wall plate)
B
Wall plate
1
15 cm - 1
C
F
Wire nuts
Jumper wire
E
* Tools Required for Assembly (not included): screwdriver.
Step1
This device is to be installed in a single gang box measuring at least
3” x 2” x 2.5” (standard single gang box) and wired in accordance with NEC.
Step2
Straighten each conductor and strip 1/2” of insulation from
each wire.
Step3
Begin by loosening all the screws on your ECO In-Wall switch. You’ll notice there
is now a loose plate in the hole. The wires will need to be inserted in the middle
and tightened with a screwdriver. (See figure 3).
The screw terminals accept up to 12AWG copper wire.
1/2”
(1.27cm)
Strip Length:
3
Step4
Wiring the Wi-Fi In-Wall switch.
Hot
(L-I)
(L-O)
Load
Hot wire
Load
wire
Neutral
Neutral
Ground
Wall
Ground wire (Green/Bare)
Neutral wire (White)
Hot wire (Black)
Load wire (Black/Red)
4
Step4 Cont.
1. Insert the ground wire(s) into hole(s) labeled “G” (near green screw
2. Insert 2 neutral wires into the holes labeled “N” (near silver screw)
3. Insert the hot wire into the hole labeled “L-I” (near brass screw)
4. Insert the load wire into the hole labeled “L-O” (near brass screw)
Step5
The ECO In-Wall switch requires a neutral wire
connection or the switch will not work.
Hot
(L-I)
(L-O)
Load
N
G
5-1
5-2. If the neutral wires from the wall box are
short and do not reach the N hole, cut the
wire at 1-1/4 in. (include the period) from
the bottom of case, remove jacket at 1/2 in.
(include the period) of both ends. Insert
longer cord to N hole. Connect the shorter
cord with enclosed jumper wire (F) and
wire nut, then insert to another N hole
(near silver screw) (See figure 5-2).
5-3. Tighten all screws firmly. (12lbf-in).
(See
figure 5-3).
5-3
Step6
Carefully fold wire into the wall box and mount the Wi-Fi In-Wall switch (A) into
wall box using the mounting screws (D), then attach the wall place using the
mounting screws(F). (See figure 6).
Step7
Restore power by flipping the breaker to the “on” position or re-installing the fuse
to the circuit.
6
A
D
B
D
E
E
CAUTION! INDOOR USE ONLY!
Do not use the Wi-Fi In-Wall
Switch outdoors or in damp or wet locations.
!
!
5-1. If the existing neutral (white) wires are
connected by wire nut in the wall box,
release the nut, insert both neutral wires
into the holes labeled N (near silver
screw). (See figure 5-1).
Wall
1-1/4”
Hot (L-I)
(L-O)
Load
N
G
5-2
Jumper
wire(F)
shorter cord
longer cord
CONTROL MULTIPLE DEVICES
WORKS WITH
amazon alexa
Wi-Fi
™
Status Indicator
BLINKING LIGHT
Wi-Fi In-Wall Switch is
ready for programming
FAST BLINKING LIGHT
Wi-Fi In-Wall Switch
cannot find a WiFi router.
Please reset.
LIGHT
SOLID LIGHT:
Programming is finished and the
Wi-Fi In-Wall Switch is now
ready to be used
via ECO Plugs APP
NO LIGHT:
Wi-Fi In-Wall Switch is rebooting
to default settings
Power Indicator
(iOS 7 or higher)
(Version 4 or higher)
*If you purchase more than
one ECO In-Wall Switch
, setup each device
one
by one
.
Your phone
Tap the
Wi-Fi/WLAN icon
Wi-Fi/WLAN
on
Your phone
Setting
!
Go into your phone’s Wi-Fi setting
(Normally is as gear icon symbol first.)
Your phone
Wi-Fi
Xyz95
xrgtg4
Home
ECO-XXXXXXXX
STEP 3
STEP 4
Your phone
abcde
Xyz95
xrgtg4
Home
Select the
ECO-XXXXXXXX
ECO-XXXXXXXX
Select the ECO Plugs #
(ECO-XXXXXXXX)
which labelled on the product.
!
Tap the
ECO Plugs APP
Your phone
ECO Plugs
Select Wi-Fi Network
Device [ECO-XXXXXXXX]
Home Router
Other Router A
Other Router B
USA
Enter Zip Code:
(Named This Device)
(Wi-Fi’s password, if needed)
Canada
Other
Home Router
Name Device:
Wi-Fi Router(WLAN):
Enter Wi-Fi Router
Password:
STEP 5
STEP 6
Fill in all your information.
*If this ECO-XXX network does not show in your list, perform a factory
RESET of the Wi-Fi In-Wall Switch
*If your router does not show up in the list, press the icon to
manually enter your router’s information
Select the Wi-Fi home router that
you want to connect to the WI-Fi
In-Wall Switch or tap ( )
(EX: Home Router)
EX: USA
EX: CANADA
USA
Enter Zip Code:
(Named This Device)
(Wi-Fi’s password, if needed)
Canada
Other
Home Router
Name Device:
Wi-Fi Router(WLAN):
Enter Wi-Fi Router Password:
USA
Phone Area Code:
(Named This Device)
416 (Toronto)
2142 (Cambridge)
(Wi-Fi’s password, if needed)
Canada
Other
Home Router
Name Device:
Wi-Fi Router(WLAN):
Enter Wi-Fi Router Password:
/
Save Setting
Join
STEP 7
*Your smartphone should reconnect to your home router. If it does
not, go back into your phone WiFi settings to connect back to it.
*
For Canada:
Please select Canada, entering the phone area code instead
of zip code.
Your phone
Congratulations!...
Complete setup...
Successful !
ECO
Your phone
Light 1
STEP 8
Name Device (Lamp, TV, small appliances) and Router Password, click the
SAVE SETTING
or
JOIN
button.
Fill in Country,
Zip Code (USA Only)
Phone Area Code (CANADA Only)
*
iOS:
If you can’t find the button, please click in the password section.
Join
Repeat steps 1-8 for each additional device. Remember to give each device a
different name (for example, Light 1, Light 2, etc.).
*
Note:
each controlled device requires a separate Wi-Fi In-Wall Switch.
Your phone
Setting
!
Tap iOS’s
Android’s
setting gear icon
(Not the ECO Plugs APP)
Link to the same router Wi-Fi
Netork as used by the first
smartphone (EX: Home Router)
* For
cloud function
. Refer
to EXPLORE THE TIMER
SETTING
*
Note:
YOU CAN CONNECT TO A MAXIMUM OF TWELVE (12) Wi-Fi
DEVICES VIA THE ECO PLUGS APP.
More
- Learn more about ECO Plugs app, including a Q & A section.
Electric Bill
- Function is not available on this device.
Setting
- Setting your Wi-Fi In-Wall Switch, such as transfer local Wi-Fi into
cloud mode, or rename the device.
Timer
- Setting On/ Off programs (up to a maximum of 12 Custom On/ Off
events).
Mail Box
- Welcome share any feedback on this App.
Programmable Timer
- Setting On/ Off events.
Select ON time and OFF time. (EX: ON - 06:30PM OFF - 05:00AM)
Can also select what day(s) of the week it effects.
COUNTDOWN TIMER
- You will select an ON date (EX: 03/29/17) and
time (EX: 07:30PM) and an OFF date (EX: 04/02/17) and time (EX:
05:00AM)
ASTRONOMIC TIMER
- Wi-Fi In-Wall Switch will turn ON/OFF at sunset or
sunrise. Can also select what day(s) of the week it effects.
HOLIDAY RANDOM
- The Wi-Fi In-Wall Switch will turn ON/OFF at random
times based on three simple settings (Night, Day, All Day)
SECURITY RANDOM
- The Wi-Fi In-Wall Switch will turn ON/OFF at random
times between a set of selected start and end dates and times.
PROGRAMMABLE RANDOM
- This icon increases or decreases the
time of your ON/OFF events by 30 minutes
PROGRAMMING THE TIMER
Tap
Tap
*
When the device change
color from white to yellow
EDITING THE PROGRAMMED TIMER
*When setting up a new timer function, make sure the Wi-Fi In-Wall Switch
is connected to your home/office router, and that theWi-Fi In-Wall Switch is
plugged into a 120Vac wall outlet. The Wi-Fi In-Wall Switch will also
remember programmed timers when removed from power.
NOTE:
If you preprogram it and move it to a different area with completely
different WiFi signals, the Wi-Fi In-Wall Switch will attempt to connect to
one of these unsuccessfully. This will make the preprogrammed timer NOT
function. In this case, you may have to RESET the Wi-Fi In-Wall Switch and
set it to a router in the area.
Select the timer function
from the list
Tap
iOS
Android
Tap
Your phone
Delete
Edit
Tapping and holding
Tap
*
When the device change
color from white to yellow
*
When the device change color from white to yellow
*
The Wi-Fi In-Wall Switch will remember programmed
times even if the Wi-Fi Network is down.
Delete
Enter editing mode
Delete mode
3.3833”
3.3833”
3.3833”
3.3833”
3.3833”
3.3833”
3.3833”
3.3833”
3.3833”
Item: TM-102
Page size: 11”(W)x8.5”(H)
Dieline:
______
Layout area:
______
11”
8.5”
11”
8.5”