background image

42

I


Baby Capsule 

I


Maxi-Cosi


TO LOOSEN:

Press on the adjuster button with thumb and pull on the strap between the 
adjuster and the seat.

TO TIGHTEN:

Pull on the extra length of tether strap.

CAUTION: CHILDREN CAN BE INJURED OR RESTRAINTS AND 

TOP TETHER STRAP DAMAGED BY UNSECURED CARGO IN A 

COLLISION. SECURE OR REMOVE HAZARDOUS CARGO BEFORE 

USING THIS CHILD RESTRAINT. 


Always secure the loose end of the top tether strap to prevent it 

hanging out of the car or being accessible by the child.


When not in use, fold hanging tether strap and place in storage 

pocket provided.

NOTE:

  Store the excess webbing in the pocket provided on the  


top tether assembly.

To loosen

To tighten

Adjusting the Top Tether Strap

V

EHIC

LE

 IN

ST

A

LL

AT

IO

N

Summary of Contents for Mico 12

Page 1: ...1 Baby Capsule I Maxi Cosi I Images and designs may vary Mico 12 Baby capsule Suitable for newborn up to 12months approx...

Page 2: ...hree months after purchase In the event of a car accident your Maxi Cosi child restraint may have unseen damage from crash forces The Maxi Cosi Accident Exchange Service offers new for old Maxi Cosi c...

Page 3: ...e I Maxi Cosi I Don t forget to please register your product warranty by visiting maxi cosi com au warranty registration maxi cosi com au warranty registration Always keep the original tax receipt for...

Page 4: ...solutions they can trust car seats and strollers that are safe smart and easy to use With Maxi Cosi parents know their children are in the best hands possible So they can focus on the other things th...

Page 5: ...5 Baby Capsule I Maxi Cosi I...

Page 6: ...ecause they may be able to undo the buckles DO NOT LEAVE CHILDREN UNATTENDED IN THE CAR Do not alter or modify this restraint Repairs must only be done by the manufacturers or agent Do not allow the r...

Page 7: ...child restraint fitter and their recommendations be considered before using a seatbelt extender Always check that the measurements between the rear and front seats in the car in which the child restr...

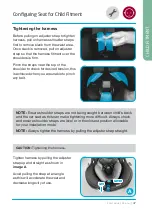
Page 8: ...21 Removing the Infant Insert 22 Adjusting for Low Birth Weight Suitability 23 Canopy Installation 24 Adjusting the Handle 25 Adjusting the Canopy 25 Connecting The Capsule to the Stroller 26 Disconn...

Page 9: ...ning the Harness 47 Buckle Height Adjustment 48 Adjusting Buckle Height and Depth Position 48 Removing the Body Insert 49 Carrier Operation and Adjustment Removing Capsule From Base 50 Handle Adjustme...

Page 10: ...10IBaby Capsule I Maxi Cosi What s in the Box...

Page 11: ...on Manual 1 Swing Tag 1 Baby Capsule I Maxi Cosi I MICO 12 BABY CAPSULE Suitable for newborn up to 12months approx Images and designs may vary Base What s in the Box Canopy Capsule Instruction Manual...

Page 12: ...Carry handle B Belt mates x 2 C Low Birth Weight button under cover D Buckle E Adjuster strap F Air Protect cell x 2 G Stroller release buttons x 2 H Harness I Body insert J Harness release button Co...

Page 13: ...tion manual and loop tether strap D Magnetic harness holders x 2 E Capsule shell F Locking indicator x 2 G Base H Stroller release buttons x 2 I Capsule release handle J Tensioning clamp K Belt path i...

Page 14: ...er B Carry handle C Canopy D Stroller release buttons x 2 E Handle adjustment buttons x 2 F Base G Loop tether strap H Loop tether metal connector I Top tether attachment hook J Top tether adjuster K...

Page 15: ...15 Baby Capsule I Maxi Cosi I Visual Guide...

Page 16: ...16IBaby Capsule I Maxi Cosi 0 12 months approx Car Installation VISUAL GUIDE...

Page 17: ...17 Baby Capsule I Maxi Cosi I Installing seatbelt to base Car Installation Lift Push Click 1 2 3 4 5 Lift Pull VISUAL GUIDE...

Page 18: ...18IBaby Capsule I Maxi Cosi Car Installation NOTE Ensure headrest is in place when restraint is not in use Installing the capsule with top tether strap 1 3 4 5 2 VISUAL GUIDE...

Page 19: ...19 Baby Capsule I Maxi Cosi I Car Installation Removing and reattaching the capsule to the base Lift Lower 1 1 2 2 Lift Pull HINT Check engagement indicators on BOTH sides of base VISUAL GUIDE...

Page 20: ...20IBaby Capsule I Maxi Cosi Adjusting the buckle height CORRECT POSITION 2 1 Thread Thread Pull 3 Car Installation VISUAL GUIDE...

Page 21: ...21 Baby Capsule I Maxi Cosi I Adjusting harness and headrest Pull Lift 1 2 HINT Loosen harness first Car Installation VISUAL GUIDE...

Page 22: ...22IBaby Capsule I Maxi Cosi Removing the infant insert Car Installation 1 2 3 4 Pull Lift HINT Loosen harness first VISUAL GUIDE...

Page 23: ...23 Baby Capsule I Maxi Cosi I Car Installation 1 2 3 4 Push Pull Pull Adjusting for low birth weight suitability VISUAL GUIDE...

Page 24: ...o the upright position on both left and right side of the capsule image2 3 Slide the canopy ends into canopy connector on both left and right side of the capsule image3 4 Connect canopy press stud ont...

Page 25: ...25 Baby Capsule I Maxi Cosi I Capsule Adjustment Adjusting the handle Adjusting the canopy 1 1 3 2 2 4 Push Push Push Pull Rotate VISUAL GUIDE...

Page 26: ...to the stroller Disconnecting the capsule from the stroller 1 2 2 Push Push Lift Compatible strollers for Mico 12 capsule Maxi Cosi Lila Comfort Stroller Maxi Cosi Lila CP2 Stroller Maxi Cosi Zelia2...

Page 27: ...27 Baby Capsule I Maxi Cosi I Detailed Section...

Page 28: ...e infant seat in your vehicle consult your vehicle s owner s handbook Vehicle Seat Location Requirements Children are safer when properly restrained in rear vehicle seating positions Whenever possible...

Page 29: ...29 Baby Capsule I Maxi Cosi I Correct Forward Facing Vehicle Position CORRECT USE CORRECT USE INCORRECT USE Vehicle Information x VEHICLE INFORMATION...

Page 30: ...shelf in sedans and on the floor area in station wagons vans and hatchbacks Make sure that you do not confuse the luggage hook in the back of a station wagon with anchor points Refer to your owner s m...

Page 31: ...de proper protection for y anchorage system on child restraints must be used in the correct way CORRECT Make sure there is no slack in the top strap and the attachment clip is up anchorage fitting INC...

Page 32: ...ook for the location of the upper anchorage point Remove the thread plug from the parcel shelf floor roof and install the attachment bolt as shown in Figure 1 Attachment bolt Anchor fitting Spacer s i...

Page 33: ...TH A CHILD RESTRAINT UPPER ANCHORAGE POINT 200mm min Centre line of seating position FOR SEDANS ONLY Drill a 9mm diameter hole in the parcel shelf on the centre line of the seating position as shown i...

Page 34: ...cle metal structure Reinforcing washer Lock washer Nut For vehicles other than sedans In Australia consult your nearest child restraint fitting station or traffic authority for vehicle inspection to f...

Page 35: ...ont seats in the car in which the child restraint is intended to be used to ensure that the space is sufficient Use of aftermarket accessories i e items not provided in the box with the child restrain...

Page 36: ...int s backrest angle should not exceed 50 measured from the horizontal plane when installed 50 NOTE These recommendations are specific only to the child restraint model s referenced in this instructio...

Page 37: ...nt is installed in the correct direction for rearward facing application refer to page 38 and 40 DO NOT wrap baby in a blanket or swaddled as infant can be ejected and killed in an accident Ensure the...

Page 38: ...ible to make entry and exit safer 3 Adjust the base angle or deploy the incline foot to help stabilise the base in ergonomic seats as needed before proceeding Refer to page 41 4 Lift the seatbelt clam...

Page 39: ...p handle down to tighten and lock the vehicle seat belt installation as shown in image E Check base is firm by applying some side pressure to the base Only a small amount of sideways movemet should be...

Page 40: ...juster strap as shown in image J 15 Tighten the Top Tether strap and remove all slack by pulling on the adjuster strap as shown in image K Careful not to overtighten the Top Tether checking that the b...

Page 41: ...the capsule release handle Turn counter clockwise to extend the incline foot and clockwise to retract 2 Once the desired angle is reached stop winding to lock the position The adjustment can be stoppe...

Page 42: ...ED BY UNSECURED CARGO IN A COLLISION SECURE OR REMOVE HAZARDOUS CARGO BEFORE USING THIS CHILD RESTRAINT Always secure the loose end of the top tether strap to prevent it hanging out of the car or bein...

Page 43: ...nfasten the buckle 2 To fasten insert one buckle tongue as shown in image 3 Insert the second buckle tongue as shown Now listen for a click 4 Remember to always pull up on the harness straps to make s...

Page 44: ...facing Newborn to approximately 12 months Check harness height The shoulder straps must be in the slots which are nearest to the child s shoulders but not lower than the child s shoulders CHILD FITMEN...

Page 45: ...ING WHEN SHOULDERS ABOVE THIS LINE 3 4 5 6 7 To be used only in a rearward facing position until the infant s shoulders reach the shoulder height marker approximately 12 months of age Continue to use...

Page 46: ...fitment 4 Estimate harness height based on recommendations on page 44 5 Squeeze the adjuster at the back of the headrest as shown to release the locking mechanism Pull or push simultaneously to adjust...

Page 47: ...any belt NOTE Ensure shoulder straps are not being caught between child s back and the car seat as this can make tightening more difficult Always check and ensure shoulder straps are level or in the...

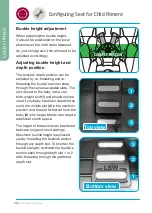
Page 48: ...to the baby is the low birth weight slot 1 and should only be used if you baby has been classified as such the middle slot 2 is the newborn position and the slot furtherest from the baby 3 is for larg...

Page 49: ...pressing the red button and pull the buckle tongues over the side of the seat looping them through the elastic holders image A 3 Pull each side wing of the insert through the harness straps as shown i...

Page 50: ...e handle on the base by simultaneously pushing up on the under handle lever with your fingers and pulling the handle out with the same hand 3 Whilst activating the release handle the base will disconn...

Page 51: ...apsule carry handle first position both hands around the connected pivot points marked by the Maxi Cosi logo and position your thumbs on top of the grey activation buttons 2 Simultaneously push down o...

Page 52: ...sh the visor to the desired position The canopy features a black out mode a canopy position that completely covers the baby when in the capsule Simply pull the canopy forward from the start position a...

Page 53: ...ments and capsule To remove push down both Stroller release buttons at the same time and pull capsule up and out of stroller attachments image B C NOTE Stroller adaptors may be sold separately For mor...

Page 54: ...ver and simultaneously push on the low birth weight harness button The button is located as per image A Once both are activated push the headrest into the lower position automatically adjusting the ha...

Page 55: ...anchor out from the capsule s buckle slots as shown in image E 7 Once released thread the buckle anchor firstly through the low birth weight slot shown in image F which is easily identified by the mo...

Page 56: ...by threading the anchor back through the product buckle slots releasing the buckle from the product Refer to page 48 for more details 3 Place the buckle under running water 40 degrees Celsius approxim...

Page 57: ...d water Tumble dry 10 15 minutes on low heat Do not tumble dry Do not dry clean Do not dry clean Never clean with bleach or spirit type cleaners Never clean with bleach or spirit type cleaners WASHING...

Page 58: ...se them to unwrap each pad from the harness straps Removing the canopy 1 Disconnect the canopy press studs on both sides and rear of the shell image A 2 Disconnect canopy plastic hoop from shell image...

Page 59: ...top image C Removing capsule cover 1 Disconnect the press studs and the ball studs located in the located in the central body and around the shell working from front to back image D 2 Un loop cover ov...

Page 60: ...ge E 5 Pull the crotch buckle out from the appropriate slot on the cover image F 6 Connect all press studs and ball studs around the cover onto the outside of the shell image G 7 Connect press studs o...

Page 61: ...studs image O 4 Pull the crotch buckle through the crotch pad Push the bottom of the crotch pad into the appropriate hole on the infant insert and the cover image P Q Put on the Canopy 1 Push the can...

Page 62: ...st you have from these images please follow the below steps 1 Adjust the headrest into the highest position see detailed section on page 46 2 Remove the inserts and backrest fabrics to expose the plas...

Page 63: ...nia bleach based or spirit type cleaners Check the webbing for fraying Ensure there are no cracks in moulding or the plastic moulding Check the Harness Adjuster is operating and is clamping the webbin...

Page 64: ...houlders either reach the lower shoulder height marker approximately 12 months of age or reach the middle height marker approximately 2 3 years of age Then to be used in a forward facing position unti...

Page 65: ...if the goods fail to be of acceptable quality and the failure does not amount to a major failure Dorel Australia Pty Ltd warrants your new product to be free from defects in materials and workmanship...

Page 66: ..._____________________________________________________ ________________________________________________________ ________________________________________________________ ________________________________...

Page 67: ...______________________________________________________ ________________________________________________________ ________________________________________________________ _______________________________...

Page 68: ...rved 02 2022 Dear Customer Don t forget to register your product within 3 months of purchase for the Lifetime Warranty offer Please visit to register now www maxi cosi com au Terms and conditions appl...

Reviews: