30MM-DH400
INSTRUCTION MANUAL
Congratulations on your purchase of the Matchmaster DigiHUB
Enclosure for your digital home wiring network system. This
system provides an easy-to-use central solution for your High
Definition Digital Solutions e.g. video, telephone, audio, security,
and data needs in your home or small office environment.
This manual describes how to install your Matchmaster DigiHUB
Enclosure.
1x Enclosure with Quick Mount Door
4x 30BA Screws
4x Plastic Pillars
10x 2.5x60mm Nylon Fasteners
1x 90cm Door Sealing Stripe
10x 3.5x130mm Nylon Fasteners
2x Door Lock Keys
A selection of tools will help make installation faster
and easier for you
1.
Electric Drill
2.
Phillips Screwdriver
3.
Level
Dimensions: 372x480x111mm (WxHxD)
For a Surface Mount Installation:
1.
Remove door using the quick release latch
2.
Remove the required knock outs from the enclosure
3.
Locate wall studs using a stud finder to fasten the chassis to
4. Position the enclosure over the mounting studs and align
the rear of the chassis, ensure it is straight, use a level to
determine.
5.
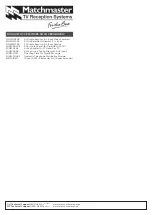
Mark positions ready for hole drilling through the screw holes
on the rear of the enclosure see (Figure 1)
6. Remove the enclosure and drill pilot holes for the
mounting screws
7.
Ensure that the enclosure is the right side up and secure
with the screws. Should not be over tightened.
1.
After mounting the enclosure, attach the cover by fitting it
along the left edge of the enclosure.
2.
Secure door using the quick latch design
3.
Place noise reduction 90cm door sealing stripe around top,
right and bottom of enclosure for door to rest against when
locked. Cut to size.
Your installation is now complete and your required modules can
now be placed into the DigiHUB Enclosure.
SURFACE MOUNT INSTALLATION
INSTALLING THE COVER
WHAT IS INCLUDED
WHAT YOU WILL NEED
ENCLOSURE SIZE
Determining the destination of all connections prior to main
chassis installation this is very important.
Below are a few questions you need to ask:
•
What media type do you plan to use?
•
How long are your cable runs?
•
What about future expansion?
•
How many networked rooms in your home or office?
•
What media types will you need in each room?
•
The location of each wall plate for each room?
•
The exact distance from each of those wall plates
to the DigiHUB?
•
Do you plan to use inbound video as well as outbound video?
Once you have answered the five questions above, you are ready
to continue the installation. You will need to determine the most
ideal location for the DigiHUB.
Each media type has a specified distance before the data will
become distorted or even non-existent. Your data connection
(using a copper connection) should not exceed 90m total
distance. Your video connection (using RG-6 coaxial cable)
should not exceed 30m total distance.
Determine the mounting location. Ensure that the location gives
you adequate space to install all necessary cables to the DigiHUB
Enclosure. The DigiHUB Enclosure should be mounted at least
300mm from any adjacent walls and at least 300mm down from
the ceiling and up from the floor.
Identify the location of each communication port that will
be used. Determine the placement of each cable that will be
attached to the unit.
SITE PLANNING
PREPARATION AND INSTALLATION THE DIGIHUB
AU Technical Support
1800 AERIAL
237 425
www.matchmaster.com.au
NZ Technical Support
0800 AERIAL
237 425
www.matchmaster.co.nz
Mounting Holes
Existing GPO
Locations
Punch Outs for
cable management
1
1
1
1
1
2
2
2
2
2
Door Seal
Stripe Location
Door includes
a quick latch
design


