Retain manual for future reference.
supremo5
5 BURNER BBQ
WITH BUILT IN OVEN
Page 1: ...Retain manual for future reference supremo5 5 BURNER BBQ WITH BUILT IN OVEN ...
Page 2: ...ll 1800 680 405 or email enquiry focuslifestyle com au Your purchase receipt is required for all warranty claims GAS SAFETY TECHNICAL DATA 4 7 ASSEMBLY 8 12 OPERATING PROCEDURE 13 14 COOKING TIPS 15 16 FAULT FINDING 17 CARE MAINTENANCE 18 20 PARTS LIST DIAGRAM 21 22 MATADOR INSTRUCTION MANUAL 2 FEATURES 3 WARRANTY 23 24 25 CONNECTING NATURAL GAS ...
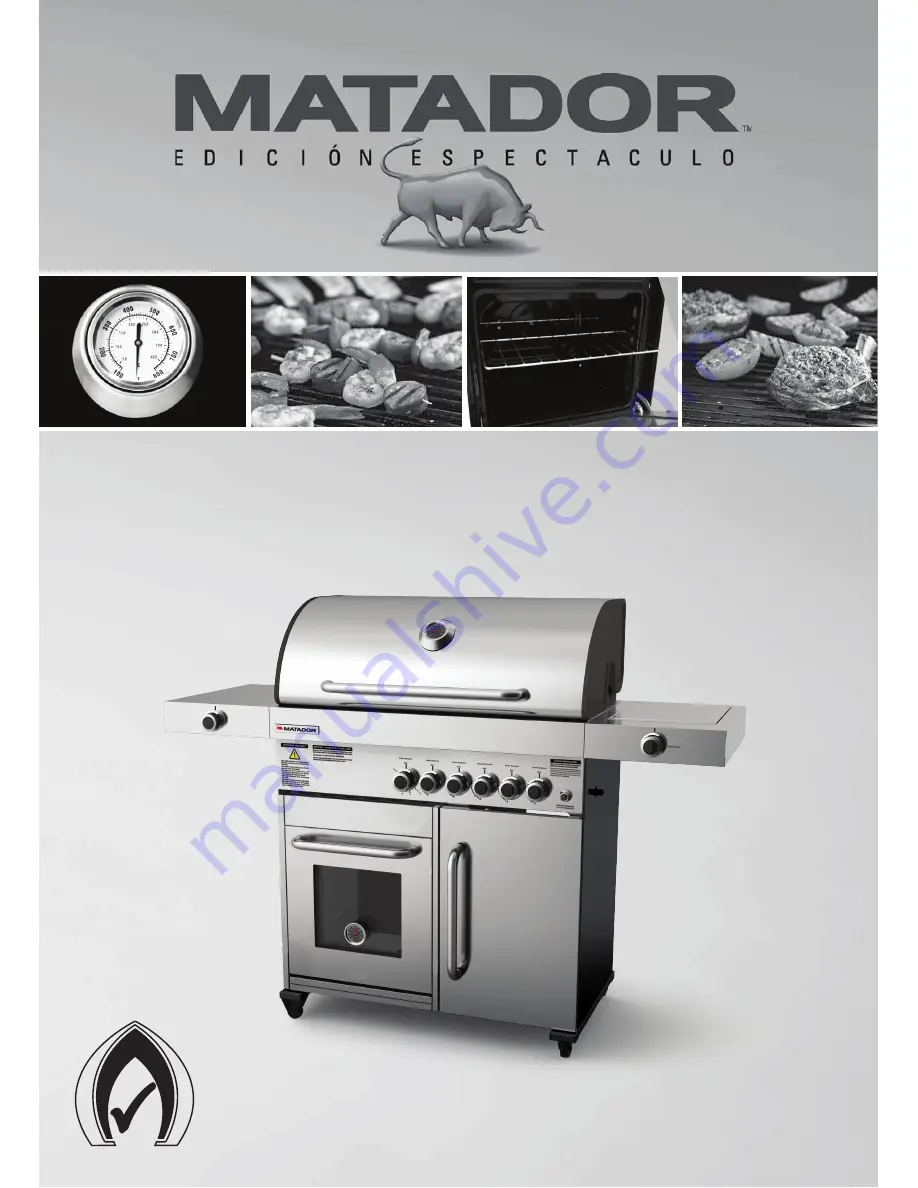
Page 3: ...shelves Chrome plated warming rack High powered Side burner Easy to use cooking timer 304 stainless steel hood with temp gauge BARBEQUE DIMENSIONS Length Width Height Hood 1450 mm 621 mm 1129 mm Cabinet 695 mm 621 mm 670 mm Electronic ignition to all burners Integrated multi purpose oven with temperature gauge Sizzle Burner ...
Page 4: ...ar this barbecue Never operate this barbecue without a regulator If you smell gas 1 Shut off gas to the barbecue at its source if possible 2 Extinguish any open flame 3 Open hood oven door 4 If odour continues immediately call your gas supplier or fire department Do not connect your barbecue to a gas cylinder exceeding 9Kg capacity Never connect an unregulated gas cylinder to your barbecue Read care...
Page 5: ...sually inspected and re qualified at each filling Always keep cylinder in an upright position Always close the cylinder valve when the barbecue is not in use Do not subject gas cylinder to excessive heat GAS CYLINDER USE SAFETY If you store your barbecue indoors ALWAYS disconnect the gas cylinder first and store the cylinder safely outside Cylinders must be stored outdoors in a well area ventilated ...
Page 6: ...ion of hose assembly Changing gas cylinder Upon re connecting gas cylinder after it has been disconnected for storage 4 parts water Open 1 part liquid detergent 3 Apply the liquid detergent solution to all visible and accessible gas connections including the connection to the gas cylinder Bubbles will appear in the liquid detergent solution if connections are not properly sealed Tighten or rectify...
Page 7: ...L WALL AREA IS COMPLETELY OPEN AND ii AT LEAST 30 OF THE REMAINING WALL AREA IS OPEN AND UNRESTRICTED IN THE CASE OF BALCONIES AT LEAST 20 OF THE TOTAL OF THE SIDE BACK AND FRONT WALL AREAS SHALL BE AND REMAIN OPEN AND UNRESTRICTED DO NOT USE YOUR BARBECUE IN GARAGES PORCHES BREEZEWAYS SHEDS OR OTHER ENCLOSED AREAS YOUR BARBECUE IS TO BE USED OUTDOORS ONLY Refer below THE BARBECUE IS NOT INTENDED ...
Page 8: ...al LPGÕ Barbecues for use with natural gas are labelled ÔNatural GasÕ CHECK BARBECUE FOR ANY DAMAGE While it is possible for one person to assemble the barbecue we recommend asking for the assistance of another person when manoeuvring some of the larger or heavier pieces GENERAL Standard Phillips head screwdriver Adjustable spanner open end shifter TOOLS YOU WILL NEED 1 Flatten cardboard packaging...
Page 9: ...ight side of trolley bottom using twelve 12 plain washers spring washers and Phillips head screws M6x5 three for each caster and tighten the screws securely using the screwdriver provided With your assistant stand the grill up carefully Loosen the two pre installed screws on both sides of right bowl side panel half way Attach side burner frame to right bowl side panel by matching the slotted holes...
Page 10: ...curely Make sure the electrode goes through the hole on the side burner seat Install control knob onto gas valve stem with OFF position pointing up Install the Timer Remove two screws from timer Then insert the timer stem through the hole on the front of the side shelf Place the control knob seat over the timer stem aligning the holes on them tighten securely using the same screws provided Attach ...
Page 11: ...g Rack into the slots on Grill Bowl Side Panels Place the Side Burner Head on Side Burner Seat Place the Side Burner Cap over the Side Burner Head Place the Side Burner Pot Support in mounting holes on the surface of Side Burner Seat 6 Install Ignitor Battery and Gas Cylinder Remove Ignitor Cap from Control Panel Place supplied AA battery into the Ignitor Slot with positive pole facing you Install...
Page 12: ...f a leak is found turn gas cylinder valve off and re check all connections have been tightened If there is still a leak do not use barbecue until repairs or replacement can be made 1 Turn the burner controls OFF 2 Turn the gas cylinder valve off fully 3 Detach the regulator assembly from gas cylinder valve Familiarise yourself with the general information and safety guidelines located at the front...
Page 13: ...ot light turn the control IMPORTANT If burner fail to light or go out during operation close gas supply at source and turn all burner controls OFF Open hood and wait 5 minutes before re attempting to light Ensure accumulated gas fumes have cleared Should a grease fire occur attempt to close gas supply at source turn off all burners and remove food if possible The hood must be in the open position ...
Page 14: ...l knob to OFF and open the gas cylinder valve the knob 4 Immediately press the Electric Ignition Button for up to 15 seconds to light the burner 5 If the burner does not light turn the burner control knob to OFF wait 5 minutes for gas to clear then retry 7 Adjust burner control knob to your desired cooking temperature OVEN BURNER IGNITION 6 Once the burner is ignited continue to hold in the knob f...
Page 15: ...ower the hood and follow the recommended times below For high temperature cooking preheat barbecue 10 to 15 minutes For low temperature cooking preheat barbecue 3 minutes To slow cook preheating is not necessary BURN OFF PREHEATING The direct cooking method can be used with the supplied cooking grills and food placed directly over the lit grill burners open flame barbecued taste DIRECT COOKING USI...
Page 16: ...d chef or a newcomer to gas grilling Sizzle Searing cooking adds another dynamic to your outdoor cooking experience With its increased power the Sizzle Searing Burner allows you to transform your center cooking zone into a higher temperature cooking experience This will now give you the opportunity to decrease the cooking time while utilizing the Sizzle Searing Burner as its increased BTU s insure...
Page 17: ...w the igniter cap and replace the battery IMPORTANT Should A flashback fire occur in or around the burner tubes follow the instruction below Failure to comply with these instructions could result in a fire or explosion that could cause serious bodily injury death or property damage Shut off gas supply to the gas barbecue Turn the control knobs to off position Open the barbecue hood Put out any fla...
Page 18: ... is cool to touch before disposing of contents The drip tray should be washed periodically in a mild detergent and warm water solution substance WARNING To avoid any flare ups it is recommended that the drip tray be checked and emptied regularly Contents of the drip tray may be very hot during cooking If emptied during extended cooking extreme caution should be taken and direct contact by hand shou...
Page 19: ...er with soft damp cloth Be sure to wipe off food particles and cooking residues some marinates and oils can be acidic and therefore attack the metal surface Also cooking residues that are not removed after each use bake into the surfaces during subsequent uses and become more difficult to remove There are a number of primary stainless steel clean ers availablethat can be safely used on this applia...
Page 20: ...e and run the brush through the burner tube and inside the burner several times to remove any debris METHOD 3 Use an air hose to force air through each burner tube The forced air should pass debris or obstructions through the burner and out the ports Regardless of which burner cleaning procedure you use we recommend you also complete the following steps to help prolong burner life 1 Use a fibre pa...
Page 21: ... Side Shelf Left P011250234 1 20B Timer P05394001B 1 21 Side Burner Hood P0011560L4 1 22 Side Burner Frame P011080184 1 23 Side Burner Body P02302016K 1 24 Side Burner P02001068A 1 25 Side Burner Cap P02013062D 1 26 Side Burner Pot Support P00801002F 1 27A Side Burner Gas Valve Assembly Y0060827 1 27B Side Burner Electrode with wire P02614065C 28 Regulator with Hose LPG P03640007A 1 29 Side Burner...
Page 22: ...th OVEN Model identify parts if replacement is necessary Contact your place of purchase or the service agent to about parts availability and ou service Items included in your barbecue specification may differ from the parts specification list depending on region or specific dealer enquire ...
Page 23: ...ossible also include a digital photograph for examining and reference We will then at our option either repair or replace the product or arrange a refund of your money and take back the product Any cost incurred by you in returning the product to the retailer will be borne by you Our liability under this manufacturer s warranty is subject to us being satisfied that a defect was caused 3 by defecti...
Page 24: ...nance and or cleaning of the grill for example due to grease fat remaining behind and burning The gas hose is not properly installed if no leak test is performed as shown in Instruction manual The grill has been converted for use with natural gas unless factory built or converted by Focus Lifestyle Products or converted by an authorised person where the conversion kit has been supplied by Focus Li...
Page 25: ...itter Plumber will need to source the necessary parts for the conversion Note Conversion Kits can be ordered directly from Focus Lifestyle Products P L Phone 1800 680 405 Email enquiry focuslifestyle com au 3 Upon completion of the conversion the Gas Fitter Plumber is Legally required to issue a Compliance Certificate 4 Do Not attempt to complete the conversion yourself 5 Failure to comply with th...
Page 26: ...t 1800 680 405 Your purchase receipt will be required for warranty claims For spare parts contact your local Bunnings Warehouse and Natural Gas Conversion call Or Email enquiry focuslifestyle com au PART No P80151139A printed 0514 ...