Retain manual for future reference.
PALLADIUM 6 BURNER BBQ
Model: HS-18MA9601
Page 1: ...Retain manual for future reference PALLADIUM 6 BURNER BBQ Model HS 18MA9601 ...
Page 2: ...ERAL INFORMATION EXPLODED PARTS VIEW PARTS LIST HARDWARE PACK ASSEMBLY STEPS BBQ LOCATION OUTDOOR AREA CONNECTION TO LPG LIGHTING PROCEDURE USING THE BBQ USING THE SMOKER BOX BBQ TIPS BBQ MAINTENANCE SPECIFICATIONS CONNECTION TO NATURAL GAS WARRANTY 3 4 5 6 7 8 9 11 12 23 25 26 27 28 29 30 37 38 40 ...
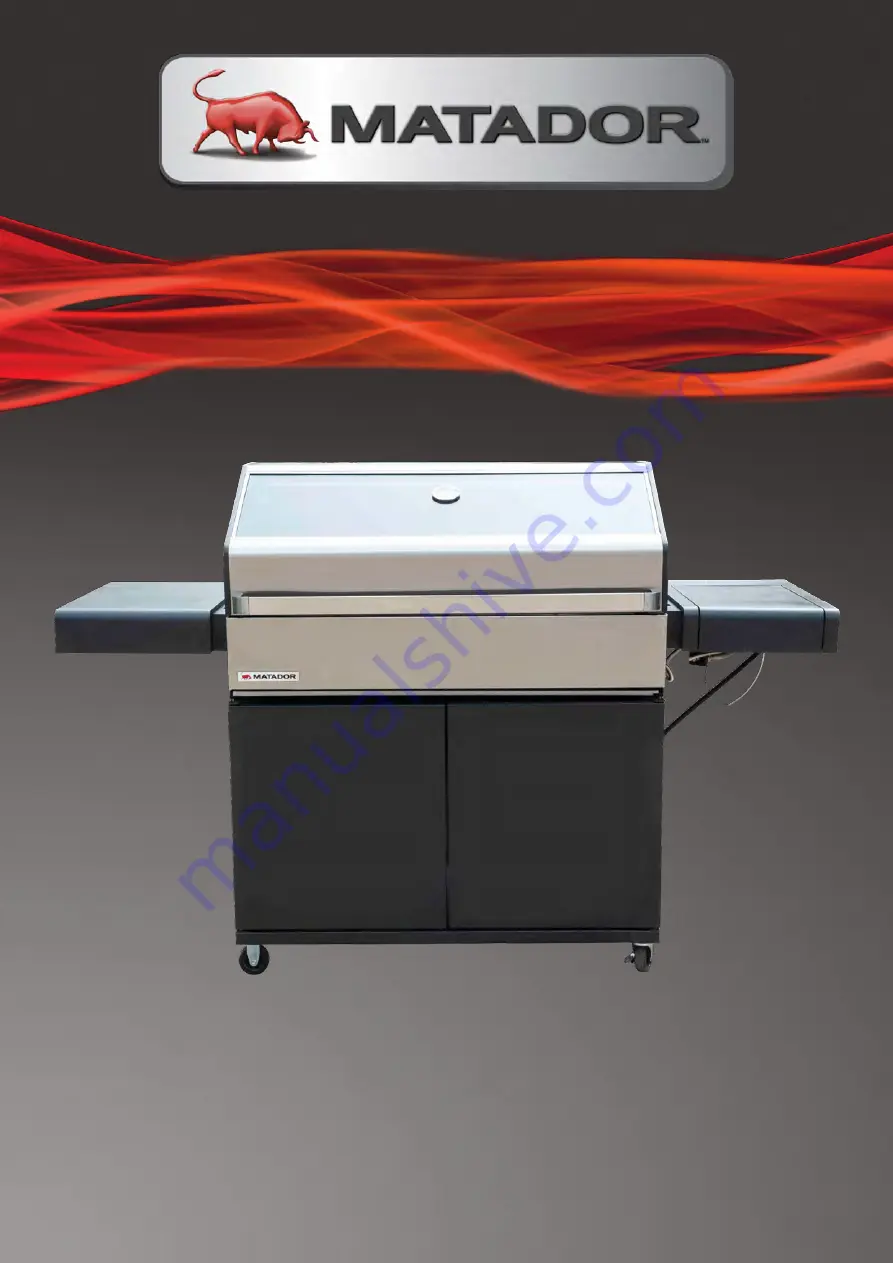
Page 3: ...NUAL 3 FEATURES BENEFITS Overall Barbecue Dimensions 4B Freestanding Length Height Depth 1775 mm 1195 mm 654 mm Gas Output Gas Type Burner BBQ Side LPG U LPG 15 MJ h 15 MJ h Natural Gas 15 MJ h 15 MJ h 13 Fully assembled BBQ ...
Page 4: ...sure they do not attempt to use the BBQ In case of a fat fire immediately isolate the gas supply turn the LPG cylinder valve off Allow the BBQ to cool before removing the drip tray Hot fat can cause serious injury This BBQ should not be located under overhead combustible construction Maintain the following minimum clearances to combustibles at all times From sides 200mm From back 500mm Overhead 10...
Page 5: ...s turned off Open the LPG cylinder valve and apply the soap solution to the gas connections using a soft bristle brush as seen below Soap bubbles will appear if there is a gas leak In case of a leak turn off the gas supply Tighten any leaking fittings then turn the gas supply on and re check Warning Do not operate the appliance until all gas leaks have been rectified Never complete a gas leak test...
Page 6: ...AL L 34 S ST TO OR RA AG GE E 1 Ensure the BBQ is properly cooled 2 Storage of this gas BBQ indoors is permissible only if the gas cylinder is disconnected and removed from the BBQ 3 Store the BBQ in a cool dry place 4 Always disconnect the gas cylinder and store it in a safe place never store a gas cylinder on its side 5 Never store a gas cylinder in a building garage or any other enclosed area 6...
Page 7: ... be installed in or on recreational vehicles and or boats Warning accessible parts may be very hot Keep young children away Do not move the appliance during use Any modification of the appliance may be dangerous Do not replace the grill with an extra hotplate The warranty will become null and void Note The normal flow of gas through the Regulator and Hose Assembly can create a humming sound A low ...
Page 8: ...EXPLODED PARTS VIEW 5 1 14 10 18 20 15 2 3 7 8 26 24 23 17 13 11 22 16 29 21 12 28 6 27 25 19 30 31 32 33 4 9 34 ...
Page 9: ...cabinet 11 Crossbeam 12 Bottom panel of cabinet 13 Back panel of cabinet 14 Separation panel of cabinet 15 Left door 16 Right door MATADOR INSTRUCTION MANUAL 8 PARTS LIST 1 Cooking grill x 2 2 Hotplate 3 Warming rack 4 Firebox 5 Flame tamer x2 6 Left side table 7 Right side burner table 8 Side burner trivet 9 Regulator 10 Left side panel of cabinet 11 Crossbeam 12 Bottom panel of cabinet 13 Back p...
Page 10: ...k x 2 22 Plastic backing board 23 Control knob 24 Seat of control knob 25 Grease tray 26 Smoker box 27 Grease cup 28 Handle of hood 29 Scraper tool 30 Left door hinge Upper 31 Left door hinge Down 32 Right door hinge Upper 33 Right door hinge Down 34 Base weight 17 Right side panel of cabinet 18 Side panel support of cabinet x 2 19 Magnet plate 20 Castor without lock x 2 21 Castor with lock x 2 22...
Page 11: ... Nut M6 2 M MA AT TA AD DO OR R I IN NS ST TR RU UC CT TI IO ON N M MA AN NU UA AL L 1 H HA AR RD DW WA AR RE E P PA AC CK K A Bolt M6 12 60 B Washer M6 18 C Spring washer M6 18 D Bolt M5 10 2 E Bolt M10 8 5 F Nut M4 3 G Screwdriver 1 H Bolt M4 10 12 I Bolt M6 35 2 J Nut M6 2 H HA AR RD DW WA AR RE E P PA AC CK K A Bolt M6 12 60 B Washer M6 18 C Spring washer M6 18 D Bolt M5 10 2 E Bolt M10 8 5 F ...
Page 12: ...oor magnet panel 19 on the bottom panel of cabinet 12 by bolt A 2pcs as shown Assemble the plastic backing board 22 on the bottom panel of cabinet 12 by bolt E 3pcs and nut F 3pcs as shown Assembly Remove all packaging and transit protection materials from STEP 1 Assemble the base weight 34 on the bottom panel of cabine 2pcs and spring washer C 2pcs as shown Assemble the door magnet panel 19 on th...
Page 13: ... on the right side cabinet panel 17 by bolt H 12pcs 5 STEP 2 Assemble the castor without lock 20 and castor with lock 21 on the bottom panel of cabinet 12 by bolt A sprin washer C washer B each 16pcs as shown STEP 3 Assemble left door axial piece Upper 30 and left door axial piece Down 31 on the left side panel of ca 10 and assemble right door axial piece Upper 32 and right door axial piece Down 3...
Page 14: ...l cabinet support 18 on the bottom panel by bolt A 8pcs as shown STEP 4 Assemble left side panel of cabinet 10 back panel of cabinet 13 and right side panel of cabinet 17 on panel of cabinet 12 by blot A 14pcs as shown STEP 5 Assemble side panel support of cabinet 18 on the bottom panel by bolt A 8pcs as shown STEP 6 Assemble crossbeam 11 on the cabinet by bolt A 4pcs as shown ...
Page 15: ...P 6 Assemble crossbeam 11 on the cabinet by bolt A 4pcs as shown STEP 7 Assemble cabinet separation panel 14 on the cabinet by bolt A 4pcs as shown STEP 7 Assemble separation panel of cabinet 14 on the cabinet by bolt A 4pcs as shown STEP 8 Assemble left door 15 and right door 16 on the cabinet as shown ...
Page 16: ...TEP 9 Assemble hood handle 28 on the hood by bolt A 4pcs as shown 8 STEP 8 Assemble left door 15 and right door 16 on the cabinet as shown STEP 9 Assemble handle of hood 28 on the hood by bolt A 4pcs as shown STEP 10 Assemble firebox 4 on the cabinet by bolt A 4pcs as shown ...
Page 17: ...te 8pcs screws already in position on firebox sides STEP 12 Assemble control knob seat 24 on the side valve by screw E 2pcs as shown put the control knob 23 on the valve bar as shown STEP 10 Assemble firebox 4 on the cabinet by bolt A 4pcs as shown STEP 11 Assemble the left side table 6 and the right side burner table 7 on the firebox by bolt A 8pcs as shown Note 8pcs screws already in position on...
Page 18: ... 24 on the side valve by screw E 2pcs as shown put the control knob 23 on the valve bar as shown S ST TE EP P 1 12 2 Assemble control knob seat 24 on the side valve by screw E 2pcs as shown put the con knob 23 on the valve bar as shown ...
Page 19: ...cs as shown in photo A and B Insert the ignition wire as shown in photo C M MA AT TA AD DO OR R I IN NS ST TR RU UC CT TI IO ON N M MA AN NU UA AL L 18 S ST TE EP P 1 13 3 Assemble the injector bracket by screw D 2pcs as photo A and B shown Insert the ignition wire as photo C shown ...
Page 20: ...hown 11 STEP 14 Insert the grease cup 27 and smoker box 26 on the control panel as shown STEP 15 Insert the flame tamers 5 on the firebox as shown STEP 15 Insert the flame tamer 5 on the firebox as shown STEP 16 Insert the cooking grill 1 and hotplate 2 on the firebox as shown ...
Page 21: ...shown STEP 16 Insert the cooking grill 1 and hotplate 2 on the firebox as shown STEP 17 Insert the warming rack 3 on the firebox and side burner trivet 8 on the side burner as shown STEP 17 Insert the warming rack 3 on the firebox and side burner trivet 8 on the side burner as shown Fully assembled BBQ ...
Page 22: ...13 Fully assembled BBQ FULLY ASSEMBLED BBQ ...
Page 23: ... at t u ut t s st ta ag gn na an nt t a ar re ea as s w wh he er re e g ga as s l le ea ak ka ag ge e a an nd d p pr ro od du uc ct ts s o of f c co om mb bu us st ti io on n a ar re e r ra ap pi id dl ly y d di is sp pe er rs s a an nd d n na at tu ur ra al l c co on nv ve ec ct ti io on n n nc cl lo os su ur re e i in n w wh hi ic ch h t th he e a ap pp pl li ia an nc ce e i is s u us se ed d s ...
Page 24: ...t 25 of total wall area 30 or more in total of the rema wall area is open and unrestricte Open sides at least 25 of total wall area 30 or more in total of the remaining wall area is open and unrestricted OUTDOOR AREA EXAMPLE 4 OUTDOOR AREA EXAMPLE 5 OUTDOOR AREA EXAMPLE 2 OUTDOOR AREA EXAMPLE 3 Both ends open OUTDOOR AREA EXAMPLE 4 Open sides are at least 25 of total wall area 30 or more in total ...
Page 25: ... EA AK K T TE ES ST TI IN NG G Leak testing must be done the first time you connect up the BBQ and whenever the LPG cylinder is re connected to the BBQ Always inspect the hose at regular intervals to check for cracks or abrasion Connect the regulator to the LPG cylinder and tighten the connection Turn the gas on at the cylinder or make sure gas is available to the BBQ but do not turn the burners o...
Page 26: ...tomatic ignition It works by throwing a flame to the side of the burner to light Push the knob in and turn anticlockwise to the high position You should hear and feel a click from the knob Hold the knob in and observe the flame extend towards the side of the burner When the burner ignites release the control knob If the burner doesn t light on the first attempt return the knob to the OFF position ...
Page 27: ...ds the front recognized by a sharp roaring sound coming from the burner It is not dangerous unless allowed to persist If this occurs simply turn the burner off wait a few minutes and then relight COOKING FOR THE FIRST TIME IMPORTANT Please add sand or fat absorption granules to the grease tray before first use We recommended you wash the cooking surfaces with soap and warm water before use The coo...
Page 28: ... the BBQ remains open during this step Leave on medium for approximately 10 15 minutes or until you see white smoke wafting from the grill plates When smoke has been achieved turn off burner 5 turn burner 6 to low and turn on burner 1 to low At this stage the lid of the BBQ can now be closed and is ready for smoking your favourite food You will receive approximately 20 25 minutes of smoke time Thi...
Page 29: ...and remove remaining oil and food scraps You should use protective gloves to avoid burning yourself Then recoat the plate with oil for continued protection BBQ TIPS Before cooking coat the hotplate with oil This will prevent food from sticking Open the hood and light the burners to preheat the BBQ Avoid continually turning the meat over When cooking internal juices rise to the surface of the meat ...
Page 30: ...identified by the following If the BBQ fails to operate correctly contact an authorised service person for repair A yellow burner flame A thick black build up of soot Control valves that seize or are difficult to turn Burners which are difficult to light Ensure the BBQ is properly cooled Storage of this gas BBQ indoors is permissible only if the gas cylinder is disconnected and removed from the BB...
Page 31: ...OOK Insertion point M MA AT TA AD DO OR R I IN NS ST TR RU UC CT TI IO O B BU UR RN NE ER R M MA AI IN NT TE EN NA AN NC CE E To reduce the chance of FLASH BACK the procedure below should be followed month in late summer or early autumn when spiders are most active or when yo been used for a period of time 1 Turn all burners valves to the full OFF position 2 Turn the LPG cylinder valve clockwise t...
Page 32: ...es during replacement of the hood glass The following steps outline the procedure to replace the glass hood GLASS HOOD REPLACEMENT 1 2 Remove the Temperature Gauge Disassemble the four M5 screws on the side of the unit ...
Page 33: ...ow directions remove all the parts from the glass as shown 3 4 M MA AT TA AD DO OR R I IN NS ST TR RU UC CT TI IO ON N M MA AN NU UA AL L 32 S St te ep p 3 3 Remove the glass as shown S St te ep p 4 4 According to the arrow directions remove all the parts from the glass as shown ...
Page 34: ... onto the replacement glass as shown Place the new glass assembly back onto the hood S St te ep p 5 5 According to the arrow directions assemble all the parts onto the replacement glass as shown S St te ep p 6 6 Place the assembly onto the hood as shown 5 6 ...
Page 35: ...f the cooking grill and prevents flow to the oil cup use the supplied Scraper Tool to quickly clear the valleys Preheat the grill before cooking for perfect sear marks every time Always keep a spare LPG cylinder filled and ready to go but never store the spare cylinder near the BBQ Use BBQ wipes to wipe down the shiny black ceramic coated panels inside the BBQ before cooking The Matte black panels...
Page 36: ...mponents are still functioning correctly Keep the outdoor gas BBQ area clear and free from combustible materials petrol and other flammable vapours or liquids Make sure there is no obstruction surrounding the BBQ which may block the flow of combustion and ventilation air To maintain the surface of your hotplate and grill plate it is recommended to periodically wash cooking surfaces with a mild soa...
Page 37: ...per burner 2 75 kPa 1 1mm Side 15 MJ h 2 75 kPa 1 1mm Burner Configuration Table Propane BURNERS NOMINAL GAS CONSUMPTION TEST POINT PRESSURE INJECTOR SIZE BBQ 15 MJ h per burner 2 75 kPa 1 07mm Side 15 MJ h 2 75 kPa 1 1mm Burner Configuration Table Universal LPG BURNERS NOMINAL GAS CONSUMPTION TEST POINT PRESSURE INJECTOR SIZE BBQ 15 MJ h per burner 1 00 kPa 1 8mm Side 15 MJ h 1 00 kPa 1 8mm Burne...
Page 38: ...configured for use with LPG from a gas cylinder If you want to connect this BBQ to a permanent Natural Gas supply the following steps must be undertaken Natural Gas Conversion Procedure Gas conversion must be conducted by a licensed plumber or gas fitter only Remove the main BBQ Burners Remove LPG injectors from all the main burner valves and replace with Natural Gas Injectors The natural gas inje...
Page 39: ...st all connections Before leaving test the operation of all burners on high and low to complete the commissioning process This involves removal of the knobs to access the screw adjustable low flame by pass to set a stable low flame Instruct the consumer on correct use of the BBQ and the location of the gas supply isolation valve which shall be closed after each use If the BBQ is supplied with a du...
Page 40: ...nder normal use This warranty is provided in addition to other rights and remedies you may have under law our goods come with guarantees which cannot be excluded under the Australian Consumer Law You are entitled to replacement or refund for a major failure and to compensation for other reasonably foreseeable loss or damage You are also entitled to have the goods repaired or replaced if the goods ...
Page 41: ...LAIMS FOR AUSTRALIAN CUSTOMERS Please contact Pacific Gas Heating Pty Ltd Tel 1300 793978 Email info pacificgas com au FOR NEW ZEALAND CUSTOMERS Please contact the store where the product was purchased PRODUCT WARRANTY The appliance must be operated and maintained in accordance with the instructions supplied in the operating manual Any repair does not extend the warranty period Any parts other tha...
Page 42: ... www matadorbbqs com au For technical and warranty support call 1300 793 978 Aus 09 9780 000 NZ Your purchase receipt will be required for warranty claims For spare parts contact Pacific Gas Heating Pty Ltd ...