headline bars
continuation tabs
notes
warnings
model no. 058-0051-2 | contact us 1-800-689-9928
8
9
SETUP
OPERA
TING INSTRUCTIONS
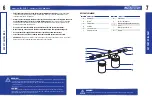
SETUP (fig. 1)
1. Attach the glass jar
(2)
to the air brush
(1)
properly and
securely. The glass jar is held in place with friction and
is not threaded.
IMPORTANT:
It is suggested that you first fully insert the
fluid connector on the glass jar lid to the fluid intake of the
air brush and then turn approximately 1/5 of a full rotation.
This will secure a tight connection between the glass jar
and the air brush.
2. Connect air hose (not included) to the air inlet
(3)
of the
air brush.
3. Connect other end of air hose to the outlet of an air
brush compressor.
IMPORTANT:
It is highly recommended that you use the Mastercraft air brush compressor which includes
the air hose to operate the air brush for your best performance.
4. Add paint to the glass jar. Make sure that the paint has been mixed and thinned properly. (See “MIXING
PAINT” in the OPERATING INSTRUCTIONS.)
OPERATING INSTRUCTIONS (fig. 2 to 3)
MIXING PAINT
Colours can be custom mixed in any combination as long as the paints are compatible.
Make sure that the paint is free of lumps and strain if necessary.
Mix and soften paint in a palette, then transfer into the glass jar.
Mix paint with a top grade bristle brush such as a number 4 through 7 red sable brush. Using an inexpensive
brush may cause bristles to fall out and clog the air brush.
THINNING PAINT
Most jar paints are too thick to spray and need thinning. Proportions of thinner needed may vary with
different manufacturers. Use the following chart only as a guide for thinning spray materials:
1 part water to 1 part watercolour/ink
7 parts water to 1 part acrylic
2 parts lacquer thinner to 1 part lacquer
IMPORTANT:
Since acrylics and lacquers dry quickly, do not set air brush down for extended periods of time
between spraying.
IMPORTANT:
Keep an extra pan or jar of solvent nearby and dip head assembly in solvent to help prevent
paint from clogging air brush. Refer to cleaning instructions for additional information.
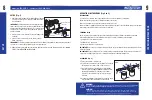
OPERATION (fig. 2)
1. Turn your air brush compressor on.
2. Regulate the air pressure to the air brush. The air brush
operation pressure ranges from 15 PSI to 50 PSI.
3. Pull off the protective cap
(4)
from the air brush
(1)
.
Press the finger lever
(5)
downward to begin air flow.
Draw back slowly/gently on the finger lever until
you achieve the air volume you need for your spray
technique.
4. Continue to adjust the spray volume by using the finger
lever, moving it front to back. When you have the
2
1
3
Air hose
Mastercraft air brush
compressor
Fig. 1
Fig. 2
1
6
9
5
4
10
7
8
WARNING!
Before spraying, make sure that the needle chucking nut (6) is hand tightened firmly around the fluid needle.
Never hand
loosen the needle chucking nut during the operation
, which will result in no material flow at your next spray.
CAUTION!
• This air brush features a dual action finger lever. Press the finger lever (5) downward ONLY to begin air flow for air
dusting on work surface if needed, then draw back slowly/gently on the finger lever till fluid comes out of the nozzle.
• Do not pull the finger lever straight back. Both actions are required for proper operation of the air brush.


