51
546001.A.6 - July 17, 2019
ENG
a) at least 25% of the total wall area is completely open and
unrestricted
b) at least 30% of the remaining wall area is open and
unrestricted
In the case of balconies, at least 20% of the total of the side, back
and front wall areas shall be and remain open and unrestricted.
See following diagrams for further illustration:
FIGURE F1-OUTDOOR AREA-EXAMPLE 1
FIGURE F2-OUTDOOR AREA-EXAMPLE 2
Both ends open
FIGURE F5-OUTDOOR AREA-EXAMPLE 5
FIGURE F3-OUTDOOR AREA-EXAMPLE 3
FIGURE F4-OUTDOOR AREA-EXAMPLE 4
Open side at
least 25% of total
wall area
30 percent or more in total
of the remaining wall area is
open and unrestricted
Open side at
least 25% of total
wall area
30 percent or more in total
of the remaining wall area is
open and unrestricted
OTHER PRECAUTIONS
Do not obstruct any of the ventilation openings in the barbecue
body. Also, position the gas supply cylinder inside the cabinet, in
the cylinder base positioning hole. Should you need to change
the gas cylinder, confirm that the cylinder is off, and that there are
no sources of ignition (cigarettes, open flame, sparks, etc.) near
before proceeding. Be sure to inspect the gas hose and ensure it
is free of any twisting or tension. The hose should hang freely with
no bends, folds, or kinks, which could obstruct free flow of gas.
Apart from the connection point, no part of the hose should touch
any hot barbecue parts. Inspect the hose before use. If the hose
is damaged, it must be replaced with a hose suitable for use with
ULPG and meet the national standards for the country of use.
The length shall not exceed 1.5m. Should minimum clearances
not be adhered to severe flare up may be experienced due to
lack of airflow around the barbecue, thus voiding manufacturer’s
warranty.
OPERATION
WARNING!
Before proceeding, be certain you understand the
safety information contained in this manual.
This barbecue is not designed to be used with more
than 66% of the cooking area as a solid plate. Full
coverage of plates will cause excessive build-up of
heat and damage the barbecue.
• Never leave burners on high for more than 10 minutes unless
actually cooking. If the burner makes hissing sounds when lit,
it may be burning inside. Turn burner off, allow it to cool and try
again.
• Close the gas cylinder valve after each use.
• Never use plastic or glass utensils on the BBQ
• Never use the BBQ in strong winds
• Never lay the gas cylinder down (always keep upright)
•
Never allow the flexible gas supply hose or any electrical cord
to come in contact with any heated surface of the BBQ.
• Never lean heavily on the side shelves of your BBQ or attempt
to transport your BBQ by lifting it from the side shelves.
•
Before you start cooking for the first time, clean the BBQ
thoroughly with hot soapy water. This is necessary to remove
residuals and solvents, oil and grease, which may have
remained from the manufacturing process. The hotplate and
grill should be thoroughly cleaned in the same manner.
NOTE:
Before using the barbecue for the first time, the
barbecue must be lit and burning for 30 minutes on the
“low” setting.
IMPORTANT
The regulator supplied with this BBQ may incorporate
an Excess Flow Control Safety Device. The Excess
Flow Control will activate to prevent gas flow should
a regulator malfunction occur. It is important that the
BBQ operator understands that all gas valves on the
BBQ are closed in the “OFF” • position prior to opening
the gas cylinder valve. If the BBQ valves are open
prior to opening the cylinder valve, the Excess
Flow Control will be activated and prevent the BBQ
from being lit. To reset, close the BBQ valves • and
gas cylinder valve, wait for 1 minute and use correct
lighting procedure as detailed below.
LIGHTING THE BBQ
Lighting the BBQ is easy, but must be done with due care.
Make sure that the gas is turned on at the cylinder, or that gas
is available to the BBQ. Also, if your BBQ has a roasting hood,
Summary of Contents for MB
Page 2: ...2 546001 A 6 July 17 2019 ...
Page 18: ...18 546001 A 6 July 17 2019 SCHRITT 15 Seitenbrenner Anschluss SCHRITT 16 Eisbox Montage ...
Page 31: ...31 546001 A 6 July 17 2019 GER ...
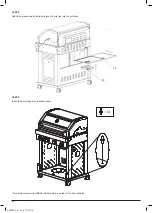
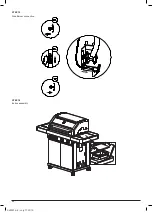
Page 46: ...46 546001 A 6 July 17 2019 STEP 15 Side Burner connection STEP 16 Icebox assembly ...
Page 67: ...SL OVEN IA N 67 546001 A 6 July 17 2019 KORAK 7 Montirajte pokrov in žar na ohišje vozička ...
Page 93: ...U K R A N IA N 93 546001 A 6 July 17 2019 КРОК 7 Встановіть гриль з кришкою на основу корпус ...
Page 111: ...U K R A N IA N 111 546001 A 6 July 17 2019 ...
Page 139: ...H U N GA R IA N 139 546001 A 6 July 17 2019 ...
Page 255: ...POL ISH 255 546001 A 6 July 17 2019 KROK 7 Zamontuj zespół pokrywy i grilla do wózka ...
Page 272: ...Urheberrechte 2019 Masport Begrenzt AL KO Geräte GmbH Ichenhauser Str 14 D 89359 Kötz Germany ...


