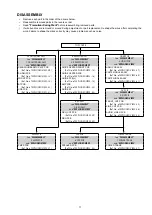


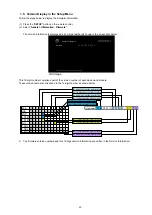


3. Selection Modes for Service-related Operations
3.1. Actions
Select diagnostic mode (service path check mode), protection history display mode, or Operation Info mode, or TUNER
STEP mode.
3.2. Starting up
Hold down buttons "
ZONE2 SOURCE
" and "
STATUS
" at the same time and press the power button to turn on the power.
Select the mode using the button "
INTERNET RADIO
", and press the button "
STATUS
" to commit the selection.
3.3. Displaying and Selecting Each Mode
The information shown on the display changes each time the button "
INTERNET RADIO
" is pressed.
Press the button "
STATUS
" to set the currently displayed mode and restart the device.
q
FLD
1 . S E R V I C E
C H E C K
Service Path Check Mode
:
The Video and Audio paths can be checked.
This function is convenient for confirming problem paths in the product and executing a path
check after repair.
w
FLD
2 . P R O T E C T I O N
The protection history can be checked.
e
FLD
4 . O P
I N F O
Operation Info for the unit can be checked.
r
FLD
5 . T U N E R
F R Q
S E T
Enables reception STEP of the ANALOG TUNER to be changed.
3.3. Canceling the mode
Press the power button to turn off the power.
25
Summary of Contents for NR1605/FB
Page 8: ...Personal notes 8 ...
Page 26: ...Personal notes 26 ...
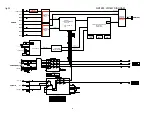
Page 103: ...CX870 7P 8P 5P PLATE PLATE 2P 7P 4P 7P 11P 5P 8P PLATE S30SC6MT WIRING DIAGRAM 103 ...
Page 140: ...Personal notes Personal notes 140 ...
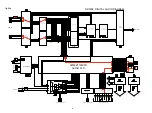
Page 161: ...2 FL DISPLAY FLD 018BT021GINK FRONT U4400 PIN CONNECTION GRID ASSIGNMENT q T7 161 ...
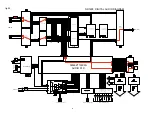
Page 162: ...ANODE CONNECTION 162 ...