background image


Boombox 


Model: 

BBX003 


Instrukcja obsługi 

User’s Manual 

Bedienungsanleitung 

Manual de usuario 

Istruzioni d’uso 

Návod k obsluze 

Инструкция использования 

Summary of Contents for BBX003

Page 1: ...Boombox Model BBX003 Instrukcja obs ugi User s Manual Bedienungsanleitung Manual de usuario Istruzioni d uso N vod k obsluze...

Page 2: ...razem z produktem Wszelkie mocowanie produktu powinno by przeprowadzane zgodnie z instrukcjami producenta i powinno by realizowane z u yciem akcesori w mocuj cych zalecanych przez producenta Zestaw ur...

Page 3: ...ktu nale y zwr ci si do serwisanta o przeprowadzenie kontroli bezpiecze stwa 20 r d a Zasilania Niniejszy produkt nale y u ywa wy cznie ze r d em zasilania wskazanym na nalepce marketingowej Je li nie...

Page 4: ...ub wilgo 3 Wtyczka g wna jest u ywana jako wy cznik Nie nale y zas ania g wnej wtyczki urz dzenia lub powinna ona by atwo dost pna w trakcie zamierzonego u ytkowania urz dzenia W celu ca kowitego od c...

Page 5: ...tu bezpiecze stwa W innym przypadku dioda lasera b dzie w czona ON podczas gdy drzwiczki CD b d wci otwarte Je li urz dzenie nie b dzie u ywane przez d u szy okres czasu nale y od czy od urz dzenia ws...

Page 6: ...Instrukcja Obs ugi PL 6 LOKALIZACJA KONTROLEK...

Page 7: ...re R D A ZASILANIA Urz dzenie pracuje na pr dzie AC 230V 50Hz lub 6 bateriach DC 1 5V C Nie nale y pr bowa dzia ania radia na jakimkolwiek innym r dle zasilania Mo e to spowodowa uszkodzenie urz dzeni...

Page 8: ...zasu nale y wyj baterie i od czy od urz dzenia wszystkie r d a zasilania Stare lub wyciekaj ce baterie mog spowodowa uszkodzenie urz dzenia i uniewa ni gwarancj 4 Nie nale y spala baterii w ogniu w ce...

Page 9: ...o zapami tanej stacji nale y nacisn przycisk MODE 8 i nast pnie nacisn przycisk 6 lub 7 w celu wyszukania zapami tanej stacji 1 20 WSKAZ WKI DLA JAK NAJLEPSZEGO ODBIORU AM Antena AM znajduje si wewn t...

Page 10: ...kranie LCD 5 a urz dzenie zacznie automatycznie odtwarza p yt CD Na ekranie LCD zostanie wy wietlony numer obecnie odtwarzanej CIE KI 4 W trakcie odtwarzania nacisn przycisk PLAY PAUSE 13 w celu wstrz...

Page 11: ...LCD 5 Nacisn przycisk 6 lub 7 aby wy wietli wszystkie zaprogramowane utwory 7 Nacisn przycisk STOP 12 aby anulowa zaprogramowane odtwarzanie 8 Tak d ugo jak urz dzenie pozostaje w czone i nie zostanie...

Page 12: ...LAY PAUSE 13 aby rozpocz odtwarzanie nacisn przycisk STOP 12 aby zatrzyma odtwarzanie Uwaga zale nie od pojemno ci danej pami ci odczyt mo e zaj wi cej ni 1 minut Urz dzenie nie mo e odczyta mojej pam...

Page 13: ...y cz sw j IPod odtwarzacz MP3 itp po zako czeniu s uchania utwor w Wy cz boombox i od cz urz dzenia z gniazda AUX IN 15 SPECYFIKACJA Zakres cz stotliwo ci AM 530 1600 kHz FM 88 108 MHz r d a zasilania...

Page 14: ...trojona prawid owo do AM lub FM FM teleskopowa antena FM nie jest rozci gni ta AM Antena sztywna nie jest prawid owo ustawiona Dostroi stacj AM lub FM FM Rozci gn teleskopow anten FM AM Przestawi urz...

Page 15: ...a p yta Zabrudzone soczewki odbiorcze Odtwarzacz poddany nadmiernym wstrz som lub wibracjom Oczy ci lub wymieni wadliw p yt U y p yty do czyszczenia soczewek w celu ich oczyszczenia Przestawi odtwarza...

Page 16: ...fore cleaning Do not use liquid cleaners or aerosol cleaners Clean only with dry cloth 7 Do not block any ventilation openings Install in accordance with the manufacturer s instructions 8 Do not place...

Page 17: ...does not operate normally or has been dropped 15 This appliance shall not be exposed to dripping or splashing water and that no object filled with liquids such as vases shall be placed on the apparat...

Page 18: ...us 2 Warning To reduce the risk of fire or electric shock do not expose this apparatus to rain or moisture 3 The mains plug is used as disconnect device The mains plug of apparatus should not be obstr...

Page 19: ...yer may not operate properly Do not put anything in the safety slot If you do the laser diode will be ON when the CD door is still open If the unit is not to be used for a long period of time make sur...

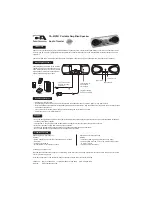
Page 20: ...20 LOCATION OF CONTROLS User s Manual EN...

Page 21: ...unit operates on AC 230V 50Hz or 6 x DC 1 5V C size batteries Do not attempt to operate the radio on any other power source You could cause damage to the unit and void your warranty Please be sure th...

Page 22: ...d of time remove the batteries and disconnect it from all power sources Old or leaking batteries can cause damage to the unit and may void the warranty 8 Do not incinerate batteries in fire to dispose...

Page 23: ...r into storing mode Press the 6 or 7 button to tune to a station 2 When the station is selected press the MODE button 8 once more to store the current station to the preset memory 3 To tune to a prese...

Page 24: ...the symbol will flash Press the PLAY PAUSE 13 button again to resume playing 11 Adjust the volume level to a comfortable level by pressing the VOLUME 10 or VOLUME 11 buttons 12 Press the STOP button...

Page 25: ...n to show all the programmed songs 7 To cancel programmed play press the STOP button 12 8 As long as the unit remains on and the CD Door 2 is not opened you can resume playing the program list at any...

Page 26: ...pause playback 10 Find your favorite track to play by pressing the 6 or 7 buttons to skip forward or backward 11 The LCD display 5 will show the selected track number 12 To repeat playback of a parti...

Page 27: ...in hot humid or dusty places 11 Keep your unit away from heating appliances and sources of electrical noise such as fluorescent lamps or motors 12 If drop outs or interruptions occur in the music dur...

Page 28: ...retest CD skips while playing Disc is dirty or scratched Wipe CD with clean cloth or use another disc Intermittent sound from CD player Dirty or defective disc Dirty pick up lens Player is subject to...

Page 29: ...Bedienungsanleitung DE 29 VERTEILUNG VON KONTROLLLICHTERN...

Page 30: ...Modus des USB Players AUX Modus des Players des AUX Eingangs Dr cken Sie die FUNC Taste 9 um durch alle Modi durchzugehen Die laufende Funktion wird in der LCD Anzeige dargestellt 5 Um den Bereitscha...

Page 31: ...eines im Stereomodus gesendeten Programms geht das Licht der FM STEREO ANZEIGE an Stellen Sie beim FM oder FM STEREO Empfang sicher dass die FM Teleskopantenne 3 vollst ndig ausgebreitet ist um die b...

Page 32: ...iedergabe zu stoppen ACHTUNG Sollte es beim Abspielen der CD zum berspringen kommen dann versuchen Sie die Lautst rke zu reduzieren Der CD Fach Deckel 2 darf beim Abspielen einer CD nicht ge ffnet wer...

Page 33: ...ammierte Wiedergabe zu starten Der erste Titel aus dem Programm wird im LCD Bildschirm 5 angezeigt Dr cken Sie die 6 oder die 7 Taste um alle programmierten Titel anzuzeigen 7 Dr cken Sie die STOP Tas...

Page 34: ...Dateien aus diesem Speicher auslesen 3 Dr cken Sie die PLAY PAUSE Taste 13 um die Wiedergabe zu starten und dr cken Sie die STOP Taste 12 um die Wiedergabe zu stoppen Achtung je nach dem jeweiligen Sp...

Page 35: ...Empfangsger tes befindet Anschlusskabel ist dem Set nicht beigef gt 2 Dr cken Sie die FUNC Taste 9 damit das Ger t zum AUX Modus wechselt 3 Starten Sie die Wiedergabe aus Ihrem IPod MP3 Player oder e...

Page 36: ...Manual de usuario SP 36 LOCALIZACI N DE ELEMENTOS DE CONTROL...

Page 37: ...4 Enchufe alimentaci n AC 7 Siguiente Sintonizaci n arriba 15 Conexi n externa AUX 7 Anterior Sintonizaci n abajo 16 Puerta USB 8 MODO 17 Tapa compartimento de pilas 9 FUNC Power Funci n Alimentaci n...

Page 38: ...o se encender el piloto INDICADOR FM EST REO Durante la recepci n de ondas FM o FM EST REO asegurarse que la antena telesc pica FM 3 est desplegada para mejorar los par metros de recepci n No obstante...

Page 39: ...cir el nivel del volumen No abrir la tapa del CD 2 durante la reproducci n del disco CD Esperar a que el disco deje de girar antes de abrir la tapa 2 MODO DE OMITIR Y BUSCAR TEMA 1 Pulsar botones 6 o...

Page 40: ...13 9 Para avanzar 10 temas adelante o atr s mantener pulsado el bot n MODE 8 durante 10 segundos y pulsar el bot n 6 o 7 Para volver a funcionamiento normal pulsar el bot n MODE 8 o esperar 3 se gund...

Page 41: ...ia PMP con fuente de alimentaci n propia asegurarse que la pila est cargada 4 Comprobar que el dispositivo USB est formateado con formato de archivos FAT o FAT32 Los dispositivos USB con formato de da...

Page 42: ...42 POSIZIONAMENTO DEI TASTI DI CONTROLLO Istruzioni d uso IT...

Page 43: ...zione AC 8 Successivo Sintonizzazione verso l alto 15 Presa ingresso AUX 7 Precedente Sintonizzazione verso il basso 16 porta USB 8 MODALITA 17 Coperchio del porta batterie 9 FUNC Power Funzione Alime...

Page 44: ...cevere un segnale pi forte FM In caso di ricezione del programma in modalit stereo si accender la lampada dell INDICATORE FM STEREO Durante la ricezione FM o FM STEREO bisogna assicurarsi che l Antenn...

Page 45: ...l tasto STOP 12 per fermare la riproduzione ATTENZIONE Nel caso che il CD salti durante la riproduzione provare ad abbassare il volume Non si pu aprire il coperchio CD 2 durante la riproduzione del CD...

Page 46: ...tti i pezzi programmati 7 Premere il tasto STOP 12 per annullare la riproduzione programmata 8 Fino a quando il dispositivo rimane accesso e non viene aperto il coperchio CD 2 si pu in un qualsiasi mo...

Page 47: ...del ricevitore boom box Il cavo di collegamento non incluso nel kit 2 Premere il tasto FUNC 9 per passare alla modalit di lavoro AUX 3 Inizia la riproduzione dal tuo iPOD riproduttore MP3 o altro disp...

Page 48: ...N vod k obsluze CZ 48 UM ST N KONTROLEK...

Page 49: ...ick FM ant na 12 STOP 4 Reproduktor 13 PLAY PAUSE p ehr v n pauza 5 LCD displej 14 Vstup pro nap jen AC 9 Dal Dolad n nahoru 15 AUX vstup 7 P edchoz dolad n dol 16 USB port 8 RE IM 17 V ko komory na b...

Page 50: ...FM r dia nebo FM STEREO je nutno zajistit aby Teleskopick FM ant na 3 byla pln rozt hnuta je to nezbytn pro z sk n mo n nejlep ch parametr p jmu Av ak pokud je FM p jem slab pokuste se za zen um stit...

Page 51: ...NUT A VYHLED V N 1 Za elem p epnut na dal skladbu nebo n vrat na za tek aktu ln skladby stiskn te tla tko 6 nebo 7 2 Za elem rychl ho prohled n skladby b hem p ehr v n CD disku stiskn te a p idr te tl...

Page 52: ...a p idr et tla tko MODE 8 na dobu 10 sekund a n sledn stisknout tla tko 6 nebo 7 Pro n vrat do norm ln ho re imu op t stiskn te tla tko MODE 8 nebo vy kejte 3 sekundy bez stisku tla tka 52 FUNKCE USB...

Page 53: ...e n nabit 4 Ujist te se e Va e USB za zen je naform tov no ve form tu syst mu soubor FAT nebo FAT 32 USB za zen naform tovan jako NTFS nejsou kompatibiln s t mto v robkem FUNKCE VSTUPU IN Tento boombo...

Page 54: ...RU 54...

Page 55: ...1 FUNC 9 FM AM 2 6 7 55 1 10 VOL 2 CD 11 VOL 3 FM 12 STOP 4 13 PLAY PAUSE 5 14 10 15 AUX 7 16 USB 8 17 9 FUNC Power FUNC 9 Standby FM FM FM AM AM CD CD USB USB AUX AUX FUNC 9 LCD 5 OFF FUNC 9 FM AM RU...

Page 56: ...3 VOL 10 VOL 11 20 1 MODE 8 6 7 2 MODE 8 3 MODE 8 6 7 1 20 AM AM AM FM FM FM FM FM 3 FM 56 CD CD R RW 1 CD R RW 2 CD R RW 3 CD R RW RU...

Page 57: ...1 FUNC 9 CD 2 CD 2 CD CD 3 5 CD 4 PLAY PAUSE 13 PLAY PAUSE 13 5 VOLUME 10 VOLUME 11 6 STOP 12 CD CD 2 CD CD 2 1 6 7 2 6 7 CD MODE 8 LCD 5 57 1 RU...

Page 58: ...CD 01 PROG 5 2 6 7 3 MODE 8 CD 02 4 2 3 20 20 5 FUL 6 PLAY PAUSE 13 5 6 7 7 STOP 12 8 CD 2 MODE 8 PLAY PAUSE 13 9 10 MODE 8 10 6 7 MODE 8 3 58 USB USB 4 USB USB 16 5 FUNC 9 USB USB MP3 6 PLAY PAUSE 1...

Page 59: ...MP3 1 PLAY PAUSE PLAY PAUSE 13 MP3 2 6 7 3 5 4 MODE 8 5 MODE 8 6 CD MODE 8 7 MODE 8 8 STOP 12 59 1 USB 1 USB 2 USB USB MP3 3 USB PMP 4 USB FAT FAT 32 USB NTFS IN AUX iPod MP3 RU...

Page 60: ...60 1 AUX IN 15 2 FUNC 9 AUX 3 Ipod MP3 4 5 IPod MP3 AUX IN 15 RU...

Page 61: ...cj produktu bez uprzedzenia Strona g wna www manta com pl Strona wsparcia technicznego www manta info pl SERVICE INFOLINE tel 48 22 332 34 63 or e mail serwis manta com pl from Monday to Friday 9 00 1...

Reviews: