Finishing Sander
item-no. 12330
CE
This tool is interference-suppressed
according to
CE EN 55014 + EN 61000
I N S T R U C T I O N - M A N U A L
Before using electric power-tools, please read and
understand the attached safety-instructions!
Additional safety-hints for impact-drill:
•
Always wear safety-goggles and a dust-mask
during your work with the finishing-sander.
•
Always secure the workpiece by clamps or else to
avoid slipping away.
•
Make sure, that there are no nails, screws or other
metal-parts in your workpiece, before starting your
job.
•
Always keep the holes in the baseplate clean from
dust.
•
Always connect a vacuum cleaner to the attached
adaptor during your work.
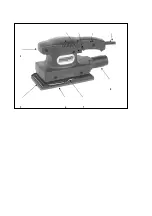
Description
1. front-handle
2. on-/off-switch
3. lock button
4. handle
5. sanding paper
6. base plate
7. paper clamp
8. adaptor for vacuum-cleaner
9. power cord
Technichal dates
voltage
230 V AC
∼
/ 50 Hz
power input
150 W
sanding area
187 x 90 mm
sandpaper-size
230 x 90 mm
no. of vibrations
10.000 min
-1
sound pressure level (LPA)
80,0 dB(A)
sound power level (LWA)
93,0 dB(A)
vibration
2,5 m/s²
(acc. to EN 50144/13)
protection class
/ II
weight
1,29 kgs
Always wear safety-goggles, dust-mask and ear-
protection, when machine is in use!
Recommended nominal operating time: approx. 20
minutes under permanent load.
Rest after permanent operation: approx. 5-10
minutes.
Fastening of sanding-paper
•
Disconnect the tool from the power-supply
before changing sanding paper.
•
Open the paper-clamps on both sides of the
base-plate and remove the worn-out sanding-
paper.
•
Place a new sanding-paper on the base-plate
observing the holes in the sanding-paper fit to
the holes of the base-plate.
•
Bend the paper to the base-plate and fasten one
clamp first. Press the sanding-paper against the
base-plate, bend the other end and fasten
second clamp.
•
Attention: This finishing sander is not suit-
able for wet-sanding jobs.
Operation
•
To start the sander pull the trigger upwards
•
For continious operation press the lock-button at
the same time.
•
To stop the machine, pull the trigger again and
release.
•
Put the sander on the workpiece, as soon as the
motor has reached its maximum speed.
•
Let the sander slide smoothly over the surface of
your workpiece and do not apply too much
pressure. This will lead to reduce the speed, to
increase the wear of the sanding-paper and the
motor and to an uneven surface.
•
Stop the sander only after having lifted from the
workpiece.
•
Do not use the sander without sanding-paper.
•
Do not cover the ventilation-slots by your hands,
in order to achieve adequate cooling of the
motor.
Maintenance
•
The sander has no need to be maintained.
•
Before cleaning the sander, be sure to
disconnect the machine from the power-supply.
•
Only use a dry brush or cloth for cleaning the
housing from sanding-dust.
•
Do not use any detergents, since they will attack
the plastic-housing and do not let any liquids
enter the inside of the machine.
Summary of Contents for 12330
Page 5: ...2 3 4 9 1 8 5 6 7 ...


