background image

5 ENGLISH

Tips for maintaining maximum 

battery life

1. 

Charge the battery cartridge before completely 

discharged. Always stop tool operation and 

charge the battery cartridge when you notice 

less tool power.

2. 

Never recharge a fully charged battery car-

tridge. Overcharging shortens the battery 

service life.

3. 

Charge the battery cartridge with room tem-

perature at 10 °C - 40 °C (50 °F - 104 °F). Let 

a hot battery cartridge cool down before 

charging it.

4. 

Charge the battery cartridge if you do not use 

it for a long period (more than six months). 

FUNCTIONAL 

DESCRIPTION

CAUTION:


Always be sure that the tool is 

switched off and the battery cartridge is removed 

before adjusting or checking function on the tool.

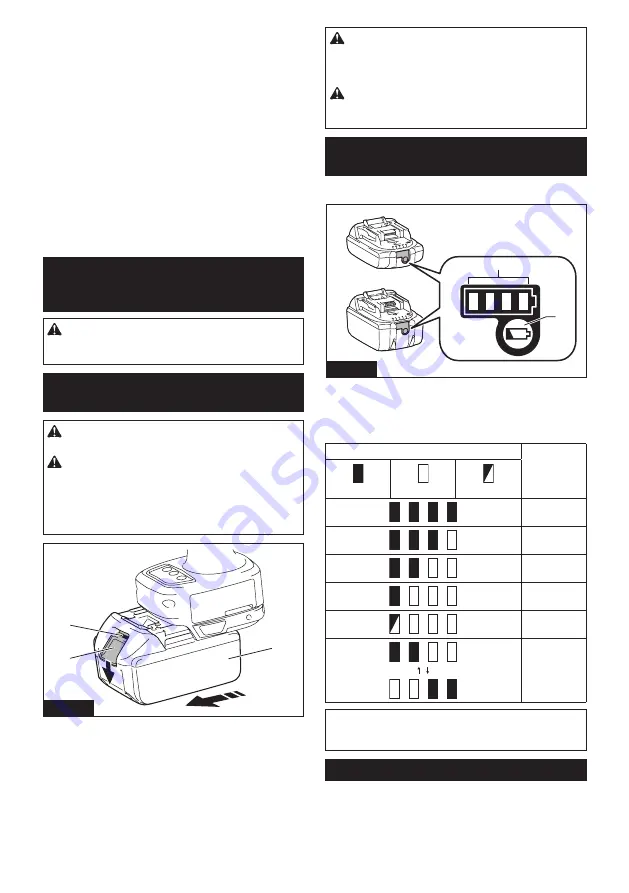
Installing or removing battery 

cartridge

CAUTION:


Always switch off the tool before 

installing or removing of the battery cartridge.

CAUTION:


Hold the tool and the battery car-

tridge firmly when installing or removing battery 

cartridge.

 Failure to hold the tool and the battery 

cartridge firmly may cause them to slip off your hands 

and result in damage to the tool and battery cartridge 

and a personal injury.

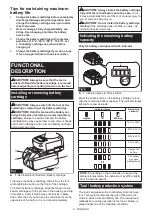
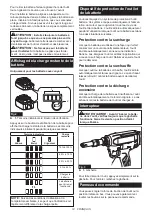
1

2

3

Fig.1

►    

1.

 Red indicator 

2.

 Button 

3.

 Battery cartridge

To remove the battery cartridge, slide it from the tool 

while sliding the button on the front of the cartridge.

To install the battery cartridge, align the tongue on the 

battery cartridge with the groove in the housing and slip 

it into place. Insert it all the way until it locks in place 

with a little click. If you can see the red indicator on the 

upper side of the button, it is not locked completely.

CAUTION:


Always install the battery cartridge 

fully until the red indicator cannot be seen.

 If not, 

it may accidentally fall out of the tool, causing injury to 

you or someone around you.

CAUTION:


Do not install the battery cartridge 

forcibly.

 If the cartridge does not slide in easily, it is 

not being inserted correctly.

Indicating the remaining battery 

capacity

Only for battery cartridges with the indicator

1

2

Fig.2

►    

1.

 Indicator lamps 

2.

 Check button

Press the check button on the battery cartridge to indi

-

cate the remaining battery capacity. The indicator lamps 

light up for a few seconds.

Indicator lamps

Remaining 

capacity

Lighted

Off

Blinking

75% to 100%

50% to 75%

25% to 50%

0% to 25%

Charge the 

battery.

The battery 

may have

malfunctioned.

NOTE:

 Depending on the conditions of use and the 

ambient temperature, the indication may differ slightly 

from the actual capacity.

Tool / battery protection system

The tool is equipped with a tool/battery protection sys

-

tem. This system automatically cuts off power to the 

motor to extend tool and battery life. The tool will auto

-

matically stop during operation if the tool or battery is 

placed under one of the following conditions:

Summary of Contents for BV4500-118

Page 1: ...Lockbolt Blind Rivet Installation Tool Outil pour boulons de blocage et rivets aveugles Herramienta de instalación para remaches de perno collar remaches ciegos BV4500 118 BV2200 118 IMPORTANT Read Before Using IMPORTANT Lire avant usage IMPORTANTE Lea antes de usar ...

Page 2: ...EN55014 1 2017 Electromagnetic compatibility Requirements for household appliances electric tools and similar apparatus Part 1 Emission EN 55014 2 2015 Electromagnetic compatibility Requirements for household appliances electric tools and similar apparatus Part 2 Immunity Product family stan dard Council Directive related to RoHS 2011 65 EU Directive 2011 65 EU of the European Parliament and of th...

Page 3: ...n and collection facilities ensure these are connected and properly used Use of dust collection can reduce dust related hazards 8 Do not let familiarity gained from frequent use of tools allow you to become complacent and ignore tool safety principles A careless action can cause severe injury within a fraction of a second 9 Always wear protective goggles to protect your eyes from injury when using...

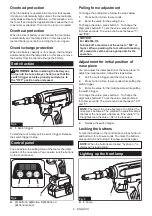
Page 4: ...wings show the symbols used for tool volts direct current Important safety instructions for battery cartridge 1 Before using battery cartridge read all instruc tions and cautionary markings on 1 battery charger 2 battery and 3 product using battery 2 Do not disassemble battery cartridge 3 If operating time has become excessively shorter stop operating immediately It may result in a risk of overhea...

Page 5: ... cartridge To install the battery cartridge align the tongue on the battery cartridge with the groove in the housing and slip it into place Insert it all the way until it locks in place with a little click If you can see the red indicator on the upper side of the button it is not locked completely CAUTION Always install the battery cartridge fully until the red indicator cannot be seen If not it m...

Page 6: ...w the steps below 1 Press button A for a few seconds 2 Enter the value for the pulling force To change the value press button C To change the digit press button B To set the value press button A for a few seconds The value can be set between 0 and 999 NOTICE For BV4500 118 To break off a mandrel set the value to 900 or higher When operating the tool without breaking off a mandrel set the value app...

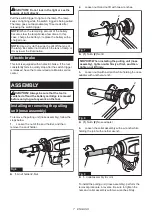
Page 7: ... service center ASSEMBLY CAUTION Always be sure that the tool is switched off and the battery cartridge is removed before carrying out any work on the tool Installing or removing the pulling unit nose assembly To remove the pulling unit nose assembly follow the steps below 1 Loosen the nut of the anvil holder and then remove the anvil holder 1 2 Fig 6 1 Anvil holder 2 Nut 2 Loosen nut A and nut B ...

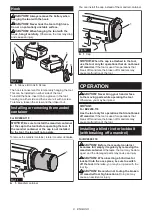
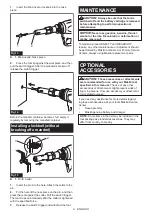
Page 8: ...stall the cap instead of the mandrel container 1 Fig 12 1 Cap NOTICE When the cap is attached to the tool use the tool only for operations that do not break off mandrel If the tool is used for operations that break off mandrels the broken off mandrels may cause malfunction of the tool OPERATION CAUTION Never bring your hand or face to the moving parts while operating the tool Otherwise you may be ...

Page 9: ... is switched off and the battery cartridge is removed before attempting to perform inspection or maintenance NOTICE Never use gasoline benzine thinner alcohol or the like Discoloration deformation or cracks may result To maintain product SAFETY and RELIABILITY repairs any other maintenance or adjustment should be performed by Makita Authorized or Factory Service Centers always using Makita replace...

Page 10: ... relative à la CEM 2014 30 UE EN55014 1 2017 Compatibilité électromagnétique exigences pour les appareils électrodomestiques outillages électriques et appareils analogues Partie 1 Émission EN 55014 2 2015 Compatibilité électromagnétique exigences pour les appareils électrodomestiques outillages électriques et appareils analogues Partie 2 Immunité Norme de famille de produits Directive du Conseil r...

Page 11: ...és si vous utilisez des dispositifs de protection tels qu un masque anti pous sière des chaussures à semelle antidérapante une coiffure résistante ou une protection d oreilles 3 Évitez les démarrages accidentels Assurez vous que l interrupteur est en position d arrêt avant de brancher l outil à la prise de courant et ou au bloc piles et avant de prendre ou de transporter l outil Vous ouvrez la por...

Page 12: ...qui risqueraient d établir une connexion entre les bornes La mise en court circuit des bornes de batterie peut causer des brûlures ou un incendie 4 Dans des conditions d utilisation inadéquates de la batterie il peut y avoir fuite d électrolyte évitez tout contact avec ce liquide En cas de contact accidentel rincez avec beaucoup d eau Si le liquide pénètre dans vos yeux il faut aussi consulter un ...

Page 13: ...llées Recouvrez de ruban isolant les contacts exposés et emballez la batterie de sorte qu elle ne puisse pas se déplacer à l intérieur de l emballage 11 Suivez la réglementation locale concernant l élimination de la batterie 12 N utilisez les batteries qu avec les produits spécifiés par Makita Installer les batteries sur des produits non conformes peut entraîner un incendie une chaleur excessive u...

Page 14: ...Dispositif de protection de l outil et de la batterie L outil est équipé d un système de protection d outil batterie Ce système coupe automatiquement l alimen tation du moteur pour augmenter la durée de vie de l outil et de la batterie L outil s arrête automatiquement pendant l utilisation lorsque l outil ou la batterie est dans l une des situations suivantes Protection contre la surcharge Lorsque...

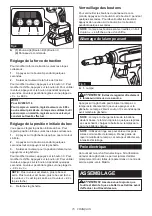
Page 15: ...s la valeur est élevée plus le bec est serré Plus la valeur est basse plus le bec est lâche La valeur 0 est la plus serrée et la valeur 99 la plus lâche 4 Relâchez la gâchette Verrouillage des boutons Pour verrouiller les boutons du panneau de com mande appuyez sur le bouton A et le bouton C pendant quelques secondes Pour déverrouiller les boutons appuyez de nouveau sur le bouton A et le bouton C ...

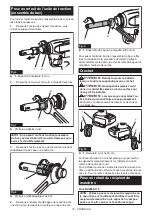
Page 16: ...z à serrer fermement les écrous et l ensemble de bague de mandrin à l aide de deux clés Crochet ATTENTION Retirez toujours la batterie lorsque l outil est suspendu par son crochet ATTENTION Ne suspendez jamais l outil dans un endroit très élevé ou à une surface qui risque d être instable ATTENTION Lorsque vous suspendez l ou til à l aide du crochet faites le soigneusement Autrement l outil risquer...

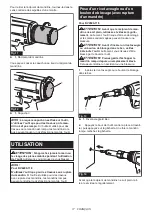
Page 17: ...ins les mandrins rompus peuvent entraîner le dysfonctionnement de l outil Pose d un rivet aveugle ou d un boulon de blocage avec rupture d un mandrin Pour BV4500 118 ATTENTION Avant que le récipient de man drins ne soit plein retirez le et videz le réguliè rement Autrement l outil risque d être endommagé et les pièces endommagées peuvent causer une blessure ATTENTION Avant d insérer un rivet aveug...

Page 18: ...intenir la SÉCURITÉ et la FIABILITÉ du pro duit les réparations et tout autre travail d entretien ou de réglage doivent être effectués dans un centre de service après vente autorisé ou une usine Makita exclusivement avec des pièces de rechange Makita ACCESSOIRES EN OPTION ATTENTION Ces accessoires ou pièces complémentaires sont recommandés pour l utili sation avec l outil Makita spécifié dans ce m...

Page 19: ...ricas de mano operadas mediante motor Seguridad Parte 1 Requisitos generales Directiva del Consejo sobre compatibilidad electromagnética EMC 2014 30 EU EN55014 1 2017 compatibilidad electromagnética Requisitos para electrodomésticos herramientas eléc tricas y aparatos similares Parte 1 Emisión EN 55014 2 2015 compatibilidad electromagnética Requisitos para electrodomésticos herramientas eléctricas...

Page 20: ...de terminar en una lesión grave 2 Use equipo de protección personal Póngase siempre protección para los ojos El equipo protector tal como máscara contra el polvo zapa tos de seguridad antiderrapantes casco rígido y protección para oídos utilizado en las condiciones apropiadas reducirá el riesgo de lesiones 3 Impida el encendido accidental Asegúrese de que el interruptor esté en la posición de apag...

Page 21: ...les pueden actuar creando una cone xión entre las terminales de la batería Originar un cortocircuito en las terminales puede causar quemaduras o incendios 4 En condiciones abusivas podrá escapar líquido de la batería evite tocarlo Si lo toca accidentalmente enjuague con agua Si hay contacto del líquido con los ojos busque asis tencia médica Puede que el líquido expulsado de la batería cause irrita...

Page 22: ...s más deta lladas Pegue o cubra con cinta adhesiva los contactos abiertos y empaque la batería de manera que ésta no pueda moverse dentro del paquete 11 Siga las regulaciones locales relacionadas al desecho de las baterías 12 Utilice las baterías únicamente con los pro ductos especificados por Makita Instalar las baterías en productos que no cumplan con los requisitos podría ocasionar un incendio ...

Page 23: ...agadas Parpadeando 75 a 100 50 a 75 25 a 50 0 a 25 Cargar la batería La batería pudo haber funcionado mal NOTA Dependiendo de las condiciones de uso y la temperatura ambiente la indicación podrá diferir ligeramente de la capacidad real Sistema de protección para la herramienta batería La herramienta está equipada con un sistema de pro tección de la herramienta batería Este sistema corta en forma a...

Page 24: ...a posición inicial de la boquilla Puede ajustar la posición inicial de la boquilla Para ajustar la posición inicial siga los pasos a continuación 1 Jale el gatillo interruptor hasta que el motor se pare 2 Oprima el botón A durante unos segundos mien tras jala del gatillo interruptor 3 Introduzca el valor apropiado para la posición inicial mientras jala el gatillo interruptor Para cambiar el valor ...

Page 25: ...extracción de la unidad de tracción sistema de la boquilla Para extraer la unidad de tracción sistema de la boqui lla siga los pasos a continuación 1 Afloje la tuerca del portayunque y luego extraiga el portayunque 1 2 Fig 6 1 Portayunque 2 Tuerca 2 Afloje la tuerca A y la tuerca B con dos llaves 1 2 Fig 7 1 Tuerca A 2 Tuerca B AVISO Al instalar la unidad de tracción sistema de la boquilla apriete...

Page 26: ... instalar la tapa en lugar del contenedor del mandril 1 Fig 12 1 Tapa AVISO Cuando la tapa se acopla a la herra mienta utilice la herramienta solo para operacio nes que no desprendan mandril Si la herramienta se usa para operaciones que desprenden mandriles los mandriles desprendidos pueden causar averías en la herramienta OPERACIÓN PRECAUCIÓN Nunca acerque las manos o la cara a las piezas móviles...

Page 27: ...té apagada y el cartucho de batería extraído antes de intentar realizar una inspección o mantenimiento AVISO Nunca use gasolina bencina diluyente tíner alcohol o sustancias similares Puede que esto ocasione grietas o descoloramiento Para mantener la SEGURIDAD y FIABILIDAD del pro ducto las reparaciones y cualquier otra tarea de man tenimiento o ajuste deberán ser realizadas en centros de servicio ...

Page 28: ...por el lijado aserrado esmerilado taladrado y otras actividades de la construcción contienen sustancias químicas reconocidas por el Estado de California como causantes de cáncer defectos de nacimiento y otros peligros de reproducción Algunos ejemplos de estos productos químicos son plomo de pinturas a base de plomo sílice cristalino de ladrillos y cemento y otros productos de albañilería y arsénic...

Reviews: