


PRECAUTIONS
SETUP
DVD FUNCTIONS
INFORMATION
Español
remote control (NB098UD)
AA (1.5 V) battery x 2
RCA audio / video cables
(WPZ0102TM018 /
WPZ0102LTE01)
owner’s manual
(1VMN28753)
Owner’s Manual
DVD / CD Player
MDV3000/F7
Supplied Accessories
Owner’s Manual
Please read before using this unit.
If you need additional operating assistance after
reading this owner’s manual, please call
TOLL FREE : 1-800-605-8610
or visit our web site at
www.magnavox.com/support
Contents
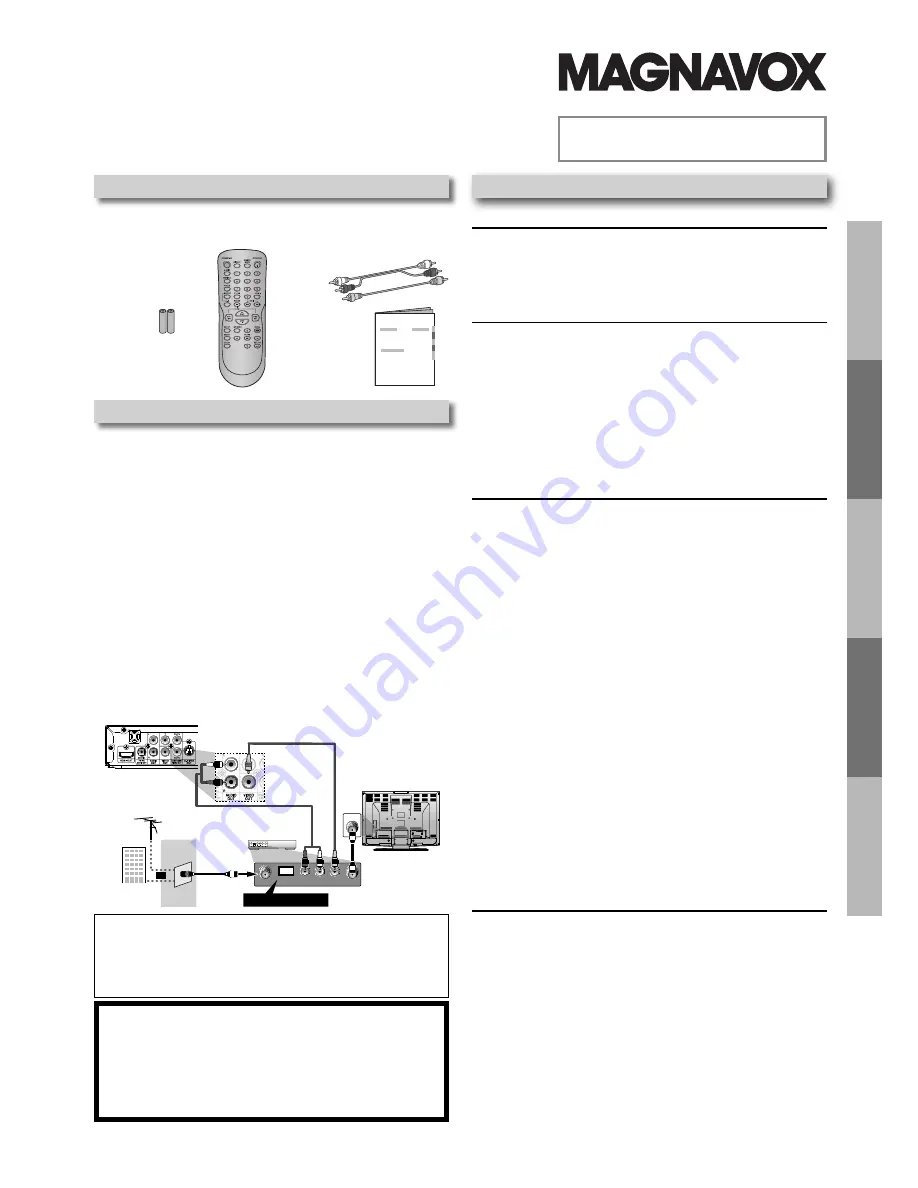
If your TV has antenna in jack only
, it is still possible to
connect this unit to your TV by using an RF modulator.
In this case, follow the instructions below.
1)
Disconnect the power cords of the devices from the
AC outlet.
2)
Make the connection as illustrated below.
3)
Set your RF modulator’s channel 3/4 switch to
either 3 or 4
, whichever the TV channel is least used in
your area. If your RF modulator has a
modulator / antenna switch, set it according to the
manual supplied with the RF modulator.
4)
Plug in the power cords of the devices to the AC outlet.
5)
Turn on your TV and choose the same channel as
you set the RF modulator’s channel 3/4 switch to.
For more details, follow the manual supplied with the
RF modulator.
rear of TV
rear of your RF
modulator
AUDIO IN
TO TV
ANT. IN
L
R
CHANNEL
4
3
VIDEO IN
ANT. IN
Set channel 3 or 4
rear of this unit
RF coaxial cable
RF coaxial
cable
VHF / UHF
antenna
cable TV
company
or
RCA video cable
RCA audio cable
Connecting to RF Modulator (Not Supplied)
Note:
• RF modulator is not supplied with this unit. You need to
purchase it at your local store.
• The quality of picture may become poor if this unit is
connected to an RF modulator.
© 2009 Funai Electric Co., Ltd.
INSTRUCCIONES EN
ESPAÑOL INCLUIDAS.
PRECAUTIONS
IMPORTANT SAFETY INSTRUCTIONS ....................................... 2
About the Discs ......................................................................... 5
Playable Discs ...........................................................................................5
Unplayable Discs .....................................................................................5
SETUP
Connections .............................................................................. 6
Connection to a TV .................................................................................6
HDMI Audio ...............................................................................................7
HDMI Mode and Actual Output Signals .........................................7
Connection to an Audio System .......................................................8
Rear Terminals ..........................................................................................8
About the Remote Control ....................................................... 9
Remote Control .......................................................................................9
Installing the Batteries for the Remote Control ...........................9
DVD FUNCTIONS
Playback .................................................................................. 10
MP3 / JPEG Playback ................................................................ 11
Search Functions ..................................................................... 11
Using Track / File / Folder Search .....................................................11
Using Title / Chapter Search ..............................................................11
Using Time Search .................................................................................11
On-Screen Display ................................................................... 12
Repeat / Random / Programmed Playback ............................ 13
Repeat Playback .....................................................................................13
Repeat A-B Playback .............................................................................13
Random Playback ..................................................................................13
Programmed Playback .........................................................................13
Special Settings ....................................................................... 14
Subtitle Language..................................................................................14
Audio Language .....................................................................................14
Camera Angles ........................................................................................14
Stereo Sound Mode ..............................................................................14
DVD Setting ............................................................................. 15
Language Setting ...................................................................................15
Display Setting ........................................................................................16
Video Setting ...........................................................................................16
Audio Setting ...........................................................................................17
Others Setting .........................................................................................18
INFORMATION
Troubleshooting Guide ........................................................... 19
Specifications .......................................................................... 19
LIMITED WARRANTY ................................................................ 20
Español .................................................................................... 23
Quick Use Guide.......................................................... Back Cover
Summary of Contents for MDV3000/F7
Page 23: ...21 EN INFORMATION Memo...
Page 24: ...22 EN INFORMATION Memo...


