background image


blue PiraT2 / 5E / Mini 

Camera User Guide


Datum: 16.09.2016 

Seite 46 von 77 


bP2-Mini_Camera_UserGuide_V2.4.1.doc 

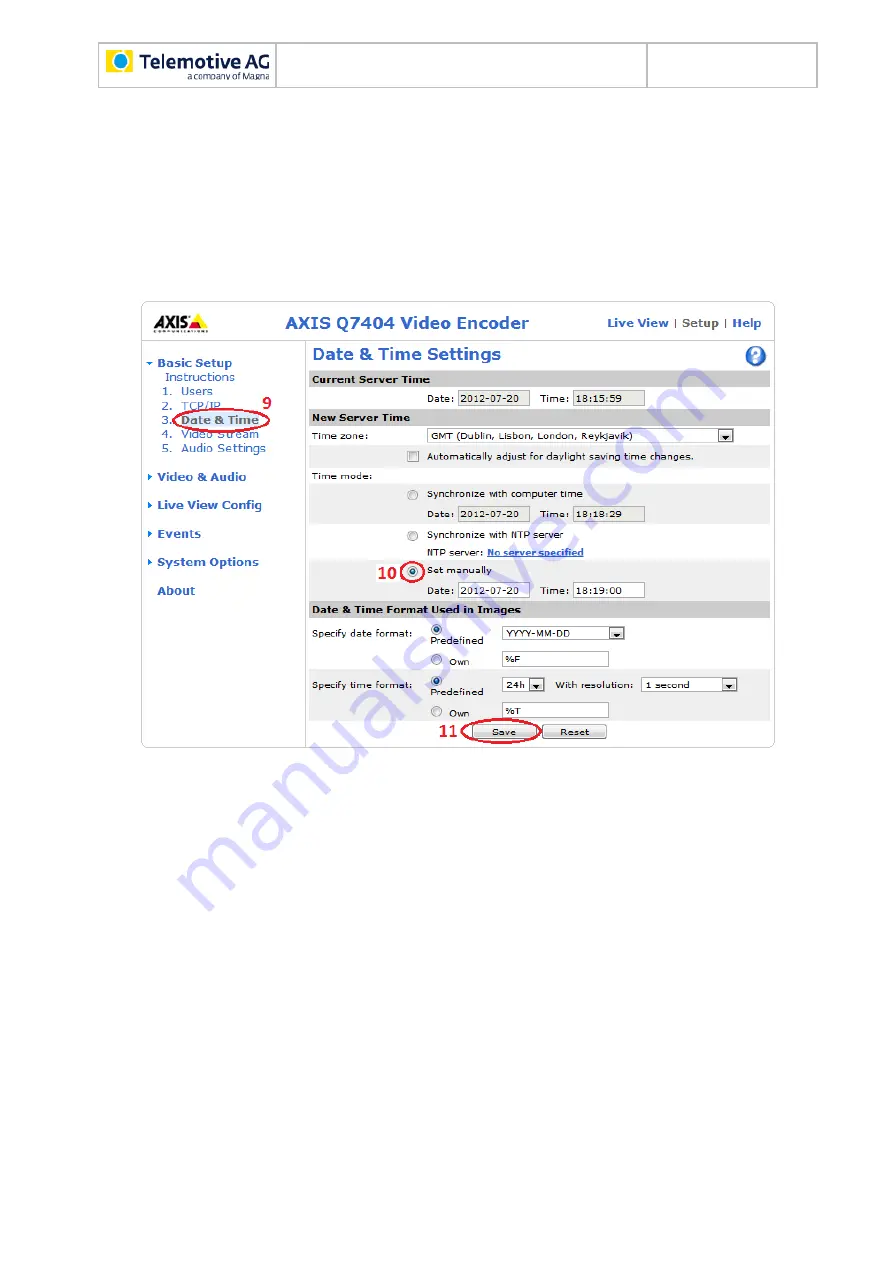
8.4  Setting date and time 

Change to the entry 

[Basic Setup]


[3. Date & Time]

 (9)

. Choose the <Time mode> 

(o) Set 

manually

 (10)

. Set up date and time. Confirm the settings with 

[Save]


(11)

Comment: 
The time set here is initially only a temporary adjustment. In our system the data logger 
is the time master and overwrites the logger time after successfully synchronizing with 
the video server. 


Figure 8.8: Set date and time manually 


You can also display date and time on the video image. 

Attention: 
Before you start recording always set the date and time in the data logger first. 
It is impossible to change the timestamp at recorded video data. This means, the setup of 
a new logger time before downloading does not change the time within the video pic-
tures. In this case, the timestamps of the other channels and the video picture timestamp 
could not match. 

Click 

[Basic Setup]


[4 Video Stream]

 (6)

. <------ Unterschied zu deutscher Version. Activate 

both checkboxes 

Include date

 and 

Include time


(7)

 to activate the display on the video image. 

Confirm the settings with 

[Save]

 (9)

If desired, change format options like <Text color>, <Text background color> and text place 

(8)

Confirm the settings with 

[Save]

 (9)

Summary of Contents for blue PiraT2

Page 1: ...blue PiraT2 5E Mini Remote Camera User Guide Version 2 4 1 16 09 2016...

Page 2: ...tion 30 7 Configuring the network camera AXIS 207 210 211 31 7 1 Related manuals 31 7 2 Automatic configuration recommended 31 7 2 1 Installing the camera template 32 7 2 2 Creating the user admin 34...

Page 3: ...3 von 77 bP2 Mini_Camera_UserGuide_V2 4 1 doc 13 3 Front display of blue PiraT2 67 14 Downloading video data 68 15 Converting video data 69 16 Watching videos 70 17 Axis IP Utility 71 18 Abbreviations...

Page 4: ...e is not entitled to transmit or to transfer the software or its rights from this license agreement 6 Licensor is not liable to licensee for any damages including compensatory special incidental exemp...

Page 5: ...ud ing negligence or other legal or equitable theory 5 The burden of proof is with the customer 6 The Telemotive AG does ensure the legal warranty according to German law Except for warran ties expres...

Page 6: ...ailable and they cannot be converted to one file the system creates several files In this way no video data is lost Attention The Video Encoder and the cameras are not set by default to standby mode w...

Page 7: ...ra User Guide Datum 16 09 2016 Seite 7 von 77 bP2 Mini_Camera_UserGuide_V2 4 1 doc To ensure the most reliable operation of your system as possible please make sure to use al ways current firmware and...

Page 8: ...nd much more Different blue PiraT Mini can be flexibly expanded to one cluster and therefore handled very easily by using Telemotive System Link Remote Control Touch optional Operate your blue PiraT M...

Page 9: ...H 264 MJPEG and MPEG 4 Therefore they are capable to reduce bandwidth and storage requirements without compromising image quality The AXIS Q7404 Video Encoder contains four separate video channels on...

Page 10: ...raT2_UserManual pdf User manual for blue PiraT Mini https www telemotive de 4 uploads media blue_PiraT_Mini_UserManual pdf User manual for Remote Control Touch https sc telemotive de 4 uploads media R...

Page 11: ...the camera with the associated main unit Connect the power supply to the main unit Connect your PC or laptop via Ethernet cable to the main unit Turn on the power supply All LEDs should light green af...

Page 12: ...tp 192 168 0 90 Choose your password and type it in This password will be needed later If the system asks for a further authentication please type in the same password like before Figure 5 2 Create a...

Page 13: ...UserGuide_V2 4 1 doc Thereafter you have to set the power line frequency of the power supply In Europe 50 Hz is common Figure 5 4 Configure the power line frequency Now you should see the live stream...

Page 14: ...up Basic Setup 1 Users Add Figure 5 6 Add a new user A new window is opened Name the new user admin and define a password This user and password will be needed later too Recommended User name admin Pa...

Page 15: ...anually You can also display date and time on the video image Attention Before you start recording always set the date and time in the data logger first It is impossible to change the timestamp at rec...

Page 16: ...ude date and time in the video stream The setup for in the video image embedded timestamps is finished Note In case that the video is stuttering or has breaks please reduce the preset Maximum frame ra...

Page 17: ...IPv4 Address Configuration o Use the following IP address Type in these data IP address 192 168 1 90 Subnet mask 255 255 255 0 Figure 5 10 Setting an IP address Confirm the settings with Save Note By...

Page 18: ...tp 192 168 1 90 Note Finally change your PCs or laptops IP configuration back to dynamic configuration 5 6 Resetting configuration The AXIS P series can be set to default settings by the following ste...

Page 19: ...d main unit Connect the power supply to the main unit Connect your PC or laptop via Ethernet cable to the main unit Turn on the power supply All LEDs should light green after about 60 seconds Network...

Page 20: ...Choose your password and type it in This password will be needed later If the system asks for a further authentication please type in the same password like before Figure 6 3 Creating an user password...

Page 21: ...i_Camera_UserGuide_V2 4 1 doc Thereafter you have to set the capture mode and the power line frequency of the power supply In Europe 50 Hz is common Figure 6 5 Configure the capture mode F41 Figure 6...

Page 22: ...Mini Camera User Guide Datum 16 09 2016 Seite 22 von 77 bP2 Mini_Camera_UserGuide_V2 4 1 doc Now you should see the live stream of the connected network camera Figure 6 7 Picture of a connected networ...

Page 23: ...rights Click Setup Basic Setup 1 Users Add Figure 6 8 Adding a new user A new window is opened Name the new user admin and define a password This user and password will be needed later too Recommende...

Page 24: ...Setup 3 Date Time Choose the Time mode o Set manually Set up date and time Confirm the settings with Save Comment The time set here is initially only a temporary adjustment In our system the data logg...

Page 25: ...e within the video pic tures In this case the timestamps of the other channels and the video picture timestamp could not match Click Basic Setup 4 Video Stream Activate both checkboxes Include date an...

Page 26: ...lude date and time in the video stream The setup for in the video image embedded timestamps is finished Note In case that the video is stuttering or has breaks please reduce the preset Maximum frame r...

Page 27: ...dio Activate the checkbox Enable audio to enable the general audio functionality Note Using the AXIS F44 these settings must be made for Camera 1 to 4 Basic Setup 4 Video Stream Camera Figure 6 13 Ena...

Page 28: ...s additionally the functionality to power a microphone Figure 6 16 Select audio input Microphone The setting of the Input gain can be used to configure an internal preamplifier for signal im provement...

Page 29: ...Figure 6 18 Setting an IP address Confirm the settings with Save Note By changing the IP address you lose the connection to the network camera This also will be told to you in an information window Fi...

Page 30: ...ra AXIS F41 F44 can be set to default settings by the following steps 1 Disconnect the connection to the power supply 2 Press and hold the control button next to the SD slot and 3 reconnect to the pow...

Page 31: ...r this variant a template is available 7 1 Related manuals AXIS 207 User Manual 1 AXIS 210 User Manual 2 AXIS 211 User Manual 3 7 2 Automatic configuration recommended Needed software AXIS Camera Mana...

Page 32: ...S ConfigTemplate_vX X cmt configures your camera automatically The download file is available in our ServiceCenter at blue PiraT Dokumen tations under the manual of the camera connection 1 Click Apply...

Page 33: ...mera User Guide Datum 16 09 2016 Seite 33 von 77 bP2 Mini_Camera_UserGuide_V2 4 1 doc 3 Click OK to confirm the template A dialog opens 4 Check the configuration process Figure 7 3 Result of the confi...

Page 34: ...hts 1 Click the configured AXIS camera with the right mouse button 2 Click User Management Add Edit User in the shortcut menu Figure 7 4 Add a user A dialog opens 3 Add administrator as follows Name t...

Page 35: ...a via hardware reset This is described in the camera manual In this case you have to use the fix IP address 192 168 0 10 for your PC The camera is reachable by the IP address 192 168 0 90 A step by st...

Page 36: ...92 168 1 90 Subnet mask 255 255 255 0 Default router 192 168 1 1 Figure 7 7 Setting an IP address Note When using a port on the rear side of the logger please type in the IP address 192 168 0 90 and t...

Page 37: ...r a special user is needed with administrator rights Click Setup Basic Configuration 1 Users Add A new window is opened Name the new user admin and define a password This user and password will be nee...

Page 38: ...blue PiraT2 5E Mini Camera User Guide Datum 16 09 2016 Seite 38 von 77 bP2 Mini_Camera_UserGuide_V2 4 1 doc Figure 7 10 Enable anonymous viewer login Index...

Page 39: ...time manually You can also display date and time on the video image Attention Before you start recording always set the date and time in the data logger first It is impossible to change the timestamp...

Page 40: ...lude date and time in the video stream The setup for in the video image embedded timestamps is finished Note In case that the video is stuttering or has breaks please reduce the preset Maximum frame r...

Page 41: ...09 2016 Seite 41 von 77 bP2 Mini_Camera_UserGuide_V2 4 1 doc 7 3 5 Setting MPEG 4 Change to the entry Video Image Advanced MPEG 4 Change Length to 32 Choose the Maximum bit rate o Limited to kbit s T...

Page 42: ...of the Video En coder are numbered Always start with the first connector Connect the power supply to the Video Encoder Connect your PC or laptop via Ethernet cable to the Video Encoder Turn on the pow...

Page 43: ...d and type it in This password will be needed later If the system asks for a further authentication please type in the same password like before Figure 8 3 Creating a user password After setting the p...

Page 44: ...a language If you download a language file to your PC it has to be selected in the next step and installed by clicking Weiter In some cases a browser add on is necessary to display the video stream No...

Page 45: ...lick Setup 1 Basic Setup 1 Users 2 Add 3 Figure 8 7 Adding a new user A new window opens Name the new user admin and define a password 4 This user and password will be needed later too Recommended Use...

Page 46: ...isplay date and time on the video image Attention Before you start recording always set the date and time in the data logger first It is impossible to change the timestamp at recorded video data This...

Page 47: ...ding date and time in the video stream The setup for in the video image embedded timestamps is finished Note In case that the video is stuttering or has breaks please reduce the preset Maximum frame r...

Page 48: ...up 2 TCP IP 12 Choose the IPv4 Address Configura tion o Use the following IP address 13 Type in these data 14 IP address 192 168 1 90 Subnet mask 255 255 255 0 Confirm the settings with Save 15 Figure...

Page 49: ...e configuration again The first camera connected to the Video Encoder AXIS Q7404 is now configured If more than one camera should be connected the same changes for all connected cameras have to be don...

Page 50: ...ideo En coder are numbered Always start with the first connector Connect the power supply to the Video Encoder Connect your PC or laptop via Ethernet cable to the Video Encoder Turn on the power suppl...

Page 51: ...ress of the video server 192 168 0 90 Choose your password and type it in This password will be needed later If the system asks for a further authentication please type in the same password like befor...

Page 52: ...wnload a language file to your PC it has to be selected in the next step and installed by clicking Weiter In some cases a browser add on is necessary to display the video stream Now you should see the...

Page 53: ...Setup 1 Users 2 Add 3 Figure 9 7 Adding a new user A new window is opened Name the new user admin and define a password 4 This password will be needed later Recommended User name admin Password 2x8bg4...

Page 54: ...y You can also display date and time on the video image Attention Before you start recording always set the date and time in the data logger first It is impossible to change the timestamp at recorded...

Page 55: ...lude date and time in the video stream The setup for in the video image embedded timestamps is finished Note In case that the video is stuttering or has breaks please reduce the preset Maximum frame r...

Page 56: ...owing IP address 4 Type in these data 5 IP address 192 168 1 90 Subnet mask 255 255 255 0 Confirm the settings with Save 6 Figure 9 11 Setting an IP address Note The video server AXIS P7214 has only o...

Page 57: ...u in an information window Figure 9 12 Hint 1 Figure 9 13 Hint 2 For reconnecting you have to change your computers IP address to 192 168 1 80 Then type in your browser the new IP address of the netwo...

Page 58: ...interface htm Attention If you use a newer version of the program it may be that the communication between software client and data logger is disturbed That is because the program changes some networ...

Page 59: ...erGuide_V2 4 1 doc After selecting your device and logging in with your chosen password for the user root from before you add the device to the device list with Next and Finish in the next window Figu...

Page 60: ...elect Parame ter Management Create Parameter File Figure 10 6 Creating Parameter File The program reads the configuration from the video server Activate the checkbox Select De select all and then clic...

Page 61: ...l IP addresses to the factory default settings First disconnect the power supply from the AXIS Video Encoder Then press and hold the RE SET button 1 while reconnecting with the power supply AXIS Q7404...

Page 62: ...case the front port still can be used for access to the logger while the Video Encoder is recording data This alternative is described in the following Connect the Gigabit Ethernet port of the logger...

Page 63: ...Client Please be sure about the setting of the logger s standby You can activate or deactivate the automatic standby at General Standby If active there are two different time settings for network conn...

Page 64: ...hannel e g CAN channel whose activity coincides with the camera ac tivity 13 2 Camera settings Click on the application Open configuration in the Telemotive System Client Expand the folder Camera in t...

Page 65: ...eo server with one IP and one quad channel AXIS P7214 F44 Note Quad channel means that up to 4 video streams are recorded in one window Figure 13 4 General settings of the camera functionality If you...

Page 66: ...e data logger 7 The data logger has to be in the same subnet as the Video Encoder network camera Figure 13 6 Configuring the cameras If you have selected under General make the same changes for all co...

Page 67: ...camera license is installed but no configuration has been performed All four channels are however recognized Figure 13 1 Display VID Case 2 X means all parameters are configured The video data are no...

Page 68: ...ll of the other trace files are recorded in the Telemotive format from the logger video signals are directly provided as MPEG4 stream from the camera and saved as it is on the log ger For the video ap...

Page 69: ...e client output window 4 Please keep in mind that when converting into one video file the system can combine a maxi mum of 400 video blocks per file After that the client opens a new file For both opt...

Page 70: ...data logger They can be used only if they have been downloaded or converted and saved to a computers disk first They can be played on any standard video player Note In case that the video is stutteri...

Page 71: ...bal en support downloads axis ip utility Figure 17 1 Axis IP Utility AXIS IP Utility helps you set the IP address of an Axis network video product Axis devices on the network are automatically discove...

Page 72: ...ntroller Area Network CCP CAN Calibration Protocol CF Compact Flash CRO Command Receive Object DAQ Data Acquisition DTO Data Transmission Object ECL Electrical Control Line ECU Electronic Control Unit...

Page 73: ...otocol SHA Secure Hash SSL Secure Sockets Layer TCP IP Transmission Control Protocol Internet Protocol TLS Transport Layer Security TMP Telemotive Packetformat TSL Telemotive System Link UDP User Data...

Page 74: ...ure 6 9 Enable anonymous viewer login 24 Figure 6 10 Set date and time manually 24 Figure 6 11 Settings for cameras 1 4 25 Figure 6 12 Include date and time in the video stream 26 Figure 6 13 Enable a...

Page 75: ...ure 9 12 Hint 1 57 Figure 9 13 Hint 2 57 Figure 10 1 AXIS Camera Management Client 58 Figure 10 2 Adding devices step 1 58 Figure 10 3 Adding devices step 2 59 Figure 10 4 Adding devices step 3 59 Fig...

Page 76: ...blue PiraT2 5E Mini Camera User Guide Datum 16 09 2016 Seite 76 von 77 bP2 Mini_Camera_UserGuide_V2 4 1 doc 20 List of tables Table 18 1 Abbreviations 73 Index...

Page 77: ...Frankfurter Ring 115a 80807 M nchen Tel 49 89 357186 0 Fax 49 89 357186 520 E Mail info telemotive de Web www telemotive de Sales Tel 49 89 357186 550 Fax 49 89 357186 520 E Mail sales telemotive de S...

Reviews: