In our
ServiceCenter
you will find detailed
manuals
for all MAGNA Telemotive devices and
the
System Client
and some optional features we are offering.
If you do not have an account for the ServiceCenter please contact
1.
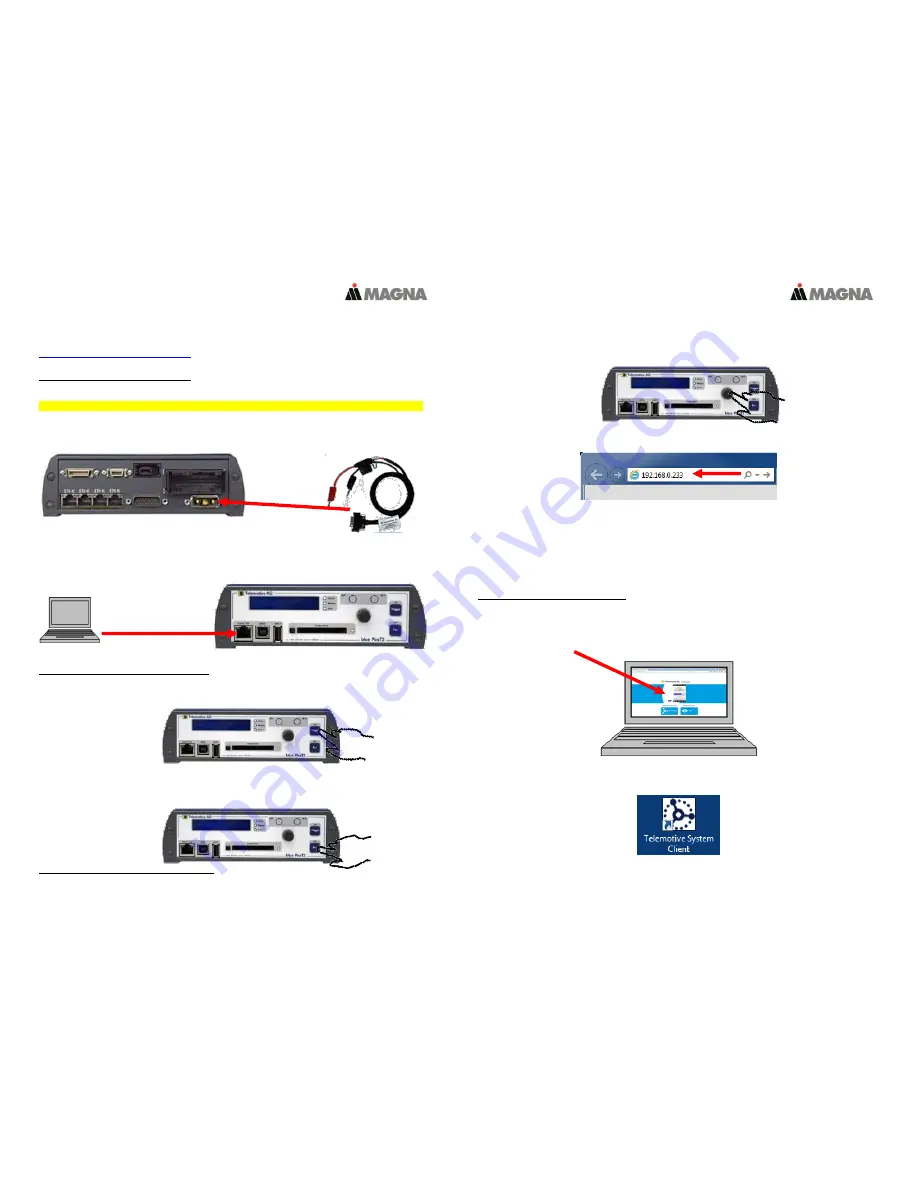
Hook up the blue PiraT2 5E
Step 1:
Connect the
blue PiraT2 5E
to the vehicle battery or a power supply via the power harness
(
red/Vbat/+/clamp30
and
black/GND/-/clamp31
).
Note: blue PiraT2 5E has a separate power cable which is separated from the main cable set!
ATTENTION: If you have ordered an external antenna eg. for GPS, the connector has to be bolt
only by hand, NOT with any tools!
Step 2:
Connect the Ethernet port with the Ethernet port of your computer by using an Ethernet cable.
Note: By default the device
is configured as Automatic DHCP configuration for with IP address
192.168.0.233!
2.
Power on/off the blue PriaT2 5E
Step 3:
Switch on the blue PiraT2 5E by pressing the
[ON / Trigger]
button.
The blue PiraT2 - Logo changes into showing the available interfaces.
To switch off the blue PiraT2 please press the
[OFF / Esc]
button for a few seconds.
3.
Connecting to the blue PiraT2 5E
Step 4:
By pressing the rotary button you will enter the operation menu. Here you can navigate through the
menu on the front display by rotating and pressing the rotary button.
Please choose here the Menu
[1] Info
navigate to infoscreen
9/10 IP
The shown IP address will be needed in the next step.
Step 5:
Open your Internet browser, enter the IP address from step 4 and confirm.
Note:
Make sure your network settings will be set to
“apply IP address automatically”
The needed Java Runtime Environment is included into the client and must not be installed
separately.
The connection between the device and the computer will be established and the Client portal is shown.
4.
Installing the Sytem Client
Step 6:
Please click on the image to start the download of the client (~130 MB) directly from the logger.
Then choose
[Save]
to save the file to your local computer.
The installation setup can be started by double clicking on the setup file. Follow the instructions, choose
an installation directory and finalize the installation by pressing
[Install].
Step 7:
After successful installation you will find the
System Client
icon on your desktop.
Double-click the icon to start the application.


