background image

English

56

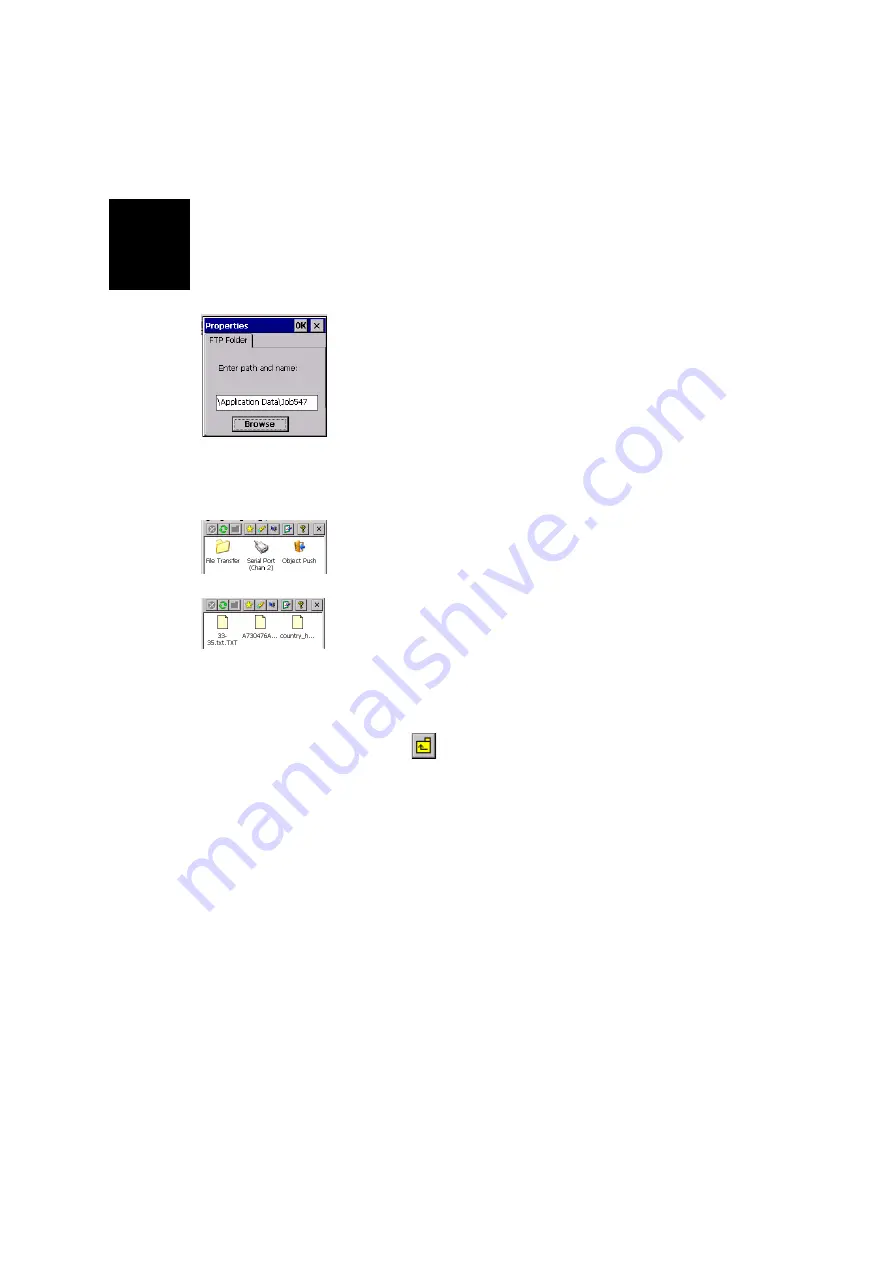
To change the source folder, tap and hold the File Transfer 
Service icon and then select 

Properties

. A window opens in 

which you can use the Browse button to select the desired 
folder.

-

On the inquiring MobileMapper CX:

• Run Bluetooth.
• Display the properties of its File Transfer Service as 

explained above for the host device.

• Enter the path and name of the local folder through 

which files will be exchanged with the host (for exam-
ple the path and folder name are: \Application 
Data\Job547\).

• Detect the host MobileMapper CX. Note that 

MobileMapper CX is detected as a WindowsCE PDA.

• If required, pair the two devices (you’ll need to enter 

the PIN code defined in the host MobileMapper CX 
Bluetooth properties; see 

page 52

).

• List the local services offered by the remote (host) 

MobileMapper CX.

• Double-tap the remote File Transfer Service icon to 

connect the inquiring unit to the host’s File Transfer 
Service. As a result the Bluetooth Manager window 
now lists the content of the remote folder (in our exam-
ple, the window would show the content of \Applica-
tion Data\Job101\ on the host MobileMapper CX).
If the remote folder contains a sub-folder (\Application 
Data\Job101\Day1\ for example), you can double-tap 
on the sub-folder icon to list the content of this sub-
folder and then download files from this subfolder.

Tap 

 in the toolbar when you want to go up to the 

initial folder (\Application Data\Job101\).

To download files from the host to the inquiring 
device

, tap and hold the icon corresponding to the file 

you want to download and then select 

Get file

. This 

starts the file transfer. Once the transfer is complete, 
the downloaded file can be found in the preset folder 
on the inquiring device (in our example, the file would 
be found in \Application Data\Job547\).

Summary of Contents for MobileMapper CX - Hiking GPS Receiver

Page 1: ...MobileMapper CX Getting Started Guide...

Page 2: ...entire risk of using the software PURCHASER S EXCLUSIVE REMEDY UNDER THIS WRIT TEN WARRANTY OR ANY IMPLIED WARRANTY SHALL BE LIMITED TO THE REPAIR OR REPLACEMENT AT MAGEL LAN NAVIGATION S OPTION OF A...

Page 3: ...ll substantially conform to the then current user documentation provided with the software including up dates thereto Magellan Navigation s sole obligation shall be the correction or replacement of th...

Page 4: ...tion of incidental or consequential damages so the above limitation or exclusion may not apply to you 7 COMPLETE AGREEMENT This written warranty is the complete final and exclusive agreement between M...

Page 5: ...Alphanumeric Keypad 11 Using the Stylus 12 Initializing GPS 13 Setting Up GPS Positioning 14 Viewing Current GPS Status 15 Signal Quality Navigation Window Sig Nav 16 Azimuth and Elevation Graph Azmt...

Page 6: ...Initialization 45 GPS Ports Configuration 46 GPS Reset 46 GPS Settings 47 GPS Status 47 Mission Planning 47 Switching Between Two Utilities 49 Bluetooth Manager Module 50 Introduction 50 Host and Inq...

Page 7: ...COM2 65 Optimizing Accuracy 66 General Guidelines 66 Recording Data for Post Processing 67 Appendices 69 Updating MobileMapper CX OS Firmware 69 Updating MobileMapper CX GPS Firmware 70 About Almanac...

Page 8: ...English...

Page 9: ...he GIS software that is right for you Key Features Integrated GPS with real time sub meter accuracy using SBAS Ready for real time RTCM corrections Integrated Bluetooth wireless technology Integrated...

Page 10: ...nt Kit SDK and GPS Application Programming Interface API delivered free of charge after a Business Partner Agreement has been approved Please contact Magellan to discuss your software development proj...

Page 11: ...ton Power indicator Battery indicator GPS receiver includes Integrated GPS accurate to sub meter with WAAS EGNOS ReadyforRTCMreal time corrections Internal antenna Speaker Battery door screws Unscrew...

Page 12: ...na connector Secure Digital Card slot door Open the door to ac cess the SD card slot Mini USB Type B port Serial port COM1 DB 9 connector DC power input connector USB host port Type A for connec tion...

Page 13: ...B serial Tap this button to set the USB port as a serial port USB serial for ActiveSync Tap this button to set the USB port for use with Microsft ActiveSync Warning The change will be effective only a...

Page 14: ...ipping box 2 Open the battery door by turning the two screws one quar ter turn counterclockwise 3 Insert the battery into the battery compartment in the back of the MobileMapper CX handheld as shown b...

Page 15: ...r approximately six hours 7 To detach the clip on I O module press the release button on the module Turning the Receiver On Once you have charged the battery in your MobileMapper CX press the red powe...

Page 16: ...by the integrated GPS re ceiver and the time zone that you specify To set the time zone In the task bar double tap the clock icon This opens the Date Time Properties screen Set the time zone field se...

Page 17: ...e using ActiveSync and the unit s USB cable and I O module On the device double tap on the CAB file The default location for installation is MyDe vice Intl where is the language number You must instal...

Page 18: ...est version by going to the Microsoft web site at www microsoft com windows mobile default mspx and clicking on the ActiveSync link 2 Attach the I O module to the MobileMapper CX handheld Connect the...

Page 19: ...p Keyboard The virtual keyboard appears on the screen Using the Integrated Alphanumeric Keypad MobileMapper CX uses a telephone style alphanumeric key pad The cursor keys are used to move the cursor l...

Page 20: ...time it takes the keyboard to recognize the Repeat command and the speed with which it repeats letters tap Settings Control Panel Keyboard An easy way to practice using the keyboard is to tap Programs...

Page 21: ...where there is a clear view of the sky then Tap then select Programs GPS Utilities GPS Initialization Initialize the receiver using one of the two methods below 1 If you do not know even the rough co...

Page 22: ...rameters individually Do not use this option unless you are very familiar with these parameters When check ing this option a new dialog box opens see opposite in which you can set the following parame...

Page 23: ...ption Open Sky NOTE The first three options Open Sky Tree Canopy and Urban Canyon use preset values for Maximum DOP Minimum SNR and Elevation Mask Viewing Current GPS Status The GPS Status utility all...

Page 24: ...vn This graph shows all the satellites currently in view Each satellite is identified by its Pseudo Random Number PRN its azimuth and elevation angles Panel Window Panel This window displays the follo...

Page 25: ...would like to output through this port from the NMEA tab in the GPS Ports Configuration utility see page 46 Menu Sub Menu Function File Configura tion Units Allows you to set the units used for dis t...

Page 26: ...establish a GPRS connection Three cases are possible GPRS connection profile known GPRS connection profile unknown Special cases wherein a modem command is needed In all cases you may have to get in...

Page 27: ...o establish a GPRS connection In this case when configuring the connection a Hayes mo dem command instead of the APN parameters should be en tered to perform the connection The modem command should be...

Page 28: ...ne Ask for a paired Bluetooth link Enter a PIN code 2 Allow the cell phone to be paired with MobileMapper CX On the cell phone select the appropriate command and then enter the same PIN code as in Ste...

Page 29: ...not be too close to each other Keep a minimum distance of 60 cm 2 feet between the two devices 1 Turn on your cell phone 2 Activate its Bluetooth device Refer to your cell phone s manual for instruct...

Page 30: ...luetooth Properties dialog see PIN Code Detectability Authentication on page 52 2 Tap OK to enter the PIN code and close the dialog box This causes the cell phone to display a message or menu confirmi...

Page 31: ...tly and you can see a yellow circle included indicative of an active pair of Bluetooth devices 2 Double tap the cell phone icon The Bluetooth Manager window now shows the Bluetooth services offered by...

Page 32: ...Tap and hold the Dial Up Networking icon When a dotted circle appears remove the stylus and in the menu that pops up select Create Shortcut A message Shortcut suc cessfully saved appears after a few...

Page 33: ...ose this mes sage 7 In the Modem window tap Next 8 In the Phone Number field type your GPRS call number see Introduction on page 18 9 Tap Finish A new icon appears in the Connection window see example...

Page 34: ...solve the problem NOTE The Password and Domain fields see Step 2 are in tentionally corrupted when next opening the Dial up connec tion This is done for safety purposes You don t need to re type thes...

Page 35: ...shortcuts 3 Double tap the Dial Up Networking icon This re estab lishes the Bluetooth connection between the cell phone and MobileMapper CX Tap OK to close the message win dow 4 Tap to minimize the B...

Page 36: ...leMapper CX 1 In the task bar tap Settings Network and Dial up Con nections 2 Tap on the icon representing the currently active GPRS connection 3 Do one of the following Tap in the menu bar top of the...

Page 37: ...MobileMapper CX via Bluetooth or a serial cable 3 Direct IP Differential corrections are taken from the Inter net at a fixed IP address They are routed to MobileMap per CX via a GSM GPRS cell phone an...

Page 38: ...e tied to the value you will have assigned to the Real Time Correction Age Limit parameter When this warning message appears Mo bileMapper CX will automatically switch to Autonomous GPS mode Step DGPS...

Page 39: ...the DGPS processing Start your application Beacon Two different connections to MobileMapper CX are possible with MobileMapper Beacon via Bluetooth preferred or using a wire connection RS232 For more...

Page 40: ...r Beacon Just tap OK A message box appears confirming that a link is now established with MobileMapper Beacon via Port COM4 on MobileMapper CX On MobileMapper Beacon the blue indicator light is on Tap...

Page 41: ...update function is automati cally run so you don t need to tap this button Typically you need to use this button after you have changed the vir tual port in Bluetooth Manager and the Settings window...

Page 42: ...t to allow MobileMapper Beacon to send its correction data When connection is effective and correc tions are being sent the Connect button is changed into a Disconnect button and the status bar at the...

Page 43: ...w ing to implement the Direct IP DGPS mode Tap on then Programs GPS Utilities DGPS Configuration Tap on the Select Mode button In the Select Differential Mode window enable the Direct IP option Tap OK...

Page 44: ...ration field and select New The Add button would appear again under the field You would then tap this button enter the three parameters of the second configuration and tap OK to save this new configur...

Page 45: ...ies DGPS Configuration Tap on the Select Mode button In the Select Differential Mode window enable the NTRIP option Tap OK The first time you select NTRIP the message No NtripCaster specified appears...

Page 46: ...r the five parameters of the second configuration and tap OK to save this new configuration After selecting the desired configuration from the NTRIP Configuration field tap OK MobileMapper CX connects...

Page 47: ...reen on which you can now see the name of this station in the Station field Cancel to return to the NTRIP Settings screen without changing the choice made in the Station field Tap the Connect button T...

Page 48: ...at COM1 will not be availa ble from the list if it s used by another application COM3 a Bluetooth port that is automatically set at power on see also Local Services on page 53 Note that the Update but...

Page 49: ...pper CX starts operating instantly in Autonomous GPS mode Subsequent Uses Next time you turn on MobileMapper CX and you run the DGPS Configuration utility you will be prompted to run the same DGPS mod...

Page 50: ...h the display and keypad are switched off Press any key or tap on the screen to switch on the backlights again To switch off the backlights tap backlight in Control Panel In the Backlight Control dial...

Page 51: ...field must be less than the amount of time displayed in the Suspend field Turning Off MobileMapper CX Manually Tap then Shut Down In the Shut Down window that opens just tap OK After a few seconds the...

Page 52: ...e a non volatile memory The removable SD Card memory a non volatile memory The RAM volatile memory mainly used for running pro grams Programs or data that are saved in the RAM will be erased when the...

Page 53: ...utility contains the latest Mo bileMapper CX enhancements It is indeed through this utility that you can implement the NET capabilities of the unit namely NTRIP and Direct IP Tap on then Programs GPS...

Page 54: ...tput port this port is always enabled and the GPS auxiliary output port if enabled For more information about MobileMapper CX data output re fer to NMEA Data Output on page 64 GPS Reset Use the Reset...

Page 55: ...constellation of satellites and determine the dilution of precision DOP for any location on the Earth It allows you to plan the best time of the day for data collec tion and maximize productivity To b...

Page 56: ...is icon to set the exact date time for which you want Mission Planning to determine the GPS constellation for the selected location Tap this icon to open the Setup window This window allows you to set...

Page 57: ...the task bar to switch from a running application to another For example if DGPS Configuration and GPS Status are both running in the background while using Mission Planning the menu opposite will pop...

Page 58: ...enabled devic es one of them is the inquiring device and the other the host device The inquiring device is the one that detects and uses one of the local services of the other device Reciprocally the...

Page 59: ...functions accessible from the Bluetooth Manager toolbar please refer to the table in Bluetooth Manager Toolbar Functions on page 74 Minimizing Maximizing the Bluetooth Window Tap in the upper right co...

Page 60: ...At the end of a search the name or class of a detected device may not have been found In this case tap and hold the Unknown icon and then select Update in the pop up menu to let Bluetooth Manager det...

Page 61: ...you to exchange data with a remote device via a virtual Bluetooth serial port This service is used when outputting GPS data via an auxiliary output see GPS Ports Configuration on page 46 File Transfe...

Page 62: ...u want to assign to the virtual port Choose any available port from the list and then tap OK A message indicates that the port is now ready Tap OK to close the message window To change the identificat...

Page 63: ...orts COM4 Run HyperTerminal name the session select the com puter port used to communicate with the external device COM4 in our example Click OK Enter the same port settings as those used by the COM p...

Page 64: ...obileMapper CX Double tap the remote File Transfer Service icon to connect the inquiring unit to the host s File Transfer Service As a result the Bluetooth Manager window now lists the content of the...

Page 65: ...the host MobileMapper CX in our example in Application Data Job101 As the inquiring MobileMapper CX is still listing the content of this remote folder the name of the uploaded file is now also visible...

Page 66: ...anywhere as far as mobile phone networks are available WiFi type local area networks on the other hand require that your location be within range of a WiFi access point Once you get an Internet connec...

Page 67: ...earby The list of available WiFi networks is displayed in the middle of the screen Move the cursor vertically to highlight the WiFi network you wish to use Tap Connect The unit will then respond accor...

Page 68: ...th a correct signal strength Good Very Good Excellent reported just underneath Tap OK to close the connection window NOTE Tap in the task bar to re open the WiFi driver window Using the Inbox Program...

Page 69: ...ail Name the service or keep the default name the default name is the same as the service type name Tap OK Enter the parameters listed below see also POP3 IMAP4 comparative flowchart below For setting...

Page 70: ...field blank SMTP host for sending mail Enter the SMTP web address used by your email provider Example smtp fr aol com Return address Some email providers don t need one some others do even if they do...

Page 71: ...i and an email service has been created In Inbox do the following to use the email box In the Inbox menu bar select Service and make sure the the name of the email service you have just created is lis...

Page 72: ...rt Configu ration window MobileMapper CX is now set up to output a NMEA message on its virtual port and the chosen auxiliary output port see below Outputting the NMEA Message on COMx NOTE To output NM...

Page 73: ...ter its baud rate number of start and stop bits and set its parity and flow control parameters Tap OK MobileMapper CX will now deliver the NMEA mes sage you have defined on its USB port Outputting NME...

Page 74: ...ntenna keep the MobileMapper CX receiver at a 45 degree angle the entire time a job is open or as long as possible If you are not using an external antenna keep the MobileMapper CX receiver as high as...

Page 75: ...one hour period and lose lock on i e fail to continuously track the available GPS satellites at Minute 20 and Minute 40 all of the features in this job were recorded during a 20 minute period of cont...

Page 76: ...than 20 minutes Each feature has to be recorded during a portion of the job file where you maintained lock on the satel lites for at least 20 minutes If you open a job open a point feature 19 minutes...

Page 77: ...copy the nbx file to MobileMapper CX s MyDevice folder 3 With the SD card inserted into MobileMapper CX double tap the My Computer icon on the desktop and then the Win dows folder 4 Scroll to the bot...

Page 78: ...dating MobileMapper CX GPS Firmware 1 Go to ftp magellangps com and copy the GPS firmware zip file beginning with an E such as E032 zip from the Mobile Mapping MM CX Firmware GPS folder to any folder...

Page 79: ...d wait until the message GPS connected at 4800 is displayed in the firmware loader s white message field 9 Tap the GPS firmware loader s Load button and wait until the message FLASH upload complete is...

Page 80: ...older using the same naming convention as the one described above The internal GPS receiver and Mission planning will always use the most recent almanac file stored in the Windows folder To force the...

Page 81: ...tions between you and the station See how you can limit these obstructions Or you are nearly out of range of the station Consider working with a closer station if possible Or atmospheric noise has sig...

Page 82: ...the status bar at the end of the sequence NOTE is only active after has been tapped Allows you to list the content of the parent folder Valid when using the File Transfer service of a remote MobileMa...

Page 83: ...lish 75 MobileMapper CX Port Allocation Port Number Assigned to COM1 RS232 COM2 Internal use VSP COM3 USB ActiveSync COM4 Bluetooth Serial Service COM5 Free COM6 USB Serial COM7 Free COM8 Free COM9 Fr...

Page 84: ...bering 18 GPRS operator 20 GPS auxiliary output 46 GSA 64 GSM GPRS 29 GSV 64 H Handstrap 3 Host 36 50 Host IP address 29 38 I I O module 3 6 10 IMAP4 60 Inbox 58 Initialize GPS 13 Inquiring device 50...

Page 85: ...Port Service 53 54 Shortcut 24 57 Sig Nav 16 Sky plot 47 SMTP 60 SNR 34 73 Speaker 3 Station 39 Station ID 34 Stats 16 Stylus 2 8 12 Suspend mode 42 System Idle mode 42 T Tap 12 Tap and hold 12 Text...

Page 86: ...n Germany 49 81 6564 7930 I Fax 49 81 6564 7950 In Russia 7 495 956 5400 I Fax 7 495 956 5360 In the Netherlands 31 78 61 57 988 I Fax 31 78 61 52 027 Email mobilemappingemea magellangps com www pro m...

Reviews: