

Installation and Maintenance
R2 Controller
Madison Company, Inc.
27 Business Park Drive
Branford, CT 06405
MADE IN THE USA
Made in the USA
203-488-4477 or 800-466-5383
www.madisonco.com
Sensing Solutions since 1959
Float Switch Configuration:
Pump-Up Mode
In a pump-up mode, the R2 relay will initiate by switching the pump when the fluid level in the tank falls below the lower
tank level switch point. The R2 relay will remain energized (latched) and the pump will continue to operate until fluid fills
the tank up to the high level switch point. When the fluid reaches the high level switch point, the control relay will de-
energize and shut off the pump. The R2 relay will remain de-energized until the fluid falls below the tank’s low level switch
point.
Pump-Down Mode
In a pump-down mode, the R2 relay will initiate by switching on the pump when the fluid level in the tank reaches the upper
tank level switch point. The R2 relay will remain energized (latched) and the pump will continue to operate until fluid in
the tank empties down to the low level switch point. When the fluid falls below the low level switch point the R2 relay will
de-energize and shut off the pump. The R2 relay will remain de-energized until the fluid reaches the tank’s high level switch
point.
Pump-Up
•
Set both float switches “Normally Closed”.
•
Connect Upper float switch to pins 5 and 6, Lower float switch to pins 5 and 8.
•
Jumper supply voltage from terminal 2 to terminal 1.
•
Connect one end of the pump / valve to terminal 3 and other end to terminal 7.
•
Connect input power to terminals 2 and 7.
Pump-Down
•
Set both float switches “Normally Open”.
•
Connect Upper float switch to pins 5 and 8, Lower float switch to pins 5 and 6.
•
Jumper supply voltage from terminal 2 to terminal 1.
•
Connect one end of the pump / valve to terminal 3 and other end to terminal 7.
•
Connect input power to terminals 2 and 7.
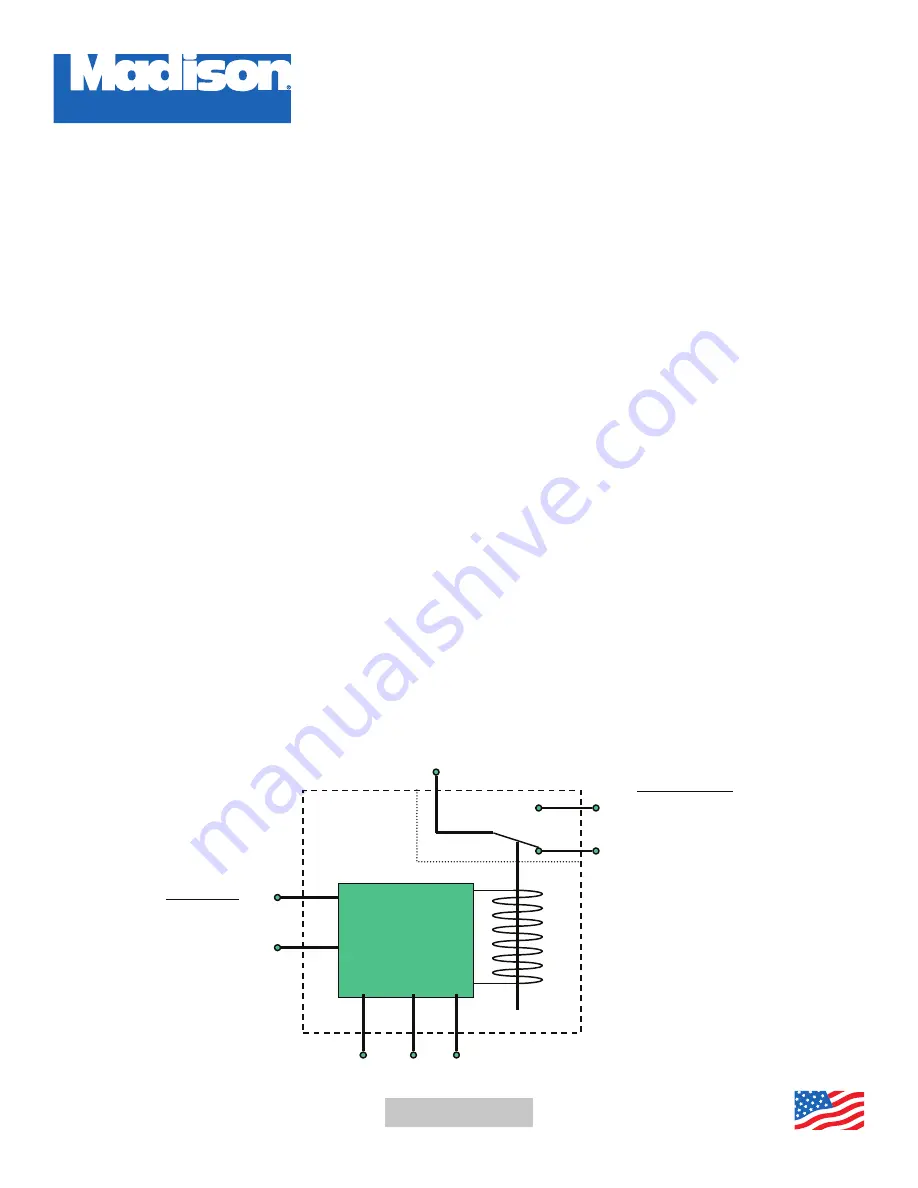
7
2
1
3
4
5
8
6
( NC
( NO )
SWITCHED
CONTACT
Input Power
R2-24…….24Vac
R2-120….120Vac
R2-220….220Vac
Output Contacts (1,3 or 1,4 )
10 Amps @ 120vac
5 Amps @ 220vac
10Amps @ 30vdc
R2 Controller
Installation Instructions
Float Switch Configuration
Pump-Up
• Set both float switches “Normally
Closed
”.
• Connect Upper float switch to pins 5 and 6, Lower float switch to pins 5 and 8.
• Jumper supply voltage from terminal 2 to terminal 1.
• Connect one end of the pump / valve to terminal 3 and other end to terminal 7.
• Connect input power to terminals 2 and 7.
Pump-Down
• Set both float switches “Normally Open”.
• Connect Upper float switch to pins 5 and 8, Lower float switch to pins 5 and 6.
• Jumper supply voltage from terminal 2 to terminal 1.
• Connect one end of the pump / valve to terminal 3 and other end to terminal 7.
• Connect input power to terminals 2 and 7.
Pump-Up Mode
In a pump-up mode, the R2 relay will initiate by switching the pump when the fluid level in the tank falls below
the lower tank level switch point. The R2 relay will remain energized (latched) and the pump will continue to
operate until fluid fills the tank up to the high level switch point. When the fluid reaches the high level switch
point, the control relay will de-energize and shut off the pump. The R2 relay will remain de-energized until the
fluid falls below the tank’s low level switch point.
Pump-Down Mode
In a pump-down mode, the R2 relay will initiate by switching on the pump when the fluid level in the tank reaches
the upper tank level switch point. The R2 relay will remain energized (latched) and the pump will continue to
operate until fluid in the tank empties down to the low level switch point. When the fluid falls below the low level
switch point the R2 relay will de-energize and shut off the pump. The R2 relay will remain de-energized until the
fluid reaches the tank’s high level switch point.
© Copyright Madison Company – ECR #5936, Effective Date 10/2011; MF-044, Rev F
Madison Company • (203) 488-4477 • (800) 466-5383 • Fax (203) 481-5036 • [email protected] • www.madisonco.com
ISO 9001 Certified
© 2018 Madison Company, Inc., MAD_MAN_MF-044_060518
ECR #10900, Effective Date 8/2018, MF-044, Rev G
ISO 9001 Certified