background image

262171

102

Revision A

ϭϬϰϭϵϴϱ

A

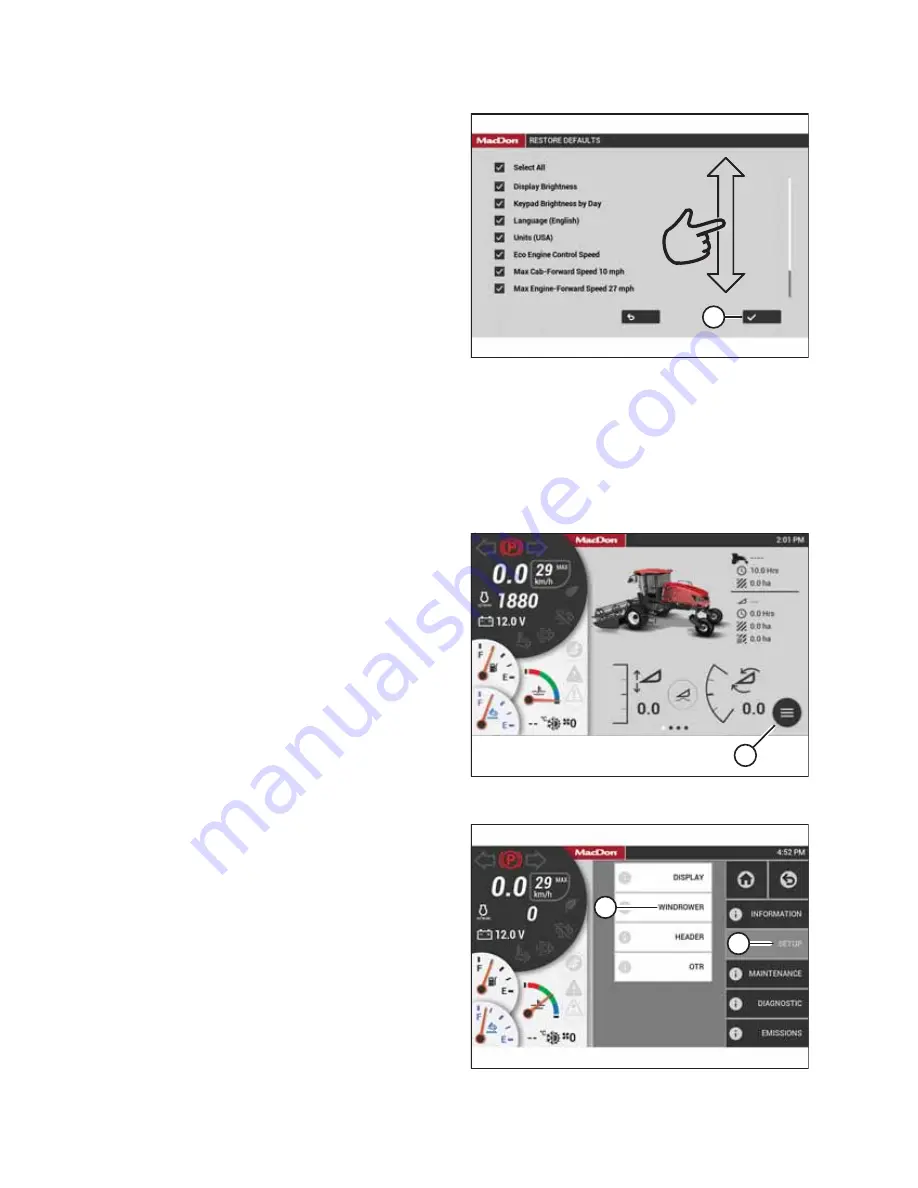
Figure 3.118: Restore Defaults Page

4.

Swipe up/down to view the available options. Pressing an
option adds a checkmark that indicates that the option will
be restored.

5.

Once you have selected the options that you wish to
restore, press checkmark (A) to restore.

3.17.12

Activating Control Locks

All header functions are factory-set to the unlocked position, but certain functions can be locked to prevent changes. This
feature can be used to maintain preferred settings when there are multiple Operators.

To activate control locks on header functions, follow these steps:

A

ϭϬϰϭϳϳϯ

Figure 3.119: HarvestTouch

Display

1.

Press MENU icon (A) to display the main menu.

ϭϬϰϭϴϵϭ

A

B

Figure 3.120: Setup Menu

2.

Select SETUP (A) and then select WINDROWER (B) from
the menu.

OPERATOR

S STATION

Summary of Contents for M2170NT

Page 1: ...M2170NT Windrower Operator s Manual 262171 Revision A Original Instruction The Harvesting Specialists ...

Page 2: ... MacDon Industries Ltd makes no representation or warranty of any kind whether expressed or implied with respect to the information in this publication MacDon Industries Ltd reserves the right to make changes at any time without notice California Proposition 65 Warning Diesel engine exhaust and some of its constituents are known to the State of California to cause cancer birth defects and other re...

Page 3: ... die Erklärung auszustellen 6 ist die technischen Unterlagen zu erstellen Benedikt von Riedesel General Manager MacDon Europe GmbH Hagenauer Straße 59 65203 Wiesbaden bvonriedesel macdon com ES Nosotros 1 declaramos que el producto Tipo de máquina 2 Nombre y modelo 3 Números de serie 4 directriz 2006 42 EC 7 2 EN ISO 4254 1 2013 EN ISO 4254 7 2009 Lugar y fecha de la declaración 5 draw redactar la...

Page 4: ...O 4254 1 2013 EN ISO 4254 7 2009 Data și locul declarației 5 pentru întocmirea declarației 6 Numele și semnătura persoanei autorizate pentru întocmirea cărții tehnice Benedikt von Riedesel Manager General MacDon Europe GmbH Hagenauer Straße 59 65203 Wiesbaden Germania bvonriedesel macdon com SV Vi 1 Maskintyp 2 Namn och modell 3 Serienummer 4 2006 42 EG Harmonierade standarder används såsom anges ...

Page 5: ...ct Integrity We 1 Declare that the product Machine Type 2 Name Model 3 Serial Number s 4 Designated standards used are EN ISO 4254 1 2015 EN ISO 4254 7 2017 1 MacDon Industries Ltd 680 Moray Street Winnipeg Manitoba Canada R3J 3S3 2 Windrower M1170 3 MacDon M2170NT 1042691 262171 iii Revision A ...

Page 6: ...n were less than 0 5m s2 The weighted root means square hand arm vibration was less than 2 41 m s2 when analyzed in accordance with ISO 5349 Noise Levels The sound pressure level depends upon the engine speed and load field and crop conditions and the type of platform used The A weighted sound pressure levels inside the operator s station ranged from 69 1 to 69 4 dB A as measured on several repres...

Page 7: ...read all the material provided before attempting to use the machine Use this manual as your first source of information about the machine If you follow the instructions provided it will work well for many years Contact your Dealer if you need assistance information or additional copies of this manual The following conventions are used in this document The M2170NT Windrower is Dual Direction meanin...

Page 8: ...ing beam Windrower Model Number _________________________ Windrower Serial Number _________________________ Model Year ______________________________ 1036695 A A MacDon M1170 Figure 2 Windrower Serial Number Location France Only Windrowers sold in France Windrower serial number plate A is located on the right side of the main frame near the walking beam Windrower Serial Number ____________________...

Page 9: ...r Windrower Serial Number _________________________ Model Year ______________________________ 1017705 A Figure 4 Engine Serial Number Location Engine serial number plate A is located on top of the engine cylinder head cover Engine Serial Number ____________________________ Model Year _____________________________ 262171 vii Revision A ...

Page 10: ......

Page 11: ...isposing of Agricultural Equipment 16 1 11 Safety Signs 18 1 11 1 Installing Safety Decals 18 1 12 Safety Decal Locations 19 1 13 Understanding Safety Signs 21 Chapter 2 Product Overview 31 2 1 Definitions 31 2 2 Specifications M2170NT Specifications 33 2 3 Windrower Dimensions 37 2 4 Component Locations 38 Chapter 3 Operator s Station 41 3 1 Console 41 3 2 Operator Presence System 43 3 2 1 Header...

Page 12: ...hut Off Valve 63 3 10 2 Air Distribution 63 3 10 3 Climate Controls 63 3 11 Operator Amenities 65 3 12 Sound System 67 3 12 1 AM FM CD DVD Radio with Bluetooth Wireless Technology 67 Activating Bluetooth Feature 68 Pairing Bluetooth Device 69 Selecting Audio Source 69 3 13 Horn 70 3 14 Engine Controls 71 3 14 1 Using Eco Engine Control 72 3 15 Windrower Controls 73 3 15 1 Operator Console Buttons ...

Page 13: ...g Fault Codes 109 Chapter 4 Attaching Headers to and Detaching Headers from Windrower 111 4 1 A40DX Auger Headers 111 4 1 1 Attaching A40DX Auger Header 111 4 1 2 Connecting A40DX Auger Header Hydraulic and Electrical Systems 118 4 1 3 Detaching A40DX Auger Header 121 4 2 D2 SP Series Draper Headers 129 4 2 1 Attaching Draper Header Supports 129 4 2 2 Attaching D2 SP Series Draper Header 130 4 2 3...

Page 14: ...ng Data 202 5 3 6 Operating the Windrower 203 Entering and Exiting Windrower 203 Adjusting Ground Speed Limit 203 Driving Forward in Cab Forward Mode 204 Driving in Reverse in Cab Forward Mode 206 Driving Forward in Engine Forward Mode 207 Driving in Reverse in Engine Forward Mode 208 Driving on Road in Engine Forward Mode 209 Driving on Road in Cab Forward Mode 212 Spin Turning 214 Stopping 215 V...

Page 15: ...Mode 260 Adjusting Draper Alarm Pressure 261 Draper Slip Warning 262 5 5 8 Knife Speed 262 Setting Knife Speed 263 Adjusting Knife Speed and Pressure Alarms 264 5 5 9 Deck Shift Control 265 Shifting Decks 265 5 5 10 Swath Compressor 265 Swath Compressor Controls 266 Locking and Unlocking Swath Compressor 267 5 6 Operating with A40DX Auger Header 268 5 6 1 Auger Header Run Screens 268 5 6 2 Reel an...

Page 16: ...7 Charge Air Cooling 298 Hydraulic Oil Cooler 298 Air Conditioning 299 Condenser 299 6 5 3 Air Intake System 299 6 5 4 Hydraulic System 301 Hydraulic Oil Cooler 301 Knife Disc Drive Hydraulics 302 Reel and Draper Hydraulics 302 Traction Drive Hydraulics 302 6 5 5 Electrical System 303 Module Layout 303 Master Controller 304 Extension Modules 304 Relay Modules 305 Preventing Electrical System Damag...

Page 17: ...er Module 334 Cleaning Left Cooling Module 334 Cleaning Right Cooling Module 337 6 10 Every 250 Hours or Annually 339 6 10 1 Changing Engine Oil 339 Draining Engine Oil 339 Replacing Engine Oil Filter 340 Adding Engine Oil 340 6 10 2 Maintaining Engine Air Filters 341 Removing Primary Engine Air Filter 341 Installing Primary Engine Air Filter 343 Cleaning Primary Air Filter 344 Replacing Secondary...

Page 18: ...ver 373 Closing Battery Cover 374 Charging Battery 375 Boosting Battery 377 Removing Battery 378 Installing Battery 379 Disconnecting Battery 379 Connecting Batteries 380 Auxiliary Power Posts 381 6 14 2 Checking Steering Link Pivots 382 6 14 3 Air Conditioning Evaporator 384 Removing Air Conditioning Cover 384 Cleaning Air Conditioning Evaporator Core 385 Installing Air Conditioning Cover 386 6 1...

Page 19: ... Drive Wheels 424 Lowering Drive Wheels Jack Method 425 Lowering Drive Wheels Forklift Method 426 6 15 9 Caster Wheels 427 Installing Forked Caster Wheel 427 Removing Forked Caster Wheel 428 Raising Caster Wheel 429 Lowering Caster Wheel 430 Chapter 7 Options and Attachments 431 7 1 Hood 431 7 1 1 Cummins Engine Coolant Heater Block Heater 431 7 1 2 High Debris Cooler Intake Hood Scoops 431 7 2 Ca...

Page 20: ...ng 446 8 9 Operator s Station Troubleshooting 449 Chapter 9 Reference 451 9 1 Ballast Kit Booster Spring Kit and Tire Pressure Requirements 451 9 2 Torque Specifications 456 9 2 1 Metric Bolt Specifications 456 9 2 2 Metric Bolt Specifications Cast Aluminum 458 9 2 3 O Ring Boss Hydraulic Fittings Adjustable 459 9 2 4 O Ring Boss Hydraulic Fittings Non Adjustable 460 9 2 5 O Ring Face Seal Hydraul...

Page 21: ...ty Alert Symbols The safety alert symbol indicates important safety messages in this manual and on safety signs on the machine 1000915 Figure 1 1 Safety Symbol This symbol means ATTENTION BECOME ALERT YOUR SAFETY IS INVOLVED Carefully read and follow the safety message accompanying this symbol Why is safety important to you Accidents disable and kill Accidents cost Accidents can be avoided ...

Page 22: ...ll result in death or serious injury WARNING Indicates a potentially hazardous situation that if it is not prevented could result in death or serious injury It may also be used to alert you to unsafe practices CAUTION Indicates a potentially hazardous situation that if it is not prevented may result in minor or moderate injury It may also be used to alert you to unsafe practices IMPORTANT Indicate...

Page 23: ...ve footwear with slip resistant soles Protective glasses or goggles Heavy gloves Wet weather gear Respirator or filter mask 1000005 Figure 1 3 Safety Equipment In addition take the following precautions Be aware that exposure to loud noises can cause hearing impairment Wear suitable hearing protection devices such as earmuffs or earplugs to help protect against loud noises 1010391 Figure 1 4 Safet...

Page 24: ... the functionality and or safety of the machine It may also shorten the machine s service life To avoid injury or death from the unexpected startup of the machine ALWAYS stop the engine and remove the key from the ignition before leaving the operator s seat for any reason 1000009 Figure 1 7 Safety around Equipment Keep the machine service area clean and dry Wet and or oily floors are slippery Wet ...

Page 25: ...eep the work area well lit 1008958 Figure 1 9 Equipment is NOT Safe for Children Relieve pressure from hydraulic circuits before servicing and or disconnecting the machine Ensure that all components are tight and that steel lines hoses and couplings are in good condition before applying pressure to hydraulic systems Keep hands feet clothing and hair away from all moving and or rotating parts Clear...

Page 26: ...262171 6 Revision A 1000004 Figure 1 10 Personal Protective Equipment Wear protective gear when working on the machine Wear heavy gloves when working on knife components SAFETY ...

Page 27: ... or hoses by using tapes clamps cements or welding The hydraulic system operates under extremely high pressure Makeshift repairs can fail suddenly and create hazardous conditions 1001207 Figure 1 12 Hydraulic Pressure Hazard Wear proper hand and eye protection when searching for high pressure hydraulic fluid leaks Use a piece of cardboard as a backstop instead of your hands to isolate and identify...

Page 28: ... repair shop if necessary Ensure that the tire is correctly seated on the rim before inflating it If the tire is not correctly positioned on the rim or is overinflated the tire bead can loosen on one side causing air to escape at high speed and with great force An air leak of this nature can thrust the tire in any direction endangering anyone in the area Do NOT stand over the tire when inflating i...

Page 29: ... clean water for 5 minutes Call a doctor immediately If electrolyte is spilled or splashed on one s clothing or their body neutralize it immediately with a solution of baking soda and water then rinse the strained area with clean water 1000017 Figure 1 18 Safety around Batteries WARNING To avoid injury from a spark or short circuit disconnect the battery ground cable before servicing any part of t...

Page 30: ...apply to plasma cutting or any other high current electrical operation performed on the machine IMPORTANT Ensure that the windrower is parked on a level surface the ignition is turned off and the key is removed before disconnecting anything The following items need to be disconnected 1017621 1017621 A Figure 1 19 Negative Terminals Negative battery terminals A two connections IMPORTANT Always disc...

Page 31: ...Cummins Proprietary ECM Connector B Location On the engine To disconnect the connectors pull the rubber boot off of the cover unlock the latch and undo the main over center latch Remove strain relief bolts C so that the connectors can be pulled away from the ECM IMPORTANT Be sure to disconnect both connectors Note the connector locations for reinstallation IMPORTANT Be sure to reconnect the connec...

Page 32: ... pressing the connector in 1017628 A Figure 1 25 Chassis Relay Module Chassis relay module A Three connectors P240 P241 and P242 Location Outside the left frame rail near the batteries 1017657 A Figure 1 26 Engine Harness Engine harness A Two round connectors C30 and C31 Location Inside the left frame rail at the rear of the windrower NOTE To disconnect circular Deutsch connectors rotate the outer...

Page 33: ...ors C25 and C26 Location Under the center of the frame just behind the front cross member NOTE To disconnect circular Deutsch connectors rotate the outer collar counterclockwise IMPORTANT To connect circular Deutsch connectors without bending the pins fully align the plug with the receptacle before pressing the connector in To align round connectors 1 Observe the channel cuts and mating channel pr...

Page 34: ...the Starting Engine section of the operator s manual Following the correct procedure will help prevent major damage to engine components and prevent personal injury To ensure that the jacket water heater if equipped and or lubricant oil heater if equipped are working correctly check the water temperature gauge and or oil temperature gauge during heater operation Engine exhaust contains combustion ...

Page 35: ... voltage to the electronic unit injectors Do NOT touch the harness connector for the electronic unit injectors while the engine is operating Failure to follow this instruction could result in an electrical shock causing personal injury or death This engine has a comprehensive programmable engine monitoring system The ECM has the ability to monitor engine operating conditions If certain conditions ...

Page 36: ... lubricants refrigerants and fuels and hazardous materials found in batteries some light bulbs and electronic equipment must be handled safely and not introduced into the environment Comply with local regulations and authorities ϭϬϰϬϲϵϱ A Figure 1 29 Symbol for Do NOT Dispose with Domestic Waste Products with symbol A should NOT be disposed of with domestic waste ϭϬϰϬϲϵϲ B Figure 1 30 Symbol for R...

Page 37: ...lectrical systems Recycle or reuse packaging material Recycle or reuse plastics that are labelled with specifications for a material such as PP TV 20 Do NOT dispose of them with domestic waste Return batteries to the vendor or take them to a collection point Batteries contain hazardous substances Do NOT dispose of batteries with domestic waste Follow local regulations to correctly dispose of hazar...

Page 38: ... part on which a safety sign was installed is replaced ensure that the repair part displays the current safety sign Replacement safety signs are available from your Dealer 1 11 1 Installing Safety Decals Worn or damaged safety decals will need to be removed and replaced 1 Decide exactly where you are going to place the decal 2 Clean and dry the installation area 3 Remove the smaller portion of the...

Page 39: ...n A 1 12 Safety Decal Locations Safety signs are factory installed in many different locations on the windrower 1034222 A G F T U S E E C P Q R J H J C E E L M N R Q D K B B B V Figure 1 32 Safety Sign Locations SAFETY ...

Page 40: ...6756 Decal Nitrite free Fill rate J 166832 Decal High pressure fluid K 166829 Decal Caution balance L 166834 Decal Warning starter jump M 166835 Decal Warning battery explode N 166836 Decal Warning battery burn P 166837 Decal Danger fan Q 166838 Decal Warning hot surface R 166839 Decal Warning belt S 166843 Decal Steering control T 167502 Decal Warning pinch hazard U 306179 Decal Header lock 2 pan...

Page 41: ...passenger seat or for use by children The Operator and the Passenger must wear their safety belts when they are operating the machine Keep all other riders off of the machine 1000685 Figure 1 34 MD 166425 MD 166425 Run over hazard DANGER To prevent the machine from moving when there is no Operator at the controls Stop the engine and remove the key from the ignition before you perform any maintenan...

Page 42: ... legible Ensure that everyone is clear of the machine before starting the engine and during its operation Do not allow riders on the machine Keep all shields in place Stay clear of moving parts Disengage the header drive put the transmission in Neutral and wait for all movement to stop before you leave the operator s seat Stop the engine and remove the key from the ignition before you service adju...

Page 43: ...m the ignition before you service adjust lubricate clean or unplug the machine Engage the safety locks to prevent the header or the reel from falling before servicing the header when it is in the raised position Use a slow moving vehicle emblem and activate the machine s warning lights when operating on roadways unless these actions are prohibited by law Run over hazard DANGER The machine will mov...

Page 44: ...to the windrower and header operator s manuals for instructions on safely towing the header Adjust the drive wheel width and walking beam width for road transportation as required per local regulations narrow transport option only available on some models For instructions refer to the operator s manual for safe procedure 1015176 Figure 1 38 MD 166829 MD 166829 Loss of control hazard DANGER To prev...

Page 45: ... which has penetrated the skin to prevent the occurrence of gangrene ϭϬϯϵϯϲϱ Figure 1 40 MD 166834 MD 166834 Run over hazard DANGER To prevent machine runaway Do NOT start the engine in gear Starting in gear can kill Do NOT start the engine by shorting across the starter or the starter relay terminals The machine can start with the drive engaged and move if the starting circuitry is bypassed Start...

Page 46: ...jury and damage from corrosive and poisonous battery acid Wear protective clothing and personal protective equipment to handle a battery 1014918 Figure 1 43 MD 166837 MD 166837 Rotating fan hazard WARNING To prevent injury Do NOT operate the engine while the engine hood is open Stop the engine and remove the key before you open the engine hood SAFETY ...

Page 47: ...revent injury Keep a safe distance from hot surfaces 1000697 Figure 1 45 MD 166839 MD 166839 Hand and arm entanglement hazard WARNING To prevent injury Do NOT operate the machine without the shields in place Stop the engine and remove the key from the ignition before you open the shield SAFETY ...

Page 48: ...he ground speed lever to the low end of the range Shift the high low speed control to the low range 0 16 km h 0 10 mph When the windrower is operating without a header attached weight must be added over the drive wheels so that you can maintain steering control If you must drive the windrower without a header or without a MacDon weight system Operate the windrower in the low speed range 0 16 km h ...

Page 49: ... engine coolant fill rate instructions and engine coolant specifications CAUTION The engine cooling system is under pressure when the engine coolant is hot To prevent injury Do NOT remove the fluid fill cap when the engine is hot Allow the engine to cool down before you open the fluid fill cap If possible use the specified Peak Final Charge Global or Fleetguard EX Compleat OAT nitrite free coolant...

Page 50: ...t the drive wheel legs and walking beam for narrow road transportation to reduce the overall windrower width as required per local regulations Make certain everyone is clear of machine before starting the engine and during operation Refer to the operator s manual instructions for safe procedure Always ensure that the lockout pins are installed and the lockout valve is in the closed position before...

Page 51: ...eatment system DM Dosing module DOC Diesel oxidation catalyst DWA Double Windrow Attachment EEC Eco engine control Engine forward Windrower operation with Operator and engine facing in direction of travel FFFT Flats from finger tight Finger tight A reference position in which the given sealing surfaces or components are making contact with each other The fitting has been tightened by hand to a poi...

Page 52: ...ts on a pulley or sprocket TFFT Turns from finger tight Timed knife drive Synchronized motion applied at cutterbar to two separately driven knives from a single hydraulic motor Torque The product of a force the length of a lever arm usually measured in Newton meters Nm foot pounds lbf ft or inch pounds lbf in Torque angle A tightening procedure in which a fitting is assembled to a specified tightn...

Page 53: ...d Field 0 29 km h 18 mph Reverse 9 6 km h 6 mph Transport Engine forward 0 43 km h 27 mph 2 Transmission Type 2 piston pumps 1 per drive wheel Displacement 44 cc 2 65 cu in Flow 167 L min 40 U S gpm Final drive Type Planetary gearbox Ratio Standard 27 88 1 System Capacities Fuel tank 518 L 137 U S gallons Diesel exhaust fluid DEF tank capacity 49 L 13 U S gallons Coolant 30 L 7 9 U S gallons Hydra...

Page 54: ...idth 1767 mm 69 6 in Depth 1735 mm 68 3 in Height 1690 mm 66 5 in Windshield wiper Front 990 mm 39 in blade washer equipped Rear 560 mm 22 in washer equipped Heater 11 10 kW 37 900 Btu hr Air conditioning 8 73 kW 29 800 Btu hr Electrical outlets 12 VDC 6 USB 2 Sound system AM FM CD DVD USB Bluetooth radio antenna microphone and two factory installed speakers Sun shades Front and rear Narrow Transp...

Page 55: ...ort Bar 540 65R30 Caster Suspended 16 5 L 16 1 with independent suspension Frame and Structure Dimensions Refer to Frame to ground crop clearance 1160 mm 45 7 in Walking beam max width 3856 mm 151 8 in with 3422 mm 134 7 in crop clearance Weight3 Base 5942 kg 13 100 lb 4 Max GVW 10 660 kg 23 500 lb Max CGVW 11 794 kg 26 000 lb Draper D1X D1XL and D2 Series Limited to 10 7 m 35 ft Auger A40DX 5 Hea...

Page 56: ...on 1 Reel Auger Drive Pump 2 Draper Drive 3 Charge Pressure Pump for Pumps 4 5 6 and 7 4 Knife Disc Drive Closed Loop System 5 Fan Drive and Lift Functions Open Loop System 6 Traction Drive Tandem Pump Left Wheel 7 Traction Drive Tandem Pump Right Wheel PRODUCT OVERVIEW ...

Page 57: ...3304 mm 130 3 32 in B 4290 mm 168 7 8 in C 5752 mm 226 7 16 in Field C 5140 mm 202 3 8 in Road D 3834 mm 150 15 16 in Field D 3489 mm 137 13 32 in Road E 1150 mm 45 5 16 in F 3480 mm 137 1 32 in G 3294 mm 129 11 16 in Field G 2934 mm 115 1 2 in Road H 3412 mm 134 1 3 in Field H 2170 mm 85 7 16 in Road J 3846 mm 151 1 2 in Max K 4403 mm 173 11 32 in Field K 3162 mm 124 1 2 in Road PRODUCT OVERVIEW ...

Page 58: ... s main components 1034048 A B C D E F G H J J K L M N E F M Figure 2 3 Cab Forward View A Header Lift Leg B Header Float Springs C Operator s Station D Windshield Wiper E Turn Signals Hazard Lights F Tail lights Engine Forward G Field Road Lights H Handholds J Mirror K Door L Maintenance Platform M Beacon Lights N Flood Lights x 4 PRODUCT OVERVIEW ...

Page 59: ...e Forward View A Caster Wheel B End Marker Rod C Rear Deflectors D Engine Compartment Hood E Work Light F Field Lights G Turn Signals Hazard Lights H Marker Lights J Field Road Lights K Mirror L Drive Wheel M Tool Box N Hood Latch P Walking Beam Q Windshield Wiper PRODUCT OVERVIEW ...

Page 60: ......

Page 61: ... the direction of travel 3 1 Console The console contains controls to operate the windrower as well as amenities for the Operator ϭϬϰϭϲϵϮ A B C D E Figure 3 1 Console The console position is adjustable to suit each particular Operator Operable parts of the console include Ignition A HarvestTouch display B Header controls C Ground speed lever GSL D Throttle E 1012702 A Figure 3 2 Console Fore Aft H...

Page 62: ...262171 42 Revision A 1012705 A Figure 3 3 Console Fore Aft 2 Adjust only fore aft as follows a Loosen nuts A under the console b Move the console as required c Tighten nuts A OPERATOR S STATION ...

Page 63: ...when the machine is traveling less than or equal to 8 km h 5 mph the HarvestTouch Display will show the warning message NO OPERATOR DETECTED and ENGINE SHUT DOWN 5 4 3 2 1 0 accompanied by a steady tone When the countdown reaches 0 the engine shuts down If the Operator leaves the seat when the machine is traveling faster than 8 km h 5 mph the engine will shut off after 10 seconds During the first ...

Page 64: ...djustment Some seat features are only available with the deluxe cab option 3 3 1 Armrest The standard and deluxe seats are equipped with one armrest The armrest provides support for the arm and the hand easing the muscle tension 1019743 A B Figure 3 4 Operator s Seat Armrest A Standard Seat B Deluxe Seat Raise the armrest for easier access to the seat Lower the armrest after the seat belt is buckl...

Page 65: ...mrest angle Rotate knob A counterclockwise to decrease the armrest angle 3 3 3 Suspension and Height Use the controls on the side of the seat to adjust the height and stiffness of the seat suspension 1012782 A Figure 3 6 Operator s Seat Suspension and Height Controls Press upper switch A to increase the seat stiffness and height Press lower switch A to decrease the seat stiffness and height OPERAT...

Page 66: ...rator s Seat Fore Aft Position Controls 1 Pull lever A up to release 2 Move the seat forward or rearward 3 Release lever A 3 3 5 Fore Aft Isolator Control Use the controls on the seat to lock the seat s fore aft isolator 1012790 A Figure 3 8 Operator s Seat Fore Aft Isolator Controls Push lever A down to lock Pull lever A up to unlock OPERATOR S STATION ...

Page 67: ...up to release 2 Position the seat back as desired 3 Release lever A 3 3 7 Lumbar Support Use the controls on the back of the seat adjust the stiffness of the seat s back 1012789 A Figure 3 10 Operator s Seat Lumbar Support Controls Rotate knob A clockwise to increase the lumbar support Rotate knob A counterclockwise to decrease the lumbar support OPERATOR S STATION ...

Page 68: ...Controls Turn knob A counterclockwise to increase vertical dampener Turn knob A clockwise to decrease vertical dampener 3 3 9 Cushion Tilt Deluxe Cab Only Use the controls on the front of the seat to adjust the deluxe seat s cushion tilt 1012784 A Figure 3 12 Deluxe Seat Cushion Tilt Controls 1 Pull lever A up to release 2 Tilt the seat cushion up or down 3 Release lever A OPERATOR S STATION ...

Page 69: ...deluxe seat s lateral isolation lockout 3 3 12 Heating Cooling Deluxe Cab Only Use the controls on the side of the seat to adjust the heating cooling of the deluxe operator s seat WARNING Do NOT use the seat heating or cooling system if you have a diminished ability to sense temperature a reduced ability to feel pain or have sensitive skin There is a possibility that some people may suffer heat in...

Page 70: ...ting and Cooling Controls Seat heating cooling switch A Move the switch forward for COOL Move the switch backward for HEAT Heating cooling high low off switch B Move the switch up for HIGH Move the switch down for LOW Center the switch for OFF OPERATOR S STATION ...

Page 71: ...he use of the machine Never use the training seat when operating the windrower in engine forward mode The training seat is NOT intended as a passenger seat or for use by children Use the seat belt whenever you are operating the machine or when you are riding as a Trainer Keep all other riders off of the machine 1012793 A Figure 3 16 Training Seat To store the training seat lift the seat and secure...

Page 72: ...ng seat occupant s seat belt is securely fastened Never wear a seat belt loosely or leave any slack in the belt system Never wear the belt in a twisted condition or pinched between the seat structural members To fasten the seat belt 1012792 A A B B Figure 3 17 Seat Belt 1 Pull the belt with metal eye A at the right side of seat completely across your body 2 Push metal eye A into buckle B until it ...

Page 73: ...262171 53 Revision A To release the seat belt 1012792 A A B B Figure 3 18 Seat Belt 1 Push the red button on the end of buckle B 2 Separate buckle B from metal eye A OPERATOR S STATION ...

Page 74: ...ng Column 1 Hold onto the steering wheel lift handle A and move the steering column forward or backward into the desired position 2 Release handle A to lock the steering column in position To adjust the steering wheel 1014888 A Figure 3 20 Steering Wheel 1 Hold onto the steering wheel turn center cap A counterclockwise and move the steering wheel up or down into the desired position 2 Turn center ...

Page 75: ...When in engine forward mode field lights B do NOT turn on Road lights A field lights B and beacon lights D have an amber LED that changes from OFF to amber when the switch is turned on Low or high beams C have a blue LED that changes from OFF to blue when the switch is turned on 3 7 1 Cab Forward Lighting Field Field lights are used to illuminate the working area around the windrower 1019668 A Fig...

Page 76: ...f work lights E Rear swath lights F NOTE For adjustment procedures refer to Aligning Headlights Cab Forward page 398 3 7 2 Cab Forward Lighting Road Road lights are used to light up the area ahead of the windrower 1020008 A B C Figure 3 24 Road Light Button The following lights are functional when ROAD LIGHT button A is selected and the operator s station is locked in the cab forward mode To toggl...

Page 77: ...orward mode 3 7 3 Engine Forward Lighting Road Road lights are used to light up the area ahead of the windrower 1012725 A B C Figure 3 26 Road Light Button The following lights are functional when ROAD LIGHT button A is pressed and the operator s station is locked in the engine forward mode To toggle between the low and high beams press HIGH BEAM button B To operate the hazard lights press HAZARD ...

Page 78: ... low high beams Red taillights B on front and rear placards Amber turn signals and hazard lights C on front and rear placards Work lights D turn on only when high beams are activated in the engine forward mode Marker Lights E NOTE To align headlights A refer to Aligning Headlights Engine Forward page 396 OPERATOR S STATION ...

Page 79: ...ert other drivers 1034162 A A Figure 3 28 Windrower Lighting Top View Beacons A are activated when the IGNITION is turned ON and BEACON button B is pressed NOTE In some areas the law requires the use of beacon lights when driving on the road 1019670 B Figure 3 29 Beacon Light Button OPERATOR S STATION ...

Page 80: ...n to turn the selected signal off NOTE Turn signals can also be controlled with the REEL DISC speed switches on the ground speed lever GSL when the header is disengaged Switch B activates the hazard lights Press the switch again to turn the lights off 1034262 C C C Figure 3 31 Windrower Lighting Top View Amber turn signals hazard lights C NOTE Amber turn hazard repeater lights are located on the s...

Page 81: ...pers are NOT on pressing and holding window washer button C will spray washer fluid onto both windows and both wipers will turn on When the button is released the washer fluid stops but both wipers continue to operate for 4 seconds before automatically stopping If only one wiper is on pressing and holding window washer button C will activate the other wiper and spray washer fluid onto both windows...

Page 82: ...ear view when the windrower is in cab forward mode Two manually adjustable mirrors B provide a rear view the windrower is in the engine forward mode Mirror assemblies are designed to fold back if accidentally struck 1016153 A Figure 3 35 Mirror Adjustment Knob The cab is equipped with power adjustable exterior mirrors for cab forward mode which can be adjusted using knob A located next to the radi...

Page 83: ...e engine coolant 1015484 A A Figure 3 36 Heater Shut Off Valve Valve A must be open to provide heat to the cab but the valve can be closed to maximize cooling 3 10 2 Air Distribution Cab air distribution is controlled through adjustable air vents located in the cab posts 1014906 A B C Figure 3 37 Adjustable Air Vents You can adjust vent A to open close B or to change direction C of the air flow 3 ...

Page 84: ...ated Windshield defog defrost switch D The windshield defog defrost operates when air conditioning A C switch E ON Air conditioning A C switch E Controls the A C system The A C operates with the blower switch ON and blower speed is set above 0 Temperature control toggle switch F Controls cab temperature Press red top area to increase cab temperature Press blue bottom area to decrease cab temperatu...

Page 85: ... operator s console has the following features Auxiliary power outlets A USB jack B Utility tray under armrest C Utility tray D Cup holder E 1014912 A Figure 3 40 Window Shades Window shades Retractable window shades A are located at the front and rear windows 1019706 A Figure 3 41 Manual Storage Location Manual storage Plastic case A is located behind the training seat to store the windrower manu...

Page 86: ...262171 66 Revision A 1014914 A Figure 3 42 Coat Hook Coat hook Coat hook A is located above the training seat to the left of the operator s seat OPERATOR S STATION ...

Page 87: ...tructions for information on the supported file types 1014920 A B Figure 3 43 Radio and Speakers Radio A and two speakers B are factory installed in the cab headliner The radio operates in AM FM CD DVD and USB modes It also supports Bluetooth wireless technology audio streaming and hands free calling Operating instructions supplied with the radio To locate the operating instructions for the radio ...

Page 88: ...n the receiver to allow mobile device pairing MOTOROLA MENU ϭϬϯϲϴϵϱ A B C D Figure 3 47 Bluetooth Radio 1 Press POWER button A to turn the radio on 2 Press and hold VOL SEL knob B for 2 seconds MENU is displayed on screen C 3 Rotate VOL SEL knob B to highlight the BT SET menu and press the VOL SEL knob to select BLUETOOTH ON OFF is displayed on screen C 4 Press VOL SEL knob B to select BLUETOOTH 5...

Page 89: ...ot refer to the radio operator s manual for instructions to access the SETUP MENU BT SET screen 3 Turn the mobile device s Bluetooth to ON For instructions refer to the device s operator s manual The radio appears as a discoverable device 4 Select VR 5650 on the mobile device NOTE A passkey is required to connect to the Bluetooth radio The default passkey is four zeros 0000 5 Enter the default pas...

Page 90: ...n the console the horn is located under the front left corner of the cab floor when facing cab forward 1012729 A Figure 3 50 Console The horn is activated by pushing button A located on the console Sound the horn three times prior to starting the engine OPERATOR S STATION ...

Page 91: ...n the windrower is not in use The ignition key also locks the doors and the tool box in the left platform ϭϬϰϭϲϵϵ B A Figure 3 52 Engine Controls Throttle A Controls the engine speed range MAX Push the lever forward MIN Pull the lever back HarvestTouch Display B Fuel level monitoring Diesel exhaust fluid DEF level monitoring High exhaust system temperature HEST indicator Exhaust system cleaning in...

Page 92: ...EEC limits the engine rpm to 1900 2300 rpm when the header is engaged and is adjustable in 100 rpm increments Activate this feature by using EEC button A on the operator s console The EEC symbol will display on the HarvestTouch Display on the right side above the main menu icon The EEC feature will be active only when the header is engaged but can be adjusted without the header running When the he...

Page 93: ...B Controls speed and direction of the movement F Forward N NEUTRAL PARK Engages neutral interlock and applies park brake when steering locked in center R Reverse Hazard warning lights C Activates the signals on the windrower and the header Push ON Push OFF Park D Engages neutral interlock and applies park brake when steering locked in center Horn E Creates noise for signalling purposes Autosteer e...

Page 94: ...t Side Delivery E Draper Double Windrow Attachment DWA Speed F Cab Forward Field Lights G Beacon Lights H Turn Signals K Hazard Lights L Clearance Lights M Road Lights N High Beams P Windshield Defog Defrost Q Air Conditioning R Temperature S Blower Speed Manual Mode T Horn U Auto Fan Speed V Cab Air Recirculation W Eco Engine Control EEC X Windshield Wiper Rear Y Wiper Fluid Z Windshield Wiper Fr...

Page 95: ...signed to the function buttons on the operator s console F1 A Float menu F2 B One Touch Return F3 C Windrower settings F4 D Header settings Press a function button to override the existing screen and display the function Press the function button again or press the BACK button to return to the previous screen Press the HOME button on the HarvestTouch Display to return to the run screen OPERATOR S ...

Page 96: ...GE switch A down NOTE Although not required it is good practice to move the throttle lever back to IDLE before engaging the header drive 3 16 2 Header Drive Reverse Button The header drive reverse button allows certain functions on various headers to operate in reverse NOTE Rotary Disc Headers do NOT have any reverse capability 1012757 A B Figure 3 58 Header Drive Controls NOTE The following heade...

Page 97: ... also operates turn signals when the header is disengaged Reel position E Autosteer engagement F if equipped 6 Header position G Back switch H controls HarvestTouch Display functions Select switch J controls HarvestTouch Display functions OPERATOR S STATION 6 Before engaging the autosteer system for the first time become familiar with the functions of the emergency stop E Stop button The E Stop bu...

Page 98: ...A B C D Figure 3 62 Ground Speed Lever To lower the header slowly press A lightly To lower the header quickly press A fully To raise the header slowly press C lightly To raise the header quickly press C fully To tilt the header downward press B To tilt the header upward press D Release the switch when the header is at the desired position NOTE The header raise and lower rates are adjustable on the...

Page 99: ...indrower when the header is not in use 1012761 A B Figure 3 64 GSL Reel and Disc Speed Switch Press and hold button A to increase the reel or disc speed Press and hold button B to decrease the reel or disc speed Release the button when the reel or disc is at the desired speed For instructions refer to the applicable header topic for detailed use of these switches IMPORTANT The reel speed on an A40...

Page 100: ...pe Header tilt Deck position header float selection Double windrow attachment DWA or swath compressor raise lower DWA speed Knife speed Draper speed Reel speed Reel height Reel fore aft Disc speed Remote Baffle Control option To program the ONE TOUCH RETURN buttons press and hold button A B or C on the GSL handle for 3 seconds until an audible tone is heard indicating that the current header setti...

Page 101: ... the One Touch Return buttons A B and C on the Ground Speed Lever GSL save header configuration settings when the machine is in cab forward mode When the machine is in engine forward mode button C enables the secondary braking system ϭϬϰϮϳϬϵ A B Figure 3 67 Secondary Braking System Button on GSL Pressing button C A while in the engine forward mode enables the secondary braking system While enabled...

Page 102: ...eck Shift Float Presets The buttons to control header functions are located on the console 1014967 A B C Figure 3 69 Header Deck Shift Buttons A Right Side Delivery B Center Delivery C Left Side Delivery Draper header with deck shift option Controls the draper deck position for double windrowing with a draper header Set header float for each deck position For instructions refer to Setting Float pa...

Page 103: ...he section in this manual that is specific to your header Conveyor Speed Adjustment Buttons The buttons to control header functions are located on the console 1014968 A B Figure 3 71 Operator s Console Conveyor Controls Adjust the header or Double Windrow Attachment DWA conveyor speed by pressing switch A to increase the speed or switch B to decrease the speed Conveyor speed can be adjusted in eit...

Page 104: ...le 1016066 A B Figure 3 72 Operator s Console Auxiliary Controls With Double Windrow Attachment DWA Raise the DWA deck by pressing button A or lower the deck by pressing button B With swath compressor attachment Raise the swath compressor by pressing button A or lower it by pressing button B OPERATOR S STATION ...

Page 105: ... s Console The HarvestTouch Display A is mounted on the operator s console 3 17 1 HarvestTouch Display Page Layout The appearance and function of the HarvestTouch Display depends on the type of header attached A ϭϬϰϭϵϮϴ B C D Figure 3 74 Header Attached Home Pages A Home Page Header Disengaged B Header Information C Performance Data D Machine Temperature Information OPERATOR S STATION ...

Page 106: ... K Figure 3 76 Left Gauge Cluster The HarvestTouch Display is divided into the following zones Windrower gauge cluster Ground speed A Maximum ground speed B Engine rpm C Eco engine control EEC active inactive D High exhaust system temperature HEST light E Inhibit status F Park and turn signal status G Level gauges for fuel and diesel exhaust fluid DEF H Coolant temperature gauge J Climate control ...

Page 107: ...res per hour resettable Run screen 4 Displays cooling fan speed engine air intake temperature hydraulic oil temperature and engine coolant temperature ϭϬϰϭϵϰϮ A B C D E Figure 3 78 Current Header Position Header position area Displays basic header functions height A and angle C Access to float settings B Access to the menu D Dots E indicate that there are multiple pages of header or windrower info...

Page 108: ... swiping the screen directly or by using the ground speed lever GSL controls A B D C E D C F G H K ϭϬϰϭϵϬϱ J Figure 3 81 HarvestTouch Display and Ground Speed Lever GSL Table 3 1 HarvestTouch Display Navigation Callout Function A Touchscreen gestures press icons and swipe pages to access features B Main menu icon press to access windrower and header settings C Icons with no border highlight inform...

Page 109: ...access SHIFT K SCROLL J Adjust maximum ground speed ϭϬϰϮϯϱϳ A B Figure 3 82 HarvestTouch Display Navigation Pressing HOME icon A from any page will display either the windrower home page if the header is disengaged or the header run screen if the header is engaged Pressing PREVIOUS BACK icon B from any page will display the previous page 3 17 3 Ground Speed Level Controls for HarvestTouch Display ...

Page 110: ...wer and header settings ϭϬϰϭϵϲϬ A H G F E D C B Figure 3 85 HarvestTouch Display Menu 1 To display the main menu press MENU icon A The following submenus are accessible through the main menu BACK PREVIOUS arrow B returns to the previous page from any place in the menu HOME icon C returns to the HOME page from any place in the menu INFORMATION D submenus include WINDROWER HEADER MODULE and PERFORMA...

Page 111: ...is defined as having the headlights or work lights OFF or having only the clearance lights ON Night mode is defined as having either the headlights or work lights ON To adjust the brightness levels follow these steps ϭϬϰϭϵϲϰ A B C Figure 3 86 HarvestTouch Display 1 Press MENU icon A on the HarvestTouch Display 2 Press SETUP B and then press DISPLAY C ϭϬϰϭϵϲϲ A Figure 3 87 Display Settings Menu 3 S...

Page 112: ...IGHT mode B default 20 Console buttons DAY mode C default 70 Console buttons NIGHT mode D default 20 3 17 6 Setting Language The language can be set in the HarvestTouch Display SETUP menu 1 Turn the key to the ON or ACC position A ϭϬϰϭϳϳϯ Figure 3 89 HarvestTouch Display 2 Select MENU A A ϭϬϰϭϳϳϰ Figure 3 90 HarvestTouch Display Menu 3 Select SETUP A OPERATOR S STATION ...

Page 113: ...Display Setup Menu 5 Select LANGUAGE A ϭϬϰϭϴϬϲ A B Figure 3 93 HarvestTouch Display Language Page 6 Select a language A 7 To save the changes select checkmark B 3 17 7 Setting Units of Measurement The units of measurement can be set in the HarvestTouch Display SETUP menu 1 Turn the key to the ON or ACC position OPERATOR S STATION ...

Page 114: ...n A A ϭϬϰϭϳϳϯ Figure 3 94 HarvestTouch Display 2 Select MENU A A ϭϬϰϭϳϳϰ Figure 3 95 HarvestTouch Display Menu 3 Select SETUP A A ϭϬϰϭϳϳϴ Figure 3 96 HarvestTouch Display Setup Menu 4 Select DISPLAY A OPERATOR S STATION ...

Page 115: ...ϬϰϭϴϬϳ Figure 3 98 Units Page 6 Select a unit of measurement A 3 17 8 Setting Time and Date The time and date can be set in the HarvestTouch Display SETUP menu 1 Turn the key to the ON or ACC position A ϭϬϰϭϳϳϯ Figure 3 99 HarvestTouch Display 2 Select MENU A OPERATOR S STATION ...

Page 116: ...Ϭϰϭϳϳϰ Figure 3 100 HarvestTouch Display Menu 3 Select SETUP A A ϭϬϰϭϳϳϴ Figure 3 101 HarvestTouch Display Setup Menu 4 Select DISPLAY A A ϭϬϰϭϳϵϮ Figure 3 102 HarvestTouch Display Menu 5 Select DATE TIME A OPERATOR S STATION ...

Page 117: ... 104 Date Time Page 7 To change the time select arrows A To switch between 12 hour and 24 hour formats select switch B 8 To save the changes select checkmark C To return to the previous page without saving changes select back arrow D A C B ϭϬϰϭϳϵϱ Figure 3 105 Date Time Page 9 To change the date select arrows A 10 To save the changes select checkmark B To return to the previous page without saving...

Page 118: ... tire size and wheel type can be set in the HarvestTouch Display SETUP menu A ϭϬϰϭϳϳϯ Figure 3 106 HarvestTouch Display 1 Select MENU A A ϭϬϰϭϳϳϰ Figure 3 107 HarvestTouch Display Menu 2 Select SETUP A A ϭϬϰϭϴϭϯ Figure 3 108 HarvestTouch Display Setup Menu 3 Select WINDROWER A OPERATOR S STATION ...

Page 119: ...nstalled on the windrower 6 Verify that the HIGH TORQUE FINAL DRIVES B is set to disabled 3 17 10 Enabling Narrow Transport System in the HarvestTouch Display The HarvestTouch Display includes a narrow transport menu option that must be enabled before extending or retracting the transport system A ϭϬϰϭϳϳϯ Figure 3 111 HarvestTouch Display 1 Select MENU A OPERATOR S STATION ...

Page 120: ... A ϭϬϰϭϳϳϰ Figure 3 112 HarvestTouch Display Menu 2 Select SETUP A A ϭϬϰϭϴϭϯ Figure 3 113 HarvestTouch Display Setup Menu 3 Select WINDROWER A A ϭϬϰϭϴϭϰ Figure 3 114 Windrower Menu 4 Select WHEEL DRIVE A OPERATOR S STATION ...

Page 121: ... reset HarvestTouch Display functions follow these steps ϭϬϰϭϵϲϰ A B C Figure 3 116 HarvestTouch Display 1 From the HOME page press MENU icon A and then press SETUP B from the menu 2 Press DISPLAY C from the setup options ϭϬϰϭϵϴϰ A Figure 3 117 HarvestTouch Display Menu 3 Press RESTORE DEFAULTS A to view the list of features that are available to restore to their default setting OPERATOR S STATION...

Page 122: ...ctivating Control Locks All header functions are factory set to the unlocked position but certain functions can be locked to prevent changes This feature can be used to maintain preferred settings when there are multiple Operators To activate control locks on header functions follow these steps A ϭϬϰϭϳϳϯ Figure 3 119 HarvestTouch Display 1 Press MENU icon A to display the main menu ϭϬϰϭϴϵϭ A B Fig...

Page 123: ...4 On the HEADER LOCKOUTS page select one or more functions from the list A to lock a function and prevent an operator from changing it NOTE Select a locked function to deactivate a lock 3 17 13 Accessing Windrower Information The HarvestTouch Display includes a page that summarizes important windrower information ϭϬϰϭϵϵϮ A B Figure 3 123 HarvestTouch Display 1 From the HOME page press MENU icon A ...

Page 124: ...INFORMATION page displays the following information Engine hours A Windrower hours B Total header hectares acres C Total header hours D 3 17 14 Accessing Header Information Header information is stored in the HarvestTouch Display ϭϬϰϭϵϵϮ A B Figure 3 126 HarvestTouch Display 1 From the HarvestTouch Display s HOME page press MENU icon A and then press INFORMATION B OPERATOR S STATION ...

Page 125: ...un screen 3 and from the Performance Information page For instructions refer to 3 17 16 Accessing Performance Information page 106 NOTE The acre count is active when the header is engaged and the header height is in the lower 50 of its range 3 17 15 Accessing Module Information Information about the windrower s electronic systems and software is available in the HarvestTouch Display ϭϬϰϭϵϵϮ A B Fi...

Page 126: ...mber and software version on the module information page Swipe up or down on the touchscreen to view more information 3 17 16 Accessing Performance Information The performance information menu displays the accumulated data over time and the accumulated data per field ϭϬϰϭϵϵϮ A B Figure 3 132 HarvestTouch Display 1 From the HarvestTouch Display s HOME page press MENU icon A and then press INFORMATI...

Page 127: ...s and telltales displayed on the HarvestTouch Display provide important information about the windrower and the engine Telltales include a symbol indicating the affected area and a short description of fault For information about symbols refer to 5 2 Symbol Definitions page 184 Red faults displayed on the top line indicate that a major fault has occurred and will cause progressive damage or affect...

Page 128: ...s corrected NOTE Closing the short description of a yellow fault will mute the alarm tone associated with that fault Alarm tones associated with red faults cannot be muted NOTE For instructions on clearing fault codes refer to 3 17 18 Clearing Fault Codes page 109 1016235 A Figure 3 136 Telltale Icon Multiple Faults Detected If multiple faults are detected the number of faults will appear in the c...

Page 129: ...ow 3 17 18 Clearing Fault Codes The lists of inactive fault codes stored on the HarvestTouch Display can be cleared using the operator s console 1 Turn the ignition key to the ACC or RUN position Make sure the engine is not running NOTE You cannot clear fault codes if the engine is running or if there are any active fault codes ϭϬϰϮϬϬϳ A B Figure 3 138 HarvestTouch Display 2 From the HarvestTouch ...

Page 130: ...ges You must resolve all active fault codes before you can clear the fault codes 1014733 A Figure 3 140 Eco Engine Control EEC Button 5 Press and hold eco engine control EEC button A for 5 seconds The CONFIRM YES NO dialog box is displayed 6 Select YES to save changes and close the dialog box or select NO to close the dialog box without saving changes OPERATOR S STATION ...

Page 131: ...drower s lift linkage and center link will need to be connected to the header DANGER To prevent bodily injury or death from the unexpected start up or fall of a raised machine always stop the engine and remove the key before leaving the operator s seat and always engage the safety props before going under the machine for any reason DANGER Ensure that all bystanders have cleared the area 1 Shut dow...

Page 132: ...lay does NOT show the message then select FLOAT ADJUST B select switch C and confirm the switch and float settings D are grayed out IMPORTANT Removing the float will release the tension in the float springs This will prevent damage to the header lift linkages when lowering the legs without a header or weight box attached to the windrower ATTACHING HEADERS TO AND DETACHING HEADERS FROM WINDROWER ...

Page 133: ...to raise the center link until the hook is above the attachment pin on the header IMPORTANT Ensure that the center link is positioned high enough that it does not contact the header as the windrower approaches the header 6 Press HEADER DOWN switch C on the GSL until the windrower lift linkages are fully lowered 1000780 B A Figure 4 4 Header Support 7 Drive the windrower forward slowly until feet A...

Page 134: ...k is locked onto the header by pressing REEL UP F switch on the GSL A D E B C ϭϬϰϮϭϴϱ Figure 4 6 Hydraulic Center Link 9 Windrowers without the Center Link Alignment kit a Press HEADER TILT UP A or HEADER TILT DOWN B switches on the GSL to extend or retract the center link cylinder until the hook is aligned with the header attachment pin b Shut down the engine and remove the key from the ignition ...

Page 135: ...llows a Pull lever A toward you to release it then rotate it toward the header to lower the safety prop onto the cylinder b Repeat the previous step for the opposite lift cylinder IMPORTANT Ensure that the safety props engage over the cylinder piston rods If the safety prop does NOT engage properly raise the header until the safety prop fits over the rod 1000711 A Figure 4 9 Header Support 13 Inst...

Page 136: ...29799 A Figure 4 11 Safety Prop Lever 17 Disengage the safety props on both lift cylinders as follows a Turn lever A away from the header to raise the safety prop until the lever locks into the vertical position b Repeat the previous step for the opposite cylinder NOTE If the safety prop will NOT disengage raise the header to release the prop 18 Start the engine 1014802 A Figure 4 12 Ground Speed ...

Page 137: ...62171 117 Revision A A ϭϬϰϭϴϯϵ Figure 4 13 HarvestTouch Display 20 Select FLOAT ADJUST A B C C D E F A B G H ϭϬϰϮϭϴϳ Figure 4 14 Float Adjustment ATTACHING HEADERS TO AND DETACHING HEADERS FROM WINDROWER ...

Page 138: ...isplay refer to MENU SETUP HEADER SENSORS or if another problem is causing the sensors to fail 23 Shut down the engine and remove the key from the ignition 24 Check the float as follows a Grasp one end of the draper header and lift it The lifting force should be 335 380 N 75 85 lbf with stabilizer transport wheels raised if equipped b Repeat this step on the other side of the header 25 Proceed to ...

Page 139: ... C Figure 4 16 Hydraulic Hoses in Storage Position 4 Retrieve hydraulic multicouplers A and electrical harness B from the header 5 Route the hose harness bundle toward the windrower through support C 1019391 A B 1024062 A C B Figure 4 17 Multicoupler 6 Insert hose support B into hole A in the windrower s left leg Route header hose bundle C under the windrower to the hydraulic and electrical couple...

Page 140: ...is locked onto the receptacle and button A pops out 10 Push button E on the front multicoupler receptacle and rotate handle F away from the windrower 11 Open cover G and position multicoupler H onto the receptacle Align the pins in the coupler with the slots in the handle and rotate the handle toward the windrower so that the coupler is locked onto the receptacle and button E snaps out 1015634 A F...

Page 141: ...injury or death from the unexpected start up or fall of a raised machine always stop the engine and remove the key before leaving the operator s seat and always engage the safety props before going under the machine for any reason DANGER Ensure that all bystanders have cleared the area 1022749 A Figure 4 22 Ground Speed Lever GSL 1 Start the engine 2 If one end of the header does NOT rise fully re...

Page 142: ...props engage over the cylinder piston rods If the safety prop does NOT engage properly raise the header until the safety prop fits over the rod ϭϬϰϮϯϱϵ A B Figure 4 24 Header Support 5 Remove the hairpin from clevis pin A and remove the clevis pin from header support B on both sides of the header 1000797 A B Figure 4 25 Header Stand 6 Lower stand A by pulling clevis pin B inverting the stand and r...

Page 143: ...ngage the safety props on both lift cylinders as follows a Turn lever A away from the header to raise the safety prop until the lever locks into the vertical position b Repeat the previous step for the opposite cylinder NOTE If the safety prop will NOT disengage raise the header to release the prop 9 Start the engine ATTACHING HEADERS TO AND DETACHING HEADERS FROM WINDROWER ...

Page 144: ...play does NOT show the message then select FLOAT ADJUST B select switch C and confirm the switch and float settings D are grayed out IMPORTANT Removing the float will release the tension in the float springs This will prevent damage to the header lift linkages when lowering the legs without a header or weight box attached to the windrower ATTACHING HEADERS TO AND DETACHING HEADERS FROM WINDROWER ...

Page 145: ...aligning center link a Press REEL UP switch A to disengage the center link from the header b Shut down the engine and remove the key from the ignition 1019354 B A Figure 4 31 Hydraulic Center Link 14 Windrowers without self aligning center link a Shut down the engine and remove the key from the ignition b Disconnect the center link by lifting release A and lift hook B off the header ATTACHING HEAD...

Page 146: ...ush latch B and pull platform A toward the walking beam until it stops and the latch engages ϭϬϰϮϯϲϬ A B Figure 4 33 Header Drive Hydraulics 17 Disconnect header drive hydraulics A and electrical harness B from the windrower 1015478 A B Figure 4 34 Left Platform 18 Push latch A to unlock platform B ATTACHING HEADERS TO AND DETACHING HEADERS FROM WINDROWER ...

Page 147: ... Multicoupler 20 Remove hose support A from the windrower s left leg 1019408 A Figure 4 37 Hydraulics Hoses in Storage Position 21 Place hydraulics electrical bundle A in the storage position on the header 22 Back the windrower away from the header 23 Shut down the engine and remove the key from the ignition ATTACHING HEADERS TO AND DETACHING HEADERS FROM WINDROWER ...

Page 148: ...on A 1022271 A B C Figure 4 38 Header Support 24 Reinstall clevis pin B into header support C and secure it with hairpin A Repeat this step at the opposite side ATTACHING HEADERS TO AND DETACHING HEADERS FROM WINDROWER ...

Page 149: ...engine and remove the key from the ignition before making adjustments to the machine B C ϭϬϰϮϰϯϭ A Figure 4 39 Draper Header Supports IMPORTANT Ensure that the correct header supports are used D2 SP Draper Headers must use header supports A A feature that distinguishes support A from all other types is that rubber block B is attached to the support using pin C To order header supports refer to the...

Page 150: ...ining draper header support 4 2 2 Attaching D2 SP Series Draper Header The windrower s lift linkage and center link will need to be connected to the header DANGER To prevent bodily injury or death from the unexpected start up or fall of a raised machine always stop the engine and remove the key before leaving the operator s seat and always engage the safety props before going under the machine for...

Page 151: ...fer to 4 2 1 Attaching Draper Header Supports page 129 Header supports are typically left installed in the header legs when the header is detached from the windrower 3 Extend the windrower wheels from narrow transport into field mode For instructions refer to Extending Wheels Field Mode page 224 1034186 A Figure 4 43 Left Signal Light Placard 4 Rotate left signal light placard A to the up vertical...

Page 152: ...header supports are installed on the windrower Remove ring A and pin B from the header leg If the header supports are installed in the header Remove hairpin C and clevis pin D from the header support Repeat this step on the other header leg 6 Start the engine ATTACHING HEADERS TO AND DETACHING HEADERS FROM WINDROWER ...

Page 153: ...lay does NOT show the message then select FLOAT ADJUST B select switch C and confirm the switch and float settings D are grayed out IMPORTANT Removing the float will release the tension in the float springs This will prevent damage to the header lift linkages when lowering the legs without a header or weight box attached to the windrower ATTACHING HEADERS TO AND DETACHING HEADERS FROM WINDROWER ...

Page 154: ...ot contact the header as the windrower approaches the header 9 Press HEADER DOWN switch C on the GSL until the windrower lift linkages are fully lowered ϭϬϰϮϭϳϭ C D A B Figure 4 47 Header Leg and Support 10 Proceed as follows If the header supports are installed on the windrower Drive the windrower slowly forward until header supports A enter header legs B If the header supports are installed in t...

Page 155: ...k is locked onto the header by pressing REEL UP F switch on the GSL A D E B C ϭϬϰϮϭϴϱ Figure 4 49 Hydraulic Center Link 13 Windrowers without the Center Link Alignment kit a Press HEADER TILT UP A or HEADER TILT DOWN B switches on the GSL to extend or retract the center link cylinder until the hook is aligned with the header attachment pin b Shut down the engine and remove the key from the ignitio...

Page 156: ...15 Shut down the engine and remove the key from the ignition 1029808 A Figure 4 51 Safety Prop Lever 16 Engage the safety props on both lift cylinders as follows a Pull lever A toward you to release it then rotate it toward the header to lower the safety prop onto the cylinder b Repeat the previous step for the opposite lift cylinder IMPORTANT Ensure that the safety props engage over the cylinder ...

Page 157: ...vis pin E and hairpin F NOTE To ensure that the pin doesn t snag the windrow install the clevis pin on the outboard side of the draper header support Repeat this step on the other header leg 1029799 A Figure 4 53 Safety Prop Lever 18 Disengage the safety props on both lift cylinders as follows a Turn lever A away from the header to raise the safety prop until the lever locks into the vertical posi...

Page 158: ...ne 1014802 A Figure 4 54 Ground Speed Lever GSL 20 Press HEADER DOWN switch A on the GSL to fully lower the header A ϭϬϰϭϴϯϵ Figure 4 55 HarvestTouch Display 21 Select FLOAT ADJUST A ATTACHING HEADERS TO AND DETACHING HEADERS FROM WINDROWER ...

Page 159: ...0 out of 10 changes the header weight at the cutterbar by approximately 91 kg 200 lb Adjust the float in increments of 0 05 to fine tune the header s performance NOTE Symbols G and H mean the left and right float sensors are not working You can still manually set the float but you should first check if the sensors were disabled through the HarvestTouch Display refer to MENU SETUP HEADER SENSORS or...

Page 160: ...you to fall IMPORTANT To prevent contamination of the hydraulic system use a clean rag to remove dirt and moisture from all fixed and movable hydraulic couplers 1 Shut down the engine and remove the key from the ignition 1015479 A B Figure 4 57 Left Platform 2 Approach platform A on the left side of the windrower Ensure that the cab door is closed 3 Push latch B and pull platform A toward the walk...

Page 161: ...ft cab forward side of the windrower 1034730 A B C Figure 4 60 Windrower Left Outer Leg 7 Connect hydraulic hose management system A to the left outer leg of the windrower by pushing ball stud B into ball stud latch C NOTE The hydraulic hoses have been removed from the illustration for clarity 1034186 A Figure 4 61 Left Signal Light Placard 8 Rotate left signal light placard A to the up vertical p...

Page 162: ...he connector by turning the collar on the electrical connector clockwise 1020152 A B C D Figure 4 63 Knife Reel Drive Multicoupler 15 Retrieve knife and reel drive multicoupler A from the hydraulic hose management system 16 Push knob B on the hydraulic receptacle and pull handle C fully away from the windrower 17 Open cover D and position the coupler onto the receptacle 18 Align the pins in the co...

Page 163: ...ader on HarvestTouch Display page 171 4 2 4 Detaching D2 SP Series Draper Header The instructions in this section outline how to properly detach the header from the windrower DANGER To prevent bodily injury or death from the unexpected start up or fall of a raised machine always stop the engine and remove the key before leaving the operator s seat and always engage the safety props before going un...

Page 164: ...gage the safety props on both lift cylinders as follows a Pull lever A toward you to release it then rotate it toward the header to lower the safety prop onto the cylinder b Repeat the previous step for the opposite lift cylinder IMPORTANT Ensure that the safety props engage over the cylinder piston rods If the safety prop does NOT engage properly raise the header until the safety prop fits over t...

Page 165: ...ngage the safety props on both lift cylinders as follows a Turn lever A away from the header to raise the safety prop until the lever locks into the vertical position b Repeat the previous step for the opposite cylinder NOTE If the safety prop will NOT disengage raise the header to release the prop 9 Start the engine ATTACHING HEADERS TO AND DETACHING HEADERS FROM WINDROWER ...

Page 166: ...play does NOT show the message then select FLOAT ADJUST B select switch C and confirm the switch and float settings D are grayed out IMPORTANT Removing the float will release the tension in the float springs This will prevent damage to the header lift linkages when lowering the legs without a header or weight box attached to the windrower ATTACHING HEADERS TO AND DETACHING HEADERS FROM WINDROWER ...

Page 167: ...aligning center link a Press REEL UP switch A to disengage the center link from the header b Shut down the engine and remove the key from the ignition 1019354 B A Figure 4 75 Hydraulic Center Link 14 Windrowers without self aligning center link a Shut down the engine and remove the key from the ignition b Disconnect the center link by lifting release A and lift hook B off the header ATTACHING HEAD...

Page 168: ...andle B when disconnecting multicoupler C Pressure may cause the handle to kick back with force 18 Route the knife reel drive hose bundle back to storage position D on the hydraulic hose management system 19 Remove any debris that may have accumulated on the receptacle 20 Close cover E 1015768 A B C D E Figure 4 78 Draper Reel Multicoupler 21 Push lock button B and pull handle C to disengage multi...

Page 169: ...position A on hydraulic hose management system B 26 Insert electrical connector into storage cup C 1015478 A B Figure 4 80 Left Platform 27 Push latch A to unlock platform B 1012700 A Figure 4 81 Left Platform 28 Pull platform A toward the cab until it stops and the latch is engaged ATTACHING HEADERS TO AND DETACHING HEADERS FROM WINDROWER ...

Page 170: ...19476 A B C D Figure 4 83 Hydraulic Hose Management System 30 Pivot hose management system B forward with handle A and engage hook D into latch C on the header 31 Back the windrower away from the header 32 Shut down the engine and remove the key from the ignition ϭϬϰϭϭϮϬ A B C Figure 4 84 Header Stand 33 Reinstall clevis pin B into header support C and secure it with hairpin A Repeat this step on ...

Page 171: ... remove the key from the ignition before making adjustments to the machine B E B C A D ϭϬϰϮϰϯϯ Figure 4 85 Draper Header Supports IMPORTANT Ensure that the correct header supports are used D1XL headers must use header supports A D1X headers or D1 headers converted for use with can use header supports A or D A feature that distinguishes support A from all other types is that rubber block B is attac...

Page 172: ...evis pin C with hairpin D 5 Repeat Step 2 page 152 to Step 4 page 152 to install the remaining draper header support 4 3 2 Attaching D1X and D1XL Series Draper Headers The windrower s lift linkage and center link will need to be connected to the draper header DANGER To prevent bodily injury or death from the unexpected start up or fall of a raised machine always stop the engine and remove the key ...

Page 173: ...1 3 Extend the windrower wheels from narrow transport into field mode For instructions refer to Extending Wheels Field Mode page 224 1034186 A Figure 4 89 Left Signal Light Placard 4 Rotate left signal light placard A to the up vertical position before connecting the windrower to a header 1000754 A B Figure 4 90 Header Leg 5 Remove hairpin A from pin B and remove pin B from the header leg Repeat t...

Page 174: ...lay does NOT show the message then select FLOAT ADJUST B select switch C and confirm the switch and float settings D are grayed out IMPORTANT Removing the float will release the tension in the float springs This will prevent damage to the header lift linkages when lowering the legs without a header or weight box attached to the windrower ATTACHING HEADERS TO AND DETACHING HEADERS FROM WINDROWER ...

Page 175: ...ORTANT Ensure that the center link is positioned high enough that it does not contact the header as the windrower approaches the header 9 Press HEADER DOWN switch C on the GSL until the windrower lift linkages are fully lowered 1015796 A B Figure 4 93 Header Leg and Draper Header Support 10 Drive the windrower slowly forward until draper header supports A enter header legs B Continue driving slowl...

Page 176: ...k is locked onto the header by pressing REEL UP F switch on the GSL A D E B C ϭϬϰϮϭϴϱ Figure 4 95 Hydraulic Center Link 13 Windrowers without the Center Link Alignment kit a Press HEADER TILT UP A or HEADER TILT DOWN B switches on the GSL to extend or retract the center link cylinder until the hook is aligned with the header attachment pin b Shut down the engine and remove the key from the ignitio...

Page 177: ... you to release it then rotate it toward the header to lower the safety prop onto the cylinder b Repeat the previous step for the opposite lift cylinder IMPORTANT Ensure that the safety props engage over the cylinder piston rods If the safety prop does NOT engage properly raise the header until the safety prop fits over the rod 1000771 A B C D Figure 4 98 Header Leg 17 Install pin B through the he...

Page 178: ... the vertical position b Repeat the previous step for the opposite cylinder NOTE If the safety prop will NOT disengage raise the header to release the prop 20 Start the engine 1014802 A Figure 4 100 Ground Speed Lever GSL 21 Press HEADER DOWN switch A on the GSL to fully lower the header A ϭϬϰϭϴϯϵ Figure 4 101 HarvestTouch Display 22 Select FLOAT ADJUST A ATTACHING HEADERS TO AND DETACHING HEADERS...

Page 179: ... 0 out of 10 changes the header weight at the cutterbar by approximately 91 kg 200 lb Adjust the float in increments of 0 05 to fine tune the header s performance NOTE Symbols G and H mean the left and right float sensors are not working You can still manually set the float but you should first check if the sensors were disabled through the HarvestTouch Display refer to MENU SETUP HEADER SENSORS o...

Page 180: ...y cause you to fall IMPORTANT To prevent contamination of the hydraulic system use a clean rag to remove dirt and moisture from all hydraulic couplers 1 Shut down the engine and remove the key from the ignition 1015479 A B Figure 4 103 Left Platform 2 Approach platform A on the left side of the windrower Ensure that the cab door is closed 3 Push latch B and pull platform A toward the walking beam ...

Page 181: ...ft cab forward side of the windrower 1034730 A B C Figure 4 106 Windrower Left Outer Leg 7 Connect hydraulic hose management system A to the left outer leg of the windrower by pushing ball stud B into ball stud latch C NOTE The hydraulic hoses have been removed from the illustration for clarity 1034186 A Figure 4 107 Left Signal Light Placard 8 Rotate left signal light placard A to the up vertical...

Page 182: ... connector by turning the collar on the electrical connector clockwise 1020152 A B C D Figure 4 109 Knife Reel Drive Multicoupler 13 Retrieve knife and reel drive multicoupler A from the hydraulic hose management system 14 Push knob B on the hydraulic receptacle and pull handle C fully away from the windrower 15 Open cover D and position the coupler onto the receptacle Align the pins in the couple...

Page 183: ...n HarvestTouch Display page 171 4 3 4 Detaching D1X and D1XL Series Draper Headers The instructions in this section outline how to properly detach D1X and D1XL Series Draper Headers DANGER To prevent bodily injury or death from the unexpected start up or fall of a raised machine always stop the engine and remove the key before leaving the operator s seat and always engage the safety props before g...

Page 184: ...ollows a Pull lever A toward you to release it then rotate it toward the header to lower the safety prop onto the cylinder b Repeat the previous step for the opposite lift cylinder IMPORTANT Ensure that the safety props engage over the cylinder piston rods If the safety prop does NOT engage properly raise the header until the safety prop fits over the rod 1000771 A B C D Figure 4 115 Header Leg an...

Page 185: ...engage the safety props on both lift cylinders as follows a Turn lever A away from the header to raise the safety prop until the lever locks into the vertical position b Repeat the previous step for the opposite cylinder NOTE If the safety prop will NOT disengage raise the header to release the prop 9 Start the engine ATTACHING HEADERS TO AND DETACHING HEADERS FROM WINDROWER ...

Page 186: ...play does NOT show the message then select FLOAT ADJUST B select switch C and confirm the switch and float settings D are grayed out IMPORTANT Removing the float will release the tension in the float springs This will prevent damage to the header lift linkages when lowering the legs without a header or weight box attached to the windrower ATTACHING HEADERS TO AND DETACHING HEADERS FROM WINDROWER ...

Page 187: ...aligning center link a Press REEL UP switch A to disengage the center link from the header b Shut down the engine and remove the key from the ignition 1019354 B A Figure 4 121 Hydraulic Center Link 14 Windrowers without self aligning center link a Shut down the engine and remove the key from the ignition b Disconnect the center link by lifting release A and lift hook B off the header ATTACHING HEA...

Page 188: ...OTE Firmly hold handle B when disconnecting multicoupler C Pressure may cause the handle to kick back with force 18 Route the knife reel drive hose bundle back to storage position D on the hydraulic hose management system 19 Remove any debris that may have accumulated on the receptacle 1015768 A B C D E Figure 4 124 Draper Reel Multicoupler 20 Push lock button B and pull handle C to disengage mult...

Page 189: ...position A on hydraulic hose management system B 24 Insert electrical connector into storage cup C 1015478 A B Figure 4 126 Left Platform 25 Push latch A to unlock platform B 1012700 A Figure 4 127 Left Platform 26 Pull platform A toward the cab until it stops and the latch is engaged ATTACHING HEADERS TO AND DETACHING HEADERS FROM WINDROWER ...

Page 190: ...1019476 A B C D Figure 4 129 Hydraulic Hose Management System 28 Pivot hose management system B forward with handle A and engage hook D into latch C on the header 29 Back the windrower away from the header 30 Shut down the engine and remove the key from the ignition 1000786 A B Figure 4 130 Header Stand 31 Reinstall pin A into the header leg and secure it with hairpin B Repeat this step on the opp...

Page 191: ...er type or attachment is connected to the windrower Refer to the following topics for information on calibrating header systems 4 4 1 Calibrating Knife Drive on HarvestTouch Display page 171 4 4 2 Calibrating Header Position Sensors on HarvestTouch Display page 175 4 4 1 Calibrating Knife Drive on HarvestTouch Display When a header is attached to the windrower the windrower s HarvestTouch Display ...

Page 192: ...ge the header NOTE Once the header is engaged header gauges A will appear on the HarvestTouch Display home page 3 Select MENU B icon A ϭϬϰϭϳϳϰ Figure 4 132 Main Menu 4 Select SETUP A A ϭϬϰϭϴϭϯ Figure 4 133 Setup Menu 5 Select WINDROWER A ATTACHING HEADERS TO AND DETACHING HEADERS FROM WINDROWER ...

Page 193: ...LIBRATION A ϭϬϰϮϭϯϳ A Figure 4 135 Calibration Selection Page 7 Select KNIFE DRIVE A ϭϬϰϯϭϬϬ A Figure 4 136 Engage Header Warning 8 Select PLAY icon A NOTE The PLAY icon will only appear if the header is engaged ATTACHING HEADERS TO AND DETACHING HEADERS FROM WINDROWER ...

Page 194: ... Calibration Page NOTE If error message A appears during the calibration process follow the instructions in the message to fix the error Select X icon B to exit the message If the knife calibration process fails Confirm that the engine and the hydraulics are at operating temperature Confirm that the hydraulic system is free of any restrictions and is in working order Confirm that the throttle is w...

Page 195: ...d a position sensor is replaced sensor readouts are erratic a pump has been replaced or when a new header type or attachment is connected to the windrower DANGER Ensure that all bystanders have cleared the area NOTE This calibration MUST be performed with the engine running and the header engaged 1 Start the engine A B ϭϬϰϮϭϰϯ Figure 4 140 HarvestTouch Display 2 Engage the header NOTE Once the hea...

Page 196: ...ϭϳϳϰ Figure 4 141 Main Menu 4 Select SETUP A A ϭϬϰϮϭϯϮ Figure 4 142 Setup Menu 5 Select CALIBRATION A ϭϬϰϮϭϰϰ A Figure 4 143 Calibration Selection Page 6 Select POSITION A ATTACHING HEADERS TO AND DETACHING HEADERS FROM WINDROWER ...

Page 197: ...T the calibration process without saving your progress The engine speed will return to the original rpm before starting the calibration process NOTE If a sensor goes out of its normal operating range during the calibration process calibration will stop and a message will appear on the screen indicating that a sensor is out of range ϭϬϰϮϱϰϬ A Figure 4 146 Calibration Page 9 When the first stage of ...

Page 198: ...s needed and repeat the calibration process from the beginning ϭϬϰϮϱϰϭ A Figure 4 148 Calibration Page 10 When the second stage of calibration is complete calibration is complete Select RESUME icon A on the screen to configure the HEADER FLOAT setting or select the HOME or BACK icons to exit the screen NOTE The engine speed returns to the speed prior to calibration when the second stage of the cal...

Page 199: ...the windrower s HarvestTouch Display 1 Turn the key to the ON or ACC position A ϭϬϰϮϭϱϭ Figure 4 149 HarvestTouch Display Header Disengaged 2 Select MENU A A ϭϬϰϭϳϳϰ Figure 4 150 HarvestTouch Display 3 Select SETUP A A ϭϬϰϮϭϱϯ Figure 4 151 HarvestTouch Display 4 Select HEADER A ATTACHING HEADERS TO AND DETACHING HEADERS FROM WINDROWER ...

Page 200: ...ϱϰ A Figure 4 152 Header Settings 5 Select the model and configuration of header A that is attached to the windrower NOTE For example D230DK means D230 Double knife header ATTACHING HEADERS TO AND DETACHING HEADERS FROM WINDROWER ...

Page 201: ... the following settings as required A CUT WIDTH B RAISE LOWER RATES C ATTACHMENTS Use this page to enable or disable attachments such as the double draper drive and swath compressor 7 Calibrate the header if attaching it to the windrower for the first time or if there is another reason to calibrate the header For instructions refer to 4 4 Calibrating Header on HarvestTouch Display page 171 ATTACHI...

Page 202: ......

Page 203: ...ne to operate the windrower for however short a time or distance ensure that they have been instructed in its safe and proper use Review this manual and all other relevant safety information with all the windrower s Operators every year Be alert for other Operators not using recommended procedures or not following safety precautions Correct these mistakes immediately before an accident occurs Do N...

Page 204: ...he console for windrower operation 1019378 A B C D E F G H J K L M N P Q R S T U V W X Y Figure 5 1 Windrower Operating Symbols A Signal Lights B Hazard Lights C Forward D Neutral E Reverse F Road Lights G High Beams H Cab forward Field Lights J Blower Speed Manual Mode K Air Conditioning L Windshield Wiper M Wiper Fluid N Float Menu P Windrower Settings Q Header Settings R Header Engage S Header ...

Page 205: ... Height F Reel Fore Aft G Draper H Draper Pressure J Draper Speed K Header Height L Header Tilt M Header Float N DWA Raise P DWA Lower Q Disc R Disc Pressure S Disc Speed T DEF U SCR Conditioning Manual V SCR Conditioning Inhibit W High Exhaust System Temperature X Engine rpm Y Fuel Z Water in Fuel AA Parking Brake AB Climate Control AC Raising Swath Compressor AD Swath Compressor Raised AE Loweri...

Page 206: ...unction H Wait to Start J Engine Coolant Temperature K Engine Intake Air Filter L Engine Oil Pressure M Engine Oil Level N Engine Oil Filter P Engine Coolant Level Q Engine Air Intake Temperature R Hydraulic Oil Pressure S Hydraulic Oil Temperature T Transmission Oil Pressure U Battery Voltage V Fan Speed W Caution Yellow Danger Red X Function Locked Y Time Z Date AA Alarm AB Alarm Off AC Volume L...

Page 207: ...s ear muffs or ear plugs to protect against loud noises Follow all safety and operational instructions given in your operator s manuals If you do not have a header manual get one from your Dealer and read it thoroughly NEVER attempt to start the engine or operate the machine except from the operator s seat Check the operation of all controls in a safe area before starting work Check for excessive ...

Page 208: ...or 3 minutes and then operate the windrower at moderate speed until the oil has warmed up 5 3 3 Preseason Checks Annual Service Annual service and preseason checks ensure that your machine is always in peak condition and safe for operation CAUTION Review the operator s manual to refresh your memory on safety and operating recommendations Review all safety signs and other decals on the windrower an...

Page 209: ...he symbol on BLOWER TOGGLE button A repeatedly until the lowest fan setting is reached 2 Press the red area on TEMPERATURE CONTROL switch F repeatedly until maximum heating is reached 3 Ensure A C control E is OFF DANGER Ensure that all bystanders have cleared the area 4 Start the engine 5 Run the windrower at low idle until the engine is warm 5 3 4 Daily Checks and Maintenance Performing daily ch...

Page 210: ... an electrically conductive and unbroken connection between all components of the fuel delivery system A wire connection from the fuel delivery system to the machine chassis will equalize the static potential between the two machines further reducing the chance of a static electric discharge A properly grounded fuel delivery system has an electrically conductive connection from the fuel delivery s...

Page 211: ...nser is smaller than that of the fuel tank CAUTION Avoid contact with eyes In case of contact rinse immediately with water for 15 minutes 4 Fill the tank with approved DEF For specifications refer to the inside back cover IMPORTANT DEF is corrosive Spilled DEF must be contained and absorbed by non combustible absorbent material like sand and then shovelled into a suitable container for disposal If...

Page 212: ...e and remove the key from the ignition 3 Wait about 5 minutes 1022834 A Figure 5 10 Engine Oil Dipstick Location 4 Locate engine oil dipstick A on the right side of the windrower Turn the dipstick counterclockwise to unlock it Remove the dipstick 5 Wipe the dipstick clean Reinsert the dipstick it into the dipstick tube 1000074 Figure 5 11 Engine Oil Level on Dipstick 6 Remove the dipstick again Ch...

Page 213: ...ood For instructions refer to 6 3 2 Closing Hood page 288 5 3 5 Engine Operation To ensure the length of the windrower s service life its engine needs to be started operated and shut down according to the provided procedures Starting Engine The windrower s computer will allow the engine to be started only when certain safety conditions have been met DANGER Start the engine only when the windrower ...

Page 214: ...ives a wake up signal the display wakes up from sleep mode and closes the battery disconnect relay The display enters a boot up sequence which takes approximately 40 seconds The following items trigger a wake up signal for the console Key switch ignition or accessory positions Cab door switch Horn button Hazards button Field lights button Clearance lights button Road lights button High beam button...

Page 215: ...trols M2 Series Windrower 3 Move ground speed lever GSL A into PARK C 4 Turn the steering wheel until it locks IMPORTANT Do NOT attempt to force the wheel out of the locked position or the steering system may become damaged NOTE The steering wheel will be able to move slightly when it is in the locked position 5 Fasten your seat belt 6 Push HEADER ENGAGE switch B to ensure it is in the OFF positio...

Page 216: ...t least 32 C 90 F To check the hydraulic oil temperature swipe right on home page area B until the page displays hydraulic oil temperature C IMPORTANT Do NOT operate the starter for longer than 15 seconds at a time If the engine does not start wait at least 2 minutes before you attempt to start the engine again If the engine is cranked for longer than 30 seconds in a 2 minute period the windrower ...

Page 217: ... tow the machine to start the engine Towing the windrower can cause damage to the hydrostatic drives Use the following table to diagnose problems with starting the windrower s engine Table 5 1 Engine Start Troubleshooting Problem Solution Controls are not in the NEUTRAL position Move the GSL to NEUTRAL Move the steering wheel to the locked centered position Disengage the HEADER switch Neutral inte...

Page 218: ...increments of 100 rpm from 1800 to 2300 rpm in the ECO RPM menu While the header is engaged the system can be activated and deactivated depending on field conditions using the Eco Engine Control EEC button A on the console When the engine is running at less than full throttle you will notice a small reduction in the maximum reel draper and ground speeds The EEC feature is turned ON or OFF by press...

Page 219: ...ft instrument cluster of the HarvestTouch Display ϭϬϰϭϵϳϬ A Figure 5 22 HarvestTouch Display Normal engine operating temperature is indicated when the needle is within the green range of gauge A If the engine temperature exceeds 105 C 221 F the needle will move to the red range of the gauge Depending on the temperature the engine will trigger a fault code and an amber caution or red stop light wil...

Page 220: ...easing exhaust temperatures in order to remove the buildup of crystallized DEF Automatic cleaning occurs any time during machine operation as long as the INHIBIT SCR CONDITIONING switch is OFF Turn on the INHIBIT SCR CONDITIONING switch if the environment is not suitable for high exhaust temperatures for example when the windrower is inside a building The INHIBIT SCR CONDITIONING switch is intende...

Page 221: ...y 3 To manually activate SCR conditioning press the SCR CONDITIONING MANUAL icon A SCR CONDITIONING ACTIVE icon B and HIGH EXHAUST SYSTEM TEMPERATURE HEST icon B will appear in the left gauge cluster during system cleaning NOTE The HEST icon also appears during normal operation when the exhaust temperature exceeds the maximum temperature threshold The icon remains on until the exhaust temperature ...

Page 222: ...eft A B C D Figure 5 27 HarvestTouch Display From the temperature information page you can view the following data Cooling fan speed A Hydraulic oil temperature B Engine intake manifold temperature C Engine coolant temperature D NOTE The engine fan speed will increase or decrease depending on the windrower s cooling requirements A small fan icon will appear beside the icon of the parameter that is...

Page 223: ...ives To prevent bodily injury or death from the unexpected startup of the machine always stop the engine and remove the key from the ignition Turn off the lights unless their being on is required for inspection purposes Release the seat belt Turn off the wipers Raise the armrest and steering wheel for easier exit and re entry Lock the cab door if you are leaving the windrower unattended 1014972 A ...

Page 224: ...selection press the checkmark icon Driving Forward in Cab Forward Mode In cab forward mode the operator s station is facing away from the engine The instructions in this section show how to operate the windrower in the forward direction while in cab forward mode 1000031 Figure 5 30 Cab Forward Mode WARNING Do NOT drive the windrower on the road in cab forward mode as lighting reflector visibility ...

Page 225: ...ring wheel counterclockwise to pivot the operator s station clockwise 180 until the pin engages the latch to secure the operator s station in the new position 3 Ensure the seat belt is fastened WARNING Ensure that all bystanders have cleared the area 4 Start the engine if it is not already running For instructions refer to Starting Engine page 193 5 Set the desired ground speed limit For instructi...

Page 226: ... at the bottom and turn the wheel in the direction you want the rear of the machine to travel ϭϬϰϭϲϯϳ B A Figure 5 33 Console 1 Move throttle lever A to a mid range position NOTE Reversing in low speed range and at reduced engine speed is recommended since steering will be less sensitive than at higher speed settings WARNING Ensure that all bystanders have cleared the area 2 Move ground speed leve...

Page 227: ...mbol to confirm that the parking brake is engaged 1 Park the windrower on a level surface ϭϬϰϮϳϬϰ A B C Figure 5 36 Operator Station 2 If the operator s seat is facing the engine skip to Step 3 page 207 If the operator s seat is in the cab forward position swivel the operator s seat to the engine forward position as follows a Place GSL A in PARK The engine can be running IMPORTANT If the GSL is NO...

Page 228: ...ew Operators to overcorrect ϭϬϰϭϲϲϮ A Figure 5 38 Console 8 If more tractive lugging power is required for instance when driving up a ramp up a hill or out of a ditch a Move GSL A closer to NEUTRAL 9 Once the lugging condition no longer exists a Set GSL A to half of the windrower s maximum forward speed Driving in Reverse in Engine Forward Mode In the engine forward mode the operator s station is ...

Page 229: ...ne Forward Mode In engine forward mode the operator s station faces the engine The windrower is designed to be driven on the road with the engine facing forward to provide better visibility for the Operator and improved stability for the machine DANGER Ensure that all bystanders have cleared the area CAUTION Windrowers sold outside of North America Do NOT drive the windrower on the road in cab for...

Page 230: ...pparent under these conditions CAUTION Familiarize yourself with the width regulations and lighting and marking requirements in your region before attempting to drive the windrower on a public road Before driving the windrower on a roadway ϭϬϰϮϳϬϳ A Figure 5 41 Header Engage Switch 1 Ensure header engage switch A is off down position 2 Clean the flashing amber lights red tail lights and headlights...

Page 231: ...s switch D to activate the hazard lights ϭϬϰϭϲϯϳ B A Figure 5 43 Console 12 Set the desired maximum ground speed limit For instructions refer to Adjusting Ground Speed Limit page 203 NOTE Maximum ground speed can be set while the windrower is moving Anticipate the acceleration or deceleration if changing the maximum speed 13 Slowly push throttle A to full forward operating speed 14 Move ground spe...

Page 232: ...hine is lost immediately pull the GSL to NEUTRAL turn the ignition to the OFF position and remove the key Driving on Road in Cab Forward Mode In cab forward mode the operator s station is facing away from the engine is capable of being driven on the road in cab forward mode with or without a header attached but at a reduced speed under restricted conditions and only for models sold in North Americ...

Page 233: ... header engage switch A is off down position CAUTION Do NOT raise the header too high Make sure you have good visibility out of the cab and that motorists are able to see the header lights 5 Raise the header if it is attached enough to clear common obstacles 6 Engage the header lift safety props 7 If the width of attached header impedes other vehicle traffic remove the header and install a MacDon ...

Page 234: ...esponsive at reduced speeds Do NOT rapidly accelerate or decelerate while turning When traveling on steep slopes Move the GSL closer to NEUTRAL to reduce the windrower s speed Lower the header If the ground speed is greater than or equal to 51 km h 30 mph the HarvestTouch Display will display a warning message SLOW DOWN with an audible alert Move the GSL closer to NEUTRAL to reduce speed With the ...

Page 235: ... steering control Always wear a seat belt when operating the windrower CAUTION Park on a level surface with the ground speed lever GSL in the PARK position and the steering wheel in the locked centered position Wait for the HarvestTouch Display to beep and display a red P symbol to confirm that the parking brake is engaged ϭϬϰϭϲϲϯ B A Figure 5 49 Console 1 Anticipate stopping and SLOWLY move GSL A...

Page 236: ...ket Only A secondary braking system is fitted to M2170NT Windrowers exported to Germany The system can only be engaged with the windrower in the engine forward mode ϭϬϯϳϰϯϯ A Figure 5 51 Secondary Brake System Enable Button German Market Only 1 In the unlikely event of a primary braking system failure while operating in engine forward mode enable the secondary disc brake system by pressing BUTTON ...

Page 237: ...sable the secondary brake system The secondary brake icon turns off on the HarvestTouch Display Viewing Performance Data You can check the current performance information on Run Screen 3 on the HarvestTouch Display ϭϬϰϮϬϭϵ A B C D E Figure 5 54 Performance Data 1 Swipe from right to left on the HarvestTouch Display screen to view the following information on the PERFORMANCE DATA page Acres per hou...

Page 238: ...ers due to reduced traction and possible loss of control When towing equipment which is not equipped with brakes do NOT exceed 32 km h 20 mph CAUTION To tow a header with a windrower the header must be equipped with the appropriate equipment to comply with local regulations Before towing verify that the signal lighting and safety equipment is installed and functioning properly Do NOT exceed the co...

Page 239: ...structions refer to 4 2 2 Attaching D2 SP Series Draper Header page 130 1015593 A B C D Figure 5 58 Draper Header Support 2 Convert the header to transport mode For instructions refer to header operator s manual 3 Detach the header from the windrower For instructions refer to 4 2 4 Detaching D2 SP Series Draper Header page 143 4 Remove hairpin D and clevis pin C securing header support B to leg A ...

Page 240: ...egs A are positioned in weight box pockets B Raise the lift legs slightly 10 Shut down the engine and remove the key from the ignition 11 Install locking pin C into the pocket and secure it with hairpin D 12 Repeat the previous step to install the locking pin in the opposite leg ϭϬϰϬϯϳϳ A B Figure 5 61 Weight Box with Harness and Hitch Clevis 13 Attach hitch clevis A to weight box B For instructio...

Page 241: ...ne 1020166 Figure 5 63 Towing a Header 17 Raise the weight box until the tow bar is level The header is now ready for transport For instructions refer to Towing Header with Windrower page 218 Attaching Hitch Clevis to Weight Box A weight box is required when transporting a header behind the windrower To accomplish this a hitch clevis must first be attached to the weight box MD B6974 Follow the ste...

Page 242: ...ll the weight box frame with approximately 0 43 m3 0 52 yd3 of structural grade concrete Ensure that there is enough concrete in the box that it reaches the underside of flange A 3 Allow the concrete to cure for 48 hours 4 Turn the weight box over using a suitable lifting device 1036721 A B C E C D Figure 5 65 Clevis Style Hitch Assembly MD 346207 Installed OPERATION ...

Page 243: ...e able to roll away After towing the windrower place blocks under the front and rear wheels to prevent uncontrolled movement 1015527 A Figure 5 66 Emergency Towing 1 Disengage the wheel drives For instructions refer to Engaging and Disengaging Wheel Drives page 223 2 Use attachment point A to tow the windrower if it gets stuck or if it must be hauled onto a trailer for transport 3 Place the blocks...

Page 244: ...arrow transport feature allows the drive wheel legs and walking beam extensions to extend from narrow transport to field position DANGER To prevent injury or death from the unexpected start up of the machine always stop the engine and remove the key from the ignition before leaving the operator s seat for any reason NOTE This procedure can be done with the seat in cab or engine forward position 1 ...

Page 245: ...te left signal light placard A to the up vertical position before connecting to a header ϭϬϯϵϳϵϵ A B Figure 5 70 Transport Locks 6 At the front of the windrower rotate walking beam lockout valve handle A to the open position in line with the valve 7 Remove lockout pins B from the sliding drive wheel legs and place them on top of the frame WARNING Ensure that all bystanders have cleared the area 8 ...

Page 246: ...ole to activate the narrow transport controls The HarvestTouch Display will display an Important Message B and sound an alarm ϭϬϰϮϳϬϬ A B Figure 5 72 Narrow Transport Control Page 11 Press F5 button A on the operator s console to activate the drive wheel leg controls The F5 page B will display on the HarvestTouch Display OPERATION ...

Page 247: ...d REEL FORE button A on the GSL to extend the drive wheel legs 14 Bring the windrower to a complete stop and place the GSL in PARK ϭϬϰϮϳϬϭ A B Figure 5 74 Narrow Transport Controls 15 Press F6 button A on the operator s console to activate the walking beam controls The F6 page B will display on the HarvestTouch Display 16 Pivot the windrower to turn the caster wheels sideways as shown on the F6 pa...

Page 248: ... button F5 or F6 again which ever is active The exit transport operation warning will display on the HarvestTouch Display NOTE Press F5 or F6 on the console or HOME or RETURN on the HarvestTouch Display to cancel transport operation at any time 19 Shut down the engine and remove the key from the ignition ϭϬϯϵϳϵϵ A B Figure 5 77 Transport Locks 20 Reinstall lock pins B into the drive wheel legs 21 ...

Page 249: ...fore leaving the operator s seat for any reason NOTE This procedure can be done with the seat in cab or engine forward position 1 Ensure the narrow transport function is enabled on the HarvestTouch Display For instructions refer to 3 17 10 Enabling Narrow Transport System in the HarvestTouch Display page 99 2 Disconnect the header or weight box from the windrower Refer to 4 Attaching Headers to an...

Page 250: ...t mode ϭϬϯϵϳϵϵ A B Figure 5 81 Transport Locks 6 At the front of the windrower rotate walking beam lockout valve handle A to the open position in line with the valve 7 Remove lockout pins B from the sliding drive wheel legs and place them on top of the frame WARNING Ensure that all bystanders have cleared the area 8 Start the engine 9 Run the engine at low idle OPERATION ...

Page 251: ...ole to activate the narrow transport controls The HarvestTouch Display will display an Important Message B and sound an alarm ϭϬϰϮϳϬϬ A B Figure 5 83 Narrow Transport Control Page 11 Press F5 button A on the operator s console to activate the drive wheel leg controls The F5 page B will display on the HarvestTouch Display OPERATION ...

Page 252: ...d REEL AFT button B on the GSL to retract the drive wheel legs 14 Bring the windrower to a complete stop and place the GSL in PARK ϭϬϰϮϳϬϭ A B Figure 5 85 Narrow Transport Controls 15 Press F6 button A on the operator s console to activate the walking beam controls The F6 page B will display on the HarvestTouch Display 16 Pivot the windrower to turn the caster wheels sideways as shown on the F6 pa...

Page 253: ... button F5 or F6 again which ever is active The exit transport operation warning will display on the HarvestTouch Display NOTE Press F5 or F6 on the console or HOME or RETURN on the HarvestTouch Display to cancel transport operation at any time 19 Shut down the engine and remove the key from the ignition ϭϬϯϵϳϵϵ A B Figure 5 88 Transport Locks 20 Reinstall lock pins B into the drive wheel legs 21 ...

Page 254: ...ject such as a wrench to touch across the battery terminals A short circuit can produce an extremely hot spark which can cause severe injuries 1 Retract all cylinders to protect the cylinder rods from corrosion during storage including Header lift cylinders Float cylinders Header tilt cylinder 2 Check for broken components and order replacements from your Dealer NOTE Attending to these items right...

Page 255: ...12 Remove the batteries For instructions refer to Removing Battery page 378 Bring the batteries to full charge and store in a cool dry place not subject to freezing 13 If possible block up the windrower to take the weight off the tires If this is not possible increase the tire pressure by 25 for storage Adjust the tire pressure to recommended operating pressure before next use IMPORTANT Do NOT exc...

Page 256: ... going under the machine for any reason DANGER Ensure that all bystanders have cleared the area 1 Start the engine 1014786 A Figure 5 90 Ground Speed Lever 2 Press HEADER UP switch A on the ground speed lever GSL to raise the header to its maximum height NOTE If one end of the header does NOT fully rise rephase the lift cylinders as follows a Press and hold HEADER UP switch A until both cylinders ...

Page 257: ...ting to be as light as possible while limiting the amount of bouncing produced by the header Doing so will reduce the amount of wear placed on knife components and will prevent the header from scooping soil Prevent the header from bouncing excessively by operating at a slower ground speed when the float setting is light A bouncing header results in raggedly cut crop Before setting the header float...

Page 258: ...able 5 4 Target Header Float Values Header Type Force Required to Lift Header at the Ends with Lift Cylinder Fully Retracted Draper 335 380 N 75 85 lbf with stabilizer transport wheels raised if equipped Auger 335 380 N 75 85 lbf Rotary Disc 426 471 N 95 105 lbf 8 Restart the engine and adjust the float as needed For instructions refer to Setting Float page 238 NOTE Increasing the float value on t...

Page 259: ...ower the header skid shoes For instructions refer to the header operator s manual 1015844 Figure 5 95 Header Float Cutterbar off Ground 3 When cutting off the ground set the cutting height with the header height controls on the GSL For instructions refer to 5 4 5 Setting Header Height page 247 A ϭϬϰϭϴϰϬ Figure 5 96 HarvestTouch Display 4 Press FLOAT SETTINGS icon A on the HarvestTouch Display to s...

Page 260: ...d and restored using the HarvestTouch Display 1029799 A Figure 5 98 Safety Prop Lever 1 Disengage the safety props on both lift cylinders as follows a Turn lever A away from the header to raise the safety prop until the lever locks into the vertical position b Repeat the previous step for the opposite cylinder NOTE If the safety prop will NOT disengage raise the header to release the prop DANGER E...

Page 261: ...page to remove or restore the header float 6 Shut down the engine and remove the key from the ignition Setting Float Options with Fixed Deck When using an auger header the DECK SHIFT buttons can be used to store three float settings This is useful when ground conditions vary or when having one side lighter is desirable such as cutting along wheel tracks or irrigation borders DANGER Ensure that all...

Page 262: ...on 1012756 1012756 A B Figure 5 103 Header Engage Switch 2 Engage the header by pushing and holding down HEADER ENGAGE switch A and pulling up on collar B 1019662 A B C Figure 5 104 Header Deck Shift Switches 3 Select one of the following deck positions using the DECK SHIFT switches on the operator s console Right side delivery A Center delivery B Left side delivery C OPERATION ...

Page 263: ...s may be installed but will be nonfunctional for certain headers Engaging and Disengaging the Header The HEADER ENGAGE switch engages and disengages the header drive DANGER To prevent bodily injury or death from the unexpected start up or fall of a raised machine always stop the engine and remove the key before leaving the operator s seat and always engage the safety props before going under the m...

Page 264: ...ress and hold HEADER ENGAGE switch B Pull up on collar C until switch B is in the ENGAGED position 3 When you are ready to return to forward operation release HEADER DRIVE REVERSE button A to stop the header 4 Push down HEADER ENGAGE switch B to the OFF position The header can now be re engaged For instructions refer to Engaging and Disengaging the Header page 243 5 4 4 Adjusting Header Angle Head...

Page 265: ... Instead use HEADER HEIGHT CONTROLS E and F Adjust the header angle as follows To decrease flatten the header angle operate HEADER TILT UP switch C on the GSL to retract the cylinder To increase steepen the header angle operate HEADER TILT DOWN switch D on the GSL to extend the cylinder NOTE HEADER TILT switches C and D can be locked out to prevent unintentional header angle changes when pressing ...

Page 266: ...p on handle A to release the locking device and lift the hook off the header pin 1015884 A B C Figure 5 110 Center Link Hook 4 Lower handle A into the locked position 5 Push up on lock pin B only not actuator rod C The handle should catch on the casting and the pin should NOT lift 1015885 Figure 5 111 Center Link Hook 6 Push up on the actuator rod The lock pin should lift with the handle OPERATION...

Page 267: ...t for draper headers the fore aft reel height and header height settings are limited as follows to prevent the reel from contacting the cab roof If you increase header height A to greater than 7 0 while reel height setting B is greater than 7 0 and reel fore aft setting C is greater than 5 0 the reel fore aft will automatically adjust forward to 5 0 or less to avoid contacting the cab roof After t...

Page 268: ...structions refer to One Touch Return Buttons page 80 5 4 7 Adjusting Header Raise and Lower Rates The header raise and lower rate settings control how fast a header is raised or lowered ϭϬϰϮϬϵϱ A B C Figure 5 115 HarvestTouch Display 1 To access the Header Raise and Lower Rates page from the home page or from a header run screen press MENU A to view the menu options 2 Press SETUP B followed by HEA...

Page 269: ...ound speed lever GSL adjusts the slow rate stage one a full button press on the GSL adjusts the fast rate stage two On the HEADER RAISE LOWER page use the arrows next to each GSL button action to control how quickly the header responds HEADER RAISE half button press A adjusts stage one slow rate HEADER RAISE full button press B adjusts stage two fast rate HEADER LOWER half button press C adjusts s...

Page 270: ...o view header run screens the header must be engaged Swipe the touch screen left or right to change the run screen page For help with HarvestTouch Display navigation refer to 3 17 2 Navigating HarvestTouch Display page 88 ϭϬϰϮϬϳϵ A B C D E F G H K J L M N P Figure 5 119 Draper Header Run Screen 1 A Reel Settings Icon F Draper Speed L Draper Pressure B Draper Settings Icon G Knife Speed M Knife Pre...

Page 271: ...stics for specific crops and conditions For procedures on controlling header height header tilt and float refer to 5 4 Operating Header page 236 5 5 3 Adjusting Reel Fore Aft Position Header performance based on crop type and conditions can be optimized by adjusting the reel fore aft position The reel fore aft position is adjusted with the multi function switches on the ground speed lever GSL 1019...

Page 272: ...ater than 5 0 lower the reel height and or header height to a value of 7 0 or less The reel fore aft will automatically move forward to 5 0 or less If you increase the header height to greater than 7 0 while the reel fore aft is greater than 5 0 and the reel height is greater than 7 0 After the reel fore aft automatically moves you will then have to manually adjust the fore aft 5 5 4 Adjusting Ree...

Page 273: ... would exceed 5 0 message D will show on the HarvestTouch Display For instructions about operating the reel fore aft refer to 5 5 3 Adjusting Reel Fore Aft Position page 251 5 5 5 Leveling Header The windrower lift linkages are factory set to provide the proper header level and should not normally require adjustment DANGER To prevent bodily injury or death from the unexpected startup of the machin...

Page 274: ...imately 150 mm 6 in off the ground 6 Ensure that member A is against link B 7 Shut down the engine and remove the key from the ignition 8 Measure the distance to the ground at both ends of the header to determine if the header is level 1015881 A B Figure 5 127 Lift Linkage 9 If adjustment is necessary start the engine and resume the float For instructions refer to Removing and Restoring Float page...

Page 275: ...rom your Dealer 5 5 6 Adjusting Reel Speed Reel speed is displayed in either rpm mph or km h depending on the global units selection The default reel speed is 60 rpm and can be set to auto or manual mode AUTO mode Minimum reel speed and operating reel speed differential relative to ground speed are set and the reel speed is maintained For instructions refer to Setting Reel Speed in Auto Mode page ...

Page 276: ...Set AUTO switch A to the ON position to access the following auto reel speed parameters Minimum reel speed B Reel index C NOTE These settings are grayed out in manual mode 3 To set the minimum reel speed press arrows B beside MINIMUM REEL SPEED and select a value within the adjustment range 1 6 8 km h 1 5 mph The default is 5 km h 3 0 mph NOTE When AUTO mode is on the speed is displayed in km h or...

Page 277: ...tment requires the header to be engaged The instructions in this section show you how to set the reel speed in manual mode ϭϬϰϮϬϰϱ A Figure 5 132 HarvestTouch Display Header Run Screen 1 Engage the header to display header run screen 1 or 2 2 To set reel speed control to manual press REEL SETTINGS icon A to access the REEL ADJUST page ϭϬϰϮϬϰϵ A B Figure 5 133 Reel Adjust Page 3 Set AUTO switch A t...

Page 278: ... alarm to be set off more often a higher setting will allow the alarm to be set off less frequently This adjustment requires that the header be engaged ϭϬϰϮϬϰϱ A Figure 5 135 HarvestTouch Display Header Run Screen 1 Engage the header to display header run screen 1 or 2 2 To adjust the reel pressure alarm set point press REEL SETTINGS icon A to access the REEL ADJUST page ϭϬϰϮϬϱϭ A Figure 5 136 Ree...

Page 279: ... One Touch Return Buttons page 80 Setting Draper Speed in Auto Mode This adjustment requires the header to be engaged The instructions in this section show you how to set the draper speed in auto mode using the HarvestTouch Display ϭϬϰϮϬϱϵ A Figure 5 137 HarvestTouch Display Header Run Screen 1 Engage the header to display header run screen 1 or 2 and then press DRAPER SETTINGS icon A ϭϬϰϮϬϲϯ A B ...

Page 280: ...IN will replace AUTO and the index value Setting Draper Speed in Manual Mode This adjustment requires the header to be engaged The instructions in this section show you how to set the draper speed in manual mode ϭϬϰϮϬϱϵ A Figure 5 139 HarvestTouch Display Header Run Screen 1 Engage the header to display header run screen 1 or 2 and then press DRAPER SETTINGS icon A 2 To set draper speed control to...

Page 281: ...that the draper is operating above the desired pressure A lower setting will cause the alarm to be set off more often a higher setting will allow the alarm to be set off less frequently This adjustment requires the header to be in operation ϭϬϰϮϬϱϵ A Figure 5 142 HarvestTouch Display Header Run Screen 1 Engage the header to display header run screen 1 or 2 2 To adjust the reel pressure alarm set p...

Page 282: ... installed 5 5 8 Knife Speed The ideal cutting speed of the knife should achieve a clean cut Crop types and conditions influence the knife and forward speeds Table 5 5 Knife Speed Header Description Knife Speed Type Size m ft Minimum Maximum rpm11 spm12 rpm11 spm12 Draper with single knife 6 1 20 600 1200 700 1400 Draper with single knife 7 6 25 600 1200 700 1400 Draper with single knife 9 1 30 60...

Page 283: ...The knife speed cannot be set outside the range specified for each header Setting Knife Speed Set the knife speed by using the HarvestTouch Display Knife speed is displayed in strokes per minute spm DANGER Ensure that all bystanders have cleared the area ϭϬϰϮϬϳϰ A Figure 5 145 HarvestTouch Display Header Run Screen 1 To set the knife speed engage the header to display header run screen 1 and then ...

Page 284: ...age 2 To adjust the KNIFE SPEED ALARM set point press arrows A until the desired value is shown NOTE The knife speed alarm alerts the Operator when knife speed drops below a specified percentage of preset knife speed In the example shown the alarm will sound if knife speed drops below 875 spm The default is 70 and the minimum value is 50 ϭϬϰϮϬϳϲ A Figure 5 149 Knife Adjust Page 3 To adjust the KNI...

Page 285: ...es A Right Side Delivery B Center Delivery C Left Side Delivery 2 Push the HEADER DECK SHIFT switch to the desired delivery position The deck s will move and the direction of the drapers will change accordingly 5 5 10 Swath Compressor The swath compressor is a large formed polyethylene sheet designed to mount to the underside of the windrower The swath compressor is designed for use with draper he...

Page 286: ...sabled height number A is replaced by a sensor disabled icon For instructions on enabling the sensor refer to the Swath Compressor for M2 Series Windrowers Setup Operation and Parts Manual 1015455 B A Figure 5 153 Operator s Console Switches A and B on the operator s console are used to adjust the position height Releasing the switch stops the movement Each momentary press of the switch changes th...

Page 287: ...er than 1 6 km h 1 mph An IMPORTANT message to raise the swath compressor appears on the HarvestTouch Display accompanied by a tone when the GSL is moved out of PARK in engine forward mode if the swath compressor is not fully raised Engage the swath compressor lock when the swath compressor is not in use or when the windrower is in engine forward mode For instructions refer to Locking and Unlockin...

Page 288: ...y To view header run screens the header must be engaged Swipe the touch screen left or right to change the run screen page For help with HarvestTouch Display navigation refer to 3 17 2 Navigating HarvestTouch Display page 88 Run Screen 1 shows the reel auger speed reel auger pressure knife speed the knife pressure and the alarm set points ϭϬϰϮϭϭϮ A B C D E F G H J K Figure 5 156 Auger Header Run S...

Page 289: ...d the reel and auger speeds are hydraulically linked and you cannot adjust the auger speed separately IMPORTANT The reel speed on an A40DX Auger Header MUST NOT EXCEED 85 rpm The auger speed MUST NOT EXCEED 320 rpm AUTO mode Minimum reel speed and operating reel speed differential relative to ground speed are set and reel speed is maintained relative to ground speed For instructions refer to Setti...

Page 290: ...2 Set AUTO switch A to the ON position to access the following auto reel speed parameters Minimum reel speed B Reel index C NOTE These settings are grayed out in manual mode 3 To set the minimum reel speed press arrows B beside REEL MIN SPEED and select a value within the adjustment range 1 6 8 km h 1 5 mph The default is 5 km h 3 0 mph NOTE When AUTO mode is on the speed is displayed in km h or m...

Page 291: ...lue Setting Reel Speed in Manual Mode Set the reel speed in manual mode using the ground speed lever GSL and the HarvestTouch Display ϭϬϰϮϭϬϭ A Figure 5 161 HarvestTouch Display Header Run Screen 1 Engage the header to display header run screen 1 or 2 and then press REEL SETTINGS icon A ϭϬϰϮϬϰϵ A B Figure 5 162 Reel Adjust Page 2 Set AUTO switch A to the OFF position NOTE In manual mode RPM switch...

Page 292: ...n on differential auger reel control and adjust the auger speed begin with Step 5 164 page 272 If differential auger reel control is on proceed to Step 6 page 274 for instructions about adjusting auger speed NOTE When the differential auger reel control is engaged the minimum maximum reel speed is dependent on the auger speed In some cases in order to have the reel run slower or faster you may hav...

Page 293: ...st of setup options opens ϭϬϰϮϭϬϰ ϭϬϰϮϭϬϰ A Figure 5 166 Set Up Header Menu List 4 Select ATTACHMENTS A from the list of options ϭϬϰϮϭϬϱ A Figure 5 167 Set Up Header Menu List 5 Set DIFFERENTIAL AUGER REEL CONTROL switch A to the ON position and then return to the HOME page OPERATION ...

Page 294: ...alarm to be set off more often a higher setting will allow the alarm to be set off less frequently This adjustment requires the header to be in operation ϭϬϰϮϭϬϭ A Figure 5 169 HarvestTouch Display Header Run Screen 1 Engage the header to display header run screen 1 or 2 and then press REEL SETTINGS icon A 2 To adjust the reel pressure alarm set point press REEL SETTINGS icon A to access the REEL ...

Page 295: ...will operate at the original set point after the header is detached and reattached to the windrower Refer to the header operator s manual for the suggested knife speed for a variety of crops and conditions NOTE The knife speed cannot be programmed outside the range specified for each header Setting Knife Speed Set the knife speed by using the ground speed lever GSL and the HarvestTouch Display Kni...

Page 296: ...ssure exceed a specified range ϭϬϰϮϭϬϮ A Figure 5 173 HarvestTouch Display Header Run Screen 1 To set either of the knife alarms engage the header to display header run screen 1 and then press KNIFE SETTINGS icon A ϭϬϰϮϭϬϵ A Figure 5 174 Knife Adjust Page 2 To adjust the KNIFE SPEED ALARM set point press arrows A until the desired value is shown NOTE The knife speed alarm alerts the Operator when ...

Page 297: ...Adjust Page 3 To adjust the KNIFE PRESSURE ALARM set point press arrows A until the desired value is shown NOTE The alarm will be set off more often at a lower setting and less often at a higher setting The factory setting is 245 bar 3600 psi OPERATION ...

Page 298: ......

Page 299: ...d should only be stored in polyethylene polypropylene or stainless steel containers DEF containers should be sealed to prevent contamination and the evaporation of water which will affect the specified water to urea ratio Diesel fuel should NEVER be mixed with DEF NOTE DEF will degrade over time depending on temperature and exposure to sunlight Shelf life specifications as defined by ISO Spec 2224...

Page 300: ... 5 25 lb Air conditioning refrigerant oil Air conditioning system total capacity PAG SP 15 240 cc 8 1 fl oz Windshield washer fluid Windshield washer fluid tank SAE J942 compliant 4 liters 1 U S gallon 6 1 3 Fuel Specifications Follow the specifications for fuel quality to optimize system performance and prevent damage to the engine or fuel components Use only ultra low sulphur diesel ULSD from a ...

Page 301: ...by the supplier If Peak Final Charge Global or Fleetguard ES Compleat OAT is unavailable use a coolant concentrate or prediluted coolant intended for use with heavy duty diesel engines with the following chemical and physical properties Provides cylinder cavitation protection according to a fleet study run at or above 60 load capacity Protects the cooling system metals cast iron aluminum alloys an...

Page 302: ...ir element cab MD 111060 Return air filter cab MD 109797 Table 6 3 Windrower Filter Part Numbers Filter Part Number Engine oil filter MD 111974 Hydraulic charge oil filter MD 201713 Hydraulic return oil filter Primary fuel filter element MD 362118 Secondary fuel filter element MD 362119 Fuel strainer filter fuel tank vent line MD 111608 Diesel exhaust fluid DEF suction filter MD 291162 Diesel exha...

Page 303: ...l machine inspections for loose hardware or other areas of concern Break in inspections ensure that all components can operate for an extended period without requiring service or replacement The break in period is the first 50 hours of operation after the machine s initial start up Break in Inspections Hours Item Check 1 Drive wheel nuts Torque 510 Nm 375 lbf ft dry Repeat checks at one hour inter...

Page 304: ...ne coolant level at reserve tank19 ü Fuel tank19 ü Drain fuel filter water trap19 ü Hydraulic hoses and lines for leaks19 ü Hydraulic oil level19 ü Tire inflation19 ü Diesel exhaust fluid DEF level19 Annually20 ü A C blower ü Antifreeze concentration ü Battery charge ü Battery fluid level ü Steering linkages ü Parking brakes 50 Hours Cab fresh air intake filter S Caster pivots S Forked caster whee...

Page 305: ...return filter and charge filter ü Safety systems 1000 Hours DEF supply module filter 1000 Hours or Annually18 p Fuel tank vent line filter p Wheel drive lubricant 2000 Hours p Crankcase breather filter and gasket p DEF tank vent hose filter 2000 Hours or Every Two Years18 p Engine coolant ü General inspection 2000 Hours or Every Three Years18 p Hydraulic oil 4500 Hours or Every Three Years18 p DEF...

Page 306: ...ashing To access the electronic maintenance schedule press MENU icon B from the windrower home page ϭϬϰϮϮϬϲ A Figure 6 2 HarvestTouch Display Main Menu 2 Select MAINTENANCE A from the main menu to open the Maintenance page ϭϬϰϮϮϬϳ A B C D Figure 6 3 Electronic Maintenance Schedule 3 Scroll up down to view the maintenance items NOTE Maintenance items include detail about replacement part numbers A ...

Page 307: ...eed to opened any time parts in the engine compartment require service DANGER To prevent bodily injury or death from the unexpected startup of the machine always stop the engine and remove the key from the ignition before leaving the operator s seat for any reason 1 Shut down the engine and remove the key from the ignition ϭϬϰϯϭϭϲ A B Figure 6 4 Hood 2 Insert a screwdriver into the hole on latch A...

Page 308: ...working in the engine compartment close the hood 1013204 A Figure 6 6 Engine Compartment 1 Grasp the hood by louver A and lower it until the hood engages the latch NOTE Check that the latch lever is not tilted to ensure the hood is latched MAINTENANCE AND SERVICING ...

Page 309: ...t is unstable and may cause you to fall 1015479 A B Figure 6 7 Left Platform 1 Approach platform A on the left side of the windrower Ensure that the cab door is closed 2 Push latch B and pull platform A toward the walking beam until it stops and the latch engages 6 4 2 Closing Platform Close the platform after moving it to access the components behind it or the engine compartment DANGER To prevent...

Page 310: ...ntil it stops and the latch is engaged 6 4 3 Adjusting Platform To achieve the proper gap between the platform and frame latch adjustment may be required DANGER To prevent bodily injury or death from the unexpected start up of the machine always stop the engine and remove the key from the ignition before making adjustments to the machine MAINTENANCE AND SERVICING ...

Page 311: ... when properly compressed against the frame The platform should also sit firmly against front guide A NOTE The top plate of the platform has been removed for clarity 6 If adjustment is required loosen two bolts C and slide the support as required 7 Tighten bolts C to 39 5 Nm 29 1 lbf ft 1015649 B A C C Figure 6 12 Left Platform 8 To adjust the horizontal position of the platform loosen bolts A and...

Page 312: ...asp the handle on storage compartment A and press latch B Pull the unlatched handle to open the compartment 1020200 B A Figure 6 14 Tool Box 2 Tool box A is located inside storage compartment B 3 Swing compartment B under the platform to close it and push on the handle to secure the latch NOTE The ignition key also locks the storage compartment MAINTENANCE AND SERVICING ...

Page 313: ...MPORTANT If the windrower will be operated when the ambient temperature is below 0 C 32 F do NOT fill the DEF tank to more than 75 of its capacity When the ambient temperature is below freezing DEF will expand in volume by approximately 7 NOTE For DEF specifications refer to this manual s inside back cover Filling Diesel Exhaust Fluid Tank The symbol inside the diesel exhaust fluid DEF gauge on th...

Page 314: ... drained when the DEF is contaminated or if storing the windrower for a period greater than 6 months DANGER To prevent bodily injury or death from the unexpected startup of the machine always stop the engine and remove the key from the ignition before leaving the operator s seat for any reason 1 Shut down the engine and remove the key from the ignition ϭϬϯϳϯϰϮ A B Figure 6 17 DEF Tank View from be...

Page 315: ...r debris off the cooler screens 1019645 A B C D E Figure 6 18 Twin Flow Cooling System A Air Conditioning Condenser B Charge Air Cooler C Hydraulic Oil Cooler D Air Conditioning Box E Engine Radiator NOTE Antifreeze is essential in any climate It broadens the operating temperature range by lowering the coolant freezing point and by raising its boiling point Antifreeze also contains rust inhibitors...

Page 316: ... Cap The pressurized coolant tank cap must fit tightly and the cap gasket must be in good condition to maintain the 97 124 kPa 14 18 psi pressure in the cooling system DANGER To prevent bodily injury or death from the unexpected startup of the machine always stop the engine and remove the key from the ignition before leaving the operator s seat for any reason CAUTION To avoid personal injury from ...

Page 317: ...spring in the cap moves freely Replace the cap if the spring is stuck 7 Close the hood For instructions refer to 6 3 2 Closing Hood page 288 Charge Air Cooler The charge air cooler CAC is located between the turbocharger and the air inlet manifolds It cools the air from the engine s turbo prior to it entering the combustion chamber 1015747 A B C D Figure 6 21 Charge Air Cooler CAC A Turbocharger B...

Page 318: ...reens and components should be cleaned with compressed air every 100 hours of operation Daily cleaning may be required if operating in heavy crop conditions For instructions refer to 6 9 2 Cleaning Cooler Module page 334 Hydraulic Oil Cooler The hydraulic oil cooler is located inside the cooling box behind the radiator 1019710 A Figure 6 23 Hydraulic Oil Cooler Clean cooler A with compressed air e...

Page 319: ...ndenser can be done at the same time as the radiator oil cooler and charge air cooler For instructions refer to 6 9 2 Cleaning Cooler Screens and Components page 334 6 5 3 Air Intake System The air intake system filters air used by the engine IMPORTANT Do NOT run engine with air cleaner disconnected or disassembled Over servicing the filter element increases the risk of dirt being ingested by the ...

Page 320: ...r Intake B Air Duct to Air Cleaner C Air Cleaner Intake D Air Cleaner E Turbocharger Intake F Aspirator Duct ϭϬϰϯϬϴϴ A Figure 6 26 Filter Service Required Message Message A appears on the windrower display when the engine air filter requires servicing MAINTENANCE AND SERVICING ...

Page 321: ... damage in the hydraulic system If the hydraulic system components must be disconnected for service protect the ends of hoses tubing and ports of components from contamination with clean lint free towels or clean plastic bags Before installing any replacement hose flush the inside with unused diesel fuel or unused commercial petroleum cleaning solvent for 10 seconds minimum Do NOT use water water ...

Page 322: ...and draper circuits are powered by a gear pump This allows independent oil flow to the reel and draper circuit and separates oil flow from the knife pump The header drive manifold manages flow control and relief for these circuits Traction Drive Hydraulics The windrower traction drive consists of two variable displacement axial piston hydraulic pumps one for each drive wheel The pump s speeds are ...

Page 323: ...es connection hubs on the M2 Series Windrower The following diagram illustrates the module locations ϭϬϰϮϯϲϯ A B C D E F G H Figure 6 29 Module Locations A Console Module B HarvestTouch Display C Roof Relay Module22 D Master Module E Expansion Module F HVAC Controller Module G Chassis Relay Module22 H Engine Control Module ECM MAINTENANCE AND SERVICING 22 For fuse and relay information refer to Fu...

Page 324: ...ster controller is mounted behind the cab Extension Modules Extension modules provide additional inputs and outputs for the master controller ϭϬϰϮϯϲϴ Figure 6 31 Extension Modules The windrower has one extension module which is located behind the cab next to the master controller It provides inputs and outputs to the various sensors and valve solenoids throughout the windrower MAINTENANCE AND SERV...

Page 325: ...er controller 1015068 Figure 6 32 Chassis Relay Module The windrower has two relay modules One is located on the chassis and the other inside the cab headliner There are fuses and relays located in both relay modules The chassis relay module is located on the left cab forward frame rail MAINTENANCE AND SERVICING ...

Page 326: ...of the machine disconnect battery cables For instructions refer to 1 8 Welding Precautions page 10 Always disconnect battery ground cables when working with the alternator or regulator Never attempt to polarize an alternator or a regulator If wires are disconnected from the alternator refer to Figure 6 34 page 306 to ensure proper connection Never ground the alternator field terminal or field Neve...

Page 327: ...se steps IMPORTANT To avoid damage to wheel rims and studs tighten the nuts by hand Threads must be clean and dry do NOT apply any lubricant or anti seize compound Do NOT use an impact gun and do NOT overtighten wheel nuts Use only genuine manufacturer specified nuts 1023264 A Figure 6 35 Drive Wheel Location 1 Locate drive wheels A 1 3 4 5 6 7 8 9 10 2 1007534 A Figure 6 36 Drive Wheel 10 Bolt 2 ...

Page 328: ...e is maintained check wheel nut bolt torque after 10 and 50 hours field or road operation and then every 200 hour intervals thereafter 1023262 A Figure 6 37 Caster Wheel Location 1 Locate caster wheel assemblies A 1000549 A 1 2 3 4 5 6 7 8 Figure 6 38 Forked Casters with Suspension 2 Tighten wheel nuts A to 163 Nm 120 lbf ft using the tightening sequence shown at right Repeat the tightening sequen...

Page 329: ...e air conditioner compressor belt will need to be tensioned DANGER To prevent bodily injury or death from the unexpected startup of the machine always stop the engine and remove the key from the ignition before leaving the operator s seat for any reason 1 Shut down the engine and remove the key from the ignition 2 Open the hood For instructions refer to 6 3 1 Opening Hood page 287 1018847 A B C D ...

Page 330: ... down the engine and remove the key from the ignition 3 Place a 4 liter 1 U S gallon drain pan under the gearbox 1030805 A B Figure 6 41 M2170NT Engine Gearbox 4 Remove drain plug A and allow the lubricant to finish draining 5 Inspect the drain plug Small metal shavings are normal If there are any larger metal pieces Contact your MacDon Dealer 6 Reinstall drain plug A and remove check plug B 7 Add...

Page 331: ...rive Lubricant 10 Bolt page 346 8 Reinstall all plugs and torque them to 24 Nm 216 lbf in 6 6 7 Return Oil Filter The return oil filter removes particulate contaminants from the oil returning from the fan drive lift circuits and drive circuits It must be changed after the first 50 hours and then at 500 hour intervals Follow the service schedule on the HarvestTouch Display Removing Return Oil Filte...

Page 332: ...egulations 1015828 A B C D Figure 6 45 Return Filter NOTE The image shows the filter head removed for component clarity 7 Remove and discard gasket C from groove B in filter head A NOTE Filter D is shown to provide context Installing Return Oil Filter The return oil filter removes particulate contaminants from the oil returning from the fan drive lift circuits and drive circuits NOTE For filter sp...

Page 333: ...city level refer to 6 1 2 Lubricants Fluids and System Capacities page 279 6 6 8 Charge Filter The charge filter removes particulate contaminants from the oil before the oil is directed into the traction and header drive pumps The oil maintains a positive pressure and is continuously supplied in these closed circuits during operation The charge filter has a high pressure bypass of 345 kPa 50 psi t...

Page 334: ...tform For instructions refer to 6 4 1 Opening Platform page 289 1015192 A Figure 6 48 M2170NT Charge Filter 3 Clean around the head of the filter 4 Place a container beneath the filter to collect any oil that may leak out 5 Unscrew filter A with a filter wrench 6 Dispose of the used oil and filter in a manner that complies with local rules and regulations Installing Charge Filter The charge filter...

Page 335: ...n the filter an additional 1 2 turn by hand IMPORTANT Do NOT use a filter wrench to install the oil filter overtightening can damage the gasket and filter 5 Check hydraulic fluid levels For instructions refer to 6 7 3 Checking Hydraulic Oil page 319 For capacity level refer to 6 1 2 Lubricants Fluids and System Capacities page 279 MAINTENANCE AND SERVICING ...

Page 336: ...draulic Oil page 319 Check the tire inflation For instructions refer to 6 7 4 Checking Tire Pressure page 320 Clean the radiator hydraulic oil cooler charge air cooler and A C condenser For instructions refer to 6 9 2 Cleaning Cooler Module page 334 Check the diesel exhaust fluid DEF level For instructions refer to 3 17 1 HarvestTouch Display Page Layout page 85 6 7 1 Checking Engine Oil Level Che...

Page 337: ...ded to the crankcase NOTE Adding 1 9 liters 2 U S quarts of engine oil will raise the level from LOW to HIGH To add oil refer to Adding Engine Oil page 317 7 Replace the dipstick Turn the dipstick clockwise to lock it Adding Engine Oil If the engine oil s dipstick shows that the engine oil level is low or if the oil has been drained more oil will need to be added DANGER To prevent bodily injury or...

Page 338: ...ilter The separator is equipped with a drain and a sensor that detects water in the fuel and displays an alert on the HarvestTouch Display Drain the water and sediment from the separator daily or at any time the Water In Fuel WIF light illuminates on the display To remove water from the fuel system refer to Removing Water from Fuel System page 318 Removing Water from Fuel System Water in the fuel ...

Page 339: ... not work correctly if the hydraulic oil level is too low or too high It is extremely important to avoid contamination of the hydraulic system when service and regular maintenance is performed DANGER To prevent bodily injury or death from the unexpected startup of the machine always stop the engine and remove the key from the ignition before leaving the operator s seat for any reason WARNING Do NO...

Page 340: ...l is not visible in the sight glass then the oil level is below the ADD mark on the dipstick This problem should be addressed immediately 7 If more oil is required to maintain the level between the low and full indicator marks refer to 6 13 3 Filling Hydraulic Oil Tank page 370 6 7 4 Checking Tire Pressure The windrower s drive and caster tires must be inflated to the proper pressure level 1014974...

Page 341: ...y 1 1 Bar or Turf 159 23 D225 7 6 m 25 ft single reel double knife short knife guards hydraulic triple delivery Base short knife guards hydraulic triple delivery B6047 1 1 Bar or Turf 159 23 D230 9 1 m 30 ft double reel double knife pointed guards hydraulic triple delivery Transport upper cross auger vertical knives B6047 1 2 Bar or Turf 241 35 D230 9 1 m 30 ft double reel double knife short knife...

Page 342: ...f 241 35 D130XL 9 1 m 30 ft single reel double knife timed Transport 1 Bar 200 29 D130XL 9 1 m 30 ft single reel double knife timed Transport 1 Turf 241 35 D130XL 9 1 m 30 ft single reel double knife timed Transport upper cross auger vertical knives B6047 1 2 Bar or Turf 241 35 D135XL 10 6 m 35 ft single reel double knife timed Base 1 1 Bar 200 29 D135XL 10 6 m 35 ft single reel double knife timed...

Page 343: ...uired Quantity of Initial Rear Ballast Base Kits B6053 Required Quantity of Additional Rear Ballast Kits B6054 Required Drive Wheel Tire Type Pressure kPa psi D135XL 10 6 m 35 ft double reel double knife timed Transport upper cross auger vertical knives B6047 1 2 Bar 283 41 D135XL 10 6 m 35 ft double reel double knife timed Transport upper cross auger vertical knives B6047 1 2 Turf 241 35 MAINTENA...

Page 344: ...hine always stop the engine and remove the key from the ignition before leaving the operator s seat for any reason NOTE Ensure the engine has cooled down prior to checking 1 Shut down the engine and remove the key from the ignition 2 Open the hood For instructions refer to 6 3 1 Opening Hood page 287 1036899 A B Figure 6 56 Coolant Recovery Tank 3 Locate coolant recovery tank A 4 Visually inspect ...

Page 345: ...t to service hydraulic system in the field Make every effort to prevent the hydraulic system from being contaminated during overhaul 6 7 7 Checking Engine Gearbox Lubricant Level and Adding Lubricant Ensure that the gearbox lubricant level is correct in order to maximize the service life of its components Check the lubricant level daily DANGER To prevent bodily injury or death from the unexpected ...

Page 346: ...el check port 1033129 A Figure 6 59 Gearbox Lubricant Filler 6 If lubricant is needed remove breather cap A and add lubricant until it runs out of the level check port NOTE For oil requirements refer to the inside back cover 1033127 A Figure 6 60 Gearbox Lubricant Check Plug 7 Replace oil level check plug A and the breather cap and tighten both 8 Operate the engine at low idle and check for leaks ...

Page 347: ...and more frequently in severe conditions 1015298 A Figure 6 61 Fresh Air Intake Filter Location The fresh air intake filter is located outside the lower right rear of cab A Refer to 6 1 5 Filter Part Numbers page 281 for the appropriate part number Removing Fresh Air Intake Filter The fresh air intake filter should be serviced every 50 hours under normal conditions and more frequently in severe co...

Page 348: ...hard surface 2 Using a dry element cleaner gun clean the element with compressed air IMPORTANT Air pressure must NOT exceed 414 kPa 60 psi Do NOT direct air against the outside of the element as dirt might be forced through to the inside 3 Hold the air nozzle next to the filter element s inner surface and move up and down the pleats 4 Repeat the previous steps to remove additional dirt as required...

Page 349: ...or the appropriate part number 1015293 A Figure 6 64 Fresh Air Intake Box 1 Clean the interior of fresh air intake box A 1015294 A B Figure 6 65 Fresh Air Intake Filter 2 Install air filter A onto fresh air box panel B 1022381 A B C Figure 6 66 Fresh Air Intake Filter 3 Secure air filter C with retainer B 4 Install knob A and turn it clockwise to tighten it MAINTENANCE AND SERVICING ...

Page 350: ...rovided to keep a record of scheduled maintenance For more information refer to 6 2 2 Maintenance Schedule Record page 284 Greasing Procedure Add grease to these greasing points according to the maintenance schedule Be sure to leave a small amount of grease on top of each fitting to prevent contamination DANGER To prevent bodily injury or death from the unexpected startup of the machine always sto...

Page 351: ...geway Replace the fitting if necessary Grease Points Add grease to these greasing points according to the maintenance schedule Be sure to leave a small amount of grease on top of each fitting to prevent contamination 1014986 1014986 B C A Figure 6 69 Grease Points A Top Link 2 Places Both Sides B Caster Pivot Both Sides C Caster Wheel Hub Both Sides 23 MAINTENANCE AND SERVICING 23 Do NOT overgreas...

Page 352: ...ides C Walking Beam Outward Facing 2 Places D Walking Beam Underside 8 places E Drive Wheel Legs Inboard Bushings Top Surfaces 2 Places Both Sides F Outboard Front Bushings Bottom Surfaces Drive Wheel Legs 2 Places Both Sides IMPORTANT Grease the sliding drive wheel legs in the narrow position every 250 hours or annually For moly grease specification refer to the inside back cover MAINTENANCE AND ...

Page 353: ...5677 A A B Figure 6 71 Return Air Filter 1 Unscrew two knobs A attaching the cover and the filter to the cab wall and remove cover and filter assembly B 1015681 A B Figure 6 72 Return Air Filter 2 Separate filter B from cover A 3 Clean the electrostatic filter as follows a Mix a solution of warm water and detergent in a suitable container so that filter B can soak for a few minutes b Agitate the w...

Page 354: ...tion before leaving the operator s seat for any reason 1 Shut down the engine and remove the key from the ignition 2 Open the hood For instructions refer to 6 3 1 Opening Hood page 287 3 Proceed to the cleaning procedures For instructions refer to or Cleaning Left Cooling Module page 334 Cleaning Left Cooling Module The engine radiator air conditioning condenser and screen in the left cab forward ...

Page 355: ... C and open screen condenser door B 1019888 A B C Figure 6 76 Left Cooler Module 3 Pull lever A up to partially open condenser B away from screen C 1019892 A B C D Figure 6 77 Left Cooler Module 4 Secure condenser A with bracket B 5 Clean debris from radiator D condenser A and screen C with compressed air MAINTENANCE AND SERVICING ...

Page 356: ...screen C and secure it with bracket A 1019887 A B C Figure 6 79 Left Cooler Module 7 Close screen condenser door B onto radiator door C and secure it with lever A 1015749 B A Figure 6 80 Left Cooler Module 8 Close radiator door B and push until latch A secures door B MAINTENANCE AND SERVICING ...

Page 357: ...ard cooler module pull latch handle A and open screen door B 1015749 B A Figure 6 82 Engine Radiator Door 2 At the left cab forward cooler module push latch A and open engine radiator door B to allow access inside the cooler module 1019883 A B C Figure 6 83 View from Inside Module Left Side 3 Use compressed air to clean debris from inside cooler box A charge air cooler B and hydraulic oil cooler C...

Page 358: ...0NT Windrowers 4 M2170NT Windrowers At the right cab forward cooler module with the screen door open clean the debris from screen A with compressed air 1013115 A B Figure 6 85 Right Cooler Module 5 Close screen door B and secure it with latch A MAINTENANCE AND SERVICING ...

Page 359: ...r should be changed whenever the engine oil is changed Draining Engine Oil As with most lubricating fluids engine oil eventually needs to be changed The oil should be drained with the engine warm so that it flows more freely taking with it any harmful deposits DANGER To prevent bodily injury or death from the unexpected startup of the machine always stop the engine and remove the key from the igni...

Page 360: ...lter NOTE For filter specifications refer to 6 1 5 Filter Part Numbers page 281 6 Screw the new filter onto the filter mount until the gasket contacts the filter head 7 Tighten the filter an additional 1 2 to 3 4 turn by hand IMPORTANT Do NOT use a filter wrench to install the oil filter Overtightening can damage the gasket and filter 8 Properly dispose of the used oil filter Adding Engine Oil If ...

Page 361: ...osing Hood page 288 6 10 2 Maintaining Engine Air Filters Engine air filters keep out dust and pollutants while allowing oxygen to reach the engine Proper maintenance of engine air filters results in smoother machine operation Removing Primary Engine Air Filter The windrower s HarvestTouch Displaywill alert the Operator when the engine air filter requires service The air filter must first be remov...

Page 362: ...the platform NOTE Hoses can be left connected to the cover 1015214 A B Figure 6 92 Air Filter 9 Pull out primary filter element A IMPORTANT Be extremely careful with the dirty element until it is completely out of the housing Accidentally bumping it while still inside may cause dirt and dust to contaminate the clean side of the filter housing 10 If necessary also change secondary filter B For inst...

Page 363: ...e most common causes of engine contamination Make sure that all hardened dirt ridges are completely removed wherever the filter gaskets contact the cleaner housing Check for uneven dirt patterns on your old element Your old element is a valuable clue to potential dust leakage or gasket sealing problems A pattern on the element clean side is a sign that the old element was not firmly sealed or that...

Page 364: ...ery third time the primary element is changed Refer to 6 2 Windrower Break In Inspections and Maintenance Schedule page 283 for the required interval 1 Hold a bright light inside the element and check carefully for holes Vibration will quickly wear a hole in the filter 2 Check the filter gasket for cracks tears or other signs of damage 3 Check the element for oil or soot contamination 4 Check the ...

Page 365: ...ment should NEVER be cleaned only replaced Do NOT remove the secondary filter element unless it needs replacing Replace the secondary element annually or after every third primary filter change even if it appears clean If replacing the secondary element a further inspection may be necessary Examine the filter canister for cracks and replace it as necessary Ensure the canister retaining latches are...

Page 366: ... Figure 6 98 Drive Wheel 10 Bolt 1 Park the windrower on level ground 2 Position the windrower so that plugs A and B are horizontally aligned with center C of the hub WARNING Use caution when removing plug as there may be pressure in the drive 3 Remove plug A or B The lubricant should be visible through the port or running out slightly If lubricant needs to be added refer to 6 10 4 Adding Wheel Dr...

Page 367: ...ansmission lubricant SAE J2360 preferred 4 Add lubricant through one of the ports until the lubricant reaches the bottom of the ports and begins to run out 5 Reinstall and tighten plug A or plug B Torque the plug to 24 Nm 216 lbf in 6 Start up and operate the windrower for a few minutes then stop and check the oil level For specifications refer to 6 1 2 Lubricants Fluids and System Capacities page...

Page 368: ...ping clamps or components can lead to exhaust leaks and engine derate Contact your Dealer for proper replacement parts 5 Inspect the area around clamps A for breakage cracks and rust through IMPORTANT If the exhaust is leaking tighten the clamps to 12 15 Nm 106 133 lbf in If it is leaking at the band connection replace the seals Contact your Dealer if the exhaust leak persists IMPORTANT Ensure the...

Page 369: ...indrower on a level surface 2 Shut down the engine and remove the key from the ignition 3 Place a 4 liter 1 U S gallon drain pan under the gearbox 1030805 A B Figure 6 101 M2170NT Engine Gearbox 4 Remove drain plug A and allow the lubricant to finish draining 5 Inspect the drain plug Small metal shavings are normal If there are any larger metal pieces Contact your MacDon Dealer 6 Reinstall drain p...

Page 370: ...e operation 1012662 B A Figure 6 102 Fuel System The windrower s fuel system is equipped with primary A and secondary B screw on cartridge type filters Primary filter A is equipped with a separator that separates sediment and water from the fuel NOTE The bottom part of the image was made transparent to show primary filter A Removing Primary Fuel Filter The fuel passes through the primary fuel filt...

Page 371: ... pre fill the filter with fuel Pre filling can contaminate the fuel system NOTE If replacing the filter refer to 6 1 5 Filter Part Numbers page 281 1012654 A B Figure 6 104 Fuel System 1 Apply some diesel fuel to the filter gasket and screw new filter A onto the filter mount until the gasket contacts the filter head 2 Reconnect water in fuel WIF sensor B 3 Tighten the filter an additional 1 2 to 3...

Page 372: ...the engine Follow the instructions in this section to properly install the secondary fuel filter IMPORTANT Do NOT pre fill the filter with fuel Pre filling can contaminate the fuel system NOTE If replacing the filter refer to 6 1 5 Filter Part Numbers page 281 1012658 A Figure 6 106 Fuel System 1 Screw new secondary filter A onto the filter mount until the gasket contacts the filter head 2 Tighten...

Page 373: ...e engine and remove the key from the ignition 2 Open the hood For instructions refer to 6 3 1 Opening Hood page 287 1012942 A B Figure 6 107 Primary Fuel Filter 3 Locate primary fuel filter assembly A 4 Turn priming knob B counterclockwise to unlock the plunger on the primary filter head 5 Pump until the hand pump becomes firm 6 Push the plunger in and lock it by turning knob B clockwise until snu...

Page 374: ...ion to the ON position ϭϬϰϮϬϬϳ A B Figure 6 108 HarvestTouch Display 2 From the HarvestTouch Display s home page press MENU icon A 3 Press DIAGNOSTIC B ϭϬϰϮϮϴϮ A Figure 6 109 HarvestTouch Display 4 Press INPUT OUTPUT A from the Diagnostic list NOTE The screen will display two options ABNORMAL STATUS and SYSTEM 5 Select the SYSTEM option ϭϬϰϮϳϭϯ A Figure 6 110 Input Output List 6 Select INTERLOCK N...

Page 375: ...ng place the ground speed lever GSL in PARK and center the steering wheel until it locks 2 With everyone clear of the machine engage the HEADER ENGAGE switch a After the header drives are running stand up out of the seat In approximately 5 seconds the header should shut off b If NOT the Operator Presence System requires adjustment Contact your MacDon Dealer NOTE To restart the header move the HEAD...

Page 376: ...CENTER STEERING WHEEL accompanied by a short beep with each flash and the engine should NOT turn over If the engine turns over the system requires adjustment Contact your MacDon Dealer A properly functioning system should operate as follows if not contact your MacDon Dealer The starter should engage ONLY when the GSL is in PARK the steering wheel is locked in the CENTER position and the HEADER ENG...

Page 377: ...t Filter The fuel tank is vented by a hose and filter in the platform rail Change the filter every 1000 hours or annually whichever occurs first Change the filter as follows DANGER To prevent bodily injury or death from the unexpected startup of the machine always stop the engine and remove the key from the ignition before leaving the operator s seat for any reason WARNING To avoid personal injury...

Page 378: ... Fuel Tank Vent and Filter 5 Position new filter B and attach it to fuel tank hose A NOTE When positioning the new filter ensure that the arrow on the filter points toward the fuel tank ϭϬϯϴϲϵϲ C B A Figure 6 116 Fuel Tank Vent and Filter 6 Attach fuel vent hose A to filter B and secure both hoses with tension clamps C 7 Close the hood For instructions refer to 6 3 2 Closing Hood page 288 MAINTENA...

Page 379: ...e 6 118 DEF Supply Module Filter Cap M2170NT 2 Inspect the area around the seal and vent of aftertreatment DEF supply module filter cap A for signs of leakage 3 DEF fluid leaves a white deposit when dry If there is evidence of leaking remove the supply module filter and clean and inspect it before replacing it For instructions refer to Cleaning and Inspecting Supply Module Filter page 361 Removing...

Page 380: ...nse the contaminated surface thoroughly with water IMPORTANT Do NOT disconnect the windrower batteries until the diesel exhaust fluid DEF dosing system has completed its purge cycle Before removing or disconnecting any components of the DEF system wait at least five minutes after the windrower s ignition switch is turned to the OFF position for the aftertreatment DEF dosing system to purge the DEF...

Page 381: ...ule are damaged replace the entire aftertreatment DEF supply module 9 Clean the aftertreatment DEF supply module cap and threads on the supply module with warm water and a clean cloth Installing Supply Module Filter Once the diesel exhaust fluid DEF supply module filter has been removed cleaned and inspected the cleaned module or a new replacement can be installed 1012014 D C A B Figure 6 120 DEF ...

Page 382: ...n 1 Shut down the engine and remove the key from the ignition ϭϬϯϴϬϬϳ A B Figure 6 121 Right Platform 2 Remove three bolts B and DEF tank cover A on the right platform 1020201 A B C D E F Figure 6 122 DEF Head 3 Disconnect electrical harness A from the DEF head 4 Prepare to plug the hoses to prevent coolant loss and then disconnect coolant pressure C and coolant return B hoses from the DEF head 5 ...

Page 383: ...h plastic retaining clips A Push the middle of retaining clip A to release it and pull the hoses away from the connector to remove them ϭϬϯϴϬϭϱ A B Figure 6 124 DEF Tank Head Top View 8 Remove six screws B that secure DEF head A to the DEF tank and remove the DEF head MAINTENANCE AND SERVICING ...

Page 384: ... line 11 Remove and discard existing O ring C 1036141 A B C Figure 6 126 DEF Fluid Filter Housing 12 Install new O ring C supplied with filter housing onto the supply line NOTE The DEF tank fluid filter housing MD 291162 includes O ring C clip A and a 40 micron filter not shown 13 Push new DEF tank liquid filter housing B onto the line and secure it with new clip A MAINTENANCE AND SERVICING ...

Page 385: ...8 DEF Tank Head 16 Connect electrical harness A IMPORTANT Correct hose connections to the DEF tank head DEF supply module and aftertreatment system are important Improper connections will result in a loss of suction causing the engine to derate lose power 17 Connect coolant pressure line C and coolant return line B to the DEF head 18 Connect DEF suction line E and DEF backflow line D to the DEF he...

Page 386: ... A Figure 6 129 DEF Hose Connection 20 Reinstall the DEF hoses and ensure they are secured with retaining clips A ϭϬϯϴϬϬϳ A B Figure 6 130 Right Platform 21 Install DEF tank cover A 22 Install three bolts B MAINTENANCE AND SERVICING ...

Page 387: ...olant System Coolant is cycled through the engine to help reduce internal heat DANGER To prevent bodily injury or death from the unexpected startup of the machine always stop the engine and remove the key from the ignition before leaving the operator s seat for any reason CAUTION To avoid personal injury from hot coolant do NOT turn the pressurized coolant tank cap until the engine cools NOTE Prop...

Page 388: ... open the pressurized coolant tank cap until the engine cools 1019237 B A Figure 6 133 Coolant Recovery Tank 1 Open the hood For instructions refer to 6 3 1 Opening Hood page 287 2 Remove pressurized cap A from the coolant recovery tank IMPORTANT Use nitrite free coolant only For coolant specifications refer to 6 1 2 Lubricants Fluids and System Capacities page 279 3 Add coolant at a rate not exce...

Page 389: ... up before draining 1 Park the windrower on a level surface 2 Shut down the engine and remove the key from the ignition 3 Open the hood For instructions refer to 6 3 1 Opening Hood page 287 4 Place a container at least 65 liters 17 U S gallons capacity under the drain at the bottom of the hydraulic reservoir to collect the oil 1012669 A Figure 6 134 Reservoir Plug 5 On the hydraulic oil tank turn ...

Page 390: ...k 13 Close the hood For instructions refer to 6 3 2 Closing Hood page 288 14 Dispose of used oil in a manner that complies with local rules and regulations 6 13 3 Filling Hydraulic Oil Tank A properly filled hydraulic oil tank reduces the risk of corrosion and clogged filters DANGER To prevent bodily injury or death from the unexpected startup of the machine always stop the engine and remove the k...

Page 391: ...the low and full indicator marks For oil specifications and quantity refer to 6 1 2 Lubricants Fluids and System Capacities page 279 NOTE When the sight glass is showing LOW approximately 4 liters 1 U S gallon is required to reach FULL 7 Reinstall the plug and turn plug handle B clockwise until the plug is secure 8 Close breather cap A 9 Close the hood For instructions refer to 6 3 2 Closing Hood ...

Page 392: ...ose 5 Install new vent hose filter B onto the DEF tank vent hose barb NOTE Ensure the arrow on vent hose filter A points away from the windrower 6 Slide clamp C over the DEF tank vent hose barb 6 13 5 General Engine Inspection Engine inspection should be performed by your MacDon Dealer Refer to your engine manual for further information NOTE Owner s Manual QSB 4 5 and QSB 6 7 Engine Cummins 402153...

Page 393: ...ION Do NOT attempt to service a battery unless you have the proper equipment and experience to perform the job Check the battery charge once a year and more often if operating in cold weather Hydrometer readings should be 1 260 to 1 300 Readings below 1 250 indicate charging is required For instructions refer to Charging Battery page 375 Keep the batteries clean by wiping them with a damp cloth Ke...

Page 394: ... end of cover A to disengage it from retaining tab B and swing the cover away from the frame Closing Battery Cover Properly closing the battery cover will protect the battery from moisture dust and corrosion 1012743 A B Figure 6 142 Battery Cover 1 Swing cover A towards the windrower frame Lift up on the cab end of the cover until it is secured by retaining tab B on the frame MAINTENANCE AND SERVI...

Page 395: ...harging rate if the battery feels hot or is venting electrolyte The battery temperature must NOT exceed 52 C 125 F The maximum charge rate in amperes should be NO MORE than 1 3 of the battery s reserve capacity minute rating If the terminal voltage exceeds 16 0 volts while charging reduce the charge rate Continue charging and reduce the rate as needed until a two hour period results in no increase...

Page 396: ... or current for a two hour period and reduce the rate as needed If the battery case gets hot during charging or spews large amounts of gas temporarily stop charging IMPORTANT NEVER overcharge the batteries Excessive charging will shorten the battery life To charge the windrower s batteries while they are connected to the windrower s electrical system follow these steps DANGER To prevent bodily inj...

Page 397: ...ne from operator s station only CAUTION Spark hazard When connecting or disconnecting booster cables do NOT allow the cable clamps to touch each other Connecting booster cables 1015676 A B C D Figure 6 145 Attaching Booster Cables 1 To access the windrower batteries open the battery cover For instructions refer to Opening Battery Cover page 373 2 Pull back the red rubber battery terminal cover and...

Page 398: ...r For instructions refer to Closing Battery Cover page 374 Removing Battery The windrower s batteries may need to be removed for service storage or replacement CAUTION Do NOT attempt to service a battery unless you have the proper equipment and training for the task Have the windrower s batteries serviced by a MacDon Dealer DANGER To prevent bodily injury or death from the unexpected startup of th...

Page 399: ...e of the battery when facing them 2 Install strap B and secure it with bolt A 3 Connect the battery cables For instructions refer to Connecting Batteries page 380 4 Close the battery cover For instructions refer to Closing Battery Cover page 374 Disconnecting Battery There may come a time where you need to disconnect the windrower s batteries whether to prevent damage perform maintenance or replac...

Page 400: ...remove the cable from the batteries Connecting Batteries 1019838 A B Figure 6 150 Engine Compartment Hood 1 Move latch A towards the right cab forward side of the windrower 2 Grasp louver B and lift the hood to open it 1018879 A B Figure 6 151 Battery Location 3 Lift up on the cab end of cover A to disengage it from retaining tab B and swing the cover away from the frame 4 Remove the plastic caps ...

Page 401: ...tic covers over the clamps 1018916 A B C Figure 6 153 Battery Cover Secured 7 Swing cover A towards the windrower frame Lift up on the cab end of the cover until it is secured by retaining tab B on the frame 8 Grasp the hood by louver C and lower it until the hood engages the latch IMPORTANT To ensure that the hood is latched ensure that the latch lever is not tilted Auxiliary Power Posts The auxi...

Page 402: ... fuse if the device has a high in rush current characteristic 6 14 2 Checking Steering Link Pivots The checks outlined in this section should be performed every year DANGER To prevent bodily injury or death from the unexpected startup of the machine always stop the engine and remove the key from the ignition before leaving the operator s seat for any reason ϭϬϰϭϲϲϮ A Figure 6 155 Console 1 Place g...

Page 403: ...s B feel firm but can be moved by hand NOTE Ball joints that are excessively loose or too stiff to pivot by hand should be replaced 1015662 A A B B A Figure 6 158 Steering Link 4 Check steering link bolts A for looseness 5 Ensure ball joints B feel firm but can be moved by hand NOTE Ball joints that are excessively loose or too stiff to pivot by hand should be replaced MAINTENANCE AND SERVICING ...

Page 404: ...ar If the air conditioning system produces insufficient cooling the evaporator fins may be clogged Fins will clog up from the side opposite the blowers The evaporator is located inside the heating air conditioning unit under the cab To access the evaporator remove the cover from the air conditioning unit Removing Air Conditioning Cover The air conditioning cover may need to be removed for service ...

Page 405: ...id cuts from evaporator fins do NOT use bare hands to brush away clogs 1 Remove the A C cover For instructions refer to Removing Air Conditioning Cover page 384 1008601 B B A A Figure 6 162 A C Evaporator Core 2 Use a vacuum cleaner or compressed air to remove dirt from inside the housing 3 Blow compressed air through the evaporator fins from blower side A first as shown Direct the air straight in...

Page 406: ...re from blower side C d Repeat the soaking procedure until air blows through the evaporator freely Installing Air Conditioning Cover Once the air conditioning evaporator core has been serviced the cover can be replaced 1008547 A B Figure 6 164 Air Conditioning Cover 1 Straighten any bent fins 2 Position cover B and secure it with eight screws A 1008578 A Figure 6 165 Air Conditioning Cover 3 Reatt...

Page 407: ...o protect against freezing The system may not drain completely and damage from freezing could still result 1015743 A Figure 6 166 Coolant Tank 3 Remove pressurized coolant tank cap A IMPORTANT Turn cap A counterclockwise to the first notch to relieve pressure before removing the cap completely 4 Check the coolant in the pressurized coolant tank using an antifreeze tester The tester should indicate...

Page 408: ...ising Drive Wheel Jack Method page 420 Raising Drive Wheels Forklift Method page 422 DANGER Ensure that all bystanders have cleared the area 5 Start the engine For instruction refer to Starting Engine page 193 ϭϬϰϮϰϯϱ A B Figure 6 167 Operator s Console 6 Set throttle A to low idle and move the ground speed lever GSL out of PARK notch B and into the neutral position 7 Watch the drive wheels if the...

Page 409: ...ic manifold and disconnect the electrical connector from P255 ϭϬϰϮϰϰϭ B C A Figure 6 169 Wheel Legs 11 Remove bolt A securing covers B from the left and right wheel legs 12 Disconnect wheel motor power connector from coil C on the left and right wheel motors Connector P274 is on the left wheel motor Connector P264 is on the right wheel motor MAINTENANCE AND SERVICING ...

Page 410: ...ovement If the drive tires do not move the parking brakes are working properly If the drive tires move the parking brakes require replacement Contact your MacDon Dealer 16 Move the GSL back to park and shut down machine ϭϬϰϮϰϰϭ B C A Figure 6 171 Wheel Legs 17 Reconnect wheel motor power connectors C on the left and right wheel motors Connector P274 is on the left wheel motor Connector P264 is on ...

Page 411: ...e hydraulic manifold 20 Close the hood For instructions refer to 6 3 2 Closing Hood page 288 21 Lower the drive tires to the ground For instructions refer to one of the following methods depending on the equipment available Lowering Drive Wheels Jack Method page 425 Lowering Drive Wheels Forklift Method page 426 MAINTENANCE AND SERVICING ...

Page 412: ...ER To prevent bodily injury or death from the unexpected startup of the machine always stop the engine and remove the key from the ignition before leaving the operator s seat for any reason WARNING To prevent personal injury or death from an explosion or fire do NOT allow open flames or sparks near the windrower when it is being refueled Do NOT refuel the windrower when the engine is hot or runnin...

Page 413: ...he engine and remove the key from the ignition ϭϬϯϳϯϰϮ A B Figure 6 174 DEF Tank View from beneath Tank 2 Place a drain pan under DEF tank B The drain pan should be large enough to hold 49 liters 13 U S gallons IMPORTANT Spilled DEF must be contained and absorbed by non combustible absorbent material like sand and then shovelled into a suitable container for disposal If the DEF is spilled on the t...

Page 414: ...structions refer to 6 3 1 Opening Hood page 287 1012843 A B C Figure 6 175 Air Conditioning A C Compressor 3 Loosen compressor mounting hardware A and rotate compressor B towards the engine to release tension on the belts 4 Remove belts C from compressor B 1015800 A B C 1 2 3 Figure 6 176 Engine Belt 5 Insert the drive end of a 1 2 in drive ratchet wrench into belt tensioner A 6 Rotate tensioner c...

Page 415: ...before leaving the operator s seat for any reason 1 Shut down the engine and remove the key from the ignition 2 Open the hood For instructions refer to 6 3 1 Opening Hood page 287 1018847 A B C D Figure 6 178 Air Conditioning A C Compressor 3 Loosen compressor mounting hardware A 4 Pry compressor B away from the engine so that a force of 45 N 10 lbf deflects belts C 5 mm 3 16 in at mid span NOTE T...

Page 416: ...For information about your M2170NT engine specifications refer to 2 2 Specifications M2170NT Specifications page 33 If the specified speeds cannot be maintained contact your MacDon Dealer IMPORTANT To avoid voiding the engine warranty contact Cummins before removing components or starting repairs 6 15 6 Lighting Lights are an important safety feature of the windrower They illuminate the working ar...

Page 417: ...5 ft A in front of a vertical surface as shown NOTE Check that the casters are positioned underneath the windrower to properly align the headlights 2 Shut down the engine and remove the key from the ignition 1012725 A Figure 6 181 Road Light Switch 3 Turn on ROAD lights A and switch them to LOW BEAM MAINTENANCE AND SERVICING ...

Page 418: ...Forward Adjust field lights when in the field or equivalent to suit Operator preference DANGER To prevent bodily injury or death from the unexpected startup of the machine always stop the engine and remove the key from the ignition before leaving the operator s seat for any reason 1 Shut down the engine and remove the key from the ignition 1034226 A Figure 6 183 Windrower in Cab Forward 2 Hold ont...

Page 419: ... the headliner Adjusting Front Field Lights Adjust field lights when in the field or equivalent to best suit Operator preference DANGER To prevent bodily injury or death from the unexpected startup of the machine always stop the engine and remove the key from the ignition before leaving the operator s seat for any reason 1 Shut down the engine and remove the key from the ignition 1034226 A Figure ...

Page 420: ...Lights Adjust the rear roof work lights to best suit Operator preference DANGER To prevent bodily injury or death from the unexpected startup of the machine always stop the engine and remove the key from the ignition before leaving the operator s seat for any reason 1034227 A B B Figure 6 187 Rear Roof Work Lights 1 Stand on left or right platform B to access rear roof work lights A MAINTENANCE AN...

Page 421: ...if necessary Adjusting Rear Swath Lights Adjust the rear swath lights to best suit Operator preference 1034227 A B B Figure 6 189 Rear Swath Lights 1 Stand on left or right platform B to access rear swath lights A 1015892 B A Figure 6 190 Left Rear Swath Light Right Opposite 2 Adjust the light position using bolts A MAINTENANCE AND SERVICING ...

Page 422: ...light bulbs refer to Replacing Headlight Bulb Engine Forward page 403 1034232 A B C D A Figure 6 191 Halogen Bulb Locations A Front Work Lights Field B Stubble Lights Rear C Rear Work Lights D Headlights Cab Forward DANGER To prevent bodily injury or death from the unexpected startup of the machine always stop the engine and remove the key from the ignition before leaving the operator s seat for a...

Page 423: ...ss A Replacing Headlight Bulb Engine Forward If a headlight bulb is burnt out or damaged it will need to be replaced DANGER To prevent bodily injury or death from the unexpected startup of the machine always stop the engine and remove the key from the ignition before leaving the operator s seat for any reason 1 Shut down the engine and remove the key from the ignition 1015802 A A A A B C C A A Fig...

Page 424: ...dlight IMPORTANT Do NOT touch the glass of the halogen bulb as oils or other chemicals from your skin will cause the bulb to fail prematurely 8 Attach the headlight to the bracket using four retained machine screws A and nylon nuts B Torque the screws to 2 0 2 7 Nm 18 24 lbf in 1015804 A A B Figure 6 196 Right Headlight Shown Left Similar 9 Connect the wiring harness connector to the headlight 10 ...

Page 425: ... the entire lamp assembly will need to be replaced as the bulbs cannot be replaced on their own DANGER To prevent bodily injury or death from the unexpected startup of the machine always stop the engine and remove the key from the ignition before leaving the operator s seat for any reason The deluxe cab is equipped with the following LED lights Four LED field lights A Two LED stubble lights B Two ...

Page 426: ...rward sun shade Open the access panel in the headliner to access the work light mounting nuts Tighten the mounting nuts to 27 Nm 239 lbf in Two rear right work lights One work light is mounted externally and is readily accessible To remove the mounting hardware for the other work light remove the radio panel from the cab Tighten the mounting nuts to 15 Nm 133 lbf in Two rear left work lights Conta...

Page 427: ... washers G and nuts B 5 Torque the nuts to 0 65 Nm 5 75 lbf in Replacing Cab Dome Bulb If the dome light in the cab ceiling burns out it will need to be replaced DANGER To prevent bodily injury or death from the unexpected startup of the machine always stop the engine and remove the key from the ignition before leaving the operator s seat for any reason 1 Shut down the engine and remove the key fr...

Page 428: ... and gently pry the lens cover until retaining tabs C engage into the dome light bezel Replacing Cabin Dome Light Assembly The cabin dome light improves visibility inside the cab If the dome light is burnt out or damaged it will need to be replaced DANGER To prevent bodily injury or death from the unexpected startup of the machine always stop the engine and remove the key from the ignition before ...

Page 429: ...n Dome Light Assembly 5 Carefully insert a slotted screwdriver or similar prying tool between the roof liner and the dome light assembly on the side of the light with the ON OFF switch 6 Gently depress retaining clip A and swing the dome light assembly downwards to disengage retaining tab B 7 Disconnect the old dome light assembly from the wiring harness 8 Connect the new dome light MD 201707 to t...

Page 430: ... console If the turn signal indicators are not working correctly contact your MacDon Dealer for more information 6 15 7 Accessing Circuit Breakers and Fuses Most circuit breakers and fuses are located inside a fuse box mounted on the left cab forward side of the frame behind the platform and inside the battery cover NOTE The circuit breakers automatically reset Fuses are the plastic blade type DAN...

Page 431: ... the tab and then lower the cover 4 Check and replace the fuses as required For instructions refer to Checking and Replacing Fuses page 412 5 Position cover B onto the fuse panel ensuring that the hooks at the bottom of the cover have engaged the fuse panel 6 Push latch A to engage the tab at top of the fuse box 7 Close the battery cover and move the platform to working position For instructions r...

Page 432: ...ld match the rating on the decal inside the fuse panel cover For information refer to Fuse Panel and Relay Module Decals page 414 Replacing Circuit Breakers and Relays If a circuit breaker or relay in the windrower s main fuse box is nonfunctional it must be replaced DANGER To prevent bodily injury or death from the unexpected startup of the machine always stop the engine and remove the key from t...

Page 433: ...262171 413 Revision A 1015815 A Figure 6 212 Fuse Box Cover Removed 3 To replace relay A pull the relay out of the receptacle and install a new relay 4 Reinstall the cover MAINTENANCE AND SERVICING ...

Page 434: ...ϮϳϬ A B C D E Figure 6 213 Left Rail Fuse Decal Locations A Main Fuse Panel Decal MD 306417 Located inside Fuse Cover Group A B Chassis Relay Module Fuse Decal MD 207816 Located inside Fuse Cover Group B C Lower AMI Group Fuse Decal MD 291378 Group D D Upper AMI Group Fuse Decal MD 207818 Group D E ATO Group Fuse Decal MD 291465 Group C MAINTENANCE AND SERVICING ...

Page 435: ...262171 415 Revision A 1037137 Figure 6 214 Main Fuse Panel Decal MD 306417 Group A MAINTENANCE AND SERVICING ...

Page 436: ...262171 416 Revision A 1020675 Figure 6 215 Chassis Relay Module Fuse Panel Decal MD 207816 Group B MAINTENANCE AND SERVICING ...

Page 437: ...evision A 1025169 A B C Figure 6 216 ATO Group C and AMI Group D Fuse Decals A Lower AMI Group Fuse Decal MD 291378 B Upper AMI Group Fuse Decal MD 207818 C ATO Group Fuse Decal MD 291465 MAINTENANCE AND SERVICING ...

Page 438: ...262171 418 Revision A 1018767 Figure 6 217 Roof Headliner Fuse Decal MD 207819 Group E MAINTENANCE AND SERVICING ...

Page 439: ...erator s seat for any reason Access the 125A main fuses as follows 1 Shut down the engine and remove the key from the ignition 2 Open the platform For instructions refer to 6 4 1 Opening Platform page 289 3 Remove the negative battery terminal For instructions refer to Disconnecting Battery page 379 1015822 A A Figure 6 218 Main Fuses 4 Locate five main fuses A secured to the left cab forward fron...

Page 440: ...el nut torque and wheel drive lubrication level should be inspected regularly Raising Drive Wheel Jack Method This procedure will help you to raise the drive wheel off the ground using a jack DANGER To prevent bodily injury or death from the unexpected startup of the machine always stop the engine and remove the key from the ignition before leaving the operator s seat for any reason CAUTION Detach...

Page 441: ...heel chocks as shown in the illustration at right ϭϬϯϵϳϰϮ A B C Figure 6 224 Drive Wheel Jack Point 6 Place a jack with a lifting capacity of at least 2268 kg 5000 lb under wheel leg jack point A NOTE The jack saddle must fit within the 50 mm 2 in retaining ring C at the jack point 7 Raise the jack until the drive wheel is slightly off the ground 8 Place a jack stand beneath lift cylinder mount B ...

Page 442: ... Detach the header from the windrower For instructions refer to 4 Attaching Headers to and Detaching Headers from Windrower page 111 2 Park the windrower on a level surface with caster wheels pointed ONLY forward or backward ϭϬϰϭϲϲϮ A Figure 6 225 Ground Speed Lever 3 Place ground speed lever GSL A in PARK 4 Shut down the engine and remove the key from the ignition ϭϬϯϵϭϱϳ A B Figure 6 226 Chockin...

Page 443: ...drower frame Removing Drive Wheels The drive wheels may need to be removed for service storage or replacement CAUTION Use a suitable lifting device capable of supporting a minimum of 907 kg 2000 lb to lift the wheel assembly away from the windrower 1008818 A B Figure 6 228 Drive Wheel Assembly 1 Raise windrower drive wheel A off the ground For instructions refer to Raising Drive Wheel Jack Method ...

Page 444: ...e operator s seat for any reason CAUTION Use a lifting device capable of supporting a minimum of 907 kg 2000 lb to lift the wheel assembly IMPORTANT The windrower must be supported with stands while the drive wheels are being installed For instructions refer to Raising Drive Wheel Jack Method page 420 or Raising Drive Wheels Forklift Method page 422 1 Shut down the engine and remove the key from t...

Page 445: ...er For instructions refer to Lowering Drive Wheels Jack Method page 425 or Lowering Drive Wheels Forklift Method page 426 10 Repeat the wheel nut torquing procedure every hour of operation until two consecutive checks confirm that there is no movement of the nuts Lowering Drive Wheels Jack Method This procedure is for using a jack to lower a drive wheel when it is raised on a jack stand DANGER To ...

Page 446: ...ve the jack 6 Remove the wheel chocks from both caster wheels Lowering Drive Wheels Forklift Method This procedure will help you to lower the drive wheels to the ground using a forklift DANGER To prevent bodily injury or death from the unexpected startup of the machine always stop the engine and remove the key from the ignition before leaving the operator s seat for any reason 1 Shut down the engi...

Page 447: ... Remove the wheel chocks from both caster wheels 6 15 9 Caster Wheels The casters wheels tire pressure wheel nut torque and the anti shimmy dampeners should be inspected regularly Installing Forked Caster Wheel The caster wheel will need to be attached to the axle assembly before it can be installed on the windrower 1019261 A B C Figure 6 236 Caster Wheel Assembly 1 Position axle assembly B into w...

Page 448: ...er C 4 Install eight bolts A and nuts four on each side of the caster to secure axle B to caster C Torque the nuts to 102 Nm 77 lbf ft 5 Lower the caster wheel For instructions refer to Lowering Caster Wheel page 430 Removing Forked Caster Wheel Once the caster wheel has been raised the forked caster axle assembly can be removed from the windrower and the wheel can be removed from the axle assembl...

Page 449: ... wheel assembly D from caster C 1019261 A B C Figure 6 240 Caster Wheel Assembly 3 Remove eight wheel nuts A that secure axle B to wheel C 4 Separate axle B and wheel C Raising Caster Wheel This procedure describes how to raise a caster wheel 1 Park the windrower on a level surface 2 Block the drive wheels ϭϬϰϭϲϲϮ A Figure 6 241 GSL Position 3 Place ground speed lever GSL A in PARK 4 Shut down the...

Page 450: ...lb 6 Place a jack stand beneath the walking beam and lower the beam until it is supported on the stand Lowering Caster Wheel This procedure describes how to lower the caster wheel 1034229 A B Figure 6 243 Caster Wheel Assembly 1 Using a suitable lifting device capable of lifting minimum 2268 kg 5000 lb raise the end of walking beam A slightly 2 Remove the jack stand and lower the end of the walkin...

Page 451: ...ur windrower 7 1 1 Cummins Engine Coolant Heater Block Heater The block heater aids in starting the engine when ambient temperatures drop below 10 degrees C MD B6979 Installation Instruction is included in the bundle 7 1 2 High Debris Cooler Intake Hood Scoops The High Debris Cooler Intake kit contains air intake ducts designed to pull cooling system air from a less debris prone area MD B6055 Inst...

Page 452: ...r Drive APMD IMD 900 Adapter Harness MD 30905726 Integrated AutoPilot GFX MD B9032 Other GPS providers may supply vehicle specific installation packages or make installation kits available through MacDon Dealers NOTE Additional completion kits may be required dependent upon the type of display being installed 7 2 2 Windrower Left Hand Drive Headlights This bundle replaces engine forward headlights...

Page 453: ... center link cylinder without leaving the operator s station MD B6617 Instruction MD 214701 included in the bundle 7 3 3 Swath Compressor The MacDon Swath Compressor is a large formed polyethylene sheet which is designed to mount to the underside of your windrower The MacDon Swath Compressor is designed for use with draper headers when cutting canola When lowered the swath compressor helps prevent...

Page 454: ...pring Kit and Tire Pressure Requirements page 451 7 4 3 Wiring Harness for Weight Box ISO The towing harness is used together with the weight box B9052 Installation instruction is included in the bundle 7 4 4 Clevis Style Hitch Assembly Stocked in EU The towing harness is used together with the weight box MD 346207 Installation instruction is included with the part 7 4 5 Towing Harness The towing ...

Page 455: ... dirt or air in fuel system Drain flush fill and prime system Priming Fuel System page 353 Improper type of fuel Use proper fuel for operating conditions 6 1 3 Fuel Specifications page 280 Crankcase oil too heavy Use recommended oil 6 1 2 Lubricants Fluids and System Capacities page 279 Low battery output Have battery tested Check battery electrolyte level 6 14 1 Batteries page 373 Poor battery co...

Page 456: ...system Contact Dealer Dirty or faulty injectors Contact Dealer Symptom Lack of power Incorrect timing Contact Dealer Engine oil viscosity too high Use recommended oil 6 1 2 Lubricants Fluids and System Capacities page 279 Intake air restriction Service air cleaner Cleaning Primary Air Filter page 344 Clogged fuel filter Replace primary fuel filter and if necessary replace secondary fuel filter 6 1...

Page 457: ...leaner Cleaning Primary Air Filter page 344 Engine overloaded Reduce ground speed Driving Forward in Cab Forward Mode page 204 Improper valve clearance Contact Dealer Engine out of time Contact Dealer Dirty injector nozzles Contact Dealer Low engine temperature Check thermostat Contact Dealer Improper type of fuel Use proper fuel 6 1 3 Fuel Specifications page 280 Symptom Starter cranks slowly or ...

Page 458: ...on Section Switch at Interlock not closed or defective Adjust switch or replace Contact your Dealer Contact Dealer Crankcase oil too high viscosity Use recommended oil 6 1 2 Lubricants Fluids and System Capacities page 279 TROUBLESHOOTING ...

Page 459: ... out or defective light bulb Replace light bulb Replacing Headlight Bulb Engine Forward page 403 Burned out or defective light bulb Replace light bulb Replacing Bulbs in Standard Work Lights or Cab Forward Headlights page 402 Burned out or defective light bulb Replace light bulb Replacing LED Lights Deluxe Cab Only page 405 Burned out or defective light bulb Replace light bulb Burned out or defect...

Page 460: ... and or conveyor is not turning Flow controls adjusted too low Toggle speed controls on HarvestTouch Display to increase flow Conveyor Speed Adjustment Buttons page 83 and Reel and Disc Speed Switch page 79 Appropriate solenoid on flow control block not being energized Contact Dealer Relief pressure too low Check adjust clean relief valve Symptom Hydraulic oil high temperature alarm activates Hydr...

Page 461: ...rator s seat or replace switch Contact your Dealer Contact Dealer Appropriate solenoid not being energized by activating switch Contact Dealer Couplers not connected Contact Dealer Faulty pump or flow controls Contact Dealer Control solenoids disconnected Contact Dealer Header ID not detected Attach header or check wiring Contact your Dealer Contact Dealer Symptom Header drive lacks power Relief v...

Page 462: ...cab Contact Dealer Faulty relief valve Repair or replace valve Contact Dealer Symptom Both wheels will not pull in forward or in reverse Loose hardware on pump controls Repair or tighten Contact Dealer Brakes binding or not releasing fully Check charge pressure Contact Dealer Low oil level and low charge pressure Check oil reservoir level 6 7 3 Checking Hydraulic Oil page 319 Wheel drives disengag...

Page 463: ... hydraulic oil filter leaks at a seal Not properly tightened Tighten filter element Installing Return Oil Filter page 312 or Installing Charge Filter page 314 Damaged seal or threads Replace filter or filter head Removing Return Oil Filter page 311 or Removing Charge Filter page 314 TROUBLESHOOTING ...

Page 464: ... km h 3 5 mph while extending or retracting the drive wheel legs Symptom leg extend or retract operation is slow Insufficient lubrication Apply moly grease to drive wheel leg slots Grease Points page 331 Symptom walking beam extensions unable to extend or retract Narrow transport feature not enabled Enable narrow transport feature 3 17 10 Enabling Narrow Transport System in the HarvestTouch Displa...

Page 465: ... will not lock with the GSL set to PARK Transmission interlock misadjusted Contact Dealer Faulty GSL neutral switch Contact Dealer Interlock springs not pulling interlock closed Replace or reattach springs Faulty switch on PARK Replace switch or adjust Symptom Insufficient road speed Ground speed limit is too low Increase limit Adjusting Ground Speed Limit page 203 Symptom Maximum ground speed is ...

Page 466: ...ow passage blocked Remove blockage Symptom Heater is not heating Heater shut off valve at engine closed Open valve 3 10 1 Heater Shut Off Valve page 63 Defective thermostat in engine water outlet manifold Replace thermostat Contact Dealer Heater temperature control defective Replace control Contact Dealer No thermostat in engine water outlet manifold Install thermostat Contact Dealer Symptom Air l...

Page 467: ...clutch slipping Remove clutch assembly for service or replacement Contact Dealer Thermostat defective or improperly adjusted Replace thermostat Contact Dealer Clogged air filters Remove air filters and clean or replace as necessary 6 9 1 Servicing Return Air Filter page 333 Heater circuit is open Lower temperature control in cab and close valve on engine 3 10 3 Climate Controls page 63 and 3 10 1 ...

Page 468: ...m Contact Dealer Loose or excessively worn drive belt Tighten or replace as required Tensioning Air Conditioner Compressor Belts page 395 and Replacing Air Conditioner Compressor Belts page 395 Noisy clutch Remove clutch for service or replacement as required Contact Dealer Noisy compressor Check mountings and repair Remove compressor for service or replacement Contact Dealer Compressor oil level ...

Page 469: ...r s station Problem Solution Section Symptom Rough ride Seat suspension not adjusted for operator s weight Adjust seat suspension 3 3 3 Suspension and Height page 45 High air pressure in tires Deflate to proper pressure 6 7 4 Checking Tire Pressure page 320 Cab suspension too stiff Adjust suspension Contact Dealer TROUBLESHOOTING ...

Page 470: ......

Page 471: ...conversion chart 9 1 Ballast Kit Booster Spring Kit and Tire Pressure Requirements The performance and stability of the windrower is affected by the weight of the attached header and its optional components The following tables describe the ballast weight booster spring kit and tire pressure requirements for optimizing windrower performance ...

Page 472: ... delivery 1 1 Bar or Turf 159 23 D225 7 6 m 25 ft single reel double knife short knife guards hydraulic triple delivery Base short knife guards hydraulic triple delivery B6047 1 1 Bar or Turf 159 23 D230 9 1 m 30 ft double reel double knife pointed guards hydraulic triple delivery Transport upper cross auger vertical knives B6047 1 2 Bar or Turf 241 35 D230 9 1 m 30 ft double reel double knife sho...

Page 473: ...Base Turf 241 35 D130XL 9 1 m 30 ft single reel double knife timed Transport 1 Bar 200 29 D130XL 9 1 m 30 ft single reel double knife timed Transport 1 Turf 241 35 D130XL 9 1 m 30 ft single reel double knife timed Transport upper cross auger vertical knives B6047 1 2 Bar or Turf 241 35 D135XL 10 6 m 35 ft single reel double knife timed Base 1 1 Bar 200 29 D135XL 10 6 m 35 ft single reel double kni...

Page 474: ... Kit Required Quantity of Initial Rear Ballast Base Kits B6053 Required Quantity of Additional Rear Ballast Kits B6054 Required Drive Wheel Tire Type Pressure kPa psi D135XL 10 6 m 35 ft double reel double knife timed Transport upper cross auger vertical knives B6047 1 2 Bar 283 41 D135XL 10 6 m 35 ft double reel double knife timed Transport upper cross auger vertical knives B6047 1 2 Turf 241 35 ...

Page 475: ... Series Windrowers Paired with Auger Headers Header Type Description Drive Wheel Tire Type Pressure kPa psi A40DX 4 9 m 16 ft Bar or Turf 200 29 A40DX GSS 4 9 m 16 ft Grass Seed Bar or Turf 159 23 A40DX 5 5 m 18 ft Bar 200 29 A40DX 5 5 m 18 ft Turf 220 32 REFERENCE ...

Page 476: ... screws Refer to the standard torque values when installing the self tapping screws Do NOT install the self tapping screws on structural or otherwise critical joints 9 2 1 Metric Bolt Specifications Specifications are provided for the appropriate final torque values to secure various sizes of metric bolts NOTE The torque values provided in the following metric bolt torque tables apply to hardware ...

Page 477: ...5 65 72 48 53 14 2 0 104 115 77 85 16 2 0 161 178 119 132 20 2 5 314 347 233 257 24 3 0 543 600 402 444 1001370 1001370 A Figure 9 3 Bolt Grades Table 9 6 Metric Class 10 9 Bolts and Class 10 Free Spinning Nut Nominal Size A Torque Nm Torque lbf ft lbf in Min Max Min Max 3 0 5 1 8 2 18 19 3 5 0 6 2 8 3 1 27 30 4 0 7 4 2 4 6 41 45 5 0 8 8 4 9 3 82 91 6 1 0 14 3 15 8 140 154 8 1 25 38 42 28 31 10 1 ...

Page 478: ...inum Specifications are provided for the appropriate final torque values for various sizes of metric bolts in cast aluminum NOTE The torque values provided in the following metric bolt torque tables apply to hardware installed dry that is hardware with no grease oil or threadlocker on the threads or heads Do NOT add grease oil or threadlocker to bolts or cap screws unless you are directed to do so...

Page 479: ...ar as possible Ensure that washer D is loose and that it is pushed toward lock nut C as far as possible 3 Ensure that O ring A is NOT on the threads Adjust O ring A if necessary 4 Apply hydraulic system oil to O ring A 1003432 D A E B C Figure 9 7 Hydraulic Fitting 5 Install fitting B into the port until backup washer D and O ring A contact part face E 6 Position the angle fittings by unscrewing n...

Page 480: ...ecifies a different torque value for the same type and size of fitting found in this topic use the value specified in the procedure instead 1004663 A B C Figure 9 8 Hydraulic Fitting 1 Inspect O ring A and seat B for dirt or defects 2 Ensure that O ring A is NOT on the threads Adjust O ring A if necessary 3 Apply hydraulic system oil to the O ring 4 Install fitting C into the port until the fittin...

Page 481: ... 509 560 375 413 9 2 5 O Ring Face Seal Hydraulic Fittings The standard torque values are provided for O ring face seal hydraulic fittings If a procedure specifies a different torque value for the same type and size of fitting found in this topic refer to the value specified in the procedure instead Torque values are shown in the Table 9 11 page 462 1001376 Figure 9 9 Hydraulic Fitting 1 Ensure th...

Page 482: ...30 3 16 4 9 16 1 4 25 28 18 21 5 Note30 5 16 6 11 16 3 8 40 44 30 32 8 13 16 1 2 55 61 41 45 10 1 5 8 80 88 59 65 12 1 3 16 3 4 115 127 85 94 14 Note30 7 8 16 1 7 16 1 150 165 111 122 20 1 11 16 1 1 4 205 226 151 167 24 2 1 1 2 315 347 232 256 32 2 1 2 2 510 561 376 414 9 2 6 Tapered Pipe Thread Fittings The standard torque values are provided for tapered pipe thread fittings If a procedure specif...

Page 483: ...hread conditioner with an appropriate cleaner 6 Inspect the final condition of the fitting Pay special attention to the possibility of cracks in the port opening 7 Mark the final position of the fitting If a fitting leaks disassemble the fitting and check it for damage NOTE The failure of fittings due to over torquing may not be evident until the fittings are disassembled and inspected Table 9 12 ...

Page 484: ... m x 3 2808 foot ft Power kilowatt kW x 1 341 horsepower hp Pressure kilopascal kPa x 0 145 pounds per square inch psi Pressure megapascal MPa x 145 038 pounds per square inch psi Pressure bar Non SI bar x 14 5038 pounds per square inch psi Torque Newton meter Nm x 0 7376 pound feet or foot pounds lbf ft Torque Newton meter Nm x 8 8507 pound inches or inch pounds lbf in Temperature degrees Celsius...

Page 485: ...ress SA defines which module generated the fault BBBBBB The SPN is the description of the unique fault value CC The FMI indicated the fault s level of severity Source address SA numbers refer to the following locations 23 HarvestTouch Display 25 HVAC box 104 Master controller and connected extension modules 176 Roof relay module 178 Chassis relay module 190 Console and ground speed lever GSL REFER...

Page 486: ...if ok Contact Dealer 23 521490 1 Electrical System Ext Module Offline Firewall Extension Module Offline Check Module connectors Module fuse if ok Contact Dealer 23 521491 1 Electrical System Ext Module Offline Chassis Extension Module Offline Check Module connectors Module fuse if ok Contact Dealer 23 521492 1 Electrical System Display Offline CAN 1 Offline Check Module connectors if ok Contact De...

Page 487: ...y Contact dealer 25 170 3 Electrical System HVAC Cab temp open circuit Voltage above normal Inspect cab temperature and wiring Contact Dealer 25 170 4 Electrical System HVAC Cab temp shorted Voltage below normal Inspect cab temperature and wiring Contact Dealer 25 442 3 Electrical System HVAC Duct temp open circuit Voltage above normal Check HVAC duct temperature sensor wiring Contact Dealer 25 44...

Page 488: ... pressure Knife pressure at maximum 3000 PSI 34 521537 2 Header System Knife Control ETDK Min Knife pressure Knife pressure below minimum 200 PSI with knife speed sensor reporting a speed 104 521000 3 Electrical System Fuel Level Sender Low Alarm Sensor voltage below 0 4V Check sensor power supply Replace sensor if necessary 104 521000 4 Electrical System Fuel Level Sender High Alarm Sensor voltag...

Page 489: ...sor if necessary 104 521021 4 Electrical System Reel Height High Alarm Sensor voltage above 4 7 V Check for wiring damage Adjust and re calibrate or replace sensor if necessary 104 521021 5 Electrical System Reel Height Low Error Sensor voltage below 0 025V Check sensor power supply Adjust and re calibrate or replace sensor if necessary 104 521021 6 Electrical System Reel Height High Error Sensor ...

Page 490: ...al System LH Float Cyl Low Alarm Sensor voltage below 0 45V Check sensor power supply Adjust and re calibrate or replace sensor if necessary 104 521030 4 Electrical System LH Float Cyl High Alarm Sensor voltage above 4 7 V Check for wiring damage Adjust and re calibrate or replace sensor if necessary 104 521030 5 Electrical System LH Float Cyl Low Error Sensor voltage below 0 025V Check sensor pow...

Page 491: ... calibrate or replace sensor if necessary 104 521036 5 Electrical System RH Float Cyl Low Error Sensor voltage below 0 025V Check sensor power supply Adjust and re calibrate or replace sensor if necessary 104 521036 6 Electrical System RH Float Cyl High Error Sensor voltage above 4 9 V Check for wiring damage Adjust and re calibrate or replace sensor if necessary 104 521036 8 Electrical System RH ...

Page 492: ...sensor power supply Adjust and re calibrate or replace sensor if necessary 104 521045 6 Electrical System Header Tilt High Error Sensor voltage above 4 9 V Check for wiring damage Adjust and re calibrate or replace sensor if necessary 104 521045 8 Electrical System Header Tilt Vref Error Reference voltage error Check sensor wiring for damage 104 521048 3 Electrical System Header Height Low Alarm S...

Page 493: ...stem LH Wheel Motor High Alarm Input frequency higher than expected Check sensor alignment power supply ground and signal path Replace sensor if necessary 104 521072 2 Electrical System RH Wheel Motor Low Alarm Input frequency lower than expected Check sensor alignment power supply ground and signal path Replace sensor if necessary 104 521072 3 Electrical System RH Wheel Motor High Alarm Input fre...

Page 494: ...th Replace sensor if necessary If a double draper drive kit is installed select it from the Settings Header Attachments menu 104 521076 3 Electrical System LH Draper Idler Spd High Alarm Input frequency higher than expected Check sensor alignment power supply ground and signal path Replace sensor if necessary 104 521076 31 Electrical System LH Draper Idler Spd Condition Exists No draper slip feedb...

Page 495: ...ical System Cooling Fan Speed Over Load High current on circuit Check wiring for damage Contact dealer 104 521082 4 Electrical System Header Raise Lower Open Load Check wiring for damage or breaks Contact dealer 104 521082 5 Electrical System Header Raise Lower Over Load High current on circuit Check wiring for damage Contact dealer 104 521083 4 Electrical System Header Tilt Open Load Check circui...

Page 496: ...igh Temperature Module has exceeded max operating temperature Allow module to cool down before continuing operation 104 521092 3 Electrical System Ext Module Firewall Low Batt Voltage Battery voltage is low Contact dealer to check charging system 104 521092 4 Electrical System Ext Module Firewall High Batt Voltage Battery voltage is high Contact dealer 104 521092 6 Electrical System Ext Module Fir...

Page 497: ...mage Contact dealer 104 521361 3 Electrical System Batt Disc Open Open Load Check wiring for damage or breaks Contact dealer This circuit is an output from the Master Controller and is connected to the Battery Disconnect Relay OFF coil This alarm will come on if the wiring connectors or Battery Disconnect Relay coil is damaged 104 521361 4 Electrical System Batt Disc Open Over Load High current on...

Page 498: ...Aux Lift Selector Open Load Check wiring for damage or breaks Contact dealer 104 521370 4 Electrical System Reel Aux Lift Selector Over Load High current on circuit Check wiring for damage Contact dealer 104 521371 3 Electrical System Reel Retract O P Open Load Check wiring for damage or breaks Contact dealer 104 521371 4 Electrical System Reel Retract O P Over Load High current on circuit Check w...

Page 499: ... O P Over Load High current on circuit Check wiring for damage Contact dealer 104 521378 3 Electrical System LH Lateral Tilt O P Open Load Check wiring for damage or breaks Contact dealer 104 521378 4 Electrical System LH Lateral Tilt O P Over Load High current on circuit Check wiring for damage Contact dealer 104 521379 3 Electrical System RH Lateral Tilt O P Open Load Check wiring for damage or ...

Page 500: ...that there is the potential for engine overheat if fan speed is too low Safe mode activated Fan will default to full rpm at high idle Contact dealer 104 521460 1 Windrower Wheel Speed LH Wheel Speed Sensor Check LH wheel speed sensor and wiring Reading speed off RH wheel only Auto reel and auto draper speed performance will be impacted while turning 104 521460 2 Windrower Wheel Speed RH Wheel Spee...

Page 501: ...eft in Sensor Low Alarm Sensor voltage below 0 35V Check sensor power supply Adjust and re calibrate or replace sensor if necessary 104 521503 4 Electrical System AHHC Left in Sensor High Alarm Sensor voltage above 4 5 V Check for wiring damage Adjust and re calibrate or replace sensor if necessary 104 521503 5 Electrical System AHHC Left in Sensor Low Error Sensor voltage below 0 175V Check senso...

Page 502: ...or replace sensor if necessary 104 521505 8 Electrical System AHHC Right out Sensor Vref Error Reference voltage error Check sensor wiring for damage 104 521506 3 Electrical System VREF Ext Mod Firewall Open Load Check wiring for damage or breaks Contact dealer The following sensors may be affected Knife SpeedReel SpeedLeft Hand Draper SpeedRight Hand Draper SpeedHeader IdentificationReel Height P...

Page 503: ...516 4 Electrical System Reel Bi pass PWM Open Load Check wiring for damage or breaks Contact dealer 104 521516 5 Electrical System Reel Bi pass PWM Over Load High current on circuit Check wiring for damage Contact dealer 104 521529 15 Windrower Gearbox Temperature Above Normal Least Severe Gearbox temperature is too high 104 521530 1 Windrower Reel Pressure High Above Normal Least Severe Reel circ...

Page 504: ...eck roof relay module 176 521104 2 Electrical System Inner Work Lights EK1 Relay Coil shorted or failed relay driver Check roof relay module 176 521104 3 Electrical System Inner Work Lights EK1 Relay Normally Open contact is open Check roof relay module 176 521104 4 Electrical System Inner Work Lights EK1 Relay Normally Closed contact is open Check roof relay module 176 521104 5 Electrical System ...

Page 505: ...rical System Tail Lights Engine Fwd EK3 Relay coil is not receiving power Check wiring to roof relay module EK3 Contact dealer 176 521119 6 Electrical System Tail Lights Engine Fwd EK3 Relay Normally open contact is shorted Check roof relay module 176 521119 7 Electrical System Tail Lights Engine Fwd EK3 Relay Normally closed contact is shorted Check roof relay module 176 521127 1 Electrical Syste...

Page 506: ...3 1 Electrical System High Beam Lights CF EK6 Relay coil open or not present Check roof relay module 176 521143 2 Electrical System High Beam Lights CF EK6 Relay Coil shorted or failed relay driver Check roof relay module 176 521143 3 Electrical System High Beam Lights CF EK6 Relay Normally Open contact is open Check roof relay module 176 521143 4 Electrical System High Beam Lights CF EK6 Relay No...

Page 507: ...9 4 Electrical System Rear Swath Lights EK8 Relay Normally Closed contact is open Check roof relay module 176 521159 5 Electrical System Rear Swath Lights EK8 Relay coil is not receiving power Check wiring to roof relay module EK8 Contact dealer 176 521159 6 Electrical System Rear Swath Lights EK8 Relay Normally open contact is shorted Check roof relay module 176 521159 7 Electrical System Rear Sw...

Page 508: ...10 Relay Normally closed contact is shorted Check roof relay module 176 521185 1 Electrical System Inner Work Lights EC1 Circuit Breaker Blown Check roof relay module 176 521185 2 Electrical System Inner Work Lights EC1 Circuit Breaker Not Powered Check wiring to roof relay module EC1 circuit breaker Contact dealer 176 521288 1 Electrical System Outer Work Lights EC2 Circuit Breaker Blown Check ro...

Page 509: ...EC8 circuit breaker Contact dealer 176 521309 1 Electrical System Beacon Lights EC9 Circuit Breaker Blown Check roof relay module 176 521309 2 Electrical System Beacon Lights EC9 Circuit Breaker Not Powered Check wiring to roof relay module EC9 circuit breaker Contact dealer 176 521312 1 Electrical System Dome Light Cab EC10 Circuit Breaker Blown Check roof relay module 176 521312 2 Electrical Sys...

Page 510: ...lay 178 521194 7 Electrical System High Beam Engine Fwd BK2 Relay Normally closed contact is shorted Replace relay 178 521202 1 Electrical System Wiper Cab Fwd BK7 Relay coil open or not present Check chassis module for missing relay Replace relay 178 521202 2 Electrical System Wiper Cab Fwd BK7 Relay Coil shorted or failed relay driver Replace relay 178 521202 3 Electrical System Wiper Cab Fwd BK...

Page 511: ... 3 Electrical System LH Turn Signal Lights BK6 Relay Normally Open contact is open Replace relay 178 521218 4 Electrical System LH Turn Signal Lights BK6 Relay Normally Closed contact is open Replace relay 178 521218 5 Electrical System LH Turn Signal Lights BK6 Relay coil is not receiving power Contact Dealer 178 521218 6 Electrical System LH Turn Signal Lights BK6 Relay Normally open contact is ...

Page 512: ... 521234 6 Electrical System Hydraulic Selector 1 2 BK9 Relay Normally open contact is shorted Replace relay 178 521234 7 Electrical System Hydraulic Selector 1 2 BK9 Relay Normally closed contact is shorted Replace relay 178 521242 1 Electrical System Wiper Engine Fwd BK8 Relay coil open or not present Check chassis module for missing relay Replace relay 178 521242 2 Electrical System Wiper Engine...

Page 513: ...is module for missing relay Replace relay 178 521266 2 Electrical System SPARE BK11 Relay Coil shorted or failed relay driver Replace relay 178 521266 3 Electrical System SPARE BK11 Relay Normally Open contact is open Replace relay 178 521266 4 Electrical System SPARE BK11 Relay Normally Closed contact is open Replace relay 178 521266 5 Electrical System SPARE BK11 Relay coil is not receiving powe...

Page 514: ...use Not Powered Contact Dealer 178 521321 1 Electrical System Wiper Cab Fwd BF3 Fuse Blown Replace blown fuse in chassis relay module 178 521321 2 Electrical System Wiper Cab Fwd BF3 Fuse Not Powered Contact Dealer 178 521324 1 Electrical System High Beam Lights EF BF4 Fuse Blown Replace blown fuse in chassis relay module 178 521324 2 Electrical System High Beam Lights EF BF4 Fuse Not Powered Cont...

Page 515: ...iring for damage Contact dealer 190 521392 3 Electrical System LH Turn Signal Switch Error Check switch for damage or binding Contact dealer 190 521393 3 Electrical System RH Turn Signal Switch Error Check switch for damage or binding Contact dealer 190 521394 3 Electrical System Hazard Switch Error Check switch for damage or binding Contact dealer 190 521395 3 Electrical System DWA Swath Roller U...

Page 516: ...409 3 Electrical System Wiper CF Switch Error Check switch for damage or binding Contact dealer 190 521410 3 Electrical System Field Lights Switch Error Check switch for damage or binding Contact dealer 190 521411 3 Electrical System F2 Button Switch Error Check switch for damage or binding Contact dealer 190 521412 3 Electrical System AC Fan Spd Decrease Switch Error Check switch for damage or bi...

Page 517: ...l System Header Stop NC Switch Error Check switch for damage or binding Contact dealer 190 521427 3 Electrical System Header Reverse Switch Error Check switch for damage or binding Contact dealer 190 521429 3 Electrical System Operator Present Switch Error Check switch for damage or binding Contact dealer 190 521430 3 Electrical System Keyswitch Ignition Switch Error Check switch for damage or bin...

Page 518: ...Electrical System Tilt Extend Switch Error Check switch for damage or binding Contact dealer 190 521446 3 Electrical System Tilt Retract Switch Error Check switch for damage or binding Contact dealer 190 521447 3 Electrical System Header Raise 1 Switch Error Check switch for damage or binding Contact dealer 190 521448 3 Electrical System Header Raise 2 Switch Error Check switch for damage or bindi...

Page 519: ...90 521459 3 Electrical System Wheel Position Switch Error Check switch for damage or binding Contact dealer 190 524129 31 Electrical System GSL Handle Offline Communications lost with the GSL Handle Contact Dealer 190 524130 31 Electrical System GSL Button Stuck There is a stuck button on the handle at power up Check GSL switches for failure or binding Contact dealer 190 524131 31 Electrical Syste...

Page 520: ...hrottle Actuator Position Sensor Circuit Engine Intake Throttle Actuator Position Sensor Circuit Voltage above normal or shorted to low source 84 2 Check Engine Amber 241 Wheel Based Vehicle Speed Wheel Based Vehicle Speed Data is erratic intermittent or incorrect 91 0 Stop Engine Red 148 Accelerator Pedal Position 1 Accelerator Pedal or Lever Position Sensor 1 Data valid but above normal operatio...

Page 521: ...ata valid but above normal operating range Least Severe Level 97 16 Water in Fuel Amber 1852 Water In Fuel Indicator Water in Fuel Indicator Data valid but above normal operating range Moderately Severe Level 100 1 Eng Oil Press Red 415 Engine Oil Pressure Engine Oil Rifle Pressure Data valid but below normal operational range Most Severe Level 100 2 Check Engine Amber 435 Engine Oil Pressure Engi...

Page 522: ...er 595 Engine Turbocharger 1 Speed Turbocharger 1 Speed Data valid but above normal operating range Moderately Severe Level 103 18 Check Engine Amber 687 Engine Turbocharger 1 Speed Turbocharger 1 Speed Data valid but below normal operating range Moderately Severe Level 105 0 Check Engine Red 155 Engine Intake Manifold 1 Intake Manifold 1 Temperature Data valid but above normal operational range M...

Page 523: ...t Level Data valid but below normal operational range Most Severe Level 111 3 Check Engine None 6522 Engine Coolant Level Coolant Level Sensor 1 Circuit Voltage above normal or shorted to high source 111 4 Check Engine None 6523 Engine Coolant Level Coolant Level Sensor 1 Circuit Voltage below normal or shorted to low source 111 17 Coolant Level Amber Blinking 2448 Engine Coolant Level Coolant Lev...

Page 524: ...75 4 Check Engine None 6525 Engine Oil Temperature 1 Engine Oil Temperature Sensor 1 Circuit Voltage below normal or shorted to low source 190 0 Stop Engine Red 234 Engine Speed Engine Crankshaft Speed Position Data valid but above normal operational range Most Severe Level 190 2 Check Engine None 2321 Engine Speed Engine Crankshaft Speed Position Data is erratic intermittent or incorrect 190 16 C...

Page 525: ...Temperature Sensor Input 1 Special Instructions 558 2 Check Engine Amber 431 Accelerator Pedal 1 Low Idle Switch Accelerator Pedal or Lever Idle Validation Switch Data is erratic intermittent or incorrect 558 13 Stop Engine Red 432 Accelerator Pedal 1 Low Idle Switch Accelerator Pedal or Lever Idle Validation Switch Circuit Out of Calibration 558 19 Stop Engine Red 3527 Accelerator Pedal 1 Low Idl...

Page 526: ... component 641 13 Stop Engine Red 2449 Engine Variable Geometry Turbocharger Actuator 1 VGT Actuator Controller Out of Calibration 641 15 Check Engine None 1976 Engine Variable Geometry Turbocharger Actuator 1 VGT Actuator Driver Over Temperature Calculated Data valid but above normal operating range Least Severe Level 641 31 Stop Engine Red 2635 Engine Variable Geometry Turbocharger Actuator 1 VG...

Page 527: ...rmal or shorted to high source 697 4 Check Engine Amber 2558 Auxiliary PWM Driver 1 Auxiliary PWM Driver 1 Circuit Voltage below normal or shorted to low source 701 14 Stop Engine Red 4734 Auxiliary I O 01 Auxiliary Input Output 1 Special Instructions 723 2 Check Engine None 2322 Engine Speed 2 Engine Camshaft Speed Position Sensor Data is erratic intermittent or incorrect 723 7 Check Engine Amber...

Page 528: ...421 Engine Compression Brake Output 2 Engine Brake Actuator Driver Output 2 Circuit Voltage above normal or shorted to high source 1073 4 Check Engine None 6422 Engine Compression Brake Output 2 Engine Brake Actuator Driver Output 2 Circuit Voltage below normal or shorted to low source 1075 3 Check Engine None 6258 Engine Electric Lift Pump for Engine Fuel Supply Electric Lift Pump for Engine Fuel...

Page 529: ...t 1235 2 Check Engine None 3331 J1939 Network 3 J1939 Network 3 Data is erratic intermittent or incorrect 1323 31 Check Engine Amber 1654 Engine Misfire Cylinder 1 Engine Misfire Cylinder 1 Condition exists 1324 31 Check Engine Amber 1655 Engine Misfire Cylinder 2 Engine Misfire Cylinder 2 Condition exists 1325 31 Check Engine Amber 1656 Engine Misfire Cylinder 3 Engine Misfire Cylinder 3 Conditio...

Page 530: ...Below Normal Operational Range Most Severe Level 1668 2 Check Engine None 4437 J1939 Network 4 Data erratic J1939 Network 4 Data is erratic intermittent or incorrect 1675 31 Check Engine None 3737 Engine Starter Mode Engine Starter Mode Overcrank Protection Condition exists 1761 1 DEF Amber 1673 Aftertreatment 1 Diesel Exhaust Fluid Tank Level Aftertreatment 1 Diesel Exhaust Fluid Tank Level Data ...

Page 531: ...e 2791 5 Check Engine Amber 2349 Engine Exhaust Gas Recirculation 1 EGR1 Valve Control EGR Valve Control Circuit Current below normal or open circuit 2791 6 Check Engine Amber 2353 Engine Exhaust Gas Recirculation 1 EGR1 Valve Control EGR Valve Control Circuit Current above normal or grounded circuit 2791 7 Check Engine None 6555 Engine Exhaust Gas Recirculation 1 EGR1 Valve Control EGR Valve Cont...

Page 532: ... Aftertreatment 1 Intake NOx Aftertreatment 1 Intake NOx Sensor Data not Rational Drifted High 3216 21 Check Engine None 6459 Aftertreatment 1 Intake NOx Aftertreatment 1 Intake NOx Sensor Data not Rational Drifted High 3218 2 Check Engine Amber 3682 Aftertreatment 1 Intake Gas Sensor Power Status Aftertreatment 1 Intake NOx Sensor Power Supply Data is erratic intermittent or incorrect 3226 2 Chec...

Page 533: ... or shorted to high source 3363 4 Check Engine None 6481 Aftertreatment 1 Diesel Exhaust Fluid Tank 1 Heater Aftertreatment 1 Diesel Exhaust Fluid Tank Heater Voltage below normal or shorted to low source 3363 7 Check Engine None 6475 Aftertreatment 1 Diesel Exhaust Fluid Tank 1 Heater Aftertreatment 1 Diesel Exhaust Fluid Tank Heater Mechanical system not responding or out of adjustment 3363 16 C...

Page 534: ...lity Aftertreatment Diesel Exhaust Fluid Quality Abnormal rate of change 3364 11 Check Engine Amber 1715 Aftertreatment 1 Diesel Exhaust Fluid Tank 1 Quality Aftertreatment Diesel Exhaust Fluid Quality Root cause not known 3364 13 Check Engine Amber 1714 Aftertreatment 1 Diesel Exhaust Fluid Tank 1 Quality Aftertreatment Diesel Exhaust Fluid Quality Out of Calibration 3364 15 Check Engine None 484...

Page 535: ...Amber 2185 Sensor supply voltage 4 Sensor Supply 4 Circuit Voltage above normal or shorted to high source 3512 4 Check Engine Amber 2186 Sensor supply voltage 4 Sensor Supply 4 Circuit Voltage below normal or shorted to low source 3513 3 Check Engine Amber 1695 Sensor supply voltage 5 Sensor Supply 5 Voltage above normal or shorted to high source 3513 4 Check Engine Amber 1696 Sensor supply voltag...

Page 536: ... Check Engine Amber 5938 Diesel Particulate Filter 1 Conditions Not Met for Active Regeneration Diesel Particulate Filter 1 Conditions Not Met for Active Regeneration Condition exists 4096 31 Check Engine Amber 3547 NOx limits exceeded due to Empty Diesel Exhaust Fluid Tank Aftertreatment Diesel Exhaust Fluid Tank Empty Condition exists 4185 31 Check Engine Amber 1427 Overspeed Shutdown Relay Driv...

Page 537: ...l Exhaust Fluid Line Heater 1 State Aftertreatment 1 Diesel Exhaust Fluid Line Heater 1 Circuit Voltage above normal or shorted to high source 4340 4 Check Engine None 6532 Aftertreatment 1 Diesel Exhaust Fluid Line Heater 1 State Aftertreatment 1 Diesel Exhaust Fluid Line Heater 1 Circuit Voltage below normal or shorted to low source 4340 5 Check Engine None 6482 Aftertreatment 1 Diesel Exhaust F...

Page 538: ...nsor Circuit Voltage below normal or shorted to low source 4360 15 Check Engine None 3164 Aftertreatment 1 SCR Catalyst Intake Gas Temperature Aftertreatment 1 SCR Intake Temperature Data valid but above normal operating range Least Severe 4360 16 Stop Engine Red 3231 Aftertreatment 1 SCR Catalyst Intake Gas Temperature Aftertreatment 1 SCR Intake Temperature Data valid but above normal operating ...

Page 539: ...ntake Temperature Data is erratic intermittent or incorrect 4765 3 Check Engine Amber 3314 Aftertreatment Diesel Oxidation Catalyst Intake Temperature Aftertreatment 1 Diesel Oxidation Catalyst Intake Temperature Sensor Circuit Voltage above normal or shorted to high source 4765 4 Check Engine Amber 3313 Aftertreatment Diesel Oxidation Catalyst Intake Temperature Aftertreatment 1 Diesel Oxidation ...

Page 540: ...3151 Aftertreatment 1 SCR Catalyst System Aftertreatment 1 SCR Catalyst System Missing Condition exists 4796 31 Check Engine None 6621 Aftertreatment 1 Diesel Oxidation Catalyst Missing Aftertreatment 1 Diesel Oxidation Catalyst Missing Condition exists 5018 11 Check Engine None 2637 Aftertreatment Diesel Oxidation Catalyst Aftertreatment 1 Diesel Oxidation Catalyst Face Plugged Root cause not kno...

Page 541: ... 2 Control Circuit Voltage above normal or shorted to high source 5484 4 Check Engine None 6457 Engine Fan Clutch 2 Output Device Driver Engine Fan Clutch 2 Control Circuit Voltage below normal or shorted to low source 5491 3 Check Engine None 6477 Aftertreatment 1 Diesel Exhaust Fluid Line Heater Relay Aftertreatment Diesel Exhaust Fluid Line Heater Relay Voltage above normal or shorted to high s...

Page 542: ...Aftertreatment Selective Catalytic Reduction Temperature Sensor Module Aftertreatment Selective Catalytic Reduction Temperature Sensor Module Bad intelligent device or component 5743 16 Check Engine Amber 4166 Aftertreatment Selective Catalytic Reduction Temperature Sensor Module Aftertreatment Selective Catalytic Reduction Temperature Sensor Module Data valid but above normal 5745 3 Check Engine ...

Page 543: ... 6472 Engine Fan Blade Pitch Fan Blade Pitch Position Sensor Circuit Voltage below normal or shorted to low source 6799 7 Check Engine Amber 5185 Engine Fan Blade Pitch Fan Blade Pitch Mechanical system not responding or out of adjustment 6802 31 Check Engine Amber 5278 Aftertreatment 1 Diesel Exhaust Fluid Dosing System Frozen Condition exists 6881 9 Check Engine Amber 5653 SCR Operator Inducemen...

Page 544: ...g Inhibited Due to Inhibit Switch SCR System Cleaning Inhibited Due to Inhibit Switch Condition exists 6928 31 Check Engine Amber 6597 SCR System Cleaning Inhibited Due to System Timeout SCR System Cleaning Inhibited Due to System Timeout Condition exists 7848 31 Check Engine Amber 6634 Diesel Particulate Filter 1 Conditions Not Met for Active Regeneration Diesel Particulate Filter 1 Conditions No...

Page 545: ...aulics 160 detaching from windrower 163 hydraulic center link with optional self alignment kit 152 hydraulic center link without optional self alignment kit 152 D2 SP Series Draper Headers attaching draper header supports 129 connecting center link 130 connecting hydraulics 140 detaching from windrower 143 hydraulic center link with optional self alignment kit 130 hydraulic center link without opt...

Page 546: ... conveyor speed adjustment buttons 83 coolant adding to engine after drain 368 checking engine coolant 324 coolant specifications 281 coolant temperature gauges 85 D D1X Series Draper Headers attaching to windrower draper header supports 151 hydraulic center link with optional self alignment kit attaching to M2 Series Windrower 152 hydraulic center link without self alignment kit attaching to M2 S...

Page 547: ...eed 82 draper speed controls 83 drive wheels See wheels and tires driving the windrower adjusting ground speed limit 203 cab forward operation 204 driving on road 209 212 engine forward operation 207 entering exiting the windrower 203 forward in engine forward mode 209 reverse in cab forward mode 206 reverse in engine forward mode 208 spin turn 214 stopping 215 E EC declaration of conformity i eco...

Page 548: ... removing primary air filter 341 engine compartment 287 engine controls 71 engine exhaust system inspecting exhaust system 347 engine gearbox maintenance adding lubricant 325 changing lubricant 310 348 checking lubricant level 325 engine oil change 339 engine operation eco engine control programming 198 starting the engine 193 troubleshooting 197 fault codes 500 faults and telltales 107 general en...

Page 549: ... buttons 75 fuses accessing fuses 410 checking and replacing 412 inspecting replacing 125A main fuses 419 G gearboxes engine changing lubricant 310 348 GPS automated steering systems See automated steering systems ground speed control troubleshooting 445 ground speed lever 73 function group 77 German export One Touch Return positions 81 HarvestTouch Display functions 88 header position six way swi...

Page 550: ...ng the header 243 draper header 250 engaging the header 243 header angles adjusting header angle 244 header drive 243 header float float operating guidelines 238 header height 247 knife disc drive hydraulics 302 operating with a header 236 A40DX Auger Header 268 operating with header header float 237 reel and draper hydraulics 302 reversing the header 244 header position sensors calibrating 175 he...

Page 551: ...eaders knife speed chart 275 alarm 264 276 auger headers setting knife speed 275 knife speed chart 262 setting 263 L language setting on HarvestTouch Display 92 LED lights See lighting lighting 55 beacons 59 replacing lights 407 cab forward mode field 55 road lights 56 engine forward mode road lights 57 field lights cab forward mode 55 flood lights adjusting front work lights field 399 headlights ...

Page 552: ...work lights rear 400 aligning headlights cab forward 398 aligning headlights engine forward 396 replacing beacon lights 407 replacing cabin dome bulb 407 replacing dome light assembly 408 replacing headlight bulb engine forward 403 replacing LED lights deluxe cab 405 lubricants fluids and system capacities 279 maintenance schedule 283 286 maintenance schedule record 284 platform operation See plat...

Page 553: ...ilt 47 suspension and seat height 45 vertical dampener 48 operator s station 41 AM FM CD DVD Bluetooth equipped radio 67 checking engine interlock 356 climate control system fan and temperature controls 63 console 41 engine controls 71 eco engine control EEC 72 header controls See header controls horn 70 lighting 55 cab forward field 55 cab forward road 56 engine forward road 57 tail beacon lights...

Page 554: ...terlock 356 checking operator presence system 353 engine safety 14 engine electronics 15 high pressure rail 14 general safety 3 hydraulic safety 7 maintenance safety 5 operational safety 187 safety alert symbols 1 safety sign decals 18 installing decals 18 interpreting decals 21 sign location 19 signal words 2 tire safety 8 welding precautions 10 safety props 236 safety systems 353 screen brightne...

Page 555: ...r headers 218 towing harness 434 towing headers preparing 219 weight box 434 towing windrower engaging and disengaging wheel drives 223 towing windrowers 223 traction drive troubleshooting 442 training seats 51 transport hitch 219 towing draper headers 218 Trimble automated steering systems 432 emergency stop button 216 troubleshooting batteries 439 cab air 446 electrical 439 engine 435 engine sta...

Page 556: ...owering drive wheels jack method 425 raising drive wheel jack method 420 raising drive wheels forklift method 422 removing drive wheel 423 tightening drive wheel nuts 307 narrow transport extend 224 retract 229 safety 8 tires checking pressure 320 troubleshooting 442 wheel drive adding lubricant 10 bolt 346 changing lubricant 10 bolt 310 checking lubricant levels 10 bolt 346 windrower faults fault...

Page 557: ... SAE 75W 140 or 80W 140 API service class GL 5 fully synthetic gear lubricant SAE J2360 preferred 2 1 liters 2 2 U S quarts Gearbox lubricant Standard wheel drive SAE 75W 140 or 80W 140 API service class GL 5 fully synthetic gear lubricant SAE J2360 preferred 1 4 liters 1 5 U S quarts Engine coolant Engine cooling system ASTM D 6210 and CES 14603 Peak Final Charge Global or Fleetguard ES Compleat ...

Page 558: ...USTOMERS M Ma ac cD Do on n c co om m DEALERS P Po or rt ta al l M Ma ac cD Do on n c co om m Trademarks of products are the marks of their respective manufacturers and or distributors Printed in Canada ...

Reviews: