background image


Software Setup 


Windows  


1.


Download and install the latest M-Game software (with embedded audio driver) from                    

m-game.com

2.


Connect the power and USB cable to the M-Game Solo and press the power        button. 

3.


Connect your separate headphones and microphone, or combined headset, to the rear panel of 
the M-Game Solo. 

4.


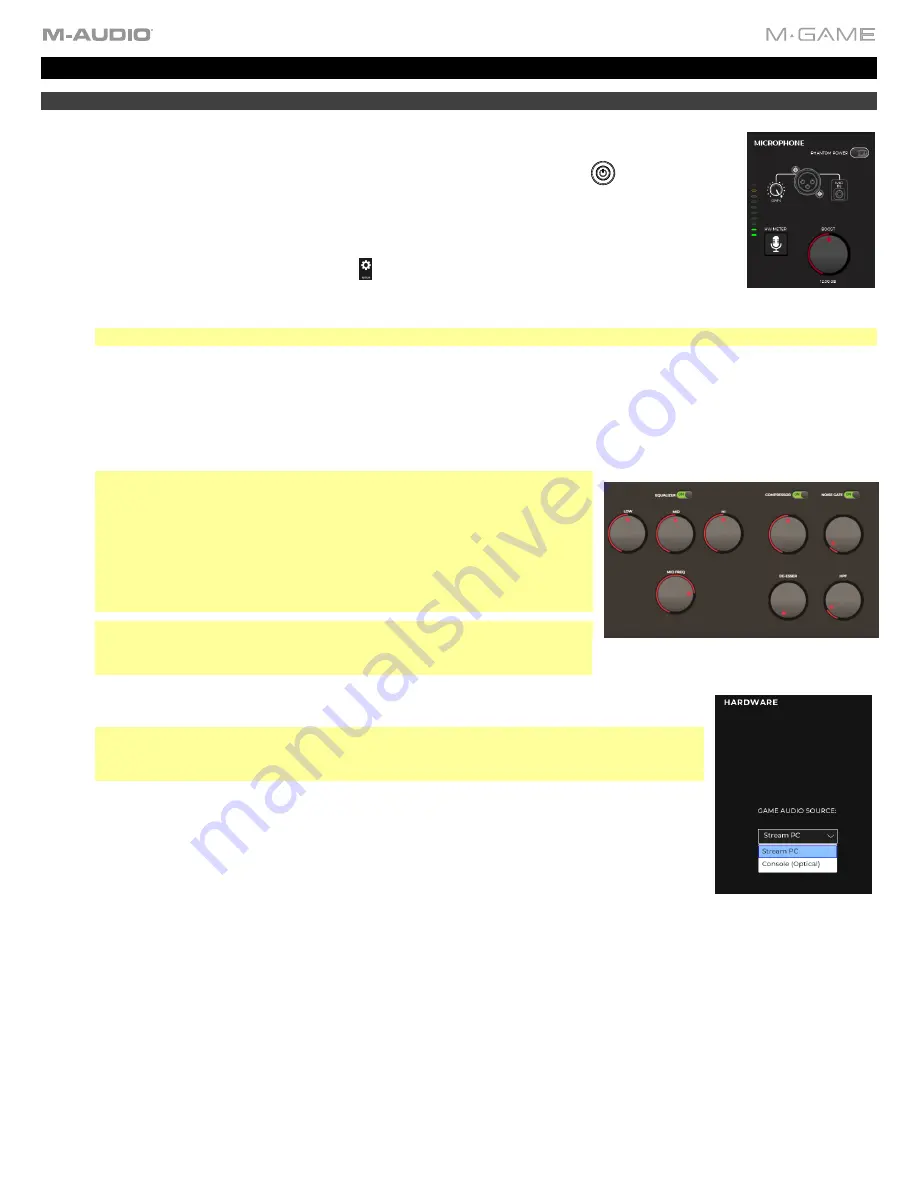
Open the M-Game software and select either the 

SET MIC 

from the 

HOME 

tab  and  follow  the      

on-screen instructions or go to the 

SETUP     

tab and select the 

HW METER

 button so its lit red. 

a.


Under 

Microphone

, turn 

Phantom Power

 on or off depending on whether you’re using a 

condenser microphone (Phantom Power on) or a dynamic microphone (Phantom Power off). 

Note: 

Headset microphones do not require phantom power. 

b.


Speak into your mic at the loudest level you expect to speak in your stream and begin turning up the 

Gain

 knob on 

the rear panel of M-Game Solo. You'll notice that the 

Mic Fader LEDs

 on M-Game Solo will light up when you 

speak, showing the incoming signal. Continue speaking into the mic and turning up the 

Gain

 knob until you see the 

Mic Fader LEDs

 flash red 3 times. If you see the 

Mic Fader LEDs

 flash red 3 times, this means M-Game Solo's 

Mic 

Gain

 knob is set too high. Turn down the Mic 

Gain

 knob until you no longer see the LED flash red 3 times. 

You’ll want to get the 

Mic Fader LEDs

 as close to the top LED without the LEDs all flashing. 

Note: 

If you are using a low gain mic (like a SHURE SM7B or 

ElectroVoice RE20) you will need to use the M-Game software's BOOST 
function. You can find BOOST in the Setup tab under Basic Microphone 
Settings. Simply speak into your mic at the loudest volume you expect to 
speak in your stream and turn up the Boost knob until the Mic fader’s 
meter in the 

M-Game software

 shows the top LED lit red. Slowly turn 

the Boost knob back down until the Mic fader’s meter in the software no 
longer shows red. You can change the BOOST level from Off to +24 dB. 

Note:

 Now that you’ve setup your mic you can turn off the HW Meter 

button in the 

M-Game software

 to return the Mic fader to its default LED 

behavior. 

c.


Adjust the EQ, Compressor, Noise Gate, High Pass Filter (HPF), and Deesser settings to 
get the best sound from your mic. 

Note: 

You can also use one of the Mic presets in the M-Game software to automatically 

configure your mic’s settings. These mic presets are found in 

File 

Setup 

Load 

Microphone Settings

5.


In the 

SETUP

 tab's 

HARDWARE

 section select what source your Game audio is coming 

from. 

6.


Open your game, chat, M-Game software, streaming software, and any other programs you 
will be running in your stream and ensure that their audio is playing. 

7.


Press the Windows key and then type 

Sound Settings 

into the search bar. Alternatively, right 

click the speaker icon in the taskbar and select 

Open Sound Settings

8.


On 

Windows 10

, in 

Sound Settings

, under 

Sound Output

 select 

System

. This will ensure any audio that you're not 

routing specifically to the M-Game Solo's Game, Chat, or Sampler fader will default to be controlled by the 

System 

fader

. Under 

Input

 select 

Stream

. This will set your broadcast/stream mix as your default output source. In 

Sound 

Settings

 under 

Advanced Sound Options

, select 

App Volume and Device Preferences

. This window shows every 

audio source running and where that audio is being sent to and from (its Routing). This allows you to send audio from 
different programs to the M-Game. 
On 

Windows 11

, in 

Sound Settings

 under 

Sound Output

 select 

System

. This will ensure any audio that you're not 

routing specifically to the M-Game Solo's Game, Chat, or Sampler fader will default to be controlled by the 

System 

fader

. Under Input select 

Stream

, this will set your broadcast/stream mix as your default output source. In 

Sound 

Settings

 select 

Volume mixer

. This window shows every audio source running. You will also be able to select where 

that audio is being sent to and from (its Routing) by pressing the down arrow next to the app's volume slider. This 
allows you to send audio from different programs to the M-Game. 

Summary of Contents for M-Game Solo

Page 1: ...M Game Solo User Guide v1 2...

Page 2: ...bout This User Guide 5 Software Download and Installation 5 Hardware Setup 6 Software Setup 7 Windows 7 macOS 9 Operation 11 Home Menu 11 Setup 13 Microphone Settings 13 Mute Button 13 CENSOR Button 1...

Page 3: ...tor 19 Effects 20 Button Control 21 Menu Bar 21 LED Control 21 Button Type 22 Individual Effects 23 Reverb Echo 23 Chorus Modulation 23 Distortion 24 LEDs 25 Color Frame 27 Features 28 Top Panel 28 He...

Page 4: ...4 Appendix 31 LEDs 31 Voice Effects 32 Technical Specifications 33 Trademarks and Licenses 33...

Page 5: ...ain is controlled using the mic Gain knob Connect speakers to the M Game Solo s Main Out Connect media player to the M Game Solo s Aux In Some parts of this manual refer to other relevant chapters or...

Page 6: ...te an effect or to trigger samples 7 Connect M Game Solo to power and turn it on 1 Connect your microphone and headphones or headset to the rear panel of the M Game 4 Optional Connect media player opt...

Page 7: ...m Off to 24 dB Note Now that you ve setup your mic you can turn off the HW Meter button in the M Game software to return the Mic fader to its default LED behavior c Adjust the EQ Compressor Noise Gate...

Page 8: ...s to the SYSTEM channel if you would like to control additional streams of software audio 11 Open your streaming broadcast software such as OBS used in the example below 12 OBS in the File Settings me...

Page 9: ...p the Gain knob on the rear panel of M Game Solo You ll notice that the Mic Fader LEDs on M Game Solo will light up when you speak showing the incoming signal Continue speaking into the mic and turnin...

Page 10: ...music program audio to the System AUX fader Note You can route additional computer audio sources to the SYSTEM AUX channel if you would like to control additional streams of software audio 10 Open yo...

Page 11: ...ings Routing Select to load or save virtual fader where applicable and active audio channels settings Sampler Select to load or save sample button assignment settings including button types Effects Se...

Page 12: ...tion Vertical Navigation Bar The vertical navigation bar allows quick access to these various sections Home default Setup Routing Sampler Effects LEDs Navigating via the graphic representation of the...

Page 13: ...low mid with a sweepable mid frequency to boost cut the signal to find the sweet spot and hi frequencies to achieve a good sound mix 6 Compressor On Off This turns on or off the Compressor effect for...

Page 14: ...l Settings This section shows from what source the Game Audio will be received from Game Audio Source Stream PC Game PC or Console Television Optical Footswitches These can be independently set to one...

Page 15: ...s the physical fader for that output and allows you to make a completely virtual mix to the output at the end of the row Using virtual faders is helpful if you would like to hear a different volume mi...

Page 16: ...16 Sampler Samples 1 6 This menu accesses the sample button functions The sampler page is broken into four sections The Sample List the Sample Button Control the Menu Bar and the Sample Editor...

Page 17: ...on Drag the sample from the sample list to either the frame or the representation of the button This will clear all current contents for the button except LED settings and assign that sample to that b...

Page 18: ...t contains basic save save as open new and delete functions 1 Update Current Sample This works like a standard save function where changes to the active sample are updated 2 Save As New Sample This wo...

Page 19: ...returns the sample waveform editor to the current selection between the beginning and ending flag 5 Normalize Button This adjusts the level of the sample s gain to its maximum non clipping level 6 Fa...

Page 20: ...ess this menu to view assign and customize the vocal effects The effects page is broken into four sections The Effect List Multi Effect List the Effect Button Control the Menu Bar and the Individual E...

Page 21: ...to search for effects library XML files You can navigate to an EFFECTS library XML file which would show all potential EFFECTS that could be imported into the EFFECTS list You can also select multipl...

Page 22: ...22 Button Type Press this to open a submenu with a Toggle and Hold selection to determine the button behavior when pressed...

Page 23: ...ffect preset Reverb Echo The Reverb Echo effect adds the sense of being in a certain space such as a hall or large room as well as a persistent reflection after a sound is heard Adjust the virtual kno...

Page 24: ...ct produces an altered crunchy or harsh signal This is usually used on guitars but can also be creatively used to achieve a lo fi sound or gritty vocals Adjust the virtual knob to control how much of...

Page 25: ...for its unassigned state LEDs not connected to buttons can only assign inactive or active UNASSIGNED INACTIVE and ACTIVE can have two types of buttons SOLID or PULSE If a state choice is set to SOLID...

Page 26: ...olid colors Gradient Fader Color with Indicator Keeps all of the LEDs below the current Fader position lit as a spectrum of the selected solid colors 1 and 2 with color 3 s selection showing the curre...

Page 27: ...27 Color Frame Press a button to open a color selection menu to set the sample color for the hardware control...

Page 28: ...r stream the mic is able to be sent to Use the M Game software to configure the mute assignment and adjust the LED behavior of this button See the Microphone Settings section for more details 3 Button...

Page 29: ...e the sampler audio signal being sent to the USB port Headphone and Main Outs Use the M Game software to change the LED behavior of this button seen in the LEDs section By default this LED will be bri...

Page 30: ...5 MAIN OUT Connect speakers to this 1 8 3 5 mm stereo TRS output 6 AUX IN Connect an MP3 player or smartphone to this 1 8 3 5 mm stereo Aux input 7 FOOTSWITCH Connect a 1 4 6 35 mm TRS non latching m...

Page 31: ...ndicator Fader 1 Color with Indicator and Background Gradient Color Gradient Color with Indicator Gradient Color with Indicator and Background Pulse Fader 1 Color Pulse Fader 2 Colors Pulse Fader 3 Co...

Page 32: ...Intimate Presence Tiny Chorus Modulation Doubler Wide Doubler Trio Hive Warbler Deep Flange Wide Flange Case What Physician In the Pipe Trembling Tremolo Reverb Echo Small Room Medium Room Large Room...

Page 33: ...15 1 kHz 4 dBu 1 dBFS Max Input Level 5 dBu Sensitivity 54 dBu Preamp EIN 130 dBu Gain Range 59 dB Mic Input unbalanced 1 8 TS Frequency Response 20 Hz 20 kHz 0 4 1 9 dB Signal to Noise Ratio 105 dB 1...

Page 34: ...35...

Reviews: