background image


14 


Setup 


Microphone Settings 


1.


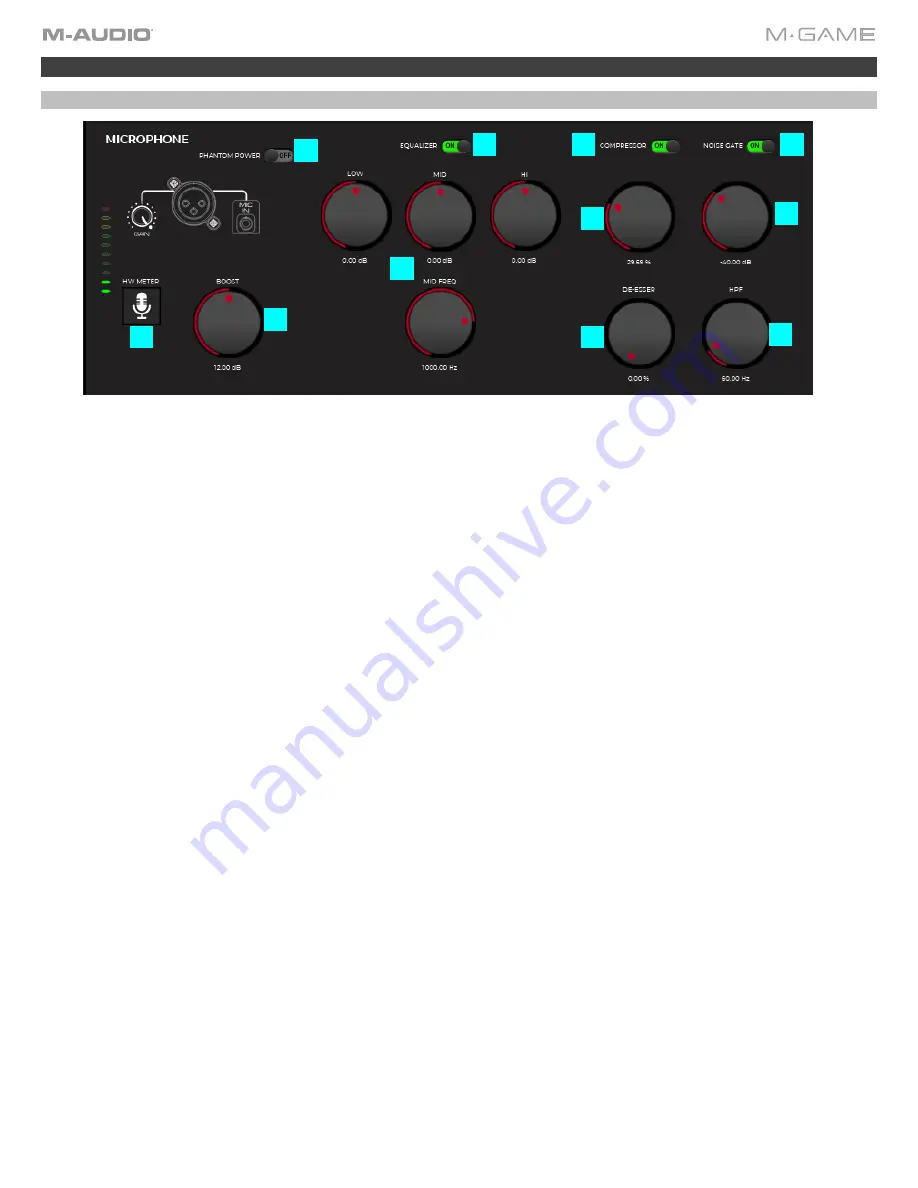
HW Meter

: This button changes the 

Mic LED/fader

 on the hardware to show what the mic gain is to aid in setting the 

optimal gain level. Unticking this button or exiting the setup page will toggle back to normal mic fader mode and turn off 
the mic LED at the top of the page. 

2.


Phantom Power

: This toggles phantom power on or off, providing power to condenser microphones. Condenser 

microphones require phantom power. Dynamic microphones and headsets do not require phantom power.  

3.


Boost

: This knob adjusts the amount of digital gain applied to the incoming mic signal. If you are using a low gain mic 

(like a SHURE SM7B or ElectroVoice RE20) you will need to use the Boost knob. You can change the BOOST level from 
Off to +24 dB. Check OBS or other software you're using to make sure that your mic signal isn’t clipping.  

4.


EQ (On/Off)

:


This turns on or off the EQ settings for the incoming mic signal.


5.


EQ

: This three-band equalizer helps to adjust the low, mid (with a sweepable mid frequency to boost/cut the signal to 

find the “sweet spot”), and hi frequencies to achieve a good sound mix.   

6.


Compressor (On/Off): 

This turns on or Off the Compressor effect for the incoming mic signal. 

7.


Compressor

: This knob reduces the loudest parts of the audio signal and makes the quieter parts sound louder. It 

actively changes the dynamic range of the mic signal by automatically reducing its level if it exceeds a certain level. 

8.


Noise Gate (On/Off): 

This turns on or off the Noise Gate effect for the incoming mic signal. 

9.


Noise Gate

: This knob can be used to reduce hum or unwanted background noise from the incoming mic signal. 

10.


De-esser

: This knob can be used to reduce the amount of sibilance (S, F, X, SH, and soft C’s sounds) common in 

vocals. 

11.


HPF

: This (High-Pass Filter) knob can be used to remove unwanted low-end rumbles. This knob is useful for removing 

the keyboard and desk impact noises. 


4

5

6

7

8

9

10

11

Summary of Contents for M-Game RGB Dual

Page 1: ...M Game RGB Dual User Guide v1 2...

Page 2: ...out This User Guide 5 Software Download and Installation 5 Hardware Setup 6 Software Setup 8 Windows 8 macOS 10 Operation 12 Home Menu 12 Setup 14 Microphone Settings 14 Mute Button 15 CENSOR Button 1...

Page 3: ...LED Control 19 Menu Bar 19 Sample Editor 20 Effects 21 Button Control 22 Menu Bar 22 LED Control 22 Button Type 23 Individual Effects 24 Vocal Processor 24 Reverb Echo 24 Chorus Modulation 25 Distort...

Page 4: ...res 29 Top Panel 29 Headphone Main Level Control 29 Mic 29 Stream 30 Banks 30 Voice FX 30 Samples 30 Rear Panel 31 Appendix 32 LEDs 32 Voice Effects 34 Technical Specifications 36 Trademarks and Licen...

Page 5: ...Dual s Aux In Some parts of this manual refer to other relevant chapters or sections which are cited in bold italic blue characters Click the text to skip immediately to that section Examples See the...

Page 6: ...optional to M Game RGB Dual s Aux In 6 Connect streaming gaming computer to M Game RGB Dual s Stream USB port 3 Optional Connect a single TS or dual TRS footswitch optional to M Game RGB Dual s Foots...

Page 7: ...n it on 3 Optional Connect media player to the M Game RGB Dual s Aux In 4 Connect primary streaming computer to the M Game RGB Dual s Stream USB port 6 Optional Connect a single TS or dual TRS footswi...

Page 8: ...he top LED without the LEDs all flashing Note If you are using a low gain mic like a SHURE SM7B or ElectroVoice RE20 you will need to use the M Game software s BOOST function You can find BOOST in the...

Page 9: ...ed by the Game fader on your M Game 10 Select these additional routing options from the Output dropdown in the App Volume and Device Preferences a Chat app Discord etc Select CHAT M Audio M Game RGB D...

Page 10: ...the loudest level you expect to speak in your stream and begin turning up the Gain knob on the rear panel of M Game RGB Dual You ll notice that the Mic Fader LEDs on M Game RGB Dual will light up whe...

Page 11: ...nt to the M Game RGB Dual s Chat fader and that your Mic is only sent to the Chat b Music Select SYSTEM OUT to route music program audio to the System AUX fader Note You can route additional computer...

Page 12: ...ttings Routing Select to load or save virtual fader where applicable and active audio channels settings Sampler Select to load or save sample button assignment settings including button types Effects...

Page 13: ...info on Record Mode please see the Sampler section Vertical Navigation Bar The vertical navigation bar allows quick access to these various sections Home default Setup Routing Sampler Effects LEDs Nav...

Page 14: ...turns on or off the EQ settings for the incoming mic signal 5 EQ This three band equalizer helps to adjust the low mid with a sweepable mid frequency to boost cut the signal to find the sweet spot and...

Page 15: ...essed and held Hardware Control Settings This section shows from what PC the Chat Audio and the Game Audio sources will be received from Chat Audio Source Stream PC or Game PC Game Audio Source Stream...

Page 16: ...the physical fader for that output and allows you to make a completely virtual mix to the output at the end of the row Using virtual faders is helpful if you would like to hear a different volume mix...

Page 17: ...17 Sampler Samples 1 10 This menu accesses the sample button functions The sampler page is broken into four sections The Sample List the Sample Button Control the Menu Bar and the Sample Editor...

Page 18: ...on Drag the sample from the sample list to either the frame or the representation of the button This will clear all current contents for the button except LED settings and assign that sample to that b...

Page 19: ...LED brightness or Bright 1 or Bright 2 for brighter LED brightness Menu Bar The menu bar has basic functions that allow you to interact with samples It contains basic save save as open new and delete...

Page 20: ...eturns the sample waveform editor to the current selection between the beginning and ending flag 5 Normalize Button This adjusts the level of the sample s gain to its maximum non clipping level 6 Fade...

Page 21: ...ess this menu to view assign and customize the vocal effects The effects page is broken into four sections The Effect List Multi Effect List the Effect Button Control the Menu Bar and the Individual E...

Page 22: ...allows a user to search for effects library XML files You can navigate to an EFFECTS library XML file which would show all potential EFFECTS that could be imported into the EFFECTS list You can also s...

Page 23: ...23 Button Type Press this to open a submenu with a Toggle and Hold selection to determine the button behavior when pressed...

Page 24: ...that preset effect s virtual Parameter knob to the Main Control Assigning an effect to the Main Control enables you to control the selected Effect parameter when the Main Control is set to FX PARAM Vo...

Page 25: ...to create a spacey or filtered vocal sound Adjust the virtual knob to control how much of the effect is applied from 0 100 Distortion The Distortion effect produces an altered crunchy or harsh signal...

Page 26: ...r RAINBOW If a state choice is set to SOLID there is one color picker available When clicked on a context menu with color swatches appears If a state choice is set to PULSE the LEDs will pulse uniform...

Page 27: ...der position lit as a spectrum of the selected solid colors 1 and 2 with color 3 s selection showing the current fader position Gradient Fader Color with Indicator and Background Keeps all of the LEDs...

Page 28: ...28 Color Frame Press a button to open a color selection menu to set the sample color for the hardware control...

Page 29: ...al has been muted to all streams 6 This RGB backlit button can be configured to mute the mic audio signal being sent to all audio streams the chat stream or the broadcast stream This button can have a...

Page 30: ...the USB ports Headphone and Main Outs Use the M Game software to change the LED behavior of this button seen in the LEDs section By default this LED will be brightly lit when Mute is active and dimly...

Page 31: ...MP3 player or smartphone to this 1 8 3 5 mm stereo Aux input 7 FOOTSWITCH Connect a 1 4 6 35 mm TRS non latching momentary dual footswitch or TS single footswitch here to assign a function in the M Ga...

Page 32: ...ight 2 Fader 1 Color Fader 1 Color with Indicator Fader 1 Color with Indicator and Background Gradient Color Gradient Color with Indicator Gradient Color with Indicator and Background Pulse Fader 1 Co...

Page 33: ...ors Chasing 1 Color Chasing 1 Color with Background Rainbow Dark 1 Rainbow Dark 2 Rainbow Default Rainbow Bright 1 Rainbow Bright 2 Button and Label LEDs Colors 127 LED Modes Solid Pulse 1 Color Pulse...

Page 34: ...Fixed Robot 2 Unison Robot 3 Group 1 Hi RPM Group 2 Wobbley Lock Tune 2 Tiny Harmonies 1 Male Harmonies 2 Female Harmonies 3 Child Smooth Harmonies Ogre Low Harmonies Squirrel Bent Choir Octave Up Dee...

Page 35: ...ler Wide Doubler Trio Hive Warbler Deep Flange Wide Flange Case What Physician In the Pipe Trembling Tremolo Reverb Echo Small Room Medium Room Large Room Pop Vocals Tight Space Plate Hall Cathedral S...

Page 36: ...u Preamp EIN 130 dBu Gain Range 59 dB Mic Input unbalanced 1 8 TS Frequency Response 20 Hz 20 kHz 0 4 1 9 dB Signal to Noise Ratio 105 dB 1 kHz 4 dBu A weighted Dynamic Range 109 dB A weighted THD N 0...

Page 37: ......

Reviews: