9.
Camera Setting:
Configure image settings for cameras. For full details, see 8.5
10.
Info:
Displays system information, such as model number, device ID, IP address, etc.
11.
Sequence:
Start or stop Sequence Mode. In Sequence Mode, the system display will auto-
matically cycle through connected channels every few seconds.
12.
Disable Beep:
Temporarily disable the current audible warning.
NOTE
Audible warnings can be given for a wide range of events, such as hard drive issues, network connectivity,
motion detection events and more. Disabling the current audible alarm using the Quick Menu will silence
the recorder only for a short time, then audible warnings will continue.
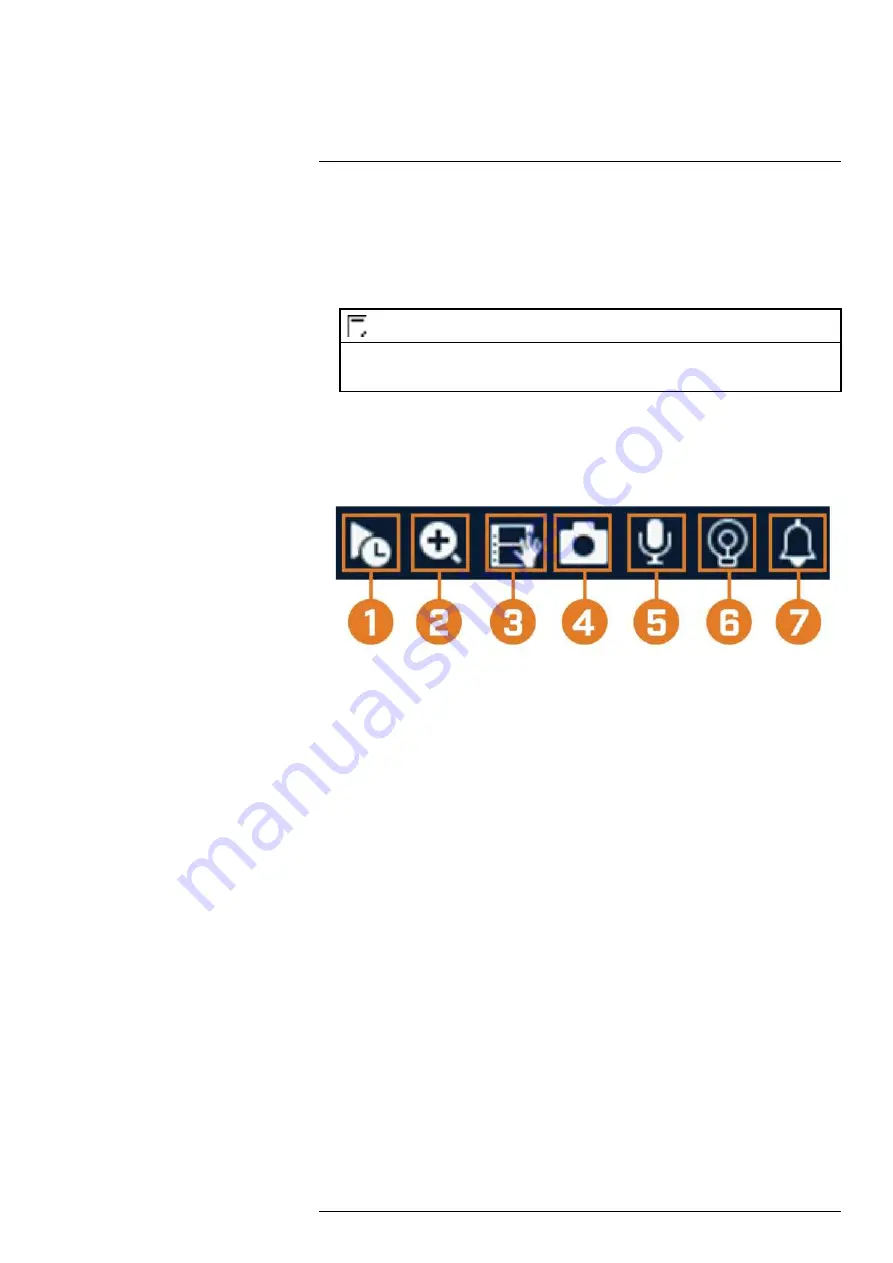
8.3 Camera Toolbar
The
Camera Toolbar
lets you perform quick functions for a specific channel on the recorder.
To use the Camera Toolbar:
• Hover the mouse near the top of a channel with a connected camera.
1.
Instant Playback:
Plays back recent video from the selected channel. By default, instant
playback is set to play the last 5 minutes of recorded video. See 17.6.18
, page 87 to set a custom playback length.
2.
Digital Zoom:
Click to enable digital zoom. Click-and-drag over the camera image to zoom
in on the selected area. Right-click to return to the full camera image. You can then repeat to
zoom in on a different area, or click the icon again to disable zoom.
3.
Real-time Backup:
Click to start recording the current channel manually. Click again to
stop recording and save the video file to a USB flash drive (not included).
4.
Snapshot:
Save a snapshot of the current camera image to a USB flash drive (not included).
5.
Two-Way Audio:
(Two—way audio cameras only)
Click to enable two-way talk on compat-
ible cameras. To be able to listen-in to sounds occurring around your camera an external
speaker (not included) must be plugged into the recorder.
6.
Warning Light:
(Deterrence cameras only)
Click to manually turn on the camera’s warning
light for 10 seconds.
7.
Siren:
(Deterrence cameras only)
Click to manually turn on the camera’s siren for 10
seconds.
8.4 On-Screen Keyboards
The
Full Keyboard
is used to input alphanumeric characters, such as in user name or password
fields. The
Number Keyboard
is used to input numeric characters only, such as in the time or
date fields.
To use the Full Keyboard:
• Using the mouse, click on a field where alphanumeric characters are entered, such as the user
name and password fields.
• The Full Keyboard opens:
#LX400113; r. 9.0/57192/57197; en-US
18


