Copyright © 2009 Lorex Technology Inc.
ULTRA DIGITAL WIRELESS
MONITORING SYSTEM
WITH INDOOR/OUTDOOR
NIGHT-VISION CAMERAS
Instruction Manual
www.lorexcctv.com
MODELS:
LW2600 Series
English Version 3.0
Page 1: ...Copyright 2009 Lorex Technology Inc ULTRA DIGITAL WIRELESS MONITORING SYSTEM WITH INDOOR OUTDOOR NIGHT VISION CAMERAS Instruction Manual www lorexcctv com MODELS LW2600 Series English Version 3 0 ...
Page 2: ...REFER SERVICING TO QUALIFIED SERVICE PERSONNEL The lightning flash with arrowhead symbol within an equilateral triangle is intended to alert the user to the presence of uninsulated dangerous voltage within the products enclosure that may be of sufficient magnitude to constitute a risk of electric shock The exclamation point within an equilateral triangle is intended to alert the user to the presen...
Page 3: ...product o A polarized plug has two blades with one wider than the other o A grounding type plug has two blades and a third grounding prong o The wide blade or the third prong is provided for your safety o If the provided plug does not fit into your outlet consult an electrician for replacement of the obsolete outlet 8 Ventilation Slots and openings in the case are provided for ventilation to ensur...
Page 4: ...hock or other hazards 16 Safety Check Upon completion of any service or repairs to this video product ask the service technician to perform safety checks recommended by the manufacturer to determine that the video product is in safe operating condition 17 Mounting The cameras provided with this system should be mounted only as instructed in this guide using the provided mounting brackets 18 Heat T...
Page 5: ...lation If this equipment does cause harmful interference to radio or television reception which can be determined by turning the equipment on and off the user is encouraged to try to correct the interference by one or more of the following measures o Reorient or relocate the receiving antenna o Increase the separation between the equipment and receiver o Connect the equipment into an outlet on a c...
Page 6: ...0 Series Convenient Signal Strength Indicator Video Audio RCA Output for Viewing on TV Monitor or Recording on VCR RCA BNC Adaptor included allows for an easy connection to a DVR or observation system Counter under counter or wall mountable Camera Features VGA Resolution Camera 46ft 14m IR Night Vision Auto infrared light filter ensures outstanding image quality any time day or night Built in Micr...
Page 7: ...eceiver 11 Connecting the Camera 11 Installation Warnings 11 Using the LCD Monitor Receiver 12 Adjusting the Display 12 Adjusting the Volume 12 Changing Channels 12 Viewing Modes 13 On Screen Display 14 Adding Cameras 15 Using Auto Scan 15 Troubleshooting 17 Appendix A System Specifications 17 Appendix B About Digital Wireless Technology 19 ...
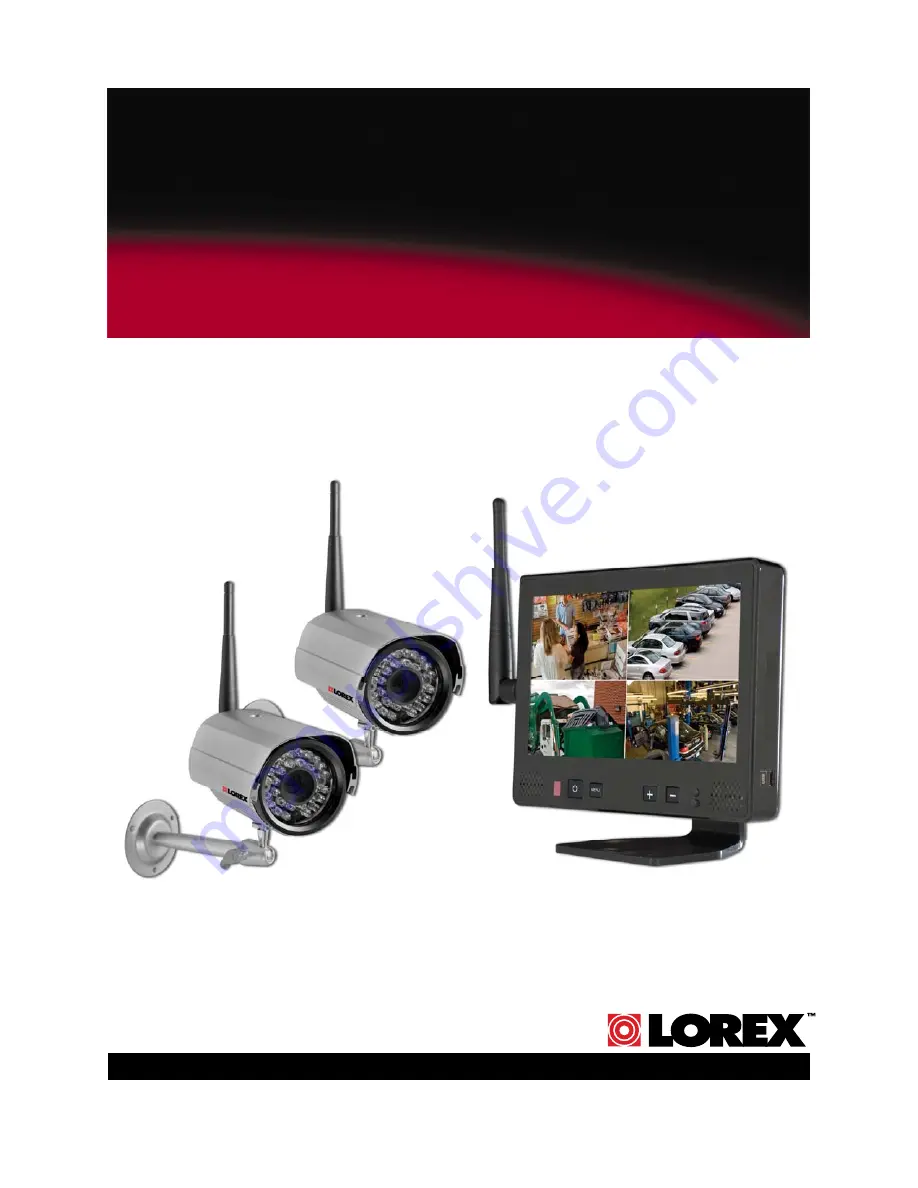
Page 8: ...LUDING ALL COMPONENTS SHOWN ABOVE 3 x POWER ADAPTER FOR RECEIVER CAMERAS 3 x MOUNTING SCREW KITS 3 X WIRELESS ANTENNAS 2 x MOUNTING STAND 1 x RCA BNC ADAPTER Camera configuration may vary by model 2 for each camera 1 for the receiver stand 1 X RECEIVER STAND 1 x 7 LCD MONITOR RECEIVER 2 x WIRELESS CAMERA with SUNSHADE 1 X RCA AUDIO VIDEO CABLE male to male ...
Page 9: ...s 8 CH Channel Select Pair Press to select from channels 1 4 Auto and Quad viewing modes press and hold on an empty channel to add pair additional cameras Note Channel Pair button is raised for a tactile difference between it and the Display button 9 RES Resolutions VGA QVGA Press to switch between VGA and QVGA press and hold to remove replace channels from Auto Scan 10 USB port N A Figure 1 1 Sid...
Page 10: ...he camera 4 Attach the camera to the mounting stand Tighten the thumbscrews to secure the camera to the stand Adjust the angle of the camera until the desired view is set 5 Connect the power cable from the camera to the power adaptor to power on the camera Note You can install additional cameras maximum of 4 cameras When adding cameras that were not included in the original box you will need to pa...
Page 11: ... the image on a monitor when camera is positioned in the same location position where it will be permanently installed Installation Warnings Aim the Cameras to best optimize the viewing area Select a location for the camera that provides a clear view of the area you want to monitor which is free from dust and is not in line of sight to a strong light source or direct sunlight Avoid installing the ...
Page 12: ... values for each of these settings Adjusting the Volume Press the buttons to increase decrease the output volume Changing Channels Press the CH button on the front panel to select from channels 1 4 Auto Scan and Quad split screen viewing modes Note Pair button is raised on the front panel for a tactile difference between it and the VGA QVGA button Connecting to a TV VCR DVR or Observation System T...
Page 13: ...annels 1 4 Auto Scan and Quad split screen For more details on Auto Scan see page 15 Press the CH button repeatedly to switch between these viewing modes PAIR Channel 1 Channel 2 Channel 3 Channel 4 Figure 5 0 View Mode diagram Press the CH button to change viewing modes Images simulated Quad mode Auto Scan mode AUTO ...
Page 14: ...tch between available cameras Note Channel Indicator not shown while in Quad Mode 3 Status Indicator The Status indicator message Connecting appears when the receiver is trying to locate a camera Note There may be temporary signal losses for less than 1 second due to the connection retrieval process between the Camera and Receiver when switching between channels This normal and should not be consi...
Page 15: ...tton on the camera see Figure 5 1 4 Press and hold the Yellow Pair button extending from the camera You must press the Yellow Pair button from the camera within 30 seconds of pressing the CH button on the Wireless Receiver If pairing is successful live video from the camera will immediately appear on the monitor Using Auto Scan Auto Scan automatically switches between channels 1 4 Press the CH but...
Page 16: ...on at the same until the Dwell Time screen appears Continue holding both buttons 3 With the Pair button and VGA QVGA button held down the receiver will automatically cycle the dwell time from 1 20 seconds Release both buttons to set the desired dwell time Note If you repeat this process the Dwell Time screen will display the last set dwell time Figure 9 0 Press and hold the RES and CH buttons at t...
Page 17: ...y when experiencing a lower frame rate i e 10 frames per second vs a higher 20 frames per second Try moving the camera closer to the receiver Remove obstructions between the Receiver and Camera There are problems with the Audio Ensure that the volume on the TV is ON Make sure that there is sound within range of the Camera Microphone If the unit emits a loud screeching noise feedback move the camer...
Page 18: ... 122 F 10 50 C Camera Specifications Camera Transmit Frequency Range 2 400GHz 2 480GHz TX Power 16dBm Data Rate 160 Kb s Modulation GFSK TX Range 450 ft 137 m Line in Sight Image Sensor Type 1 4 Color CMOS Image Sensor Effective Pixel H 640 V 480 Image Processing Motion JPEG Image Resolution Up to 640 x 480 VGA Lens 5 08mm F 2 8 Viewing Angle 58 AGC On AES 1 60 1 62500S Power Requirement 12Vdc 10 ...
Page 19: ...h is much higher then the analog transmission signal allowed by authorities around the Globe When an image is captured by the camera it is instantly converted from an analog to digital signal and packaged into small packets With each successful transmission via the 2 MHz paths discussed above the packets of information containing images are delivered to the receiver and decoded into analog informa...
Page 20: ...nuals Guides de l utilisateur Guías del usuario Quick Start Guides Guías de arranque rápido Guides de début rapide Specification Sheets Fichas de especificaciones Fiches signalétiques Software Upgrades Actualizaciones del programa Mises à jour du logiciel Firmware Upgrades Actualizaciones del microprograma Mises à jour du micro logiciel VISIT VISTEZ VISITE www lorexcctv com ...