22
Instruction Manual
4.6 FASTPRIME™ VALVE ASSEMBLY
O-RING REPLACEMENT
ALWAYS WEAR PROTECTIVE
CLOTHING, FACE SHIELD,
SAFETY GLASSES AND GLOVES WHEN PERFORMING
ANY MAINTENANCE OR REPLACEMENT ON YOUR PUMP.
Refer to the LMI
®
Metering Pump Price List for
the proper Spare Parts Kit or RPM PRO PAC™
kit number or contact your local LMI
®
stocking
distributor.
1. Be sure the Injection Check Valve is properly
installed and is operating. If a shut-OFF valve
has been installed downstream of the Injection
Valve, it should be closed.
BE SURE YOUR RELIEF
TUBING IS CONNECTED TO
YOUR FASTPRIME™ VALVE AND RUNS BACK TO YOUR
SOLUTION DRUM OR TANK.
2. Turn the FASTPRIME™ Knob one-and-a-
half turns counter-clockwise
Q
. This will
depressurize the head. Keep valve open.
Carefully remove the return line by gently
pulling tubing and moving it from side to side
to gradually back tubing OFF of the barbed
fitting.
3. Hold return line tubing upright until solution
drains back into solution drum or tank.
4. Using a 3/4” (or 19 mm) socket or wrench
remove Retaining Nut and pull out the entire
FASTPRIME™ Valve assembly. Remove and
replace the two small O-rings.
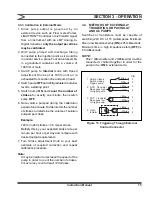
5. Reinsert the FASTPRIME™ Valve assembly
and retighten the Retaining Nut. Then turn the
FASTPRIME™ Knob clockwise
P
to tighten
knob to the closed position. To avoid damaging
the parts, it is important that the flange on the
FASTPRIME™ Valve is flush with the Retaining
Nut prior to reassembly.
6. Recut 1 to 2 inches OFF the tip of the return line
and ensure the end is squared. Press the return
line tubing on completely past the barbs.
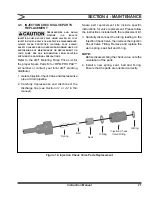
INCORRECT
CORRECT
Note gap between Flange
and Retaining Nut
No gap between Flange
and Retaining Nut
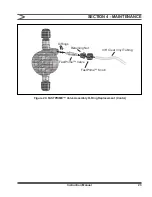
Figure 19. FASTPRIME™ Valve Assembly O-Ring Replacement
SECTION 4 - MAINTENANCE
Summary of Contents for ROYTRONIC A Series
Page 35: ......


