12
Instruction Manual
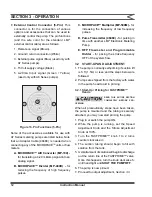
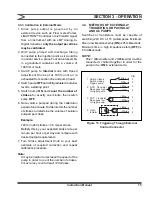
7. External Control Connector (5-Pin):
This
connector is for the connection of various
options and accessories that can be used to
externally control the pump. The pin functions
(and the wire color for the standard LMI
®
external control cable) are as follows:
1. Remote on signal (Brown).
2. Ground / return connection (White).
3. External pulse signal (Blue) (used only with
A7 Series pumps).
4. 15 Volt supply voltage (Black).
5. 4-20mA Input signal (Green / Yellow)
(used only with A8 Series pumps).
1
2
4
3
5
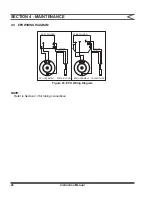
Figure 13. Pin Functions (5-Pin)
Some of the accessories available for use with
A7 Series metering pumps are listed below. Note
that an Adapter Cable (48488) is needed when
connecting any of the MICROPACE
TM
units or flow
meters.
A. MICROPACE™ A/D Converter (MP-100) -
for translating a 4-20 milliamp signal into an
analog signal.
B. MICROPACE™ Divider (MP-400D) -
for
reducing the frequency of high frequency
pulses.
C. MICROPACE™ Multiplier (MP-500M) -
for
increasing the frequency of low frequency
pulses.
D. Pulse Transmitter (48489) -
for pulsing in
time with another LMI
®
Electronic Metering
Pump.
E. RFP Flowmeter and Programmable
Divider -
for pacing the stroke frequency
OFF of the system flow.
3.2 START-UP AND ADJUSTMENT
1. The pump is normally self-priming if suction lift
is 5 ft (1.5m) or less and the steps below are
followed.
2. Pumps are shipped from the factory with water
in the pump head to aid in priming.
3.2.1 Start-Up / Priming for FASTPRIME™
Heads
READ THIS ENTIRE SECTION
COMPLETELY BEFORE PRO-
CEEDING.
When all precautionary steps have been taken,
the pump is mounted and the tubing is securely
attached, you may now start priming the pump.
1. Plug in or switch the pump ON.
2. While the pump is running, set the Speed
Adjustment Knob and the Stroke Adjustment
Knob at 100%.
3. Turn the FASTPRIME™ knob 1 to 2 turns
counter clockwise
Q
.
4. The suction tubing should begin to fill with
solution from the tank.
5. A small amount of solution will begin to discharge
out the return line of the FASTPRIME™ valve.
Once this happens, turn the knob clockwise
P
until hand tight and
SHUT THE PUMP OFF
.
6. The pump is now primed.
7. Proceed to output adjustment,
Section 3.3
.
SECTION 3 - OPERATION
Summary of Contents for ROYTRONIC A Series
Page 35: ......


