Job no.
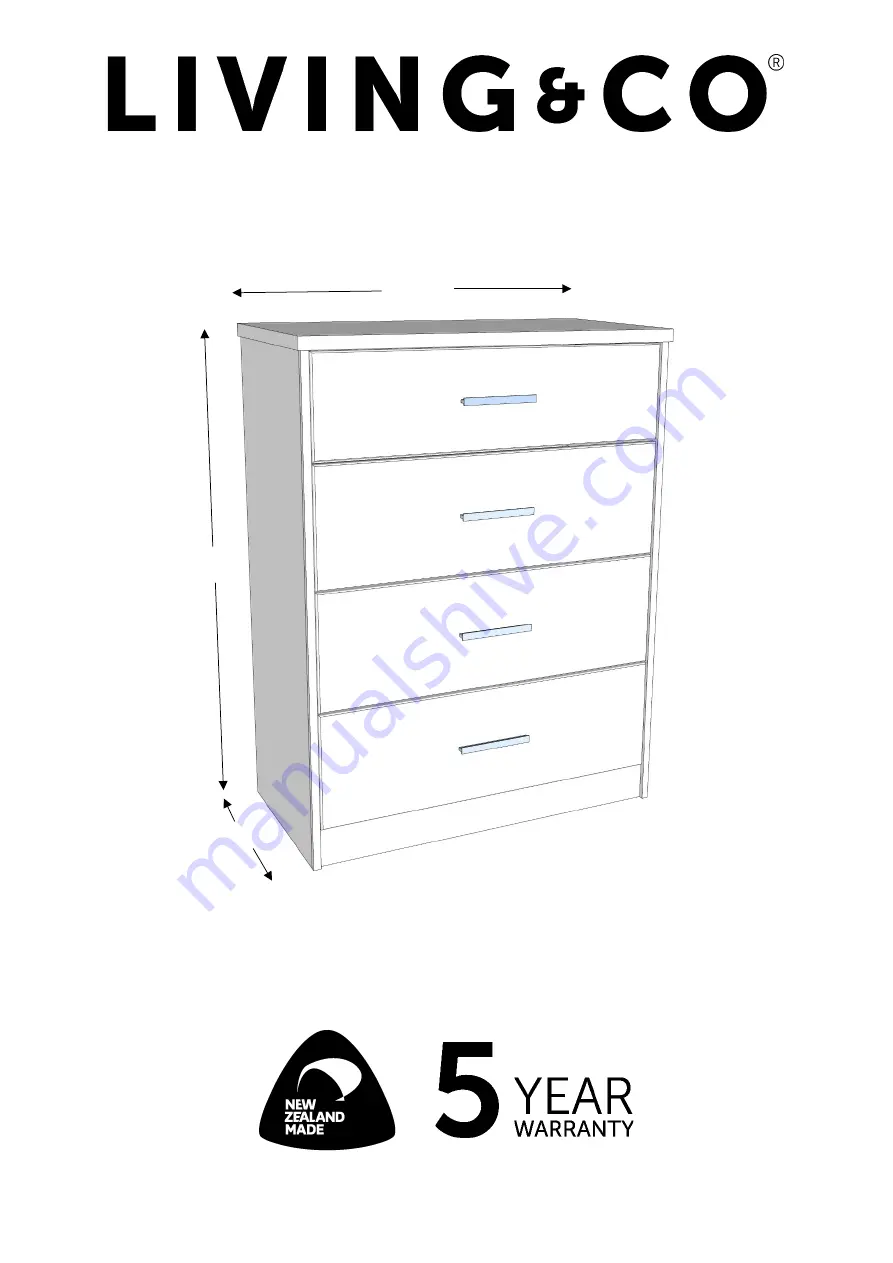
Tākiwira 4 Drawer Tallboy
INSTRUCTION MANUAL
Maximum recommended weight is 15kgs per drawer
102
cm
78
39.6
Page 1: ...Job no Tākiwira 4 Drawer Tallboy INSTRUCTION MANUAL Maximum recommended weight is 15kgs per drawer 102cm 78cm 39 6cm ...
Page 2: ...AFTER SALES SUPPORT www compacfurniture co nz or 0800 100 858 1 120Min Approximate Assembly Time 1 Person Assembly Floor Area 3m x 4m Required Assembly Space Tools Required Assembly Details ...
Page 3: ...commend that where possible all items are assembled near to the area in which they will be placed in use to avoid moving the product unnecessarily 6 During Assembly please take care not to over tighten hardware as this may damage the product 7 Always place the product on a steady and stable surface 8 Do not use the product as a stepladder 9 This product is intended for indoor household use only as...
Page 4: ... 732 x 235 x 15mm Laminate on one side 4 LH Drawer Side 340 x 160 x 12mm Laminate on both sides 4 RH Drawer Side 340 x 160 x 12mm Laminate on both sides 4 Drawer Back 688 x 155 x 12mm Laminate on one side 4 Drawer Bottom 698 x 339 x 4mm Laminate on one side 1 Back Panel 939 x 758 x 4mm Plain both sides are unfinished folded Parts List Hardware List 24 x Connecting Bolts 12 x Large Cams 15mm 12 x L...
Page 5: ... will need these for steps 1 and 2 Your pack will contain two sets of Metal Drawer Slides These are bundled together with adhesive tape The set comprises of 4 components Undo the tape on one set at a time and separate the parts LEFT HAND PART DL RIGHT HAND PART DR The Drawer Slide components shown above are attached to the drawer They have the letters DL or DR stamped on them to indicate left hand...
Page 6: ...he LH End using two Drawer Slide Screws for each slide ensure that the end of the slide with the wheel is on the side with the finished edge Insert two Large Cams as shown make sure the arrow on the top of the Cam points towards the top edge of the End Push two Dowels into the top edge of the End Screw two Connecting Bolts into the holes as shown Assembly STEP 1 Top STEP 2 LH End Connecting Bolt L...
Page 7: ...Rails Install two Large Cams into each piece as indicated Push the Dowels into each of the boards as indicated STEP 3 RH End Connecting Bolt Large Cam Drawer Slide Screw STEP 4 Rails Large Cam Dowel Connecting Bolt Drawer Slide Screw Screw through the 2nd hole in Cam Dowel Dowel Drawer Slide Screw Cam Connecting Bolt Connecting Bolt Connecting Bolt Dowel Cam Dowel Cam ...
Page 8: ...d in the End take note of the drawing below to get them in the correct place The Rails are interchangeable Ensure the finished surface of the Toeboard faces towards the Front Edge of the unit so the cams cannot be seen when the unit is completed Make sure the Large Cams face towards the top of the End Tighten all four Cams in a clockwise direction to lock Rails and Toeboard to the LH End The Large...
Page 9: ...ll the Cams in the Rails and Toeboards in a clockwise direction Fit the Top to the Ends by fitting the four Connecting Bolts installed in the Top into the Cams in the Ends Tighten all four Cams to lock the Top to the Ends Tap the four Nail on Glides into the bottom of the Ends as indicated below Space them about 50mm in from the front and back edges STEP 6 Attach RH End STEP 7 Attach Top and Glide...
Page 10: ...nything that may damage the laminate finish Slide the Back Panel in place please ensure that the end with the predrilled holes part way down the panel is at the top Secure the Back Panel in place as shown with the 8 Panhead Screws as indicated STEP 8 Back Panel Screw the Panhead screws through the predrilled holes in the Back Panel Panhead Screw ...
Page 11: ...follow steps 9 11 four times to assemble the four drawers Install the hardware in the Drawer parts as shown below Note Be sure that the arrow on the Small Cam points to the end of the drawer side nearest it Assemble the Drawers STEP 9 Install Hardware Cam Dowel Connecting Bolt Small Cam Dowell Drawer Bottom LH Drawer Drawer Side RH Drawer Side Drawer Front Connecting Bolt DRAWER FRONT Cam LH DRAWE...
Page 12: ...ion to lock the Drawer Sides in place Slide the Drawer Bottom into place in the grooves in the Drawer Sides and Drawer Front Fit the Drawer Back into place between the Drawer Sides The groove in the Drawer Back will fit over the end of the Drawer Bottom Secure the Drawer Sides to the Drawer Back with four Woodscrews as shown below STEP 10 Assemble the Drawer Drawer Back Drawer Bottom 2 x Woodscrew...
Page 13: ...ttached the Drawer Slides DL and DR with the four woodscrews as shown below Ensure that the ends of the slides without the wheels are hard up against the back of the Drawer Front Each side requires two slides STEP 11 Attach the Drawer Slides RH Drawer Slide DR Woodscrew Woodscrew LH Drawer Slide DL Woodscrew ...
Page 14: ...drawer go behind the front rollers in the cabinet and into the channel of the drawer slide It helps to lift the front of the drawer up a little when doing this STEP 12 Attach the Handle and Insert the Drawers Angle the drawer slightly to ensure that the wheel at the back of the drawer slide goes behind the front wheel on the cabinet slide Then lift the drawer up and slide it into the channel of th...
Page 15: ... precautionary measure The use of tip over restrains may only reduce but not eliminate the risk of tip over Compac Furniture can take no responsibility Congratulations your Tākiwira 4 Drawer Tallboy is now complete Thank you for supporting New Zealand Made furniture STEP 12 Attach the Handle and Insert the Drawers Top Wall Use a screw suitable for your wall not supplied Fabric strap provided Washe...
Page 16: ...ur products we back them up with a five year warranty Now you too can relax knowing that you are covered For parts and assistance call the manufacturer direct on 0800 100 858 Please do not call the store you purchased the cabinet from as they will be unable to help you This product is covered by five year warranty when accompanied by proof of purchase ...