17
GB/IE/NI
in correct direction. The correct polarity is shown inside the battery
compartment.
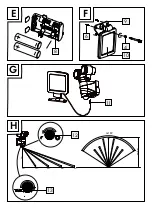
Insert the battery compartment
8
into the back of the main unit
1
(Fig. D). Make sure that the upper lug and charging socket are
inserted into the respective supports. Do not pinch any wires.
Fit the main unit
1
onto the mounting plate
5
. Insert the 2 lugs
into the respective slots on the upper side of the mounting plate
5
. Ensure the product is correctly seated.
Secure the main unit
1
with the screw on the bottom (Fig. A).
Pay attention to the rubber nipple which covers the charging
socket.
Connect the plug of the connection cable
11
with the charging
socket of the main unit
1
(Fig. G).
Winter-time use
The low amount of sunlight may reduce the light ON time at night de-
pending on the on-time. Due to the low position of the sun also verify
the solar cell
10
is out of shade throughout the day in winter and re-
move ice and snow as necessary.
If the light ON time is inadequate due to the weather, recharge or
replace the rechargeable batteries (see„Charging the rechargeable
batteries“ or „Replacing the rechargeable batteries“).
Cleaning and Care
Use a slightly dampened, lint-free cloth and mild cleaning agent to
clean.


