15
GB/IE/NI
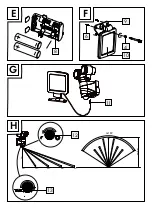
Use the holes of the bracket
9
intended for the screws to mark
the holes for drilling (Fig. F).
Now drill the mounting holes.
Insert the wall plugs
6
into the drilled holes.
Fix the bracket
9
using the screws
4
with a suitable cross-head
screwdriver (Fig. F).
After mounting, check that the bracket
9
of the solar cell
10
is
fitted securely.
Next adjust the solar cell to face south.
Connecting the solar cell to the main unit
After mounting the two operating units (main unit
1
and solar cell
10
)
run the connection cable
11
so it is not subjected to mechanical stress.
Use typical installation material such as cable clamps or conduit to fas-
ten the connection cable, to prevent damage to the insulation.
Connect the plug of the connection cable
11
with the charging
socket of the main unit
1
(Fig. G).
Adjust both LED spotlights
2
to your desired angle. The LED spot-
lights are independently rotatable and tiltable.
Your product is now ready for use.
Start-up
Note:
Connect the main unit
1
to the solar cell
10
before using for the
first time.


