

EFG80
Minimum Requirements
•
Windows 98, NT 4.0, 2000,
Millennium, or XP
•
10BaseT or 100BaseTX Ethernet
network
•
TCP/IP protocol installed
EtherFast
®
Network Attached Storage with
80GB Hard Drive + PrintServer
Instant GigaDrive
™
Series
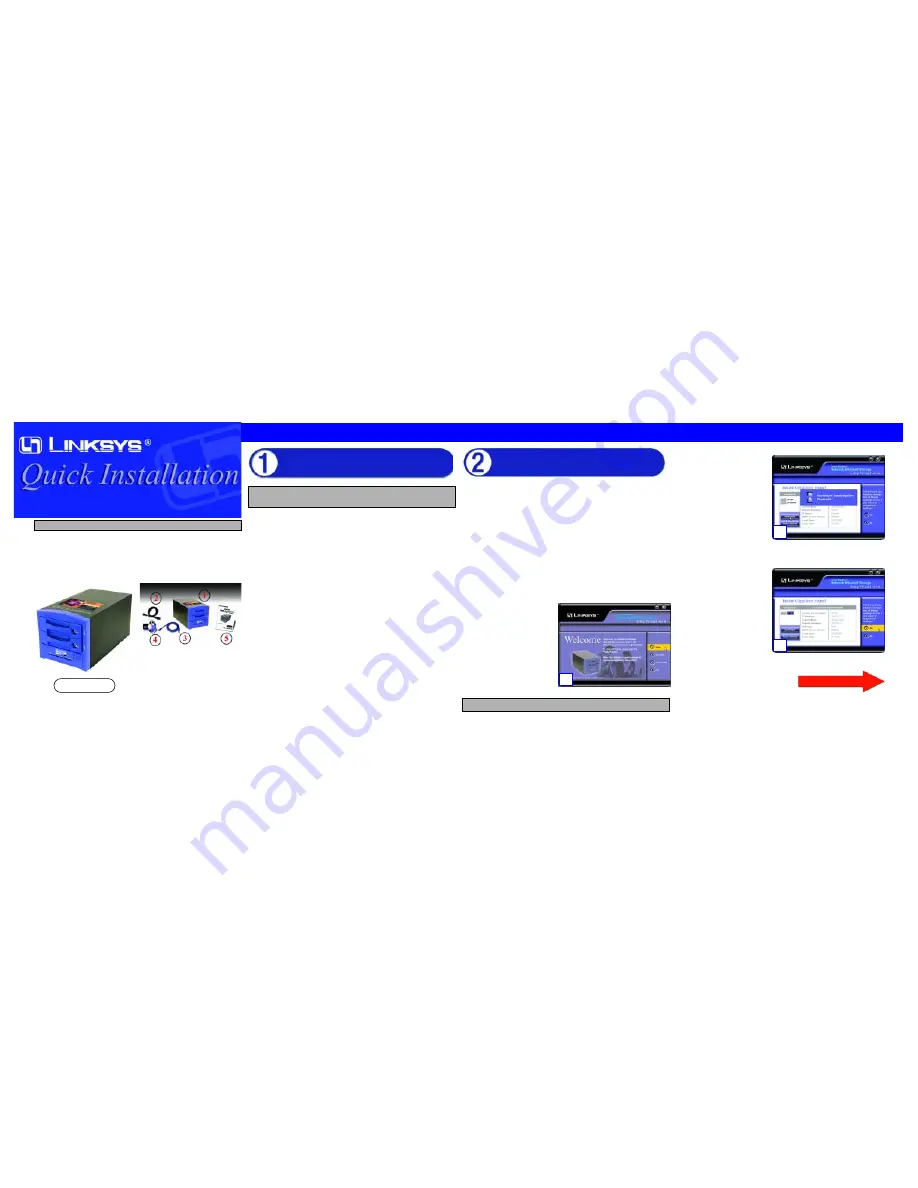
Package Contents
• One EtherFast Instant GigaDrive (
1
)
• One Power Cord (
2
)
• One Ethernet Network Cable (
3
)
• One Setup Wizard CD-ROM (
4
)
• One User Guide (
5
)
• One Quick Installation and
Registration Card
A. Determine if the GigaDrive will be installed onto a network backbone or
directly to a PC. If you are connecting the GigaDrive to a PC, press the
Uplink button located on the Instant GigaDrive’s rear panel. If you are
connecting the GigaDrive to a hub or switch, the Uplink button should not
be pressed in. If it is pressed in, press the button once to release it.
B. Connect the supplied Ethernet network cable to the GigaDrive’s LAN
port. Connect the other end of the cable to your hub, switch, or PC.
C. If you are NOT connecting a printer to the GigaDrive, proceed to step D.
If you are connecting a printer to the GigaDrive, connect a standard print-
er cable to the GigaDrive’s printer port on the back panel. Connect the
other end of the cable to your printer.
D. Plug the supplied power cord into the GigaDrive’s power port on the back
panel. Connect the other end of the power cord to an electrical outlet.
E. To power on the GigaDrive, press its power switch, which is located on
the GigaDrive’s back panel. If you attached a network printer to the
GigaDrive, then power on the network printer.
F. When the GigaDrive’s Ready LED is solidly lit and the other LEDs are
not lit, the GigaDrive’s boot-up is complete. If the Error LED is flashing,
or if the GigaDrive repeatedly beeps, there is a hardware problem. Review
the Beep Codes section in the User Guide for possible solutions.
Installing the EtherFast Network
Attached Storage
Now that everything is connected and powered on, you are ready to config-
ure the GigaDrive so that it is accessible to the users on your system. You will
have to run the GigaDrive’s Setup Wizard on your PC to access the
GigaDrive’s Quick Setup feature. To run the Setup Wizard on your Windows
98, Me, NT 4.0, 2000, or XP PC, follow these instructions.
A. Insert the Setup Wizard CD-ROM into your PC’s CD-ROM drive.
B. An autorun menu should appear a few seconds after you insert the CD
into your CD-ROM drive. If the autorun menu does not appear after a
minute, click the Start button, and select Run. Enter D:\SetupUtility.exe
(where “D” is the letter of your CD-ROM drive) in the Open window, and
press Enter.
C. Click the Setup button to con-
tinue the setup procedure.
D. The Setup Wizard will auto-
matically search for any
GigaDrives currently on your
network or attached to your
PC. If it fails to detect the
GigaDrive or if a GigaDrive
has been installed since the
Setup Wizard’s last search,
click Search Again to run
another search.
When a GigaDrive has been found by the Setup Wizard, you can create a
desktop shortcut for quicker access to that specific GigaDrive.
E. When you have found the
GigaDrive you wish to set up,
click the GigaDrive to select it.
Click the Yes button on the
right to change any of the
GigaDrive’s settings.
D
This Quick Installation is meant to help you install the product quickly and easily. For detailed instructions on installation and
configuration, and further setup options, please consult the User Guide.
Continued on back
Note: Make sure the TCP/IP protocol has been configured on your network
PCs before installing the GigaDrive.
Using the EtherFast Network Attached
Storage’s Setup Wizard
C
E
Note: The default IP address of the GigaDrive is 192.168.1.77.