

Quick Installation Guide
Applicable models: LDV-DM712AUSK / LDV-DM714AUSK Dual Monitor DVI/VGA KVM Switch w/ Audio&Mic
Rev. 1.6 Copyright© All rights reserved.
7.1 surround sound support
KVM Switching Client Software for Windows/Mac
2 x USB 2.0 hub port + 1 X DEVICE port with full driver
support for any advanced USB 2.0 device
User-definable Hotkey Preceding Sequence
LDV-DM712AUSK/LDV-DM714AUSK
2/4-port Dual Monitor DVI/VGA KVM Switch
w/ 7.1 surround sound support
Quick Installation Guide
Thank you for purchasing the
LDV-DM712AUSK/LDV-
DM714AUSK Dual Monitor DVI/VGA KVM Switch w/ 7.1
surround sound support
! With our highly reliable and quality
product, user can enjoy countless benefits from using this
KVM Switch.
LDV-DM712AUSK
LDV-DM714AUSK
Introduction
The
LDV-DM712AUSK/
LDV-DM714AUSK
Dual Monitor
DVI/VGA KVM Switch
is a 2/4-port TMDS-compliant Dual
Monitor DVI/VGA KVM Switch designed for sharing two
monitors/Flat Panel Displays –one DVI and one VGA monitor
specifically - between multiple multimedia computers with Dual
Head display [1 x DVI + 1 x VGA]. Its 7.1 channel surround
sound renders a theater digital audio experience that greatly
enlivens your DVD playbacks or gaming sessions. You can sit
back and enjoy to the full with live audio/video output from this
KVM switch.
This Dual Monitor DVI USB KVM Switch supports both digital
video (2048 x 1536) and analog video (1920 x 1200) for your
maximum convenience in adapting to your display
requirements. It is TMDS-compliant to support DDC2B
emulation and HDCP compliant for digital contents protection.
The
2 extra USB 2.0 hub ports
are for sharing high-speed
USB 2.0 devices. However, to offer full driver support to some
advanced USB 2.0 gadgets that need their own drivers for full
function, it also provide
a Device port
with no emulation for
the direct signal pass-through required for these delicate
devices. Thus, you can connect it to the transceiver of your
wireless/Bluetooth keyboard/mouse to enable its full driver
and functional support.
In addition to the keyboard hotkey operation, it provides an
innovative and easy-to-use
KVM Switcher Software (for
Windows/Mac)
-- a small software client application to
facilitate your KVM switching operations such as PC selection
and hotkey sequence programming, autoscanning, autoscan
delay
time
programming,
independent/simultaneous
audio&PC switching, etc. User can use either the original
keyboard hotkey or the KVM switcher client software to
facilitate KVM operation.
Out-of-the-box Installation
Take the KVM Switch out of the box and begin
installation….
Step 1.
Power up you KVM Switch by connecting the external
power adapter to it
Step 2.
Connect the shared USB keyboard, mouse, two
monitors
and the 7.1 channel speaker system and
microphone
as well as other shared USB devices to
the KVM switch. If you use an advanced USB device
(such as wireless/Bluetooth mouse, etc) that needs
its own driver for full function, you can to connect it to
the Device port.
Step 3.
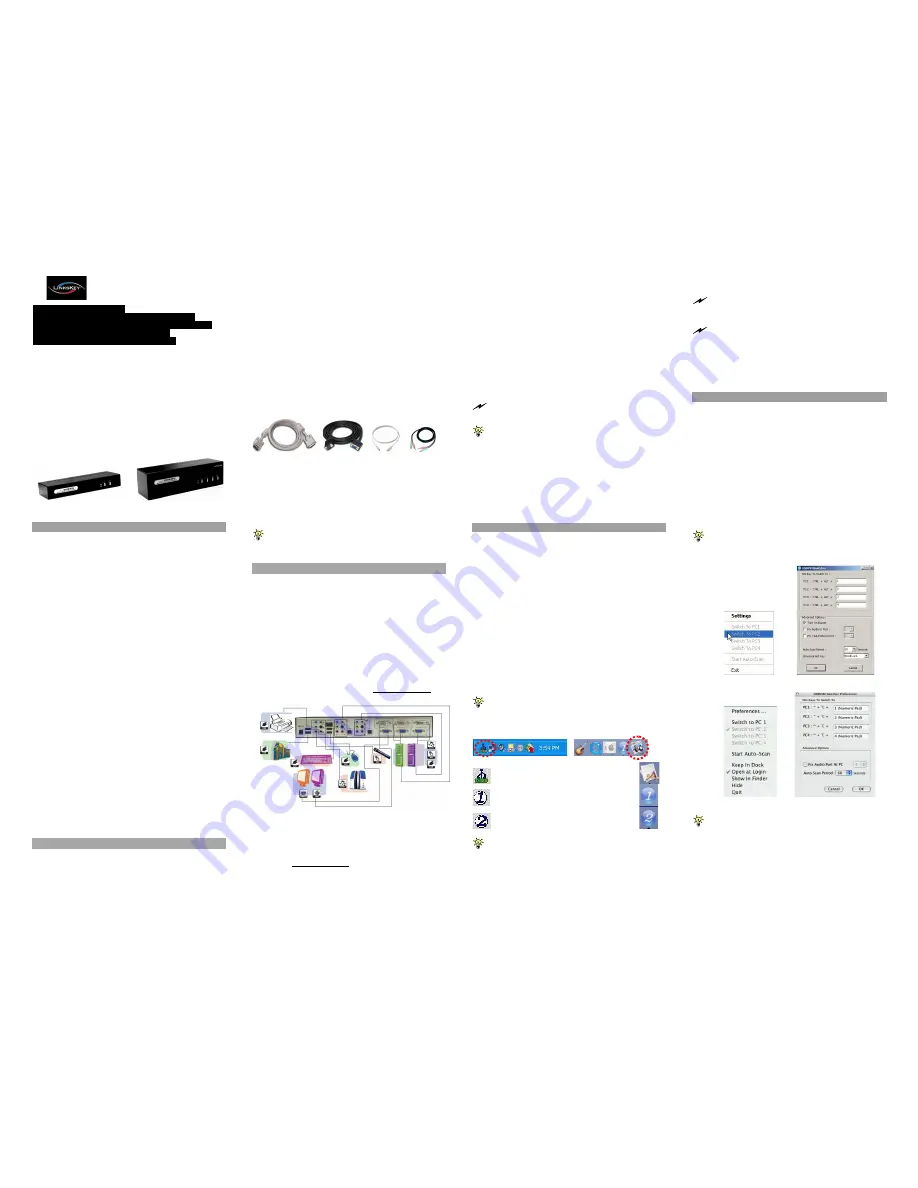
Connect each of your computers to the KVM switch,
using the DVI-I video cable, VGA cable, USB (Type
A-to-Type B) cable and audio & Mic cables (see the
pictures below).
DVI-I
VGA Cable
USB cable
Audio/Mic
Video Cable
(HDB15)
(TypeA-to-TypeB)
Step 4
. (
Now your KVM Switch should have been powered-
up….
) Power up the connected computers one by
one. After your computers are powered up, the
keyboard and mouse will be recognized and now you
can begin operating the KVM switch.
And also you should verify the USB device on your Device Port
are fully functioning after installation of its driver on both connected
PCs
Easy Operation
There are three methods to control your KVM Switch for PC,
USB hub port as well as audio/mic channel selection: using
the
front-panel push buttons,
a
hotkey sequence, or the
Switcher Software.
Front-panel buttons
The front-panel buttons let you have direct control over KVM
switch operation and channel switching. Simply press the
PC
button for PC port switching (and if binding is enabled
between PC / USB hub port control / audio&mic switching,
they will be jointly selected at the same time). If you want to
enable the binding of PC / Hub port control / Audio&Mic
switching, use the hotkey sequences.
See Quick Reference Sheet
Basic configuration (showing only LDV-DM712AUSK)
Keyboard hotkey
A keyboard hotkey sequence consists of at least three specific
keystrokes:
See Quick Reference Sheet
Hotkey sequence = [ScrLk]
*
+ [ScrLk]
*
+
Command key(s)
* User-definable = SCROLL LOCK, CAPS, ESC, F12 or NUM LOCK
Hotkey preceding sequence configuration:
For users who want to
use a preceding sequence other than two consecutive Scroll Locks,
there is also one convenient way to configure it.
(1)
Hit Scro
Scro H, then two beeps will signal readiness for new
preceding sequence selection [or Press and hold down the last front-
panel button (Button 2) until you hear two beeps, then release the
button.]
(2)
Select and press the key you would like to use as your
preceding sequence (
SCROLL LOCK
,
CAPS
,
ESC
,
F12 or NUM
LOCK
keys are available for selection) and you’ll hear a beep for
selection confirmation. Now you can use the new preceding sequence
to execute your hotkey commands.
Each keystroke within a hotkey sequence should be pressed
within 2 seconds. Otherwise, the hotkey sequence will not be
validated.
For detailed Hotkey sequences and their corresponding functional
commands, please refer to the Quick reference sheet.
Switcher Software
The KVM switcher software provides Windows version and
Mac version. Before you can operate the KVM switch with the
Switcher Software, you have to install it to the connected
computers. Please refer to the following sections for details of
software installation and operation.
Install the Switcher Software
Note that the Switcher Software provides an alternative way for
KVM operation in addition to the original hardware hotkeys. Thus,
if you are satisfied with the hardware hotkeys, you don’t
necessarily have to install the software client.
Step 1.
Insert the companion CD ROM into your CD drive,
and the Autorun screen will pop up (If the Autorun
feature has not been enabled on your computer. Just
find the Autorun.exe on the CDROM and double-click
it to start).
Step 2.
Click the “Software Installation for Window” to start
installation. Follow the instructions to completion. If
the installation is complete, you will see a KVM
Switcher icon appear on the system tray of your
desktop. Right-click to evoke the operation menu and
double-click to evoke the configuration box. For Mac
User, you should find the Mac switcher software (with
a file extension of .pkg or .zip) and install it on your
Mac.
The Windows switcher software is recommended for use on
Windows 98 SE or later. And the Mac switcher Software is
recommended for use on Mac OS 10.4 [Tiger] and later.
Windows Mac OS
No live connection detected
Current active PC channel is on port 1
Current active PC channel is on port 2
The KVM Switcher Software supports the Windows operating
systems. For other OS platforms such as Linux, you can still use the
keyboard hotkey -
ScrLk + ScrLK
+ (x), x = port number, to switch PC.
Some older computers with USB interface might need to
manually enable the USB option in the BIOS settings before you
can use any USB devices. If your USB interface does not work,
please check the USB option in the BIOS.
If you use Windows 95/98/SE or Mac OS and has not yet
installed a USB mouse on your computer, there might be an error
message telling you that mouse is not detected and prompting
you to decide whether to ignore the same message in the future,
and yet you will find there is no mouse movement to disable this
message….So it is suggested that you should installed your USB
mouse on your computer first, before connecting it to this KVM
Switch.
KVM Switcher Operation Reference
Switch to PC x by Operation Menu
Right-click the KVM Switcher icon to evoke the operation
menu, then select whichever PC that is available for switching.
Once you select a PC channel, it will immediately switch to
that PC. Note that the unconnected port(s) or the active port
will be grayed-out and hence non-selectable.
Switch to PC x by Keyboard Hotkeys
Hit the hotkey according to your current hotkey definition:
Hotkey sequence = Ctrl - Alt - [command key]*
* The factory default hotkey setting is Ctrl + Alt + 1/2/3/4 for PC 1/2/3/4. You
can also use ScrLk + ScrLk to switch PC.
Note that these 3 keys should be pressed and held together. And
it is upon the release of all three keys, the switching action will be
executed.
Windows:
Operation Menu
Configuration Dialog Box
Mac OS:
Operation Menu
Configuration Dialog Box
Note that in addition to those “software” hotkeys as configured in
the software interface, you can still use the original “hardware” hotkey
such as …
Hotkey sequence = [ScrLk]
*
+ [ScrLk]
*
+
Command key(s)
* User-definable = SCROLL LOCK, CAPS, ESC, F12 or NUM LOCK
.