background image

Barrier Systems by Lindsay 

+1 (888) 800-3691 (U.S. toll free or +1 (402) 829-6800 - ECN 60881

7

ARMORGUARD® BARRIER 

Moving the System with Personnel

After the section has been lifted and locked in the up 

position it can be moved with human power or vehicle 

power. The first step in any move is to position the tillers 

so that the section will move in the desired direction.

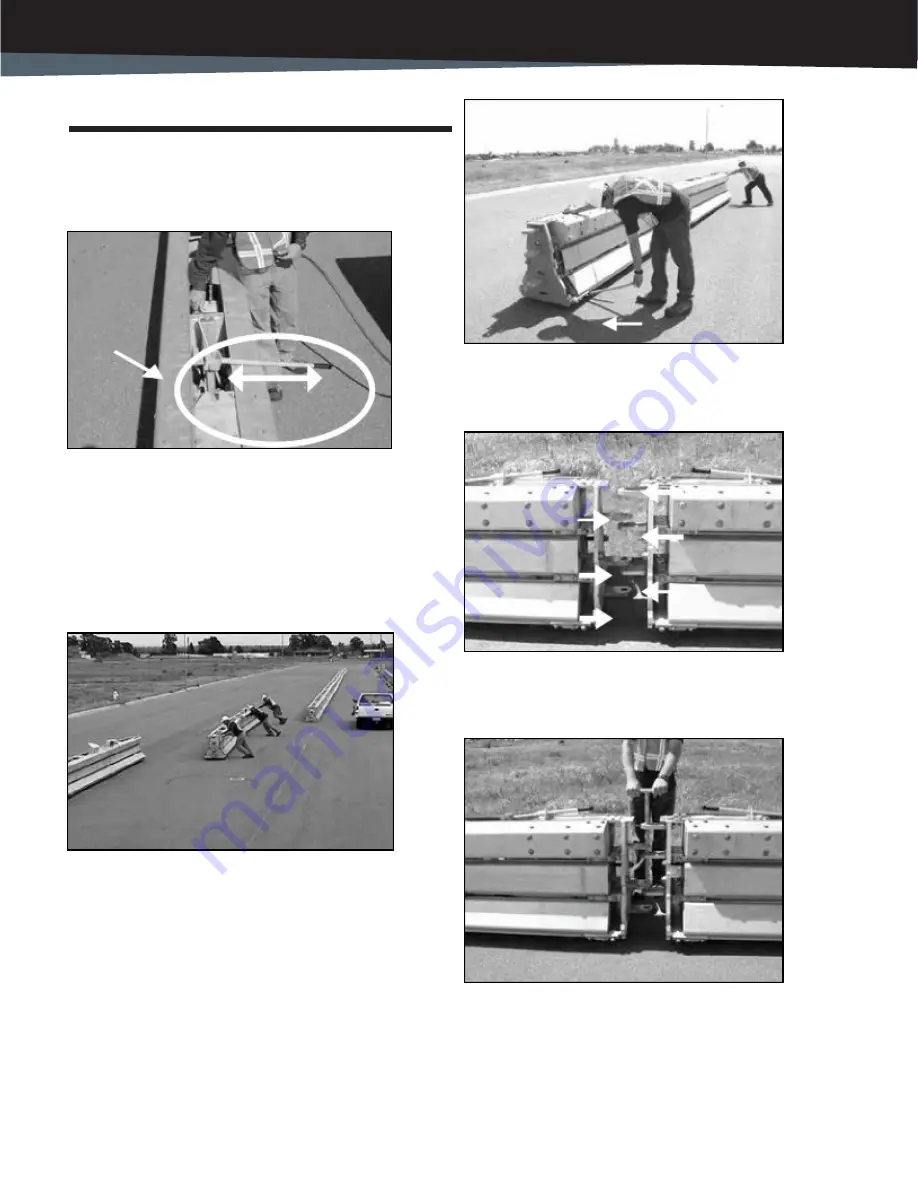
Figure 4. The Steering Wheels are connected to the Tiller Handle 
located on the top of each end of the barrier. Remove the Tiller 
Handle from its cradle and use it to position the steering wheels in 
the desired direction of travel. 

NOTE: Failure to follow this procedure could cause 

damage to the steering wheels. Never force a section 

in a direction other than in the steering wheel 

direction.

Figure 5. Relocate the section, or in this case Multi-section (56’) to 

the desired position. Typically two people can easily control and 

move a single link section (28’) and 3 people are typically used to 

move a multi-section (56’) as shown above.

Tiller Handle

Steering Direction

 
Figure 6. (QUICK TIP) If a section is difficult to get started moving, use 
the Hinge Pin as a lever to start the section moving. 

Figure 7. There are two different ends on a barrier section. Be sure 
that you have a Lower hinge matched with an Upper hinge section 
before installing the hinge pin.

Figure 8. When all of the holes of the two section hinges are aligned, 
install the hinge pin. The pin must be fully installed.

Summary of Contents for Barrier Systems ARMORGUARD NCHRP 350 TL-3

Page 1: ...ANUAL ARMORGUARD BARRIER NCHRP 350 TL 3 Movable Longitudinal Steel Barrier ARMORGUARD BARRIER NCHRP 350 TL 3 Movable Longitudinal Steel Barrier 1823784 Installation and Maintenance Manual INSTALLATION...

Page 2: ...with a Vehicle 11 Using on uneven surfaces 11 Operation on a sloped Surface 12 Towing Specifications 12 Surface Conditions for Towing Towing Control Towing Speed Limitations and Warnings 13 Manual Ja...

Page 3: ...ED OR TO REPAIR OR TO MANUFACTURE BY LTS PRODUCTS OR PARTS NOT COMPLYING WITH LTS SPECIFICATIONS OR AT LTS ELECTION TO THE REPAYMENT OF AN AMOUNT EQUAL TO THE PURCHASE PRICE OF SUCH PRODUCTS OR PARTS...

Page 4: ...Minimum lengths of 68 m Test Level 3 and 34 m Test Level 2 Maximum Deflection 2 m Test Level 3 and 1 m Test Level 2 Barrier width approximately 710 mm 28 Barrier section height approximately 812 mm 32...

Page 5: ...ate section onto wheels A steering wheel is located on both ends of each barrier section The steering wheel is attached to a tiller handle located at the top of the barrier that can be used to steer t...

Page 6: ...ng lifted at all times Do not pick up sections with a forklift as damage may occur to the bottom panels from the forks Failure to safely secure and or control a section could result in damage to the s...

Page 7: ...his procedure could cause damage to the steering wheels Never force a section in a direction other than in the steering wheel direction Figure 5 Relocate the section or in this case Multi section 56 t...

Page 8: ...put into service Depending on how the section was raised either activate the Air Control Panel to lower the section or hand jack the section back to the down position CAUTION Keep feet clear from the...

Page 9: ...personnel lower each section at its final deployment or storage position Relocating Sections with a Vehicle A pickup can be used to pull large sections of barrier either at an angle or straight Figure...

Page 10: ...a winch or a come along as shown above to bring two sections together on a slope so that the hinge pin can be removed on installed Use caution when moving sections on a slope or on the crown of a road...

Page 11: ...d to pull the system back into position when it is being closed Do not disconnect the tether line until the hinge pins are in the locked position the barrier is lowered onto the road surface and the s...

Page 12: ...ines for Test Level 3 TL 3 longitudinal barri ers The impact conditions recommended in NCHRP 350 are intended to address typical in service collisions When ArmorGuard Barrier is properly installed and...

Page 13: ...ist of the following items Structural components Conduct an inspection of all structural assemblies to ensure that all components are structurally sound properly connected and there are no loose faste...

Page 14: ...the ArmorGuard system is subject to change without notice to reflect improvements and upgrades Please contact Barrier Systems by Lindsay to confirm that you are using the most current installation man...

Reviews: