background image

33

ESP

AÑOL

cÓMo UsaR

configuraciones del ciclo y 

opciones(cont.) 

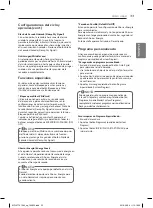
alerta de Secado húmedo (damp dry Signal)

Con esta opción, la secadora hará sonar la alarma 

cuando la carga está 80% seca. Esta función le 

permite retirar el(los) artículo(s) liviano(s) que seca(n) 

rápidamente o que desea planchar o colgar mientras 

aún se encuentran húmedos. Presione el botón Alerta 

de Secado húmedo (Damp Dry Signal).

anti arrugas(Wrinkle care)

Al seleccionar esta opción, hará girar la carga 

periódicamente por un plazo de hasta 3 horas después 

del ciclo seleccionado, o hasta que se abra la puerta. 

Esto es de ayuda para prevenir la formación de arrugas 

cuando no le sea posible retirar las prendas de la 

secadora inmediatamente. 

Funciones especiales 

Los botones de opción también activan funciones 

especiales, como el bloqueo para niños. presione y 

mantenga presionado el botón Bloqueo para Niños  

(Child Lock) marcado con la función especial. 

* bloqueo para niños(child lock)

Utilice esta opcion para evitar un uso no deseado 

de la secadora   o para evitar modificaciones en las 

configuraciones de ciclo mientras la secadora esta 

funcionando. Presione y sostenga los botones Alerta de 

Secado húmedo (Damp Dry Signal)

 al mismo tiempo 

durante 3 segundos para activar o desactivar la funcion 

Bloqueo para Niños(Child Lock). 

Cuando se ha fijado el seguro infantil, aparecerá el 

indicador de seguro infantil y se desactivarán todos los 

botones excepto el botón de ENCENDIDO/APAGADO (ON/

OFF).

noTa

Bloqueo para Niños(Child Lock) se mantiene después 

del fin del ciclo. Si desea desactivar esta función, 

presione y sostenga 3 segundos el botón Alerta de 

Secado húmedo (Damp Dry Signal)

.

ahorrar energía (energy Saver)

Esta opción le permite reducir el consumo de energía en 

el ciclo Normal, dependiendo del tamaño de la carga.
Cuando se seleccione el Ahorrar Energía, el ciclo 

comienza con una sección de secado por aire y se 

aumenta el tiempo de secado .

noTa

El Ahorrar Energía es la opción por defecto en el ciclo 

Normal.  

Puede desactivar la opción de Ahorrar Energía para 

un ciclo Normal más rapido que comienza con 

secado caliente.

* Secado en parrilla (default on/off) 

Esta opción permite la configuración de Ahorrar Energía 

para ser cambiados.  

Para ejecutar un ciclo Normal y sin la opción de Ahorrar 

Energía, mantengapresionado durante tres segundos el 

botón de Ahorrar Energía. 

En la pantalla aparece Activado o Desactivado.

Programa personalizado 

Si tiene una combinacion especial de ajustes que usa 

con frecuencia, puede guardar estos ajustes a manera de 

programa personalizado(Custom Program).

* para guardar un programa personalizado:

1. Encienda la secadora y presione el botón Ciclo (Cycle)  

para seleccionar el ciclo deseado. 

2. Use los botones de Adjuste de ciclos para fijar los ajustes 

para ese ciclo.

3. Apriete el(los) botón(es) de opción de ciclo para la opción 

que desea añadir. Aparecerá en la pantalla un mensaje 

de confirmación.

4. Apriete y mantenga apretado el botón Programa 

Especializado(Custom Program).

noTa

Puede guardar solo un programa personalizado 

a la vez. Al apretar y mantener apretado el botón 

Programa Especializado(Custom Program), 

reemplazará cualquier programa personalizado que 

haya guardado anteriormente.

para recuperar un programa especializado::

1. Encienda la secadora.
2. Apriete el botón Programa Especializado(Custom 

Program). 

3. Apriete el boton INICIO/PAUSA (START/PAUSE) para 

iniciar el ciclo.

MFL67731084_sp_160822.indd   33

2016-08-24   �� 12:18:39

Summary of Contents for DT21WS

Page 1: ...ANUAL DrYer MFL67731084 www lg com ENGLISH ESPAÑOL Dt21WS Please read this owner s manual thoroughly before operating and keep it handy for reference at all times MFL67731084_en_160824 indd 1 2016 08 24 12 16 26 ...

Page 2: ...Reversing the Door 16 Installing the Side Vent Package 17 Venting the Dryer 19 Connecting Gas Dryers 21 Connecting Electric Dryers 26 Special Requirements for Manufactured or Mobile Homes 26 Final Installation Check 27 Installation Test Duct Check 29 HOW TO USE 29 Operating the Dryer 30 Cycle Guide 31 Sorting Loads 31 Loading the Dryer 31 Check the Lint Filter Before Every Load 32 Cycle Settings a...

Page 3: ...low of gases into the room from appliances burning other fuels including open fires Do not install a clothes dryer with flexible plastic venting materials If flexible metal foil type duct is installed it must be of a specific type identified by the appliance manufacturer as suitable for use with clothes dryers Flexible venting materials are known to collapse be easily crushed and trap lint These c...

Page 4: ...on of children is necessary when the dryer is used near children This appliance is not intended for use by persons including children with reduced physical sensory or mental capabilities or lack of experience and knowledge unless they have been given supervision or instruction concerning use of the appliance by a person responsible for their safety Children should be supervised to ensure that they...

Page 5: ...ck and or fire hazard Remove all packing items and dispose of all shipping materials properly Failure to do so can result in death explosion fire or burns Place dryer at least 18 inches above the floor for a garage installation Failure to do so can result in death explosion fire or burns Keep all packaging from children Packaging material can be dangerous for children There is a risk of suffocatio...

Page 6: ... door with a hinge on the opposite side to that of the tumble dryer Gas dryers MUST be exhausted to the outside Failure to follow these instructions can result in fire or death The dryer exhaust system must be exhausted to the outside of the dwelling If the dryer is not exhausted outdoors some fine lint and large amounts of moisture will be expelled into the laundry area An accumulation of lint in...

Page 7: ...gged into a properly grounded outlet Electric shock can result if the dryer is not properly grounded Have the wall outlet and circuit checked by a qualified electrician to make sure the outlet is properly grounded Failure to follow these instructions can create an electric shock hazard and or a fire hazard The dryer should always be plugged into its own individual electrical outlet which has a vol...

Page 8: ...tions in the installed household ductwork that reduce exhaust airflow through the dryer If you see the alert Clean or repair the ducts to remove the restrictions Keep your ducts clean to help increase efficiency and reduce long drying times caused by blocked ducts Smart Diagnosis Should you experience any technical difficulty with your dryer it has the capability of transmitting data via your tele...

Page 9: ...nly authorized components The manufacturer is not responsible for product malfunction or accidents caused by the use of separately purchased unauthorized components or parts The images in this owner s manual may be different from the actual components and accessories and are subject to change by the manufacturer without prior notice for product improvement purposes Side vent kit sold separately Ki...

Page 10: ...ME BUTTONS Use these buttons with the Time Dry and other MANUAL DRY cycles to adjust the drying time Press the More Time button to increase the selected manual cycle time by one minute press Less Time to decrease the cycle time by one minute D TIME AND STATUS DISPLAY The display shows the settings estimated time remaining options and status messages for your dryer F G OPTION BUTTONS The option but...

Page 11: ...FILTER reminder The display will show Clean Filter when the dryer is turned on as a reminder to check the filter It turns off when the START PAUSE button is pressed D CUSTOM PROGRAM If you have a special combination of settings that you use frequently you can save these settings as a Custom Program E Flow Sense DUCT BLOCKAGE SENSING SYSTEM INDICATOR The Flow Sense duct blockage sensing system dete...

Page 12: ...ecking and choosing the proper location Leveling the dryer Connecting electric dryers Venting the dryer Plugging in the power cord and grounding Connecting gas dryers Test run Installation test Refer to page 27 Press and hold 120V 240V MFL67731084_en_160824 indd 12 2016 08 24 12 16 31 ...

Page 13: ...so be considered No other fuel burning appliance can be installed in the same closet as a dryer Additional spacing should be considered for ease of installation and servicing Additional clearances might be required for wall door and floor moldings Additional spacing should be considered on all sides of the dryer to reduce noise transfer For closet installation with a door minimum ventilation openi...

Page 14: ... it must be level To minimize vibration noise and unwanted movement the floor must be a perfectly level solid surface 1 Position the dryer in the final location Place a level across the top of the dryer All four leveling feet must rest solidly on the floor Gently push on the top corners of the dryer to make sure that the dryer does not rock from corner to corner If you are installing the dryer on ...

Page 15: ...ons To avoid damage to the dryer or the door support the door with a stool or box that fits under the door or have an assistant support the weight of the door Avoid dropping the door to avoid damage to the door or the floor 1 Open the door and remove the two plastic hole caps on the catch side by gently prying up with a flat blade screwdriver Save these for step 6 2 While supporting the door remov...

Page 16: ...g is not available on gas models Press the adapter duct onto the blower housing and secure to the base of the dryer as shown 3 Preassemble a 4 inches 10 2 cm elbow to the next 4 inches 10 2 cm duct section and secure all joints with duct tape Be sure that the male end of the elbow faces AWAY from the dryer Insert the elbow duct assembly through the side opening and press it onto the adapter duct S...

Page 17: ...should be kept as short as possible Make sure to clean any old ducts before installing your new dryer Failure to follow these instructions can result in fire or death Rigid or semirigid metal ducting is recommended for use between the dryer and the wall In special installations when it is impossible to make a connection with the above recommendations a UL listed flexible metal transition duct may ...

Page 18: ...nd of each section of exhaust duct must point away from the dryer Use duct tape on all duct joints Insulate ductwork that runs through unheated areas in order to reduce condensation and lint buildup on duct surfaces Incorrect or inadequate exhaust systems are not covered by the dryer warranty Failures or poor performance caused by such exhaust systems will not be covered by the dryer warranty Duct...

Page 19: ...e testing of the gas supply Failure to do so can result in fire explosion or death Supply line requirements Your laundry room must have a rigid gas supply line to your dryer In the United States an individual manual shutoff valve MUST be installed within at least 6 ft 1 8 m of the dryer in accordance with the National Fuel Gas Code ANSI Z223 1 or Canadian gas installation code CSA B149 1 A 1 inch ...

Page 20: ... so can result in fire explosion or death Gas dryers MUST exhaust to the outdoors Failure to do so can result in fire explosion or death Connecting the gas supply 1 Make sure that the gas supply to the laundry room is turned OFF Confirm that the type of gas available in your laundry room is appropriate for the dryer The dryer is prepared for Natural Gas with a 3 inch NPT gas connection 2 Remove th...

Page 21: ...ire only or as required by local codes Allow sufficient slack in wiring so dryer can be moved from its normal location when necessary Failure to do so can result in fire explosion or death The power cord pigtail connection between wall receptacle and dryer terminal block IS NOT supplied with dryer Type of pigtail and gauge of wire must conform to local codes and with instructions on the following ...

Page 22: ...in relief is required 1 Remove the terminal block access cover on the upper back of the dryer Install a UL listed strain relief into the power cord through hole then thread a UL listed 30 A 240 V 4 wire 10 AWG minimum copper conductor power cord through the strain relief Use a 30 A 240 Vca UL listed power cord with 10 AWG minimum copper conductor and closed loop or forked terminals with upturned e...

Page 23: ...r three wires and strip 1 inch 2 5 cm insulation from each wire Bend the ends of the three shorter wires into a hook shape 2 Remove the terminal block access cover on the upper back of the dryer Install a UL listed strain relief into the power cord through hole then thread the power cable prepared in Step 1 through the strain relief Ground Wire 5 12 7 cm 1 2 5 cm Connecting Electric Dryers cont US...

Page 24: ...ted strain relief is required 1 Remove the terminal block access cover on the upper back of the dryer Install a UL listed strain relief into the power cord through hole then thread a UL listed 30 A 240 V 3 wire 10 AWG minimum copper conductor power cord through the strain relief Use a 30 A 240 V UL listed power cord with 10 AWG minimum copper conductor and closed loop or forked terminals with uptu...

Page 25: ... covering from the wire Strip 1 inch 2 5 cm insulation from each wire Bend the ends of the three wires into a hook shape 2 Remove the terminal block access cover on the upper back of the dryer Install a UL listed strain relief into the power cord through hole then thread the power cable prepared in Step 1 through the strain relief Use UL listed 3 wire 10 AWG minimum copper conductor cable Allow at...

Page 26: ... from any combustible construction be at least 2 inches 5 cm and when venting the dryer to the outdoors the dryer can be installed with a clearance of 1 inch 2 5 cm at the sides and back of the dryer Please be aware that venting materials are not supplied with the dryer You should obtain the venting materials necessary for proper installation Final Installation Check Once you have completed the in...

Page 27: ...y if the activation is successful 3 Press START PAUSE button The dryer will start the test which will last about two minutes The heat will be turned on and the temperatures in the drum will be measured 4 Check the display for results During the test cycle monitor the Flow Sense display on the control panel If no bars are displayed when the cycle ends the exhaust system is adequate If the exhaust s...

Page 28: ...ith multiple elbows or bends Excess or crushed transition duct Too many elbows or exhaust too long Check for blockages and lint buildup Make sure the ductwork is not crushed or restricted Crushed or damaged exhaust Lint buildup or blockage NOTE When the dryer is first installed this test should be performed to alert you to any existing problems with the exhaust duct in your home However since the ...

Page 29: ...Cycle When the cycle is finished the chime will sound if it is set Remove your clothing from the dryer immediately to reduce wrinkling If Wrinkle Care is selected the dryer will tumble briefly every few minutes to help prevent wrinkles from setting in the clothes 6 Clean the Lint Filter If the lint filter has not already been cleaned lift out the filter and remove the lint from the last load This ...

Page 30: ...s unique dual sensor system to detect and compare the moisture level in clothes and in the air and adjust the drying time as needed to ensure superior results The dryer automatically sets the dryness level and temperature at the recommended setting for each cycle The estimated time remaining will be shown in the display Manual dry cycles Use manual dry cycles to select a specific amount of drying ...

Page 31: ...oading the Dryer Warning To reduce the risk of fire electric shock or injury to persons when using this appliance follow basic precautions including the following Check all pockets to make sure that they are empty Items such as clips pens coins and keys can damage both your dryer and your clothes Flammable objects such as lighters or matches could ignite causing a fire Failure to do so can result ...

Page 32: ...g time from 20 to 60 minutes in 10 minute increments Use this for small loads or to remove wrinkles Use the More Time Less Time buttons to add or reduce the drying time in 1 minute increments Signal Adjusts the volume of the Signal or turns off the Signal Press the button repeatedly until the desired volume setting is illuminated NOTE To protect your garments not every dryness level temperature or...

Page 33: ...vate Child Lock press and hold the Damp Dry Signal button for three seconds Energy Saver This option helps to reduce the energy consumption in the Normal Cycle depending on the load size When the Energy Saver option is selected the cycle begins with an air dry section and the drying time is increased NOTE The Energy Saver option is turned on by default in the Normal Cycle Turn off the Energy Saver...

Page 34: ...ctivation process may differ Refer to the manual of your smart phone for details 1 2 1 2 The Tag On guide The Tag On icon Tag On position Look for the Tag On icon next to the LED screen on the control panel This is where you position your smart phone when using the Tag On function with the LG Smart Diagnosis Cycle Download and Laundry Stats features of the LG Smart Laundry DW Global application Wh...

Page 35: ...sis results on the cycles recently used Images are for reference only The actual LG Smart Laundry DW Global application may be different Tag On This feature uses LG Smart Diagnosis Cycle Download and Laundry Stats when you touch the LG appliance s Tag On logo with your NFC equipped smartphone Tag On self diagnosis using LG Smart Laundry DW Global application 1 Install LG Smart Laundry DW Global ap...

Page 36: ...nditions of the Use and Privacy Policy by pressing I accept 4 Enter your phone number in the field Use this phone number when talking to the LG customer service representative for them to find your Smart Diagnosis data Images are for reference only The actual LG Smart Laundry DW Global application may be different MFL67731084_en_160824 indd 36 2016 08 24 12 16 55 ...

Page 37: ...r reference only The actual LG Smart Laundry DW Global application may be different Tag On cycles download using LG Smart Laundry DW Global application 1 Install LG Smart Laundry DW Global application on a NFC equipped smartphone Install the application from the Play store and run it 2 Select Tag On Home card and icons at the bottom of the screen are all available to use 3 Select Select Tag On Cyc...

Page 38: ...the washer s control panel If it isn t recognized touch on the upper right of the Tag On screen on your LG Smart Laundry DW Global application to see the detailed guide This might happen due to the different NFC antenna positions for each phone Check the FLOW SENSE Status 1 Please check the FLOW SENSE Status in Laundry Stats screen 2 Press the Venting Tips button when you home exhaust system block...

Page 39: ...n button 3 Touch the Tag On logo When a Tag On screen appears On the right tap your smart phone on the Tag On icon on the right side of the dryer s control panel If it isn t recognized touch on the upper right of the Tag On screen on your LG Smart Laundry DW Global application to see the detailed guide This might happen due to the different NFC antenna positions for each phone 4 Check whether wash...

Page 40: ... detailed guide This might happen due to the different NFC antenna positions for each phone 4 Select a laundry category based on the issue you want the machine to focus on 5 After selecting the category a list of specific cycles will appear Select the cycle based on your needs 6 When the Tag On screen appears see at right tap your smart phone to the Tag On logo on the right side of the washer s or...

Page 41: ...ss steel cleaner used according to the manufacturer s specifications Never use steel wool or abrasive cleansers they can scratch or damage the surface Cleaning around and under the dryer Vacuum lint and dust from around the dryer and underneath it regularly Vent ductwork should be checked for lint buildup and cleaned at least once per year If any noticeable reduction in airflow or drying performan...

Page 42: ...r dryer to dry only clean items because dirty items can soil clean clothes placed in the same or subsequent loads Stains on dried clothes are actually stains that were not removed during the washing process Make sure that clothes are being completely cleaned according to the instructions for your washer and detergent Display shows error code tE1 or tE2 Thermistor is malfunctioning Turn off the dry...

Page 43: ...nd to retain more moisture To help reduce and maintain more consistent drying times for large and heavy fabrics separate these items into smaller loads of a consistent size Use the appropriate control settings for the type of load you are drying Make sure the lint filter is cleaned before every load With some loads that produce high amounts of lint it may be necessary to clean the filter during th...

Page 44: ... See the Installation Instructions Ductwork should be checked cleaned soon Dryer can be used in this condition but drying times may be longer If exhaust restrictions are sensed by the FlowSense system the indicator will remain on for two hours after the end of the cycle Opening the door or pressing the POWER button will turn off the display The display shows d90 d95 The duct work is about 90 95 bl...

Page 45: ...xt button on the phone Smart Diagnosis Through the Call Center 1 Call the LG call center 2 When instructed to do so by the call center agent hold the mouthpiece of your phone over the Smart Diagnosis logo on the machine Hold the phone no more than one inch but not touching the machine NOTE Do not touch any other buttons or icons on the display screen 3 Press and hold the Temp button for three seco...

Page 46: ...MFL67731084_en_160824 indd 46 2016 08 24 12 16 59 ...

Page 47: ...l de PRoPieTaRio secadora www lg com esPaÑol dt21Ws lea este manual de usuario detenidamente antes de la utilización y guárdelo a mano para futuras consultas MFL67731084_sp_160822 indd 1 2016 08 24 12 18 13 ...

Page 48: ...ión del paquete de ventilación lateral 17 Cónexión del conducto de ventilación de la secadora 19 Conexión de secadoras a gas 21 Cómo conectar las secadoras eléctricas 26 Requisitos especiales para viviendas móviles o prefabricadas 26 Revisión de instalación final 27 Prueba de Instalación conducto de compro bar 29 CÓMO USAR 29 Funcionamiento de la secadora 30 Guía de ciclos 31 Clasificación de carg...

Page 49: ...o procedentes de otros aparatos que quemen otros combustibles incluyendo quemadores abiertos No instale una secadora junto a materiales de ventilación plásticos flexibles Si se instala un conducto flexible metálico de tipo lámina de metal éste deberá cumplir las especificaciones determinadas por el fabricante del electrodoméstico para su uso con secadoras Se sabe que los materiales de ventilación ...

Page 50: ... secadora ni dentro de ella Cuando se usa la secadora cerca de los niños se necesita una supervisión estricta Este aparato no se destina para utilizarse por personas incluyendo niños cuyas capacidades físicas sensoriales o mentales sean diferentes o estén reducidas o carezcan de experiencia o conocimiento a menos que dichas personas reciban una supervisión o capacitación para el funcionamiento del...

Page 51: ...a tierra se pueden producir descargas eléctricas Antes de usar la secadora debe estar correctamente instalada como se describe en este manual Si la secadora no se encuentra adecuadamente conectada a tierra se pueden producir descargas eléctricas Instale y almacene la secadora en un lugar no expuesto a temperaturas inferiores al punto de congelación ni expuesto a la intemperie Todas las reparacione...

Page 52: ...s de ceras no deben ponerse a secar en la secadora de ropa Los artículos tales como el hule espuma gorras de baño textiles a prueba de agua los artículos con recubrimiento de caucho y las prendas o almohadas que se proporcionan con almohadillas de hule espuma no deben ponerse a secar con calor en la secadora de ropa Los suavizantes de telas o productos similares deben utilizarse como se especifica...

Page 53: ...do a tierra adecuadamente Si la secadora no se encuentra adecuadamente conectada a tierra se pueden producir descargas eléctricas Contrate a un electricista calificado para que controle el tomacorriente y el circuito eléctrico para asegurarse que el enchufe está correctamente conectado a tierra Si estas instrucciones no se cumplen se podrán producir descargas eléctricas y o riesgo de incendio La s...

Page 54: ...de obstrucciones en el sistema de ventilación doméstico instalado que reducen el flujo de ventilación de la secadora Si aparece el mensaje de alerta Limpie o repare los conductos para eliminar las obstrucciones Mantenga sus conductos limpios para aumentar la eficiencia de la secadora y reducir largos ciclos de secado causados por conductos bloqueados Smart Diagnosis Si experimenta alguna dificulta...

Page 55: ...iar la vida útil de su lavadora utilice sólo componentes autorizados El fabricante no se hace responsable de los fallos del producto o accidentes causados por la utilización de piezas o componentes no autorizados Las imágenes de esta guía pueden no coincidir con los componentes y accesorios reales y están sujetas a cambios sin previo aviso para mejoras en el producto Paquete de ventilación lateral...

Page 56: ...se el botón para esa opción a fin de seleccionar otras configuraciones E BOTONES DE MÁS TIEMPO MENOS TIEMPO MORE TIME LESS TIME Utilice esos botones con el Secado por tiempo Time Dry y otros ciclos de SECADO MANUAL MANUAL DRY para ajustar el tiempo de secado Pulse el botón MÁS TIEMPO More Time para aumentar el tiempo del ciclo manual seleccionado de un minuto pulse MENOS TIEMPO Less Time para redu...

Page 57: ... de Filtro Clean Filter cuando se ha encendido la secadora como un recordatorio para revisar el filtro Se apaga cuando se aprieta el botón INICIO PAUSA START PAUSE D Programa Especializado CUSTOM PROGRAM Si usted tiene una combinación especial de configuraciones que utiliza con frecuencia puede guardarlas como Programa Especializado Custom Program E INDICADOR DEL SISTEMA DE SENSOR DE BLOQUEO DE CO...

Page 58: ...de la ubicación adecuada Nivelación de la secadora Cómo conectar las secadoras eléctricas ventilación de la secadora Conexión del enchufe y la toma de tierraa Conexión de secadoras a gas Prueba de funcionamiento Prueba de Instalación consulte la página 27 Pulse y mantenga 120 V 240 V MFL67731084_sp_160822 indd 12 2016 08 24 12 18 18 ...

Page 59: ... lugar que permita la instalación correcta del sistema de escape El secador de gas debe tener una salida de escape hacia el exterior Consulte Requisitos de ventilación La salida eléctrica de toma a tierra debe estar a 61 cm 2 pies de ambos lados de la secadora Consulte Requisitos eléctricos El suelo debe ser firme para soportar el peso total de la secadora siendo éste de 90 7 kg 200 lbs Igualmente...

Page 60: ...rinde un desempeño óptimo de secado debe estar nivelada Para minimizar la vibración el ruido y movimiento no deseados el piso deberá ser una superficie perfectamente nivelada y sólida 1 Coloque la secadora en su ubicación final Coloque un nivel sobre la parte superior de la secadora Las 4 patas niveladoras deberán apoyarse firmemente en el piso Empuje suavemente las esquinas superiores de la secad...

Page 61: ...ños en la secadora o en la puerta sujete dicha puerta con un taburete o una caja de un tamaño acorde o consiga un apoyo que soporte el peso de la puerta Evite que la puerta se caiga para que no se produzcan daños en la puerta o en el suelo 1 Abra la puerta y retire las dos cubiertas de plástico que cubren el agujero en la zona de sujeción para ello presione con cuidado hacia arriba con un destorni...

Page 62: ...ucto adaptador en la carcasa del ventilador y asegure la base de la secadora como se indica Instalación del paquete de ventilación lateral 3 Conecte un codo de 4 pulgadas 10 2 cm a la siguiente sección de conducto de 4 pulgadas 10 2 cm y asegure todas las conexiones con cinta adhesiva impermeable Asegúrese de que el extremo macho del codo apunte hacia AFUERA de la secadora Inserte el montaje de co...

Page 63: ... El conducto de escape deberá mantenerse lo más corto posible Asegúrese de limpiar cualquier tipo de conducto antiguo antes de instalar su secadora nueva Si no se siguen estas instrucciones se podrá producir incendio o muerte Se recomiendan conductos rígidos o semirígidos para usar entre la secadora y la pared En instalaciones particulares cuando es imposible realizar una conexión siguiendo las re...

Page 64: ...cción del conducto de escape deberá apuntar hacia afuera de la secadora Use cinta adhesiva impermeable en todas las conexiones de conducto Aísle el sistema de conducto que se tiende a través de áreas sin calefacción para reducir la condensación y acumulación de pelusa en las superficies del conducto Los sistemas de escape incorrectos o inadecuados no están cubiertos por la garantía de la secadora ...

Page 65: ...Requisitos de la línea de suministro Su cuarto de lavado debe tener una línea rígida de suministro de gas para la secadora En los EE UU se DEBE instalar una válvula manual de corte individual a una distancia de menos de 6 pies 1 8 m de la secadora de acuerdo con el Código Nacional de Gas Combustible ANSI Z223 1 o el Código Canadiense para Instalaciones de Gas CSA B149 1 Un tapón de tubería NPT de ...

Page 66: ...roducir una explosión incendio o muerte Las secadoras de gas DEBEN ventilar hacia el exterior Si no se cumple con esto se podrá producir una explosión incendio o muerte Conexión del suministro de gas 1 Asegúrese de que el suministro de gas al cuarto de lavado se encuentre APAGADO Confirme que el tipo de gas disponible en su cuarto de lavado sea el adecuado para la secadora La secadora está lista p...

Page 67: ...s leyes locales Disponga de suficiente dotación de cableado de manera de poder mover la secadora de su ubicación normal cuando sea necesario Si no se cumple con esto se podrá producir una explosión incendio o muerte NO se provee la conexión en espiral del cable eléctrico entre la caja de pared y el bloque terminal de la secadora con la misma El tipo de conexión en espiral y el calibre del alambre ...

Page 68: ...l localizado en la parte superior trasera de la secadora Instale un protector de tensión listado por UL en el orificio de pase del cable eléctrico luego pase un cable eléctrico conductor de cobre Núm 10 AWG de por lo menos 4 hilos 30 A 240 V listado por UL por el protector de tensión Instale un cable eléctrico de 30 A 240 Vca listado por UL con un conductor de cobre Núm 10 AWG como mínimo y termin...

Page 69: ...os finales de los 3 cables en forma de gancho 2 Quite la cubierta de acceso al bloque terminal localizado en la parte superior trasera de la secadora Instale un protector de tensión listado por UL en el orificio de pase del cable eléctrico luego pase el cable eléctrico fabricado en el Paso 1 por el protector de tensión Alambre de conexión a tierra 5 12 7 cm 1 2 5 cm Cómo conectar las secadoras elé...

Page 70: ... la cubierta de acceso al bloque terminal localizado en la parte superior trasera de la secadora Instale un protector de tensión listado por UL en el orificio de pase del cable eléctrico luego pase un cable eléctrico conductor de cobre Núm 10 AWG de por lo menos 3 hilos 30 A 240 V listado por UL por el protector de tensión Instale un cable eléctrico de 30 A 240 V listado por UL con un conductor de...

Page 71: ...gue 1 pulg 2 5 cm del aislamiento decada alambre Haga los finales de los 3 cables en forma de gancho 2 Quite la cubierta de acceso al bloque terminal localizado en la parte superior trasera de la secadora Instale un protector de tensión listado por UL en el orificio de pase del cable eléctrico luego pase el cable eléctrico fabricado en el Paso 1 por el protector de tensión Instale un cable eléctri...

Page 72: ... sea de por lo menos 2 pulgadas 5 cm y que cuando se ventile la secadora al exterior se pueda instalar la secadora dejando un espacio libre de 1 pulgada 2 5 cm a los lados y la parte trasera de la secadora Tenga en cuenta que los materiales de ventilación no se proveen con la secadora Debe obtener los materiales de ventilación necesarios para una instalación adecuada Revisión de instalación final ...

Page 73: ...vación se ha realizado con éxito 3 Pulse el botón INICIO PAUSA START PAUSE La secadora iniciará el test que durará alrededor de dos minutos Se encenderá el calor y se medirán las temperaturas en el tambor 4 Observe la pantalla para conocer el resultado Durante el ciclo de prueba controle el visualizador del Flow Sense en el panel de control Si al terminar el test no muestra ninguna barra el sistem...

Page 74: ...tiples formaciones de torceduras o codos Conducto demasiado largo o muy torcido Tubería demasiado larga o con demasiados codos Controle los bloqueos y la acumulación de pelusa Asegúrese que la tubería no posea cortes ni restricciones Tubería estrangulada o bloqueada Acumulación de pelusa o bloqueo NOTA Cuando recién se instala la secadora debe realizarse esta prueba para alertarlo sobre cualquier ...

Page 75: ... detalles 4 FIN DEL CICLO Al finalizar el ciclo si lo tiene ajustado oirá un aviso sonoro Retire inmediatamente sus prendas de la secadora para reducir las arrugas Si tiene seleccionada la función Anti Arrugas Wrinkle Care la secadora volteará brevemente la carga cada pocos minutos para ayudar a prevenir la aparición de arrugas en sus prendas 6 LIMPIAR EL FILTRO DE PELUSAS Si aún no ha limpiado el...

Page 76: ...ensor de Secado utilizan el sistema exclusivo de sensor doble de LG para detectar y comparar el nivel de humedad en las prendas y en el aire y programar el tiempo de secado del modo necesario para asegurar resultados superiores La secadora ajusta automáticamente el nivel de sequedad y temperatura del ajuste recomendado para cada ciclo El tiempo restante estimado se mostrará en la pantalla Ciclos d...

Page 77: ...elas se secarán más rápido que otras Cómo cargar la secadora advertencia Para reducir el riesgo de incendio descargas eléctricas o heridas al usar su electrodoméstico siga las precauciones básicas incluyendo lo siguiente Revise todos los bolsillos para asegurarse de que estén vacíos Los artículos como clips fósforos plumas monedas y llaves pueden dañar su secadora o sus prendas Los objetos inflama...

Page 78: ...les en todos los ciclos Vea la Guía de ciclos para obtener más detalles Nivel De Secado Dry Level Selecciona el nivel de sequedad para el ciclo Apriete el boton de Nivel De Secado Dry Level varias veces para navegar por los ajustes disponibles Esta opcion esta disponible unicamente en los ciclos de Sensor de Secado sensor dry La secadora ajustara el tiempo de ciclo automaticamente Al seleccionar S...

Page 79: ... Secado Húmedo Damp Dry Signal Ahorrar Energía Energy Saver Esta opción le permite reducir el consumo de energía en el ciclo Normal dependiendo del tamaño de la carga Cuando se seleccione el Ahorrar Energía el ciclo comienza con una sección de secado por aire y se aumenta el tiempo de secado NOTA El Ahorrar Energía es la opción por defecto en el ciclo Normal Puede desactivar la opción de Ahorrar E...

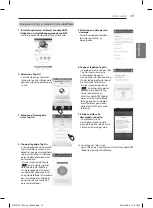
Page 80: ...s detallada sobre el uso de la función Tag On 1 2 1 2 1 2 1 2 1 2 NOTA El proceso de activación de NFC puede variar dependiendo del fabricante del smartphone y la versión del SO Android Para más información consulte el manual del smartphone Antes de utilizar la función Tag On La función Tag On le permite utilizar cómodamente las funciones LG Smart DiagnosisTM y de Descarga de ciclos para comunicar...

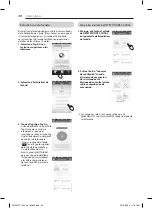
Page 81: ...icos de los ciclos utilizados más recientemente Las imágenes solo sirven como referencia La aplicación LG Smart Laundry DW Global real puede ser diferente Tag On Esta función utiliza LG Smart Diagnosis Descarga de ciclos y Estadísticas de lavado cuando se toca el logotipo Tag On del aparato LG con un smartphone equipado con NFC AutodiagnósticoTag On con la aplicación LG Smart Laundry DW Global 1 I...

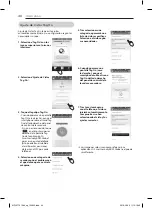
Page 82: ... la política de uso y privacidad pulsando Acepto 4 Introduzca en el campo para ello dispuesto su número de teléfono Utilice este número de teléfono cuando hable con el representante del servicio al cliente de LG para que ellos puedan encontrar los datos del diagnóstico inteligente Las imágenes solo sirven como referencia La aplicación LG Smart Laundry DW Global real puede ser diferente MFL67731084...

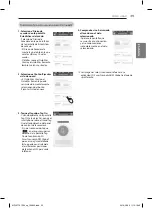
Page 83: ...ven como referencia La aplicación LG Smart Laundry DW Global real puede ser diferente DescargadelosciclosTagOnconlaaplicaciónLGSmartLaundry DWGlobal 1 Instale la aplicación LG Smart Laundry DW Global en un smartphone equipado con NFC Instale la aplicación desde el Play y ejecútela 2 Seleccione Tag On La ficha de inicio y todos los iconos de la parte inferior de la pantalla están disponibles para s...

Page 84: ...ho del panel de control de la lavadora Si no es reconocido toque en el ángulo superior derecho de la pantalla Tag On de la aplicación LG Smart Laundry DW Global para ver una guía detallada Esto puede ocurrir debido a las diferentes posiciones de la antena NFC para cada teléfono Comprobar el estado de DETECCIÓN DE CAUDAL 1 Marque por favor el estado de DETECCIÓN DE CAUDAL en la pantalla de Estadíst...

Page 85: ...botón Ejecutar Ciclo de nuevo 3 Toque el logotipo Tag On Cuando aparezca una pantalla Tag On a la derecha ponga el smartphone sobre el icono Tag On del lado derecho del panel de control de la secadora Si no es reconocido toque en el ángulo superior derecho de la pantalla Tag On de la aplicación LG Smart Laundry DW Global para ver una guía detallada Esto puede ocurrir debido a las diferentes posici...

Page 86: ... detallada Esto puede ocurrir debido a las diferentes posiciones de la antena NFC para cada teléfono 4 Seleccione una categoría de secado según el problema en el que desea que se centre la máquina 5 Tras seleccionar una categoría aparecerá una lista de ciclos específicos Seleccione el ciclo según sus necesidades 6 Cuando aparezca una pantalla Tag On ver a la derecha ponga el smartphone sobre el ic...

Page 87: ...vencional usado según las especificaciones del fabricante Nunca use limpiadores abrasivos ni de lana metálica pueden raspar o dañar la superficie Limpieza alrededor y debajo de la secadora Aspire la pelusa y polvo alrededor de la secadora y debajo de ella con regularidad Se debe revisar que el sistema de conductos de ventilación no tenga acumulación de pelusa y se debe limpiar una vez por año Si s...

Page 88: ...strucciones provistas con su suavizador de telas Asegúrese de usar su secadora solo para secar artículos limpios ya que los artículos sucios pueden ensuciar las prendas limpias en la misma carga o en las subsiguientes Las manchas en ropas secas son en realidad manchas que no se eliminaron durante los procesos de lavado Asegúrese de que las ropas queden completamente limpias de acuerdo con las inst...

Page 89: ...mpo de secado Las telas pesadas requieren de mayor tiempo de secado ya que tienden a retener mayor humedad Para ayudar a reducir y mantener tiempos de secado más constantes para telas pesadas y de mayor tamaño separe estos artículos en cargas más pequeñas de un tamaño sistemático Use los ajustes de control adecuados para el tipo de carga que esté secando Asegúrese de limpiar el filtro de pelusa an...

Page 90: ...erá controlar limpiar de inmediato para eliminar la pelusa acumulada y otros bloqueos La secadora se puede usar pero su funcionamiento y eficacia se verán reducidos de forma importante Si el sistema Flow SenseTM detecta restricciones de salida el indicador permanecerá encendido durante dos horas tras finalizar el ciclo Si abre la puerta o pulsa el botón Encendido Apagado ON OFF se apagará la panta...

Page 91: ...ono Smart Diagnosis a través del Centro de atención telefónica 1 Llame al Centro de atencion telefonica de LG Electronics al telefono 2 Cuando se lo indique el agente del Centro de atención telefónica mantenga el micrófono de su teléfono sobre el logotipo Smart Diagnosis del equipo Sostenga el teléfono a no más de una pulgada o 2 5 cm pero sin tocar el equipo NOTA No toque ningún otro botón ni ico...

Page 92: ...MFL67731084_sp_160822 indd 46 2016 08 24 12 18 50 ...

Reviews: