background image

Installation

22

Install

ation

2

Connections

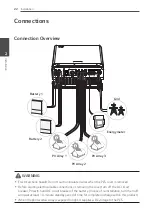
Connection Overview

PV Array 3

battery 2

PV Array 1

PV Array 2

battery 1

energy meter

Grid

WARNING


y

Electrical shock hazard. Do not touch uninsulated wires when the PCS cover is removed.


y

Before starting electrical cable connections or removing the cover, turn off the AC circuit 
breaker, PV switch and DC circuit breaker of the battery. (In case of re-installation, turn them off 
and wait at least 10-minute standby period of time for complete discharge within this product.)


y

When the photovoltaic array is exposed to light, it supplies a DC voltage to the PCS.

Summary of Contents for D008KE1N211

Page 1: ...es download INSTALLATION MANUAL Energy Storage System Please read this manual carefully before installing your set and retain it for future reference MODEL LG ESS Home 10 D010KE1N211 LG ESS Home 8 D008KE1N211 Copyright 2019 2020 LG Electronics Inc All Rights Reserved MFL71429501 ...

Page 2: ...entially explosive objects near the product y y Do not place any kind of objects on top of the product during operation y y All works on the PV modules power conditioning system and battery system must be carried out by qualified personnel only y y Electrical installations must be done in accordance with the local and national electrical safety standards y y Wear rubber gloves and protective cloth...

Page 3: ...ct should not be exposed to water dripping or splashing and no objects filled with liquids such as vases should be placed on the product y y To prevent fire or electric shock hazard do not expose this production to rain or moisture y y Do not block any ventilation openings Ensure reliable operation of the product and protect it from over heating The openings shall never be blocked by placing any o...

Page 4: ...be damaged y y Never use any solvents abrasives or corrosive materials to clean this product y y Do not store on or place against any objects to the product It may cause serious defects or malfunction y y Before making a connection make sure the PV switch on this product is switched off y y This unit is designed to feed power to the public grid only Do not connect this unit to an AC source or gene...

Page 5: ...hone Energy Storage System Energy Meter ABB Smart Meter The electricity generated from a PV array can be stored to the connected battery or sold to energy supply companies y y DC Coupled ESS LG ESS can achieve higher system efficiency due to simpler power conversion process y y Three Phase Connection 3 phase connection secures phase balancing y y Smart Management With built in Smart PMS it analyse...

Page 6: ...14 Bottom 15 Installation Choice of location 16 Mounting Location 16 Minimum Clearance 18 Wall Mounting 19 Connections 22 Connection Overview 22 Connection Diagram 23 PV Array Connections 24 Battery Connections 28 ATS BMS EV METER Communication Connections 31 Grid Connections 32 Energy meter heat pump and internet connection 36 WLAN Dongle Connection 39 Turning on the Product 39 Turning off the Pr...

Page 7: ... Adding a New Installer 60 Registering the PCS Web browser 61 Registering the PCS Mobile App 63 Troubleshooting Error Codes and Messages 66 PCS Error Codes 66 Battery Error Code 72 Battery DC DC Converter Error Code 74 Appendix Maintenance 76 Cleaning the Product 76 Inspecting Regularly 76 Disposing the Product 76 Specifications 77 Others 80 Shift factor effective characteristic cosφ P 80 Reactive...

Page 8: ...maged during a specified test in which it is exposed to vertically dripping water This product should not be disposed of with other household waste Disposal regulations should be observed in this country Caution risk of danger Refer to the installation manual or operating manual Caution hot surface Caution risk of electric shock energy storage timed discharge The relevant equipment complies with t...

Page 9: ...rts solar energy into direct current electricity SOC State of charge Current state of a battery BMS Battery Management System Electronic system that manages a rechargeable battery DC Direct Current AC Alternating Current DHCP Dynamic Host Configuration Protocol Standardized network protocol used on Internet Protocol IP networks for automatic distributing network configuration parameters such as IP...

Page 10: ...e range from south 0 to west 90 and it counted with negative values within the range from south 0 to east 90 Tilt angle The tilt angle indicates by how much degrees the tilt of the module surface deviates from the horizontal PV module The PV module refers to a panel designed to absorb the sun s rays as a source of energy for generating electricity PV array Technical device for the conversion of so...

Page 11: ...is Product Power conditioning system 1EA Wall bracket 1EA Lower cover Grid cable plug Battery cable plugs 2 EA each WLAN dongle Inserted Energy meter plug Heat Pump Plug Communication connector Lower cover screws 2EA Quick Installation Manual User Manual 1EA each ...

Page 12: ... with the cross sectional area 4 mm2 6 mm2 Battery Connections y y Lead wires with the cross sectional area 4 mm2 6 mm2 Grid connections y y Lead wires with the cross sectional area 4 mm2 or thicker including yellow green stripe cable Energy meter and internet connections y y LAN cable y y RJ 45 plug y y Energy meter cable Grounding y y LAN cable y y RJ 45 plug y y Energy meter cable ATS y y ATS C...

Page 13: ...Getting Started 13 Getting Started 1 Name of Each Part Front and Rear A B C E D A PCS body B LED Indications C Lower Cover D Bracket connected part E Screw holes for wall mounting ...

Page 14: ...PCS Fault Solar Off Energy is not being generated Green Energy is being generated White Blink PCS Fault Battery Off Stand by Green Battery is in charging Blue Battery is in discharging Red Blink Battery error White Blink PCS Fault WLAN Off Unplugged WLAN dongle Green Network connected Blue WLAN network connected Red Blink Network disconnected ...

Page 15: ...connectors 2 C ATS BMS EV METER Communication terminals D Black start button E PV switch DC Disconnect F PV1 and connectors G PV2 and connectors H PV3 and connectors I Ethernet port J Meter connector K Heat pump connector L Wireless connection button M WLAN dongle port USB type N AC grid cable connector ...

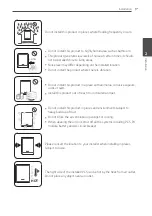
Page 16: ...t on the ground y y The mounting surface must be able to support the weight of this product 34 kg y y Do not install the product on the ceiling y y Do not install the product widthwise or install on a wall with lean more than 10 degrees y y Do not install the product tilting forward y y Install the product the connection side down y y Appropriate operating temperature is from 0 C to 40 C y y Do no...

Page 17: ...o not install this product in a place with ammonia corrosive vapours acids or salts y y Install this product out of reach from children and pet y y Do not install this product in places and environments subject to heavy build up of dust y y Do not block the air ventilation openings for cooling y y When cleaning the air duct shut off all the systems including PCS PV module battery and AC circuit br...

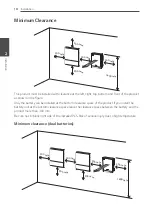
Page 18: ...figure Only the battery can be installed at the bottom clearance space of the product If you install the battery unit at the bottom clearance space leave the clearance space between the battery and the product more than 300 mm Be sure not to block right side of the installed PCS Risk of serious injury due to high temperature Minimum clearance dual batteries 300 mm 300 mm 1600 mm 300 mm 300 mm 300 ...

Page 19: ...e drilling locations are not located on any electrical wiring within the wall NOTE When attaching the wall bracket to a wall adjust the horizontal level using inclinometer b Fix the wall bracket with screws and anchors And insert anchors into the holes at the lower part NOTE y y Before fixing the bracket screws check the horizontal level once again using inclinometer y y Depending on the surface d...

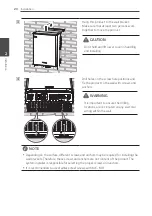
Page 20: ... to the wall with screws and anchors WARNING It is important to ensure the drilling locations are not located on any electrical wiring within the wall NOTE y y Depending on the surface different screws and anchors may be required for installing the wall brackets Therefore these screws and anchors are not content of the product The system installer is responsible for selecting the proper screws and...

Page 21: ... 2 E After finishing every electrical connections assemble the supplied lower cover and fix the screws as shown in the figure NOTE Hold the lower cover when attaching or removing the lower cover Care with handling the lower cover ...

Page 22: ...when the PCS cover is removed y y Before starting electrical cable connections or removing the cover turn off the AC circuit breaker PV switch and DC circuit breaker of the battery In case of re installation turn them off and wait at least 10 minute standby period of time for complete discharge within this product y y When the photovoltaic array is exposed to light it supplies a DC voltage to the ...

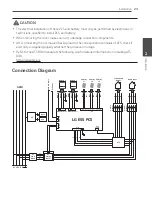
Page 23: ...rid alive or outage y y Refer to the ATS BOX manual at the following site for detailed information on installing ATS BOX https enwitec eu Connection Diagram L1 L2 L3 N 3Φ Power Meter 3Φ Energy Meter B A L1 L2 L3 N LG ESS PCS 1 2 3 N Grid ATS Comm B A Meter Load Output L1 L2 L3 N Lan Ethernet USB USB or Dongle PV1 PV1 PV2 PV2 PV3 PV3 PV PV1 PV1 PV2 PV2 PV3 PV3 PV Array 1 PV Array 2 PV Array 3 Circu...

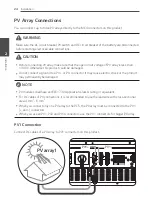
Page 24: ...d be damaged y y Do not connect a ground to a PV or PV connector It may cause electric shock or the product may permanently be damaged NOTE y y PV modules shall have an IEC61730 Application Class A rating or equivalent y y For DC cables of PV connections it is recommended to use the lead wire with cross sectional area 4 mm2 6 mm2 y y When you connect only one PV array to the PCS the PV array must ...

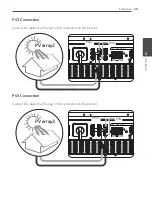
Page 25: ...25 Installation 2 PV2 Connection Connect DC cables of a PV array to PV2 connectors on this product PV2 PV2 PV array2 PV3 Connection Connect DC cables of a PV array to PV3 connectors on this product PV3 PV3 PV array3 ...

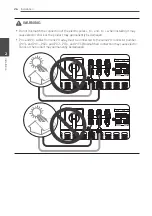
Page 26: ... to when installing It may cause electric shock or the product may permanently be damaged y y PV and PV cables from one PV array must be connected to the same PV connector number PV1 and PV1 PV2 and PV2 PV3 and PV3 Mismatched connection may cause electric shock or the product may permanently be damaged ...

Page 27: ...lel connection to the one PV input on the product It may cause electric shock or the product may permanently be damaged NOTE If there is only one PV array connection needed on the system use PV1 PV1 connectors And insert safety caps on unused connectors PV2 PV2 PV3 PV3 ...

Page 28: ... connections y y Battery replacement can only be carried out by qualified personnel If the battery needs to be changed it should be placed with a product which meets the manufacturer s specifications y y Do not mismatch the connection of the electric poles to and to when installing It may cause electric shock or the product may permanently be damaged CAUTION Incorrect battery polarity connection w...

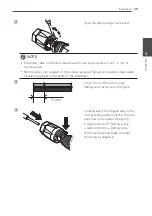
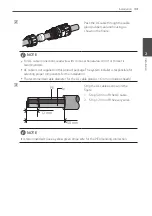
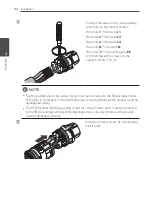
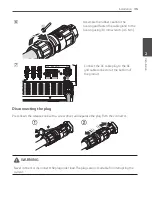
Page 29: ...oduct package The system installer is responsible for selecting proper components for the installation c 15 mm Strip 15 mm off the both and battery wires as shown in the figure d Carefully insert the stripped wires to the corresponding cable connector The wire ends have to be visible in the spring cable connector Battery wire cable connector Battery wire And close the spring Make sure that the spr...

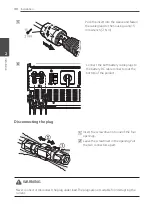
Page 30: ...both battery cable plugs to the battery DC cable connectors at the bottom of the product Disconnecting the plug A Insert the screwdriver into one of the four openings B Leave the screwdriver in the opening Pull the two connectors apart WARNING Never connect or disconnect the plug under load The plugs are not suitable for interrupting the current ...

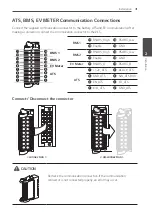
Page 31: ... to the PCS BMS 1 BMS 2 EV Meter ATS BMS1 q RS485_High r RS485_Low o Enable p GND BMS2 m RS485_High n RS485_Low k Enable l GND EV Meter i RS485_A j RS485_B ATS g 12V_ATS h BLACK_ATS e GND_ATS f SW_ATS BOX c EN_ATS d K3_ATS a K14_ATS b GND_ATS Connect Disconnect the connector connection disconnection CAUTION Recheck the communication connection If the communication connector is not connected proper...

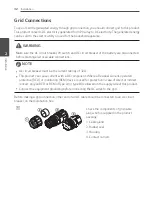
Page 32: ...y y AC circuit breaker must be the current ratings of 32A y y This product can cause current with a DC component Where a Residual Current operated protective RCD or monitoring RCM device is used for protection in case of direct or indirect contact only an RCD or RCM of Type A or type B is allowed on the supply side of this product y y Connect the equipment grounding before connecting the AC wires ...

Page 33: ...cable is not supplied on this product package The system installer is responsible for selecting proper components for the installation y y The recommecded cable diameter for the AC cable gland is 16 mm including sheath C 50 mm 12 mm N PE Strip the AC cable as shown in the figure 1 Strip 50 mm off the AC cable 2 Strip 12 mm off the every wires NOTE It is recommended to use a yellow green stripe wir...

Page 34: ...carriers 1 N m NOTE y y The N neutral hole in the contact carrier must be connected to the N neutral terminal of the AC circuit breaker on the distribution box correctly Otherwise the product could be damaged seriously y y The PE Protective Earth grounding connector in the contact carrier must be connected to the 6 Grounding terminal of the distribution box correctly Otherwise the product could be...

Page 35: ...m wrench 4 5 N m g Connect the AC cable plug to the AC grid cable connector at the bottom of the product Disconnecting the plug Press down the release knob with a screw driver and separate the plug from the connector WARNING Never connect or disconnect the plug under load The plugs are not suitable for interrupting the current ...

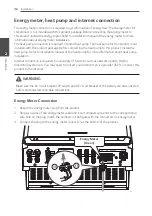
Page 36: ...efer to installation manual of the heat pump for more information about heat pump installation Internet connection is required to use variety of functions such as network update EnerVu monitoring system etc You may need to contact your Internet service provider ISP to connect this product to the internet WARNING Make sure the AC circuit breaker PV switch and DC circuit breaker of the battery are d...

Page 37: ...two wires of the heat pump cable and insert stripped wire ends to the corresponding wire hole on the plug Check the labels BUS A and BUS B on both ends of the connection to connect to the heat pump The BUS A connection on the ESS side should be connected to the BUS A connection on the heat pump side and the BUS B connection on the ESS side should be connected to the BUS B connection on the heat pu...

Page 38: ...plug to the ethernet port at the bottom of the product as shown in the figure LAN DRM Not supported Energy Meter and LAN Connection Diagram PV Array1 Load 1 Disconnection Switch Internet Router Hotspot Bi Directional Meter Grid Energy Meter Internet Load 2 Load 3 PV Array2 Distribution Box ...

Page 39: ...hown in the figure USB Turning on the Product When all the connections are finished check the status in numbering order below 1 Switch the AC circuit breaker to the ON position 2 Switch the DC circuit breaker of the connected battery to the ON position 3 Turn the PV switch of the PCS to the ON position Turning off the Product The order of turning off the product is the reverse order of turning on ...

Page 40: ...ormal load All electrical home load except backup load Additional check point when connecting single phase and high power loads even within the max usable home load capacity Type of load Acceptable Small plug in appliance such as TV Computers Radios Routers Lighting compact Fluorescent or LED recommended Refrigerator and freezers microwaves cookers Unacceptable AWHP Air to water heat pump Air cond...

Page 41: ...at physical connection and installation are done as described in this manual exactly and securely Installing LG EnerVu Plus App Download LG EnerVu Plus on the Apple App Store or Google Play Store OR LG EnerVu Plus NOTE y y Depending on the device LG EnerVu Plus app may not work y y LG EnerVu Plus app will be available in version of the software as follow Android O S Lollipop 5 0 or later iOS O S i...

Page 42: ...us application from Apple App store or Google Play store To connect to the system directly the WLAN dongle must be connected to the system Make sure that the supplied WLAN dongle is connected to the system Connect directly to ESS a Run LG EnerVu Plus app on your mobile device b If it is the first time to connect to the system connection method selection screen appears Tap Connect directly to ESS o...

Page 43: ... been made for 5 minutes the WLAN LED lights green and the WLAN signal is disabled d Read the guidance and tap OK to display WLAN selection screen Select the SSID which starts with LGE_ESS The password input screen appears NOTE The last 2 characters of the SSID are the same as the last 2 characters of the system registration number Example SSID LGE_ESS 5E Registration No LGE ESS DE1710BKRH00685E ...

Page 44: ...LAN password printed in the label outside of the PCS NOTE If the connection failed try after turning off the mobile data option on your mobile device Android If the connection is successful main screen appears as shown in the figure iOS If the connection is successful run LG EnerVu Plus app to display the main screen as shown in the figure ...

Page 45: ...creen appears 2 Tap Installer Setting option to display password input screen 3 Enter the installer password and tap OK to enter the Installer Setting screen Initial password is the case insensitive registration number printed outside of the PCS It is recommeded to change the password after first entering See Other function settings on page 54 for more information of Password Change option ...

Page 46: ... PV PV1 PV2 and PV3 1 Select the currently selected value of each option to change Input menu appears on the screen 2 Input the desired value 3 Select Accept to complete the setting Meter 1 Select the currently selected value of each option to change Input menu appears on the screen 2 Input the desired value 3 Select Save to complete the setting Tap Start Auto to collect the connected energy meter...

Page 47: ...ue 3 Select Save to complete the setting Tap Grid System or System2 to show more setting options for the PCS NOTE y y All the values on the PCS screen should not be edited by user It may cause system malfunction if you change the values by user y y Viewable information names are listed below Stable Volt Mode fixed cosPhi Type fixed cosPhi Setpoint cosPhi P Type cosPhi P Start cosPhi P End cosPhi P...

Page 48: ...u service you need to subscribe to the EnerVu service and activate the devics If the Web server data upload option is not set to On the data may not uploaded to the server Wired Network Setting When the Connection Type option in the Connection Status is set to Wired Wired connection options are displayed If IP Setting option in Wired setting tab is set to Auto the system will automatically be allo...

Page 49: ... field After entering the all the fields tab Connect to finish the wireless network connection If the connection is succesful Internet Connected is displayed on the screen If IP Setting option in Wireless Setting tab is set to Auto this product will be automatically allocated an IP address from local area network LAN via wireless connection You may need to set network connection manually depending...

Page 50: ...ou will not be able to connect this product y y A DSL modem is required to use DSL service and a cable modem is required to use cable modem service Depending on the access method and subscriber agreement with your ISP you may not be able to use the internet connection feature contained in this product or you may be limited to the number of devices you can connect at the same time If your ISP limit...

Page 51: ...est for battery charging through grid Charging from PV The operating test for battery charging through PV Discharging The operating test for battery discharging to grid Inverter The operating test for converting PV s DC power to AC power The result is displayed when each test is completed When there is no problem with the test Success is displayed When Fail is displayed tap each test result to dis...

Page 52: ...ries are installed set the setting to On to use two batteries Battery maker Operating range Winter Mode SOC Battery Installation Date and Battery Capacity can be set manually 1 Select the currently selected value of each option to change Input menu appears on the screen 2 Input the desired value 3 Select Accept to complete the setting CAUTION If the Use batteries setting is set to off or the syste...

Page 53: ... page 63 for more information of system registration with mobile application System Log You can see the list of mode changes system fault and system warning log Refer to Error Codes and Messages on page 66 for more information of error codes messages and solutions Tap System Log on Installer Settings The list of all notice occurring in this product during certain period Set start date and end date...

Page 54: ...sired Temperature C A high desired temperature to change in case of H P DHW On Reboot Select Reboot to reboot system Password Change Select Password Change on Installer Settings The Change Password menu is displayed Enter the new password in the New Password and Password Check filed And then selelct Change Password to complete the password changing Factory Reset Select Factory Reset to set all the...

Page 55: ...ou can set is 30 sec ATS Box Version 10013679 Bender VMD460 After 5 seconds of recovering grid power from the outage the PCS stops the backup mode The power will be supplied to the critical load and the PCS after the time set by the ATS box And then the PCS automatically restarts in normal mode Using the EnerVu application you can set the interval of restarting the system after power recovery Foll...

Page 56: ...internet browser installed computer tablet or mobile with internet access is needed to access EnerVu web monitoring system y y This product must be connected to internet Check Network setting menu on the system y y The system owner must create a LG ESS account before registering the product Refer to Creating a new account Owner section below Creating a New Account Owner a On your browser visit LG ...

Page 57: ...d and select CHECK AVAILABILITY Fill in Password Password confirm and Birthday fields and select CONFIRM The E mail confirmation page appears d A confirmation e mail will be sent to your e mail address On your e mail select CONFIRM to complete the e mail confirmation ...

Page 58: ...ount creation page select CONFIRM to complete creating your account F Select SIGN IN to go to the SIGN IN WITH LG ACCOUNT page Input your User ID and Password and select SIGN IN G Available LG account services are displayed on the screen ...

Page 59: ...nervu lg ess com Select Installer The Installer Sign In page appears b Select Sign Up The Sign Up page appears Fill your mail address in Email field and select Check And then fill the First Name and Last Name fields c Fill the required information on Company Details section And then read the Installer Terms and Installer Privacy Policy carefully If you agree with every terms and policies click I a...

Page 60: ...e mail address and the password and select Installer Sign In B Select the Users tab on the Account page Select Add New User button to open a new user input page C Input first name and last name of new installer Select Role option as User or Administrator User means installer that has not authority to add user or subsidiary Select Company option as parent company or subsidiary And then select AddUs...

Page 61: ...Sign In page appears And then input the installer s e mail address and the password and select Installer Sign In If the installer does not have an account select Sign Up and make a new installer account c Select Activation tab The Add a New System screen appears d Fill every information in the System Info section and select Save to save the information ...

Page 62: ... number and select Check The ESS information will automatically be filled Select Save to go to the next step F Fill the every information In the Owner field and select Save to save the information And Select Activation at the bottom of the page to finish the activation process ...

Page 63: ...tion a Run LG EnerVu Plus app on your mobile device The main screen appears on the screen Tap installer settings Registration b Input installer s ID and Password fields and tap Sign In to login The Enervu menu appears on the screen c Enter the every fields in the EnerVu menu The marked fields are required fields NOTE For complete registering the system Owner email field must be filled If the owner...

Page 64: ...on is in incomplete status the system should be activated through one of the following methods Method 1 For installer a On your browser visit LG EnerVu page at http enervu lg ess com Select Installer The Installer Sign In page appears And then input the installer s e mail address and the password and select Installer Sign In B Select Activation In Process and select the system name you are going t...

Page 65: ...nish the activation process Method 2 For owner Inform the system owner to make an owner account and login at EnerVu page The registration number input screen appears as in the figure Note the registration number from the system and input the number to finish the activation NOTE Refer to Creating a new account on page 56 for more information of making a new account ...

Page 66: ...correct wiring grid connection has detected Contact service center P401 Meter Comm Fault Communication error with the energy meter Contact service center P403 BMS A Comm Fault Communication error with the connected battery for over 30 seconds Contact service center P404 PMS Comm Fault Communication error with the connected PMS for over 60 seconds Contact service center P405 SDSP Comm Fault Communi...

Page 67: ...oltage Voltage level of the grid L3 is higher than the limitation Automatically restart after detecting fault P466 Grid L1 Over Voltage 10min The 10minutes average voltage level of the grid L1 is higher than the limitation Automatically restart after detecting fault P467 Grid L2 Over Voltage 10min The 10minutes average voltage level of the grid L2 is higher than the limitation Automatically restar...

Page 68: ... of PV A is higher than the limitation Automatically restart after PV A voltage is normal P507 PVB Over Voltage Voltage level of PV B is higher than the limitation Automatically restart after PV B voltage is normal P508 Batt A Over Voltage Voltage level of battery A is higher than the limitation Automatically restart after Battery A voltage is normal P509 PVC Over Voltage Voltage level of PV C is ...

Page 69: ...n the limitation Automatically restart after Grid L2 Current is normal P521 L3 Over Current Instant Current level of the grid L3 is instantaneously higher than the limitation Automatically restart after Grid L3 Current is normal P522 Batt A Over Current Current level of the battery A is higher than the limitation Automatically restart after Battery A Current is normal P523 PVA Over Current Current...

Page 70: ...atically restart after detecting fault P538 Grid Relay7 Grid relay is not operable N 1 Automatically restart after detecting fault P539 Grid Relay8 Grid relay is not operable N 2 Automatically restart after detecting fault P540 SDSP Detection The sub processing unit in the product is in fault Automatically restart after detecting fault P541 Fan Detection The cooling fan 1 in the product is in faul...

Page 71: ...power line of battery B is not connected Automatically restart after detecting fault P555 Unacceptable Load Fault L1 unacceptable L1 load is connected in backup mode Check if the unacceptable load is connected P556 Unacceptable Load Fault L2 unacceptable L2 load is connected in backup mode Check if the unacceptable load is connected P557 Unacceptable Load Fault L3 unacceptable L3 load is connected...

Page 72: ... restart after detecting fault B192 Under Temperature warning The battery temperature is lower than the limitation Automatically restart after detecting fault B193 Cell Voltage Imbalance Warning Cell Voltage differences between the battery cells are higher than the limitation Automatically restart after detecting fault B194 Cell Under Voltage Warning Cell Voltage level of battery cell is lower tha...

Page 73: ...ce center B617 Battery Monitoring IC Loss Of Communication Fault 2 Battery Monitoring IC Loss Of Communication Fault 2 Contact service center B618 PCS Loss Of Communication Fault2 PCS Loss Of Communication Fault 2 Contact service center B622 Over Discharge Power Limit Fault Discharge Power of the battery is lower than the limitation Contact service center B623 Over Charge Power Limit Fault Charge ...

Page 74: ...re Automatically restart after detecting fault B367 DDC_BMS_Loss of Communication DC DC BMS Loss of Communication Automatically restart after detecting fault B638 DDC_INVERTER_Loss of Communication DC DC INVERTER Loss of Communication Automatically restart after detecting fault B639 OVP CB Open Over Voltage Protection Curcuit Breaker Open Contact service center B640 Reverse Polarity_PV power charg...

Page 75: ... 7 06493 Harzgerode Tel Germany 0049 0 39484 976 380 Austria 0043 0 720 11 66 01 Switzerland 0041 0 44 505 11 42 Belgium Netherlands Luxembourg 0031 20 456 1660 E Mail lge e service48 de 3 LG Electronics Contact LG Electronics Deutschland GmbH Alfred Herrhausen Allee 3 5 65760 Eschborn Tel 0049 18 06 807 020 E Mail b2b service lge de LG Electronics Benelux Krijgsman 1 1186 DM Amstelveen The Nether...

Page 76: ...ith strong pressure may damage the surface Do not leave rubber or plastic products in contact with the product for a long period of time When cleaning the air duct shut off all the systems including PCS PV module battery AC circuit breaker After that clean the filter with soft brush Inspecting Regularly It is recommended to check the operating status and connection status once a year It should be ...

Page 77: ... AC Voltage Range 319 458 V 184 264 5 V Frequency Range 50Hz 47 5 Hz 51 5 Hz Rated Output Power 8 kVA 10 kVA Rated Output current 11 5 A 14 4 A THD Power Factor 5 0 8 Inrush current peak and duration 70 Aac 0 02 ms Max output fault current 80 Aac 20 ms Max output overcurrent protection 55 6 Apeak Backup output LG ESS Home 8 LG ESS Home 10 Maximum usable home load capacity in backup operation 1 Sin...

Page 78: ...0 V Voltage nominal or range Charge 400 450 VDC Discharge 350 430 VDC Charge 400 450 VDC Discharge 350 430 VDC 1 Value for battery cell only depth of discharge 95 capacity may be limited to protect system 2 The capacity may decrease as the battery ages Efficiency PCS Max Efficiency PV to Grid 97 7 General Data Dimensions W H D mm 450 599 210 PCS 746 688 206 LGHB 7H 746 903 206 LGHB 10H Weight 34 k...

Page 79: ...t the installer y y Design and specifications are subject to change without notice Contact office for compliance of this product LG Electronics European Shared Service Center B V Krijgsman 1 1186 DM Amstelveen The Netherlands www lg com global business ess SIMPLIFIED EU DECLARATION OF CONFORMITY Hereby LG Electronics declares that the radio equipment type PCS Unit is in compliance with Directive 2...

Page 80: ...r Start 50 cosphi P Start 1 cosphi P End 0 9 cosphi P End 0 9 Name Description Default Value Available Value Uint cosphi P Start cosphi at starting point 1 0 9 1 cosphi P End cosphi at end point 0 95 0 9 1 cosphi P Power Start Active power at starting point P Pmax 50 20 100 cosphi P Power End Active power at End point P Pmax 100 20 100 ...

Page 81: ...Grid voltage point a U Un 90 80 120 Q U Xb Grid voltage point b U Un 92 80 120 Q U Xc Grid voltage point c U Un 108 80 120 Q U Xd Grid voltage point d U Un 110 80 120 Q U Ya Reactive power point a Q Sr 43 6 43 6 43 6 Q U Yb Reactive power point b Q Sr 0 43 6 43 6 Q U Yc Reactive power point c Q Sr 0 43 6 43 6 Q U Yd Reactive power point d Q Sr 43 6 43 6 43 6 Q U Lock in Active power lock in P Pn 1...

Page 82: ...er Hz 40 Name Description Default Value Available Value Uint P f Active Power Active power gradient at overfereuency 40 0 100 P f Start Freq P f function starting frequency 50 2 50 51 5 Hz P f Reset Freq P f function reset frequency 50 18 50 51 5 Hz P f wait time Waiting time of active power gradient after reset frequency 1 60 sec ...

Page 83: ... U Active Power 100 0 Name Description Default Value Available Value Uint P U Active Power Active power gradient at overvoltage 100 0 100 P U Start Voltage P U function starting voltage U Un 110 100 120 P U End Voltage P U function end voltage U Un 112 100 120 P U wait time Waiting time of active power gradient 1 60 sec ...

Page 84: ......

Page 85: ... der Installation des Gerätes sorgfältig durch und bewahren Sie sie zum späteren Nachschlagen auf MODELL LG ESS Home 10 D010KE1N211 LG ESS Home 8 D008KE1N211 https www lg com global business ess business resources download Rev D 04 11 2020 Copyright 2019 2020 LG Electronics Inc Alle Rechte vorbehalten ...

Page 86: ... y Elektroinstallationen müssen in Übereinstimmung mit den vor Ort und im Land geltenden Sicherheitsstandards durchgeführt werden y y Bei Arbeiten an Hochspannungs Starkstromsystemen wie zum Beispiel an PCS und Akkusystemen PCS Power Conditioning System Spannungsaufbereitungssystem unbedingt Gummihandschuhe und Schutzkleidung Schutzbrille und Schutzschuhe tragen y y Es besteht Stromschlaggefahr Ni...

Page 87: ...iert werden Sorgen Sie für einen ordnungsgemäßen Betrieb des Produkts und schützen Sie es vor Überhitzung Auf keinen Fall dürfen Öffnungen blockiert werden z B indem Gegenstände auf dem Produkt abgelegt werden y y Während des Betriebs kann die Temperatur im Metallgehäuse hoch sein y y Um Funkwellen Interferenzen zu vermeiden müssen alle Zubehörteile wie zum Beispiel der Energiezähler die für den A...

Page 88: ...ieses Produkts keine Lösungsmittel Scheuermittel oder ätzenden Mittel benutzen y y Keine Gegenstände auf dem Produkt ablegen oder daran anlehnen Das könnte zu schweren Defekten oder Funktionsstörungen führen y y Überzeugen Sie sich vor Anschließen des Produkts davon dass der PV Schalter dieses Produkts ausgeschaltet ist y y Die Einheit ist dazu ausgelegt Strom in das öffentliche Stromversorgungsne...

Page 89: ...eugte Elektrizität kann im angeschlossenen Akku gespeichert oder an ein Energieversorgungsunternehmen verkauft werden y y Galvanisch gekoppelte ESS Das galvanisch gekoppelte ESS von LG ESS Energy Storage System Energiespeichersystem erzielt eine höhere Systemeffizienz weil der Vorgang zur Stromumwandlung einfacher ist y y 3 phasiger Anschluss Der 3 phasige Anschluss sorgt für Phasenausgleich y y S...

Page 90: ...nzeigen 14 Unten 15 Installation Wahl des Aufstellungsorts 16 Montageort 16 Mindestabstände 18 Wandmontage 19 Anschlüsse 22 Überblick über die Anschlüsse 22 Anschlussplan 23 Anschlüsse PV String 24 Anschlüsse für Akku 28 Kommunikations Anschlüsse ATS BMS EV ZÄHLER 31 Energiezähler Wärmepumpe und Internetverbindung 36 Anschluss von WLAN Dongle 39 Produkt einschalten 39 Produkt ausschalten 39 Anschl...

Page 91: ...es Konto anlegen Administrator 59 Einen neuen Installateur hinzufügen 60 PCS Registrierung mit Web Browser 61 PCS Registrierung mit App auf Mobilgerät 63 Fehlerbehebung Fehlercodes und Meldungen 66 PCS Fehler 66 Akku Fehlercode 72 Akku DC DC Konverter Fehlercode 74 Anhang Wartung 76 Das Produkt reinigen 76 Regelmäßige Inspektionen 76 Produkt entsorgen 76 Technische Daten 77 Sonstiges 80 Verschiebu...

Page 92: ...en Test nicht beschädigt bei dem es vertikal tropfendem Wasser ausgesetzt wird Dieses Produkt darf nicht mit dem Hausmüll entsorgt werden Es müssen die im betreffenden Land geltenden Entsorgungsvorschriften befolgt werden Vorsicht Gefahr Siehe Installationsanleitung oder Betriebsanleitung Vorsicht heiße Oberfläche Vorsicht Stromschlaggefahr zeitlich festgelegte Entladung gespeicherter Energie Die ...

Page 93: ...en Energie aus der Sonne in Gleichstrom umwandelt SOC Ladezustand SOC State of Charge Ladezustand des Akkus BMS Battery Management System Kontroll Einheit die das Laden und Entladen des Akkus steuert DC Gleichstrom DC Direct Current AC Wechselstrom AC Alternating Current DHCP Dynamic Host Configuration Protocol Standardisiertes Netzwerkprotokoll das in Internet Protocol IP Netzwerken benutzt wird ...

Page 94: ... Der Azimutwinkel wird im Bereich von Süden 0 bis Westen 90 mit positiven Werten angegeben im Bereich von Süden 0 bis Osten 90 mit negativen Werten Neigungswinkel Der Neigungswinkel gibt an um wie viel Grad die Neigung der Moduloberfläche von der Horizontalen abweicht PV Modul Zusammenschaltung mehrerer Solarzellen in einem Modul zur Umwandlung von Solarenergie in einen elektrischen Gleichstrom bz...

Page 95: ...ngs system jeweils 1 Wandhalterung jeweils 1 Untere Abdeckung Kabelstecker Akku Akkukabel Stecker jeweils 2 WLAN Dongle Einfügen Stecker für Energiezähler Wärmepumpen Anschluss Konnektor für Kommunikation Schrauben für untere Abdeckung jeweils 2 Anleitung Schnellinstallation und Bedienungsanleitung jeweils 1 ...

Page 96: ...ungsdrähte mit Querschnittsfläche von 4 mm2 6 mm2 Anschlüsse für Akku y y Leitungsdrähte mit Querschnittsfläche von 4 mm2 6 mm2 Anschlüsse Netz y y Leitungsdrähte mit Querschnittsfläche von 4 mm2 oder dicker einschließlich gelb grün gestreifter Leitung Energiezähler und Internetverbindung y y LAN Kabel y y RJ 45 Stecker y y Kabel für Energiezähler Erdung y y Potentialausgleichschiene PE Schiene AT...

Page 97: ...ste Schritte 13 Erste Schritte 1 Bezeichnung der einzelnen Teile Vorne und hinten A B C E D A PCS Körper B LED Anzeigen C Untere Abdeckung D Wandhalterungsverbindungsteil E Schraubenlöcher für Wandmontage ...

Page 98: ...hlossen Weiß blinkend PCS Fehler Solar Aus Es wird kein Strom erzeugt Grün Es wird Strom erzeugt Weiß blinkend PCS Fehler Battery Aus Standby Grün Akku wird geladen Blau Akku wird entladen Rot blinkend Fehler bei Akku Weiß blinkend PCS Fehler WLAN Aus Ungesteckter WLAN Dongle Grün Mit Netzwerk verbunden Blau Mit WLAN verbunden Rot blinkend Von Netzwerk getrennt ...

Page 99: ...Akku C Kommunikations Anschlüsse ATS BMS EV ZÄHLER D Schwarze Starttaste E PV Schalter DC trennen F Anschlüsse PV1 und G Anschlüsse PV2 und H Anschlüsse PV3 und I Ethernet Anschluss J Anschluss Zähler K Anschluss Wärmepumpe L Taste für Drahtlosverbindung M Anschluss für WLAN Dongle Typ USB N AC Kabelstecker Netz ...

Page 100: ...che auf der das Gerät montiert wird muss das Gewicht dieses Produkts 34 kg tragen können y y Das Produkt nicht an der Decke installieren y y Dieses Produkt nicht breitseitig installieren oder an einer Wand die um mehr als 10 Grad geneigt ist y y Das Produkt nicht mit Neigung nach vorne installieren y y Das Produkt mit der Anschlussseite nach unten installieren y y Geeignete Betriebstemperatur von ...

Page 101: ... wo es mit Ammoniak ätzenden Dämpfen Säuren oder Salzen in Berührung kommen kann y y Das Produkt außerhalb der Reichweite von Kindern und Haustieren installieren y y Dieses Produkt nicht an Plätzen oder in Umgebungen installieren wo sich viel Staub ansammelt y y Die Öffnungen die zur Luftzirkulation und Kühlung dienen unbedingt frei lassen y y Vor Reinigen des Luftkanals alle System Komponenten ei...

Page 102: ...ildung Im Freiraum unterhalb des Produkts darf nur der Akku installiert werden Falls Sie den Akku im Freiraum unterhalb des Produkts installieren muss zwischen Akku und Produkt ein Abstand von über 300 mm eingehalten werden Darauf achten dass die rechte Seite des installierten PCS nicht blockiert wird Gefahr schwerer Verletzung durch hohe Temperatur Mindestabstände Doppel Akku 300 mm 300 mm 1600 m...

Page 103: ...den Stellen an denen der Bohrer angesetzt wird keine elektrischen Kabel verlegt sind HINWEIS Wenn Sie die Wandhalterung an der Wand anbringen sorgen Sie für horizontalen Sitz indem Sie den Neigungsmesser benutzen b Die Wandhalterung mit Dübel und Schrauben befestigen In die Löcher unten Dübel einsetzen HINWEIS y y Vor dem Festziehen der Schrauben noch einmal mit einem Neigungsmesser prüfen dass di...

Page 104: ...mit Dübel und Schrauben an der Wand befestigen WARNUNG Darauf achten dass unter den Stellen an denen der Bohrer angesetzt wird keine elektrischen Kabel verlegt sind HINWEIS y y Welche Schrauben und Dübel zur Anbringung der Wandhalterungen erforderlich sind hängt von der Wandbeschaffenheit ab Darum sind die Schrauben und Dübel nicht Bestandteil des Lieferumfangs Der Installateur des Systems ist ver...

Page 105: ...rchführung aller elektrischen Anschlüsse die untere Abdeckung anbringen und mit den Schrauben befestigen siehe Abbildung HINWEIS Beim Anbringen oder Entfernen der unteren Abdeckung diese festhalten Die untere Abdeckung mit Vorsicht behandeln ...

Page 106: ...rten Drähte berühren y y Bevor Sie die elektrischen Kabelanschlüsse herstellen oder die Abdeckung abnehmen erst den AC Hauptschalter den PV Schalter und den DC Hauptschalter des Akkus auf AUS schalten Bei einer erneuten Installation diese Schalter auf AUS schalten und das Produkt in Bereitschaft lassend mindestens 10 Minuten warten damit es sich vollständig entlädt y y Wird dem Photovoltaik String...

Page 107: ...z unter Spannung steht oder ausgefallen ist y y Detaillierte Informationen zur Installation der ATS BOX finden Sie im Handbuch zur ATX BOX auf der folgenden Website https enwitec eu Anschlussplan L1 L2 L3 N 3Φ Power Meter 3Φ Energy Meter B A L1 L2 L3 N LG ESS PCS 1 2 3 N Grid ATS Comm B A Meter Load Output L1 L2 L3 N Lan Ethernet USB USB or Dongle PV1 PV1 PV2 PV2 PV3 PV3 PV PV1 PV1 PV2 PV2 PV3 PV3...

Page 108: ...ukt beschädigt werden y y Am Anschluss PV oder PV kein Erdungskabel anschließen Sonst besteht Stromschlaggefahr oder das Produkt könnte nachhaltig beschädigt werden HINWEIS y y PV Module müssen IEC61730 Anwendungsklasse A oder einem äquivalenten Standard entsprechen y y Für die DC Kabel der PV Anschlüsse wird empfohlen dass die Zuleitungsdrähte eine Querschnittsfläche im Bereich von 4 mm2 bis 6 mm...

Page 109: ...tallation 2 Anschluss PV2 DC Kabel einer PV String an PV2 Anschlüsse dieses Produkts anschließen PV2 PV2 PV String 2 Anschluss PV3 DC Kabel einer PV String an PV3 Anschlüsse dieses Produkts anschließen PV3 PV3 PV String 3 ...

Page 110: ...schlaggefahr oder das Produkt könnte nachhaltig beschädigt werden y y Die Kabel PV und PV von der PV Reihe müssen an den PV Konnektor mit derselben Nummer angeschlossen werden PV1 und PV1 PV2 und PV2 PV3 und PV3 Bei Vertauschen der Anschlüsse besteht Stromschlaggefahr und das Produkt könnte nachhaltig beschädigt werden ...

Page 111: ...des Produkts anschließen Sonst besteht Stromschlaggefahr oder das Produkt könnte nachhaltig beschädigt werden HINWEIS Muss nur eine PV String ans System angeschlossen werden dann die Konnektoren PV1 und PV1 benutzen In die nicht benutzten Anschlüsse PV2 PV2 PV3 PV3 Sicherheitskappen setzen ...

Page 112: ...r des Akkus auf AUS zu schalten damit die Anschlüsse getrennt werden y y Der Austausch von Akkus darf nur von Fachkräften ausgeführt werden Falls der Akku ausgetauscht werden muss dann muss der neue Akku den Spezifikationen des Herstellers entsprechen y y Beim Installieren Pluspol und Minuspol nicht vertauschen Sonst besteht Stromschlaggefahr oder das Produkt könnte nachhaltig beschädigt werden VO...

Page 113: ...antwortlich die für die Installation geeigneten Komponenten auszuwählen C 15 mm Die und Drähte des Akkukabels um 15 mm abisolieren siehe Abbildung d Vorsichtig die abisolierten Kabelenden in den entsprechenden Kabel Konnektor einführen Die Drahtenden müssen in der Feder sichtbar sein Kabel Konnektor Akku Draht Kabel Konnektor Akku Draht Und Feder schließen Darauf achten dass die Feder eingerastet ...

Page 114: ...hraubendreher auf den Freigabeknopf drücken und dann den Stecker vom Anschluss trennen A Den Schraubendreher in eine der vier Öffnungen einführen B Den Schraubendreher in der Öffnung lassen Die beiden Konnektoren zu Seite auseinander ziehen WARNUNG Niemals den Stecker trennen wenn er Strom führt Die Stecker sind nicht geeignet den Strom zu unterbrechen ...

Page 115: ... EV Meter ATS BMS1 q RS485_High r RS485_Low o Enable p GND BMS2 m RS485_High n RS485_Low k Enable l GND EV Meter i RS485_A j RS485_B ATS g 12V_ATS h BLACK_ATS e GND_ATS f SW_ATS BOX c EN_ATS d K3_ATS a K14_ATS b GND_ATS Den Konnektor anschließen trennen Verbindung keine Verbindung VORSICHT Überprüfen Sie noch einmal den Anschluss für die Kommunikation Falls der Stecker nicht ordnungsgemäß mit dem ...

Page 116: ... HINWEIS y y Der AC Hauptschalter muss eine Strombelastbarkeit von 32 A haben y y Dieses Produkt kann zusammen mit einer DC Komponente das Fließen von Strom bewirken Wird im Fall eines direkten oder indirekten Kontaktes zum Schutz ein Fehlerstromschutzschalter RCD Residual Current Device oder ein Fehlerstromüberwachungsgerät RCM Residual Current Monitor verwendet dann ist auf der Lieferseite diese...

Page 117: ...n nicht zum Lieferumfang dieses Produkts Der Installateur des Systems ist verantwortlich die für die Installation geeigneten Komponenten auszuwählen y y Der empfohlene Kabeldurchmesser für die AC Kabelverschraubung ist 16 mm einschließlich Ummantelung C 50 mm 12 mm N PE Die Enden des AC Kabels abisolieren siehe Abbildung 1 Das AC Kabel um 50 mm abisolieren 2 Die Adern um 12 mm abisolieren HINWEIS ...

Page 118: ...taktträgern festziehen 1 N m HINWEIS y y Das N Loch neutral am Kontaktträger muss ordnungsgemäß verbunden werden mit dem N Anschluss neutral des AC Hauptschalters im Verteilerkasten Sonst könnte das Produkt schwer beschädigt werden y y Der PE Anschluss PE Protective Earth Schutzerde muss ordnungsgemäß verbunden werden mit dem 6 Anschluss G Grounding Erdung des Verteilerkastens Sonst könnte das Pro...

Page 119: ...benschlüssel benutzen 4 5 N m g Unten beim Produkt den AC Kabelstecker Netz am Stecker für das AC Kabel anschließen Stecker trennen Mit einem Schraubendreher auf den Freigabeknopf drücken und dann den Stecker vom Konnektor trennen WARNUNG Niemals den Stecker trennen wenn er Strom führt Die Stecker sind nicht geeignet den Strom zu unterbrechen ...

Page 120: ...tung Eine Internetverbindung ist erforderlich um verschiedene Funktionen nutzen zu können zum Beispiel um Updates über das Netzwerk durchzuführen um das EnerVu Überwachungssystem zu nutzen usw Um dieses Produkt mit dem Internet zu verbinden müssen Sie eventuell Ihren Internet Dienstanbieter ISP Internet Service Provider kontaktieren WARNUNG Daran denken vor der Verlegung und Herstellung der elektr...

Page 121: ...rennen 2 Zwei Drähte des Wärmepumpen Kabels abisolieren und die abisolierten Enden ins entsprechende Loch des Steckers einführen Bei beiden Enden die Bezeichnungen BUS A und BUS B daraufhin prüfen dass sie die Verbindung zur Wärmepumpe herstellen Der Anschluss BUS A auf ESS Seite muss mit Anschluss BUS A auf Wärmepumpen Seite verbunden werden Der Anschluss BUS B auf ESS Seite muss mit Anschluss BU...

Page 122: ... Ethernet Anschluss des Produkts anschließen siehe Abbildung LAN DRM nicht unterstützt Anschlussplan für Energiezähler und LAN PV String 1 Last 1 Schalter für Trennung Internet Router Hotspot Bidirektionaler Stromzähler Stromnetz Energiezähler Internet Last 2 Last 3 PV String 2 Verteilerkasten ...

Page 123: ...ießen siehe Abbildung USB Produkt einschalten Nach Fertigstellung aller Anschlüsse den Status prüfen indem Sie dazu in der unten angegeben Schrittfolge vorgehen 1 Den AC Hauptschalter auf ON EIN schalten 2 Den DC Hauptschalter des angeschlossenen Akkus auf ON EIN schalten 3 Den PV Schalter des PCS auf ON EIN schalten Produkt ausschalten Zum Ausschalten des Produkts gehen Sie wie beim Einschalten v...

Page 124: ...ußer Reserve Last Zusätzlicher Prüfpunkt bei Anschluss von 1 phasigen Lasten und Hochleistungs Lasten auch bei maximal nutzbare Heim Belastbarkeit Lastart Zulässig Kleine an eine Steckdose anzuschließende Geräte wie Fernseher Computer Radios Router Beleuchtung kompakte Leuchtstofflampen oder LED empfohlen Kühlschrank und Tiefkühler Mikrowelle Herd Unzulässig AWHP Air to water heat pump Luft Wasser...

Page 125: ...chen Anschlüsse und Installationsarbeiten gemäß den Beschreibungen in diesem Handbuch ordnungsgemäß und sicher durchgeführt worden sind Die App LG EnerVu Plus installieren Die App LG EnerVu Plus aus dem Apple App Store oder Google Play Store herunterladen OR LG EnerVu Plus HINWEIS y y Es ist vom Gerät abhängig ob LG EnerVu Plus auf ihm ausgeführt werden kann oder nicht y y LG EnerVu Plus gibt es f...

Page 126: ...en und herunterladen Um eine Verbindung zum System herstellen zu können muss am System der WLAN Dongle angeschlossen sein Vergewissern Sie sich dass der WLAN Dongle am System angeschlossen ist Direkt mit dem ESS verbinden a Auf dem Mobilgerät die App LG EnerVu Plus ausführen b Wird die Verbindung zum System erstmals hergestellt wird der Bildschirm zur Auswahl der Verbinungsmethode angezeigt Auf di...

Page 127: ...gestellt ist leuchtet die WLAN LED grün und das WLAN Signal wird deaktiviert d Lesen Sie die Anleitung und tippen Sie auf OK um den Bildschirm für die WLAN Auswahl anzuzeigen Die SSID auswählen welche mit LGE_ESS beginnt Der Bildschirm zur Eingabe des Passworts erscheint HINWEIS Die letzten 2 Zeichen der SSID sind identisch mit den letzten 2 Zeichen der Systemregistrierungsnummer Beispiel SSID LGE...

Page 128: ...t außen am PCS HINWEIS Falls der Verbindungsaufbauversuch fehlschlägt versuchen Sie es noch einmal nachdem Sie bei Ihrem Mobilgerät die Option Mobile Daten ausgeschaltet haben Android Ist die Verbindung erfolgreich aufgebaut worden wird der Hauptbildschirm angezeigt siehe Abbildung iOS Ist die Verbindung erfolgreich aufgebaut worden die App LG EnerVu Plus ausführen um den Hauptbildschirm anzuzeige...

Page 129: ...nster zur Eingabe des Passworts einzublenden 3 Das Installateur Passwort eingeben und dann auf OK tippen um zum Bildschirm Installateur Einstellungen zu gelangen Das Anfangspasswort entspricht der Registrierungsnummer die außen auf dem PCS System aufgedruckt ist Es kann ohne Beachtung von Groß und Kleinschreibung eingegeben werden Es wird empfohlen nach dem ersten Aufrufen dieses Bildschirms das P...

Page 130: ... zu ändern das Feld mit dem derzeitigen Wert auswählen Dann wird auf dem Bildschirm ein Eingabemenü angezeigt 2 Geben Sie den gewünschten Wert an 3 Auf Übernehmen tippen um die Einstellung abzuschießen Zähler 1 Um einen Einstellwert zu ändern das Feld mit dem derzeitigen Wert auswählen Dann wird auf dem Bildschirm ein Eingabemenü angezeigt 2 Geben Sie den gewünschten Wert an 3 Auf Übernehmen tippe...

Page 131: ...gezeigt 2 Den gewünschten Wert angeben 3 Auf Übernehmen tippen um die Einstellung abzuschießen Um weitere Einstelloptionen für das PCS zu sehen auf Grid System oder System2 tippen HINWEIS y y Der Benutzer sollte nicht alle Werte auf dem PCS Bildschirm bearbeiten es könnte sonst zu Fehlern im System kommen y y Nachfolgend sind die Daten aufgelistet die eingesehen werden können Stable Volt Mode fixe...

Page 132: ...u Dienst registrieren und dann die Geräte aktivieren Ist die Funktion Hochladen von Daten zum Web Server nicht auf Ein geschaltet werden die Daten nicht zum Server hochgeladen Einstellungen für drahtgebundenes Netzwerk Wenn unter Verbindungsstatus die Option Verbindungsart auf Drahtgebunden gestellt ist werden die Optionen für eine drahtgebundene Verbindung angezeigt Ist auf dem Register Einst Kab...

Page 133: ...binden tippen um die Einrichtung der Drahtlosnetzwerk Verbindung abzuschließen Wenn die Verbindung erfolgreich aufgebaut ist wird Internet verbunden auf dem Bildschirm angezeigt Ist auf dem Register WLAN Einstellungen die Option IP Einstellung auf Automatisch gestellt wird diesem Produkt vom lokalen Netzwerk LAN über die drahtgebundene Verbindung automatisch eine IP Adresse zugewiesen Falls durch ...

Page 134: ... nicht mit dem Internet verbinden y y Um einen DSL Dienst nutzen zu können ist ein DSL Modem erforderlich und für ein Kabelmodem Dienst ist ein Kabelmodem erforderlich Je nach Internet Zugriffsmethode und Nutzungsvertrag mit Ihrem Internet Dienstanbieter kann es sein dass Sie die Internetfunktion dieses Produkts nicht nutzen können oder es kann sein dass die Anzahl der gleichzeitig verbundenen Ger...

Page 135: ...h das Netz Aufladen von PV Betriebstest Akku aufladen durch PV Entladen Betriebstest Strom von Akku abführen ins Netz Wechselrichter Betriebstest DC Strom von PV umwandeln in AC Strom Sobald ein Test durchgeführt worden ist wird dessen Ergebnis angezeigt Wenn die getestete Funktion einwandfrei funktioniert wird Erfolg angezeigt Falls Fehler angezeigt wird tippen Sie auf jedes einzelne angezeigte T...

Page 136: ... Akkus installiert und sollen beide benutzt werden stellen Sie die Einstellung auf Ein Die Werte für Akku Hersteller Betriebsbereich Ladezustand Winter Modus Akku Installationsdatum und Akkuleistung können manuell festgelegt werden 1 Um einen Einstellwert zu ändern das Feld mit dem derzeitigen Wert auswählen Dann wird auf dem Bildschirm ein Eingabemenü angezeigt 2 Geben Sie den gewünschten Wert an...

Page 137: ...Registrierung des PCS auf Seite 63 Systemprotokoll Es ist möglich die Liste der protokollierten Modus Änderungen Systemfehler und Systemwarnungen einzusehen Weitere Informationen zu Fehlercodes Meldungen und Lösungen finden Sie unter Fehlercodes und Meldungen auf Seite 66 Unter Installateur Einstellungen auf Systemprotokoll tippen Es wird die Liste aller Ereignisse angezeigt die in einem bestimmte...

Page 138: ...ur die geändert werden muss falls H P DHW Ein ist Neustart Um das System neu zu starten booten Neustart wählen Passwort ändern Unter Installateur Einstellungen auf Passwort ändern tippen Das Menü Passwort ändern wird angezeigt In die Felder Neues Passwort und Passwort Überprüfung jeweils das neue Passwort eingebeben Um dann die Änderung des Passworts in Kraft zu setzen auf Passwort ändern tippen Z...

Page 139: ...sec ATS Box Version 10013679 Bender VMD460 Wenn nach einem Netzausfall der Strom wieder fließt dauert es 5 Sekunden bis das PCS Power Conditioning System Spannungsaufbereitungssystem den Reserve Modus beendet Nach Ablauf des bei der ATS Box festgelegten Zeitintervalls wird Strom zur kritischen Last und zum PCS geliefert Und dann startet das PCS neu im Normalbetriebsmodus Mit der EnerVu Applikation...

Page 140: ...Tablet oder Mobilgerät mit Internetzugang und installiertem Internet Browser erforderlich y y Das Produkt muss mit dem Internet verbunden sein Überprüfen Sie bei diesem System die Einstellungen unter Netzwerk y y Der System Eigner muss ein LG ESS Konto einrichten bevor das Produkt registriert werden kann Siehe den Abschnitt unten Ein neues Konto anlegen Eigner Ein neues Konto anlegen Benutzer a Mi...

Page 141: ...elder Passwort Passwort bestätigen und Geburtsdatum ausfüllen und dann BESTÄTIGEN wählen d An die angegebene E Mail Adresse wird eine Bestätigungs E Mail gesendet Klicken in der E Mail auf BESTÄTIGEN um die Bestätigung per E Mail abzuschließen e Auf der Seite zum Anlegen des Kontos BESTÄTIGEN wählen um das Anlegen des Kontos abzuschließen ...

Page 142: ...ungen 3 F EINLOGGEN auswählen um zur Seite MELDEN SIE SICH MIT IHREM LG KONTO AN zu gelangen Benutzer ID und Passwort eingeben und EINLOGGEN auswählen G Auf dem Bildschirm werden die verfügbaren Dienste des LG Kontos angezeigt ...

Page 143: ...egistrieren auswählen Die Seite Sich registrieren wird angezeigt Ins Feld E Mail tragen Sie die E Mail Adresse ein und wählen dann Überprüfen Dann in den Feldern Vorname und Nachname die entsprechenden Angaben machen C Im Abschnitt Unternehmensdetails die entsprechenden Angaben machen Dann aufmerksam die Installateur Bestimmungen und Installateur Datenschutzrichtlinien aufmerksam durchlesen Wenn S...

Page 144: ...ählen Die Schaltfläche Neuen Benutzer hinzufügen auswählen damit sich eine neue Seite öffnet auf der die Angaben zu einem neuen Benutzer eingetragen werden können C Den Vornamen und den Nachnamen des neuen Installateurs eingeben Legen Sie dessen Rolle fest entweder als Benutzer oder als Administrator Benutzer bedeutet Installateur der nicht die Befugnis hat Benutzer oder eine Zweigniederlassung hi...

Page 145: ...nn die E Mail Adresse des Installateurs sowie das Passwort eingeben dann Einloggen Installateur wählen Falls der Installateur kein Konto hat Sich registrieren auswählen um eine neues Installateur Konto anzulegen C Das Register Aktivierung auswählen Der Bildschirm Ein neues System hinzufügen wird angezeigt d Im Feld System Info die entsprechenden Daten eintragen und dann Speichern auswählen um die ...

Page 146: ...auswählen Das Feld wird automatisch mit den ESS Daten gefüllt Um mit dem nächsten Schritt fortzufahren Speichern auswählen F Bei Eigner die entsprechenden Daten eintragen und dann Speichern auswählen um die Daten zu speichern Unten auf der Seite Aktivierung auswählen um den Aktivierungsvorgang abzuschließen ...

Page 147: ...irm angezeigt Auf Installateur Einstellungen Registrierung tippen b In die Felder ID und Passwort die entsprechenden Installateur Angaben machen und auf Einloggen tippen um sich anzumelden Dann wird auf dem Bildschirm das Menü EnerVu angezeigt C Im EnerVu Menü in allen Feldern die entsprechenden Angaben machen Die mit einem gekennzeichneten Felder müssen ausgefüllt werden HINWEIS Um die Registrier...

Page 148: ...ung unvollständig sollte das System mit einer der folgenden Methoden aktiviert werden Methode 1 für Installateure a Mit dem Browser die LG EnerVu Seite besuchen unter http enervu lg ess com Installateur auswählen Die Seite Einloggen Installateur wid angezeigt Dann die E Mail Adresse des Installateurs sowie das Passwort eingeben dann Einloggen Installateur wählen B Aktivierung Im Gang auswählen und...

Page 149: ... Benutzer Instruieren Sie den Eigner des Systems sich ein Eigner Konto anzulegen und sich auf der EnerVu Seite anzumelden Der Bildschirm zur Eingabe der Registrierungsnummer wird angezeigt siehe Abbildung Notieren Sie sich die Registrierungsnummer vom System und geben Sie diese Nummer ein um die Aktivierung abzuschließen HINWEIS Mehr Informationen zum Anlegen eines neuen Kontos finden Sie auf Seit...

Page 150: ...t verkabelter Anschluss des Stromversorgungsnetzes erkannt Kundendienst kontaktieren P401 Meter Comm Fault Fehler bei Kommunikation mit Energiezähler Kundendienst kontaktieren P403 BMS A Comm Fault Länger als 30 Sekunden andauernder Fehler bei Kommunikation mit angeschlossenem Akku Kundendienst kontaktieren P404 PMS Comm Fault Länger als 60 Sekunden andauernder Fehler bei Kommunikation mit angesch...

Page 151: ...z L2 ist die Spannung höher als der Grenzwert Nach Fehlererkennung automatischer Neustart P465 Grid L3 Over Voltage Beim Stromversorgungsnetz L3 ist die Spannung höher als der Grenzwert Nach Fehlererkennung automatischer Neustart P466 Grid L1 Over Voltage 10min Beim Stromversorgungsnetz L1 ist für 10 Minuten die Durchschnittspannung höher als der Grenzwert Nach Fehlererkennung automatischer Neusta...

Page 152: ...r normal ist P504 DC Link Over Voltage Bei der DC Verbindung ist die Spannung höher als der Grenzwert Automatischer Neustart wenn die Spannung der DC Verbindung normal ist P505 DC Link Over Voltage Unbalance Beim DC Verbindungsabgleich ist die Spannung höher als der Grenzwert Automatischer Neustart wenn die Spannung der DC Verbindung normal ist P506 PVA Over Voltage Bei PV A ist die Spannung höher...

Page 153: ...nachdem die Stromstärke bei PV A normal ist P518 PVB Over Current Instant Bei PV B ist die Stromstärke sofort höher als der Grenzwert Automatischer Neustart nachdem die Stromstärke bei PV B normal ist P519 L1 Over Current Instant Beim Stromversorgungsnetz L1 ist die Stromstärke sofort höher als der Grenzwert Automatischer Neustart nachdem die Stromstärke bei Stromversorgungsnetz L1 normal ist P520...

Page 154: ...omstärke bei PV C normal ist P532 Grid Relay1 Das Stromversorgungsnetz Relais arbeitet nicht L1 1 Nach Fehlererkennung automatischer Neustart P533 Grid Relay2 Das Stromversorgungsnetz Relais arbeitet nicht L1 2 Nach Fehlererkennung automatischer Neustart P534 Grid Relay3 Das Stromversorgungsnetz Relais arbeitet nicht L2 1 Nach Fehlererkennung automatischer Neustart P535 Grid Relay4 Das Stromversor...

Page 155: ...ehlererkennung automatischer Neustart P551 PV Source Unmatching Fehlerhafter Anschluss von PV Quelle Nach Fehlererkennung automatischer Neustart P552 Battery Source Unmatching Fehlerhafter Anschluss von Akku Quelle Nach Fehlererkennung automatischer Neustart P553 Battery A Disconnection BMS Kommunikation ist verbunden aber das Stromkabel von Akku A ist nicht verbunden Nach Fehlererkennung automati...

Page 156: ...der Akkuzelle ist höher als der Grenzwert Nach Fehlererkennung automatischer Neustart B186 Over Discharge Power Limit Entladestrom des Akkus ist niedriger als der Grenzwert Nach Fehlererkennung automatischer Neustart B187 Over Charge Power Limit Ladestrom des Akkus ist höher als der Grenzwert Nach Fehlererkennung automatischer Neustart B188 Over Discharge Current Die Stromstärke des Akkus ist nied...

Page 157: ...ratur ist niedriger als der Grenzwert Nach Fehlererkennung automatischer Neustart B612 Over Temperature fault Die Akku Temperatur ist höher als der Grenzwert Nach Fehlererkennung automatischer Neustart B613 Cell Voltage Imbalance Fault Die Spannungsdifferenz zwischen Akkuzellen ist höher als der Grenzwert Nach Fehlererkennung automatischer Neustart B614 Cell Under Voltage Fault Bei Akkuzelle ist d...

Page 158: ...utomatischer Neustart B634 DDC_Over Voltage DC DC Überspannung Nach Fehlererkennung automatischer Neustart B635 DDC_Link Over Current DC DC Verbindung Überstrom Nach Fehlererkennung automatischer Neustart B636 DDC_Over Temperature DC DC Konverter zu hohe Temperatur Nach Fehlererkennung automatischer Neustart B367 DDC_BMS_Loss of Communication DC DC BMS Kommunikationsverlust Nach Fehlererkennung au...

Page 159: ...H Augustenhöhe 7 06493 Harzgerode Tel Deutschland 0049 0 39484 976 380 Österreich 0043 0 720 11 66 01 Schweiz 0041 0 44 505 11 42 Benelux 0031 20 456 1660 E Mail lge e service48 de 3 LG Electronics Kontakt LG Electronics Deutschland GmbH Alfred Herrhausen Allee 3 5 65760 Eschborn Tel 0049 18 06 807 020 E Mail b2b service lge de LG Electronics Benelux Krijgsman 1 1186 DM Amstelveen The Netherlands ...

Page 160: ...rodukte nicht über einen längeren Zeitraum in Kontakt sind mit dem Produkt Zum Reinigen des Luftkanals alle System Komponenten einschließlich PCS PV Module Akku und AC Hauptschalter ausschalten Danach den Filter mit einer weichen Bürste reinigen siehe Abbildung Regelmäßige Inspektionen Es wird empfohlen jedes Jahr den Betriebszustand und die Anschlüsse zu überprüfen Das sollte ein Techniker oder e...

Page 161: ...0 V 230 V AC Spannungsbereich 319 458 V 184 264 5 V Frequenz bereich 50Hz 47 5 Hz 51 5 Hz Nenn Ausgangsleistung 8 kVA 10 kVA Nenn Ausgangsstromstärke 11 5 A 14 4 A THD Phasenwinkel 5 0 8 Einschaltstrom Spitze und Dauer 70 Aac 0 02 ms Max Ausgangs Fehlerstrom 80 Aac 20 ms Überstromschutz bei Output maximal 55 6 Apeak Reserve Ausgabe LG ESS Home 8 LG ESS Home 10 Maximal nutzbare Heimlast Leistung be...

Page 162: ... Aufladen 400 450 VDC Entladen 350 430 VDC Aufladen 400 450 VDC Entladen 350 430 VDC 1 Wert ausschließlich für die Akku Zelle Entladungstiefe 95 die Leistung ist möglicherweise begrenzt um das System zu schützen 2 Wenn der Akku älter wird kann die Leistung sinken Wirkungsgrad PCS Max Wirkungsgrad PV an Stromversorgungsnetz 97 7 Allgemeine Daten Abmessungen B H T mm 450 599 210 PCS 746 688 206 LGHB...

Page 163: ...y y Konstruktion und Spezifikationen können ohne Vorankündigung geändert werden Bei Fragen zur Produktkonformität wenden Sie sich an das Büro LG Electroonics Europeam Shared Service Center B V Krijgsman 1 1186 DM Amstelveen Niederlande www lg com global business ess VEREINFACHTE EU KONFORMITÄTSERKLÄRUNG Hiermit erklärt LG Electronics dass der Funkanlagentyp PCS Unit der Richtlinie 2014 53 EU entsp...

Page 164: ... Power Start 50 cosphi P Start 1 cosphi P End 0 9 cosphi P End 0 9 Name Beschreibung Standardwert Verfügbarer Wert Einheit cosphi P Start cosphi bei Startpunkt 1 0 9 1 cosphi P End cosphi bei Endpunkt 0 95 0 9 1 cosphi P Power Start Wirkleistung bei Startpunkt P Pmax 50 20 100 cosphi P Power End Wirkleistung bei Endpunkt P Pmax 100 20 100 ...

Page 165: ... Spannung Punkt a U Un 90 80 120 Q U Xb Netz Spannung Punkt b U Un 92 80 120 Q U Xc Netz Spannung Punkt c U Un 108 80 120 Q U Xd Netz Spannung Punkt d U Un 110 80 120 Q U Ya Blindleistung Punkt a Q Sr 43 6 43 6 43 6 Q U Yb Blindleistung Punkt b Q Sr 0 43 6 43 6 Q U Yc Blindleistung Punkt c Q Sr 0 43 6 43 6 Q U Yd Blindleistung Punkt d Q Sr 43 6 43 6 43 6 Q U Lock in Wirkleistung Lock in P Pn 10 0 ...

Page 166: ... per Hz 40 Name Beschreibung Standardwert Verfügbarer Wert Einheit P f Active Power Wirkleistung Gradient bei Überfrequenz 40 0 100 P f Start Freq P f Funktion Start Frequenz 50 2 50 51 5 Hz P f Reset Freq P f Funktion Reset Frequenz 50 18 50 51 5 Hz P f wait time Wartezeit von Wirkleistung Gradient nach Frequenz Reset 1 60 sec ...

Page 167: ... Active Power 100 0 Name Beschreibung Standardwert Verfügbarer Wert Einheit P U Active Power Wirkleistung Gradient bei Überspannung 100 0 100 P U Start Voltage P U Funktion Start Spannung U Un 110 100 120 P U End Voltage P U Funktion Ende Spannung U Un 112 100 120 P U wait time Wartezeit von Wirkleistung Gradient 1 60 sec ...

Page 168: ......

Page 169: ... download MANUEL D INSTALLATION Système de stockage d énergie Veuillez lire attentivement ce manuel avant d installer votre appareil et conservez le pour référence ultérieure MODÈLE LG ESS Home 10 D010KE1N211 LG ESS Home 8 D008KE1N211 Copyright 2019 2020 LG Electronics Inc Tous droits réservés ...

Page 170: ...es PV le système de conditionnement d énergie et sur la batterie doivent être uniquement entrepris par du personnel qualifié y y Les installations électriques doivent être conformes aux normes de sécurité électrique standard tant locales que nationales y y Il est nécessaire de porter des gants en caoutchouc et des vêtements de protection bottes et lunettes de protection pour travailler sur les sys...

Page 171: ... pas exposer ce produit à la pluie ou à l humidité y y Ne bloquer aucune ventilation Vérifier le fonctionnement fiable du produit afin de le protéger contre la surchauffe Les ouvertures ne doivent jamais être obstruées par des objets posés sur ce produit y y La température du boîtier métallique peut être élevée pendant le fonctionnement y y Afin d éviter des interférences radioélectriques tous les...

Page 172: ...roduit pourrait être endommagé y y Ne jamais utiliser de produits solvants abrasifs ou corrosifs pour nettoyer ce produit y y Ne pas ranger ni poser d objets sur le produit Cela pourrait provoquer de graves défauts ou un dysfonctionnement y y Avant de procéder à un branchement vérifier que l interrupteur PV du produit est en position éteinte y y Cette unité est conçue pour alimenter uniquement le ...

Page 173: ...ière système Batterie PCS L électricité générée par un ensemble PV peut être stockée dans la batterie connectée ou vendue à des fournisseurs d énergie y y ESS couplé en CC LG ESS peut s avérer plus efficace grâce à son processus de conversion de l énergie plus simple y y Connexion triphasée La connexion triphasée assure l équilibre des phases y y Gestion intelligente Grâce à la fonction Smart PMS ...

Page 174: ...e l emplacement 16 Emplacement de l installation 16 Espace minimum 18 Fixation murale 19 Connexions 22 Aperçu des connexions 22 Schéma de connexion 23 Connexions de l ensemble PV 24 Connexions de la batterie 28 Connexions de communication ATS BMS COMPTEUR EV 31 Connexions de réseau électrique 32 Compteur d énergie pompe à chaleur et connexion Internet 36 Connexion du dongle WLAN 39 Mise sous tensi...

Page 175: ...trateur 59 Ajout d un nouvel installateur 60 Enregistrer le PCS navigateur Internet 61 Enregistrer le PCS App mobile 63 Dépannage Messages et codes d erreur 66 Défaut PCS 66 Battery Error Code 72 Code d erreur du convertisseur CC CC de batterie 74 Annexe Entretien 76 Nettoyer le produit 76 Examiner régulièrement 76 Mettre le produit au rebut 76 Caractéristiques 77 Divers 80 Facteur de recalage Eff...

Page 176: ...agé en cas de chute verticale de gouttes d eau lors d un test spécifique Ce produit ne doit pas être mis au rebut avec les ordures ménagères Il faut respecter les réglementations d élimination du pays Précaution risque de danger Consulter le manuel d installation ou le manuel d utilisation Précaution surface chaude Précaution risque de choc électrique décharge programmée du stockage d énergie L éq...

Page 177: ...cité à courant continu SOC État de charge État actuel de la charge de la batterie BMS Système de gestion de la batterie Système électronique gérant une batterie rechargeable CC Courant continu CA Courant alternatif DHCP Protocole de configuration dynamique des hôtes Protocole normalisé de réseau utilisé sur les réseaux IP protocole internet pour paramétrer la configuration du réseau de distributio...

Page 178: ...t et en valeurs négatives de 0 sud à 90 est Angle d inclinaison L angle d inclinaison indique de combien de degrés l inclinaison de la surface du module se dévie de l horizontale Module PV Le module PV est un panneau conçu pour absorber les rayons du soleil comme source d énergie pour générer de l électricité Ensemble PV Appareil technique pour transformer l énergie solaire en énergie électrique T...

Page 179: ...Support mural x1 Couvercle inférieur Fiche de câble de réseau Fiches de câble de batterie x2 de chaque Dongle WLAN inséré Fiche de compteur d énergie Fiche de pompe à chaleur Connecteur de communication Vis du couvercle inférieur x2 Manuel d installation rapide et Manuel d utilisation x1 de chaque ...

Page 180: ...iques section de 4 à 6 mm2 Connexions de la batterie y y Fils électriques section de 4 à 4 mm2 Connexions de réseau électrique y y Fils électriques section de 4 mm2 ou plus épais y compris câble vert et jaune Connexions Internet et compteur d énergie y y Câble LAN y y Fiche RJ 45 y y Câble de compteur d énergie Mise à la terre y y Câble LAN y y Fiche RJ 45 y y Câble de compteur d énergie ATS y y C...

Page 181: ...Démarrage 13 Démarrage 1 Nom de chaque pièce Avant et arrière A B C E D A Corps PCS B Indications LED C Couvercle inférieur D Partie reliée au support E Trou de vis pour fixation murale ...

Page 182: ...ar Solaire Éteint Pas de génération d énergie Vert Génération d énergie Blanc clignotant Défaut PCS Battery Batterie Éteint Veille Vert Batterie en cours de chargement Bleu Batterie en cours de déchargement Rouge clignotant Erreur de batterie Blanc clignotant Défaut PCS WLAN Éteint Débranché le dongle WLAN Vert Réseau connecté Bleu Réseau WLAN connecté Rouge clignotant Réseau déconnecté ...

Page 183: ... communication ATS BMS COMPTEUR EV D Bouton de démarrage à froid E Interrupteur PV Déconnexion CC F Connecteurs PV1 et G Connecteurs PV2 et H Connecteurs PV3 et I Port Ethernet J Connecteur de compteur K Connecteur de pompe a chaleur L Bouton de connexion sans fil M Port de dongle WLAN type USB N Connecteur de câble pour réseau à CA ...

Page 184: ...r ce produit au sol y y La surface de montage doit pouvoir supporter le poids de ce produit 34 kg y y Ne pas installer ce produit au plafond y y Ne pas installer ce produit dans le sens de la largeur ni sur un mur incliné de plus de 10 degrés y y Ne pas installer ce produit incliné vers l avant y y Installer ce produit avec la connexion vers le bas y y La température de fonctionnement idéale est c...

Page 185: ...endroit renfermant de l ammoniaque ou des vapeurs des acides ou des sels corrosifs y y Installer ce produit hors de la portée des enfants et des animaux y y Ne pas installer ce produit dans des endroits ou environnements sujets à une forte accumulation de poussière y y Ne pas bloquer les ouvertures d aération d air de refroidissement y y Pour nettoyer la conduite d air éteindre tous les systèmes y...

Page 186: ...t comme indiqué sur la figure Seule la batterie peut être installée dans l espace sous le produit Si vous installez la batterie à cet espace laissez au moins 300 mm entre le produit et la batterie S assurer de ne pas bloquer le côté droit du PCS installé Risque de blessures graves dues à une température élevée Espace minimum deux batteries 300 mm 300 mm 1600 mm 300 mm 300 mm 300 mm 300 mm ...

Page 187: ...surer que les emplacements à percer ne sont pas situés sur un câble électrique passant dans le mur REMARQUE Pour fixer le support mural à un mur ajuster l horizontalité à l aide d un niveau b Fixer le support mural à l aide de vis et de chevilles Insérer d abord les chevilles dans les trous de la partie inférieure REMARQUE y y Avant de serrer les vis du support vérifier l horizontalité une nouvell...

Page 188: ...à l aide des vis et des chevilles AVERTISSEMENT Il est important de s assurer que les emplacements à percer ne sont pas situés sur un câble électrique passant dans le mur REMARQUE y y En fonction de la surface les vis et chevilles nécessaires pour installer le support mural peuvent varier C est pour cette raison qu elles ne sont pas fournies avec le produit L installateur du système est responsabl...

Page 189: ...Après avoir raccordé toutes les connexions électriques assembler le couvercle inférieur fourni et serrer les vis comme illustré sur la figure REMARQUE Maintenir le couvercle inférieur pour le fixer ou le déposer Le manipuler avec soin ...

Page 190: ... isolés lorsque le couvercle du PCS est déposé y y Avant de brancher les câbles électriques ou de retirer le couvercle éteindre le disjoncteur CA l interrupteur PV et le disjoncteur CC de la batterie En cas de réinstallation les éteindre puis patienter au moins 10 minutes pour être sûr que le produit est complètement déchargé y y Lorsque l ensemble photovoltaïque est exposé à la lumière il fournit...

Page 191: ...st correctement fournie que le réseau soit sous tension ou interrompu y y Consulter le manuel du BOÎTIER ATS sur le site suivant pour en savoir plus sur son installation https enwitec eu Schéma de connexion L1 L2 L3 N 3Φ Power Meter 3Φ Energy Meter B A L1 L2 L3 N LG ESS PCS 1 2 3 N Grid ATS Comm B A Meter Load Output L1 L2 L3 N Lan Ethernet USB USB or Dongle PV1 PV1 PV2 PV2 PV3 PV3 PV PV1 PV1 PV2 ...

Page 192: ...pas connecter la terre à un connecteur PV ou PV Cela peut provoquer un choc électrique ou endommager définitivement le produit REMARQUE y y Les modules PV doivent posséder une qualification de classe A selon la norme CEI61730 ou équivalente y y Concernant les câbles CC des connexions PV il est conseillé d utiliser le fil de sortie d une section de 4 mm2 à 6 mm2 y y Si vous connectez un seul ensemb...

Page 193: ...xion PV2 Raccorder les câbles CC d un ensemble photovoltaïque aux connecteurs PV2 de ce produit PV2 PV2 Ensemble PV2 Connexion PV3 Raccorder les câbles CC d un ensemble photovoltaïque aux connecteurs PV3 de ce produit PV3 PV3 Ensemble PV3 ...

Page 194: ...installation Cela peut provoquer un choc électrique ou endommager définitivement le produit y y Les câbles PV et PV d un ensemble PV doivent être connectés au même numéro de connecteur PV PV1 et PV1 PV2 et PV2 PV3 et PV3 Une connexion ne coïncidant pas peut provoquer un choc électrique ou endommager définitivement le produit ...

Page 195: ...èle à une entrée PV du produit Cela peut provoquer un choc électrique ou endommager définitivement le produit REMARQUE Si un seul ensemble PV doit être raccordé utiliser les connecteurs PV1 et PV1 Insérer des capuchons de sécurité sur les connecteurs non utilisés PV2 PV2 PV3 PV3 ...

Page 196: ...ue par du personnel qualifié Si la batterie a besoin d être changée elle devra être remplacée par un produit conforme aux spécifications du fabricant y y Ne pas confondre la connexion des pôles électriques avec et avec lors de l installation Cela peut provoquer un choc électrique ou endommager définitivement le produit MISE EN GARDE Une mauvaise connexion de la polarité de la batterie endommagerai...

Page 197: ...de choisir les bons composants pour cette installation c 15 mm Dénuder 15 mm des fils et de la batterie comme illustré sur la figure d Insérer avec soin les fils dénudés dans le connecteur de câble correspondant Les extrémités du fil doivent être visibles dans le ressort Connecteur câble Fil de batterie Connecteur câble Fil de batterie Et refermer le ressort S assurer que le ressort est bien en pl...

Page 198: ... câble CC de la batterie en bas du produit Déconnecter la fiche A Insérer le tournevis dans l une des quatre ouvertures B Y laisser le tournevis Démonter les deux connecteurs AVERTISSEMENT Ne jamais connecter ou déconnecter la fiche en charge Les fiches ne conviennent pas pour interrompre le courant ...

Page 199: ...on au PCS BMS 1 BMS 2 EV Meter ATS BMS1 q RS485_High r RS485_Low o Enable p GND BMS2 m RS485_High n RS485_Low k Enable l GND EV Meter i RS485_A j RS485_B ATS g 12V_ATS h BLACK_ATS e GND_ATS f SW_ATS BOX c EN_ATS d K3_ATS a K14_ATS b GND_ATS Connecter Déconnecter le connecteur connexion déconnexion MISE EN GARDE Vérifiez de nouveau la connexion de communication Si le connecteur de communication n e...

Page 200: ... y Le courant nominal du disjoncteur CA doit être de 32 A y y Ce produit peut créer un courant avec un composant CC Si un dispositif différentiel résiduel DDR ou de surveillance de courant résiduel RCM est utilisé à titre de protection en cas de contact direct ou indirect seul un DDR ou un RCM de type A ou B est permis sur le côté alimentation du produit y y Raccorder la mise à la terre de l équip...

Page 201: ... Le câble CA n est pas fourni avec ce produit L installateur du système est responsable de choisir les bons composants pour cette installation y y Le diamètre de câble recommandé pour le presse étoupe CA est de 16 mm gaine comprise C 50 mm 12 mm N PE Dénuder le câble CA comme indiqué sur la figure 1 Dénuder 50 mm du câble CA 2 Dénuder 12 mm de tous les fils REMARQUE Il est conseillé d utiliser un ...

Page 202: ...s vis sur les porte contacts 1 N m REMARQUE y y Le trou N neutre du porte contact doit être correctement relié à la borne N neutre du disjoncteur CA du coffret de distribution Sinon cela pourrait endommager sérieusement le produit y y Le connecteur de mise à la terre du conducteur de protection PE du porte contact doit être correctement connecté à la borne 6 mise à la terre du coffret de distribut...

Page 203: ...m 4 5 N m g Connecter la fiche de câble CA au connecteur du câble de réseau électrique CA en bas du produit Déconnecter la fiche Appuyer sur le bouton de dégagement à l aide d un tournevis et séparer la fiche du connecteur AVERTISSEMENT Ne jamais connecter ou déconnecter la fiche en charge Les fiches ne conviennent pas pour interrompre le courant ...

Page 204: ... à chaleur pour en savoir plus sur l installation de la pompe à chaleur Une connexion à Internet est requise pour utiliser un certain nombre de fonctionnalités comme la mise à jour du réseau le système de surveillance EnerVu etc Contacter le cas échéant votre opérateur Internet pour connecter ce produit à Internet AVERTISSEMENT S assurer que le disjoncteur CA l interrupteur PV et le disjoncteur CC...

Page 205: ...2 Dénuder deux fils du câble de la pompe à chaleur et insérer les extrémités dénudées des fils dans le trou correspondant sur la fiche Vérifier les étiquettes BUS A et BUS B aux deux extrémités de la connexion pour les connecter à la pompe à chaleur La connexion BUS A sur le côté de l ESS doit être raccordée à la connexion BUS A sur le côté de la pompe à chaleur et la connexion BUS B sur le côté d...

Page 206: ...s du produit comme indiqué sur la figure LAN DRM non pris en charge Schéma des connexions LAN et du compteur d énergie Ensemble PV 1 Load 1 Interrupteur de déconnexion Routeur Internet point d accès Compteur bidirectionnel Réseau électrique Compteur d énergie Internet Load 2 Load 3 Ensemble PV 2 Coffret de distribution ...

Page 207: ...dans le connecteur USB en bas du produit comme indiqué sur la figure USB Mise sous tension du produit Lorsque toutes les connexions sont raccordées vérifier dans l ordre les étapes suivantes 1 Allumer le disjoncteur CA 2 Allumer le disjoncteur CC de la batterie connectée 3 Placer l interrupteur PV du PCS sur ON Mise hors tension du produit Pour éteindre le produit procéder en sens inverse de la mi...

Page 208: ... de courant Charge normale toutes les charges électriques de la résidence sauf charge de secours Point de contrôle supplémentaire pour la connexion de charges monophasées et haute puissance même en capacité de charge maximale utilisable de la résidence Type de charge Acceptable Petit dispositif à brancher comme TV ordinateurs radios routeurs Éclairage fluocompact ou LED recommandé Réfrigérateur et...

Page 209: ...ts et l installation ont été suivis de manière exacte et sûre comme décrit dans ce manuel Installer l App LG EnerVu Plus Télécharger LG EnerVu Plus depuis Apple App Store ou Google Play Store OR LG EnerVu Plus REMARQUE y y En fonction de votre appareil l application LG EnerVu Plus peut ne pas fonctionner y y L application LG EnerVu Plus sera disponible dans les versions de logiciel suivantes Andro...

Page 210: ...on LG EnerVu Plus depuis Apple App Store ou Google Play Store Pour connecter directement le système le dongle WLAN doit être connecté au système S assurer que le dongle WLAN fourni est connecté au système Connexion directe au ESS a Lancer l app LG EnerVu Plus sur votre appareil mobile b Lors de la première connexion au système l écran du choix de la méthode de connexion s affiche Appuyer sur l opt...

Page 211: ...pas dans les 5 minutes le voyant LED WLAN s allume en vert et le signal WLAN se désactive d Lire les consignes et appuyer sur OK pour afficher l écran de sélection du WLAN Sélectionner le SSID commençant par LGE_ ESS L écran de saisie du mot de passe apparaît REMARQUE Les 2 derniers caractères du SSID sont les mêmes que les 2 derniers caractères du numéro d enregistrement du système Exemple SSID L...

Page 212: ...e passe WLAN imprimé sur l étiquette à l extérieur du PCS REMARQUE En cas d échec de connexion essayer après avoir éteint les données mobiles de votre appareil mobile Android si la connexion se déroule avec succès l écran principal s affiche comme sur la figure iOS si la connexion se déroule avec succès lancer l app LG EnerVu Plus pour afficher l écran principal comme sur la figure ...

Page 213: ...on Paramétrage par l installateur pour afficher l écran de saisie du mot de passe 3 Introduire le mot de passe de l installateur et appuyer sur OK pour entrer dans l écran Paramétrage par l installateur Le mot de passe initial est le numéro d enregistrement insensible à la casse imprimé sur l extérieur du PCS Il est recommandé de changer le mot de passe après la première saisie Voir les paramètres...

Page 214: ...1 Sélectionner la valeur actuelle de chaque option que vous souhaitez modifier Le menu de saisie apparaît à l écran 2 Saisir la valeur souhaitée 3 Sélectionner Accepter pour compléter le paramétrage Compteur 1 Sélectionner la valeur actuelle de chaque option que vous souhaitez modifier Le menu de saisie apparaît à l écran 2 Saisir la valeur souhaitée 3 Sélectionner Accepter pour compléter le param...

Page 215: ...itée 3 Sélectionner Accepter pour compléter le paramétrage Appuyer sur Grid System ou System2 pour afficher davantage d options de configuration du PCS REMARQUE y y Les valeurs de l écran PCS ne peuvent pas être modifiées par l utilisateur Si l utilisateur change les valeurs cela pourrait entraîner un dysfonctionnement du système y y Voici les noms des informations pouvant être affichées Stable Vo...

Page 216: ... Afin d utiliser le service EnerVu il est nécessaire d y souscrire et d activer les appareils Si l option Envoi des données au serveur web n est pas sur Activé les données ne seront pas chargées au serveur Paramétrage du réseau câblé Lorsque l option Type de connexion dans Statut de la connexion est sur Filaire les options de connexion par câble s affichent Si l option Paramètre IP dans l onglet P...

Page 217: ...se Après avoir rempli tous les champs appuyer sur Connecter pour compléter la connexion au réseau sans fil Si la connexion se déroule avec succès Internet connecté s affiche à l écran Si l option Paramètre IP dans l onglet Paramétrage sans fil est sur Auto une adresse IP sera automatiquement allouée à partir du réseau local LAN via une connexion câblée Il se peut que la connexion au réseau soit à ...

Page 218: ...ent vous ne pourrez pas brancher le produit y y Un modem DSL est nécessaire pour utiliser le service DSL et un modem par câble est nécessaire pour pouvoir utiliser le service de modem par câble Suivant la méthode d accès de votre fournisseur et le contrat d abonnement souscrit il est possible que vous ne puissiez pas utiliser la fonctionnalité de connexion à Internet offerte par ce produit ou que ...

Page 219: ...ctionnement du chargement de la batterie par le réseau électrique Chargement depuis le PV Test de fonctionnement du chargement de la batterie par le panneau PV Déchargement Test de fonctionnement du déchargement de la batterie au réseau électrique Onduleur Test de fonctionnement pour transformer le CC du PV en CA Le résultat s affiche à la fin de chaque test Si aucun problème ne survient pendant l...

Page 220: ...es sont installées ajuster le paramètre sur On pour utiliser les deux batteries Il est possible d ajuster manuellement Constructeur de la batterie Plage de service SOC mode hiver Date d ajout installation de la batterie et Capacité de la batterie 1 Sélectionner la valeur actuelle de chaque option que vous souhaitez modifier Le menu de saisie apparaît à l écran 2 Saisir la valeur souhaitée 3 Sélect...

Page 221: ...strement du système via application mobile Journal système Permet de consulter la liste des changements de mode des défauts du système et le journal des avertissements du système Consulter Messages et codes d erreur à la page 66 pour en savoir plus sur les codes d erreur les messages et les solutions Appuyer sur Journal système dans Paramétrage par l installateur Cela affiche la liste de tout ce q...

Page 222: ...ouhaitée à modifier si la fonction H P DHW est activée Redémarrer Sélectionner Reboot Réinitialiser pour redémarrer le système Changement mot de passe Sélectionner Changement mot de passe dans Paramétrage par l installateur Le menu Changement mot de passe s affiche Saisir le nouveau mot de passe dans les champs Nouveau mot de passe et Vérification du mot de passe Puis sélectionner Changement mot d...

Page 223: ... s Boîtier ATS Version 10013679 Bender VMD460 5 secondes après le rétablissement de l électricité suivant une coupure le PCS arrête le mode de secours L électricité sera rétablie à la charge critique et au PCS après le temps défini par le boîtier ATS Puis le PCS redémarre automatiquement en mode normal À l aide de l application EnerVu vous pouvez définir l intervalle de redémarrage du système aprè...

Page 224: ...ifs y y Pour accéder au système de surveillance Internet EnerVu il faut un ordinateur une tablette ou un mobile doté d un navigateur Internet et ayant accès à Internet y y Ce produit doit être connecté à Internet Vérifier le menu de paramétrage Network réseau du système y y Le propriétaire du système doit créer un compte LG ESS avant d enregistrer le produit Consulter le paragraphe Créer un nouvea...

Page 225: ...ot de passe Mot de passe confirmé et Anniversaire puis sélectionner CONFIRMER La page de confirmation de l e mail s affiche d Un e mail de confirmation sera envoyé à votre adresse électronique Dans l e mail cliquer sur CONFIRMER pour confirmer définitivement l e mail e Sur la page de création du compte sélectionner CONFIRMER pour compléter la création de votre compte ...

Page 226: ... Paramètres 3 F Sélectionner SE pour aller à la page CONNEXION À VOTRE COMPTE LG Saisir vos Identifiant utilisateur et Mot de passe puis sélectionner SE G Les services du compte LG disponibles s affichent à l écran ...

Page 227: ...fication installateur s affiche b Sélectionner Inscription La page Inscription s affiche Introduire votre adresse électronique dans le champ Email et sélectionner Vérification Puis remplir les champs Prénom et Nom de famille c Remplir les informations de la section Détails société Puis lire attentivement les Conditions d utilisation de l installateur et Politique de confidentialité de l installate...

Page 228: ...ication installateur B Sélectionner l onglet Utilisateurs sur la page Compte Sélectionner le bouton Ajouter nouvel utilisateur pour ouvrir une page de saisie d un nouvel utilisateur C Saisir le prénom et le nom du nouvel installateur Sélectionner l option Rôle à choisir entre Utilisateur ou Administrateur Un utilisateur est un installateur qui ne possède pas l autorité d ajouter un utilisateur ou ...

Page 229: ...s saisir l adresse électronique de l installateur et son mot de passe avant de sélectionner Identification installateur Si l installateur n a pas de compte sélectionner Inscription et créer un nouveau compte installateur c Sélectionner l onglet Activation L écran Ajouter un nouveau système s affiche d Remplir toutes les informations de la section Infos système puis sélectionner ENREGISTRER pour en...

Page 230: ... Vérification Les informations d ESS se rempliront automatiquement Sélectionner ENREGISTRER pour aller à l étape suivante F Remplir toutes les informations du champ Propriétaire puis sélectionner ENREGISTRER pour enregistrer les informations Sélectionner Activation en bas de la page pour finir le processus d activation ...

Page 231: ...il mobile L écran principal apparaît à l écran Appuyer sur Paramétrage par l installateur Enregistrement b Remplir les champs ID et Mot de passe de l installateur et appuyer sur Se connecter pour se connecter Le menu EnerVu apparaît à l écran c Remplir tous les champs du menu EnerVu Les champs marqués d un sont des champs à caractère obligatoire REMARQUE Pour enregistrer dûment le système il faut ...

Page 232: ...ent est incomplet le système devra être activé par l une des méthodes suivantes Méthode 1 pour installateur a Se rendre depuis le navigateur sur la page de LG EnerVu http enervu lg ess com Sélectionner Installateur La page Identification installateur s affiche Puis saisir l adresse électronique de l installateur et son mot de passe avant de sélectionner Identification installateur B Sélectionner A...

Page 233: ...vation Méthode 2 pour propriétaire Informer le propriétaire du système qu il créé un compte propriétaire et qu il se connecte à la page EnerVu L écran de saisie du numéro d enregistrement s affiche comme sur la figure Noter le numéro d enregistrement du système et saisir le numéro pour compléter l activation REMARQUE Consulter Créer un nouveau compte à la page 56 pour en savoir plus sur la créatio...

Page 234: ...ur de communication avec le compteur d énergie Contacter le centre de service P403 BMS A Comm Fault Erreur de communication avec la batterie connectée pendant plus de 30 secondes Contacter le centre de service P404 PMS Comm Fault Erreur de communication pendant plus de 60 secondes avec le PMS connecté Contacter le centre de service P405 SDSP Comm Fault Erreur de communication avec l unité de trait...

Page 235: ...rieure à la limite Redémarrage automatique après détection du défaut P467 Grid L2 Over Voltage 10min La tension moyenne du réseau L2 sur 10 minutes est supérieure à la limite Redémarrage automatique après détection du défaut P468 Grid L3 Over Voltage 10min La tension moyenne du réseau L3 sur 10 minutes est supérieure à la limite Redémarrage automatique après détection du défaut P469 Grid Over Freq...

Page 236: ...périeure à la limite Redémarrage automatique quand la tension de la liaison CC redevient normale P506 PVA Over Voltage La tension du PV A est supérieure à la limite Redémarrage automatique quand la tension du PV A redevient normale P507 PVB Over Voltage La tension du PV B est supérieure à la limite Redémarrage automatique quand la tension du PV B redevient normale P508 Batt A Over Voltage La tensi...

Page 237: ...ormal P517 PVA Over Current Instant Le courant du PV A est instantanément supérieur à la limite Redémarrage automatique quand le courant du PV A redevient normal P518 PVB Over Current Instant Le courant du PV B est instantanément supérieur à la limite Redémarrage automatique quand le courant du PV B redevient normal P519 L1 Over Current Instant Le courant du réseau L1 est instantanément supérieur ...

Page 238: ...Le relais du réseau électrique n est pas opérationnel L1 1 Redémarrage automatique après détection du défaut P533 Grid Relay2 Le relais du réseau électrique n est pas opérationnel L1 2 Redémarrage automatique après détection du défaut P534 Grid Relay3 Le relais du réseau électrique n est pas opérationnel L2 1 Redémarrage automatique après détection du défaut P535 Grid Relay4 Le relais du réseau él...

Page 239: ...onduleur L3 est supérieure à la limite Redémarrage automatique après détection du défaut P551 PV Source Unmatching Connexion source du PV non valide Redémarrage automatique après détection du défaut P552 Battery Source Unmatching Connexion source de batterie non valide Redémarrage automatique après détection du défaut P553 Battery A Disconnection La communication de BMS est connectée mais la ligne...

Page 240: ...tension de charge de l élément de batterie est supérieure à la limite Redémarrage automatique après détection du défaut B186 Over Discharge Power Limit La puissance de décharge de la batterie est inférieure à la limite Redémarrage automatique après détection du défaut B187 Over Charge Power Limit La puissance de charge de la batterie est supérieure à la limite Redémarrage automatique après détecti...

Page 241: ... automatique après détection du défaut B610 Temperature Deviation Fault L écart de température entre les batteries est supérieur à la limite Redémarrage automatique après détection du défaut B611 Under Temperature fault La température de la batterie est inférieure à la limite Redémarrage automatique après détection du défaut B612 Over Temperature fault La température de la batterie est supérieure ...

Page 242: ...e B631 Cell Over Voltage Fault La tension de l élément de batterie est supérieure à la limite Contacter le centre de service Code d erreur du convertisseur CC CC de batterie Code Message Description Solution B632 DDC_Battery Over Voltage Surtension du convertisseur CC CC de batterie Redémarrage automatique après détection du défaut B633 DDC_Battery Over Current Surintensité du convertisseur CC CC ...

Page 243: ... accéder depuis le serveur Si vous rencontrez un problème technique ou avez une question contacter la société installatrice ou LG Electronics 1 Société installatrice Adresse Tél 2 Service client LG Electronics ESS Solar Service E Service Haberkorn GmbH Augustenhöhe 7 06493 Harzgerode Tél Allemagne 0049 0 39484 976 380 Autriche 0043 0 720 11 66 01 Suisse 0041 0 44 505 11 42 Benelux 0031 20 456 1660...

Page 244: ...isser de produits en caoutchouc ou en plastique en contact prolongé avec le produit Pour nettoyer la conduite d air éteindre tous les systèmes y compris le PCS le module PV la batterie le disjoncteur CA Après cela nettoyer le filtre à l aide d une brosse souple comme indiqué sur la figure Examiner régulièrement Il est recommandé de vérifier le statut de fonctionnement et le statut de connexion une...

Page 245: ...5 V Plage de fréquences 50Hz 47 5 Hz 51 5 Hz Puissance de sortie nominale 8 kVA 10 kVA Courant de sortie nominale 11 5 A 14 4 A Facteur de distorsion harmonique Facteur de puissance 5 0 8 Courant d appel crête et durée 70 Aac 0 02 ms Courant de sortie max par défaut 80 Aac 20 ms Protection contre surintensité de sortie max 55 6 Apeak Sortie de secours LG ESS Home 8 LG ESS Home 10 Capacité de charg...

Page 246: ...Chargement 400 450 VDC Déchargement 350 430 VDC Chargement 400 450 VDC Déchargement 350 430 VDC 1 Valeur uniquement pour l élément de batterie profondeur de décharge 95 la capacité peut être limitée pour protéger le système 2 La capacité peut diminuer en fonction de l âge de la batterie Efficacité PCS Efficacité max du PV au réseau 97 7 Données générales Dimensions l h p mm 450 599 210 PCS 746 688...

Page 247: ...y La conception et les caractéristiques peuvent être sujettes à modification sans préavis Contacter pour la conformité de ce produit LG Electronics European Shared Service Center B V Krijgsman 1 1186 DM Amstelveen Pays Bas www lg com global business ess DÉCLARATION DE CONFORMITÉ CE SIMPLIFIÉE Par la présente LG Electronics déclare que l unité PCS de type équipement de radio est conforme à la direc...

Page 248: ... End 0 9 cosphi P End 0 9 surexcité sous excité Nom Description Valeur par défaut Valeur disponible Unité Début cosphi P cosphi au point de démarrage 1 0 9 1 Fin cosphi P cosphi au point final 0 95 0 9 1 Démarrage puissance cosphi P Puissance active au point de démarrage P Pmax 50 20 100 Fin puissance cosphi P Puissance active au point final P Pmax 100 20 100 ...

Page 249: ...on réseau point a U Un 90 80 120 Q U Xb Tension réseau point b U Un 92 80 120 Q U Xc Tension réseau point c U Un 108 80 120 Q U Xd Tension réseau point d U Un 110 80 120 Q U Ya Puissance réactive point a Q Sr 43 6 43 6 43 6 Q U Yb Puissance réactive point b Q Sr 0 43 6 43 6 Q U Yc Puissance réactive point c Q Sr 0 43 6 43 6 Q U Yd Puissance réactive point d Q Sr 43 6 43 6 43 6 Q U Lock in Verrouil...

Page 250: ...iption Valeur par défaut Valeur disponible Unité P f Active Power Variation active en surfréquence 40 0 100 P f Start Freq Fréquence de démarrage de la fonction P f 50 2 50 51 5 Hz P f Reset Freq Fréquence de réinitialisation de la fonction P f 50 18 50 51 5 Hz P f wait time Temps d attente de variation active après la fréquence de réinitialisation 1 60 s ...

Page 251: ... Active Power 100 0 Nom Description Valeur par défaut Valeur disponible Unité P U Active Power Variation active en surtension 100 0 100 P U Start Voltage Tension de démarrage de la fonction P U U Un 110 100 120 P U End Voltage Tension de fin de la fonction P U U Un 112 100 120 P U wait time Temps d attente de variation active 1 60 s ...

Page 252: ......

Page 253: ...download INSTALLATIEHANDLEIDING Energie opslagsysteem Lees deze handleiding zorgvuldig door voordat u uw set gaat installeren en bewaar de handleiding voor toekomstige naslag MODEL LG ESS Home 10 D010KE1N211 LG ESS Home 8 D008KE1N211 Copyright 2019 2020 LG Electronics Inc Alle rechten voorbehouden ...

Page 254: ... worden uitgevoerd y y Elektrische installaties moeten worden uitgevoerd conform de lokale en nationale elektrische veiligheidsstandaarden y y Draag rubberen handschoenen en beschermende kleding veiligheidsbril en schoenen wanneer u werkt met hoogspanningssystemen zoals PCS en batterijsystemen y y Er is een risico op een elektrische schok Verwijder de behuizing niet Er zijn geen onderdelen aanwezi...

Page 255: ...lopen wanneer het product in gebruik is y y U kunt radiostoring voorkomen door ervoor te zorgen dat alle accessoires zoals een elektriciteitsmeter die op het product moeten worden aangesloten geschikt zijn voor gebruik in huishoudelijke commerciële en licht industriële omgevingen U voldoet doorgaans aan deze vereiste wanneer de apparatuur voldoet aan de klasse B limieten van EN55022 y y Het produc...

Page 256: ...t kan ernstige defecten of storingen veroorzaken y y Controleer voordat u een verbinding maakt of de PV schakelaar op het product is uitgeschakeld y y Deze eenheid is alleen ontworpen om stroom aan het openbare elektriciteitsnet te leveren Sluit deze eenheid niet aan op een wisselstroombron of generator Als u het product op externe apparaten aansluit kan uw apparatuur ernstig beschadigd raken y y ...

Page 257: ...m ketel Batterij PCS De elektriciteit die wordt gegenereerd via een PV array kan worden opgeslagen op de aangesloten batterij of worden verkocht aan energiebedrijven y y ESS met gelijkstroom De systeemefficiëntie van LG ESS wordt beter dankzij eenvoudigere stroomomzetprocessen y y Driefasige aansluiting Driefasige aansluiting zorgt voor fasebalans y y Slim beheer Met ingebouwde Smart PMS wordt PV ...

Page 258: ...5 Installeren Gekozen locatie 16 Installatielocatie 16 Minimale vrije ruimte 18 Montage aan de muur 19 Verbindingen 22 Verbindingsoverzicht 22 Verbindingsdiagram 23 PV arrayaansluitingen 24 Batterij aansluitingen 28 ATS BMS EV METER Communicatieverbindingen 31 Netaansluitingen 32 Elektriciteitsmeter warmtepomp en internetverbinding 36 WLAN dongle aansluiting 39 Het product inschakelen 39 Het produ...

Page 259: ... Beheerder 59 Een nieuwe installateur toevoegen 60 Het PCS registreren Webbrowser 61 Het PCS registreren mobiele app 63 Problemen oplossen Foutcodes en berichten 66 PCS storing 66 Foutcode Batterij 72 Batterij DC DC Converter Foutcode 74 Bijlage Onderhoud 76 Het product reinigen 76 Regelmatig inspecteren 76 Het product verwijderen 76 Specificaties 77 Overige 80 Verschuivingsfactor effectieve kenme...

Page 260: ...rbij het product wordt blootgesteld aan verticaal druppelend water Dit product mag niet worden verwijderd met ander huishoudelijk afval In dit land moet u zich houden aan regelgevingen voor het verwijderen van het product Let op risico op gevaar Zie de installatiehandleiding of gebruikershandleiding Let op warm oppervlak Let op risico op elektrische schok getimede ontlading van opgeslagen energie ...

Page 261: ...et naar gelijkstroom elektriciteit SOC Beschikbare lading Huidige status van een batterij BMS Batterijmanagementsysteem Elektronisch systeem dat een oplaadbare batterij beheert DC Gelijkstroom AC Wisselstroom DHCP Dynamic Host ConfigurationProtocol Gestandaardiseerd netwerkprotocol dat wordt gebruikt op IP netwerken IP Internet Protocol voor automatische distributie van netwerkconfiguratieparamete...

Page 262: ...0 naar west 90 en wordt geteld aan de hand van negatieve waarden binnen het bereik van zuid 0 naar oost 90 Kantelhoek De kantelhoek geeft aan met hoeveel graden de kanteling van het moduleoppervlak afwijkt van de horizon PV module De PV module verwijst naar een paneel dat is ontworpen om zonnestralen te absorberen als energiebron voor het genereren van elektriciteit PV array Technisch apparaat voo...

Page 263: ...ioneringssys teem 1EA Muurbeugel 1EA Onderste behuizing Netkabelstekker Stekkers batterijkabel 2 EA elk WLAN dongle geplaatst Energy meter plug Stekker voor warmtepomp Communicatieconnector Schroeven onderste behuizing 2 EA Snelle Installatiegids Gebruikershandleiding 1EA elk ...

Page 264: ...Kabels met een doorsnede van 4 mm2 6 mm2 Batterij aansluitingen y y Kabels met een doorsnede van 4 mm2 6 mm2 Netaansluitingen y y Loden draden met doorsnedezone 4 mm2 of dikker Met inbegrip van geel groen gestreepte kabel Elektriciteitsmeter en internetverbindingen y y LAN kabel y y RJ 45 stekker y y Elektriciteitsmeterkabel Aarding y y LAN kabel y y RJ 45 stekker y y Elektriciteitsmeterkabel ATS ...

Page 265: ...e slag 13 Aan de slag 1 Naam van elk onderdeel Voorkant en achterkant A B C E D A PCS behuizing B Led aanduidingen C Onderste behuizing D Beugel aangesloten onderdeel E Schroefgaten voor montage aan de muur ...

Page 266: ...r Zonne energie Uit Er wordt geen energie gegenereerd Groen Er wordt energie gegenereerd Wit knipperend PCS storing Battery Batterij Uit Stand by Groen Batterij wordt opgeladen Blauw Batterij wordt ontladen Rood knipperend Batterijfout Wit knipperend PCS storing WLAN Uit Unplugged WLAN dongle Groen Netwerk verbonden Blauw WLAN netwerk verbonden Rood knipperend Verbinding met netwerk verbroken ...

Page 267: ... ATS BMS EV METER Communicatieterminals D Zwarte startknop E PV schakelaar DC Verbinding verbreken F PV1 aansluitingen en G PV2 aansluitingen en H PV3 aansluitingen en I Ethernetpoort J Meteraansluiting K Warmtepompaansluiting L Knop voor draadloze verbinding M WLAN donglepoort USB type N AC netkabelaansluiting ...

Page 268: ...installatieoppervlak moet het gewicht van dit product 34 kg kunnen dragen y y Installeer de eenheid niet aan het plafond y y Installeer het product niet in de breedte of aan een muur waarbij het product meer dan 10 graden overhelt y y Installeer het product niet naar voren gekanteld y y Installeer het product met de aansluitingen naar beneden y y De juiste gebruikstemperatuur ligt tussen 0 C en 40...

Page 269: ...duct niet op plaatsen waar ammoniak corrosieve dampen zuren of zouten aanwezig zijn y y Installeer het product buiten het bereik van kinderen of huisdieren y y Installeer dit product niet op plaatsen of in omgevingen waar sterke stofvorming plaatsvindt y y Blokkeer niet de luchtventilatie openingen voor afkoeling y y Wanneer u het luchtkanaal reinigt moet u alle systemen afsluiten zoals PCS de PV ...

Page 270: ...Alleen de batterij mag in de onderste vrije ruimte van het product worden geplaatst Als u de batterij eenheid in de vrije ruimte aan de onderkant plaatst zorgt u ervoor dat de vrije ruimte tussen de batterij en het product meer dan 300 mm is Zorg ervoor om de rechterzijde van de geïnstalleerde PCS niet te blokkeren Risico op ernstige letsels door de hoge temperatuur Minimale vrije ruimte Tweevoudi...

Page 271: ...kabeling in de muur bevinden OPMERKING Wanneer u de muurbeugel aan een muur bevestigt zorgt u er met een waterpas voor dat deze helemaal recht wordt geplaatst b Maak de muurbeugel vast met schroeven en pluggen Steek pluggen in de gaten van het onderste gedeelte OPMERKING y y Voordat u de beugelschroeven aandraait controleert u nogmaals met een waterpas of de beugel nog steeds waterpas staat y y Af...

Page 272: ... de muur WAARSCHUWING Het is belangrijk om te controleren of de boorlocaties zich niet in de buurt van elektrische bekabeling in de muur bevinden OPMERKING y y Afhankelijk van het oppervlak hebt u mogelijk verschillende schroeven en pluggen nodig voor de installatie van de muurbeugels Daarom worden deze schroeven en pluggen niet meegeleverd bij het product De systeeminstallateur is verantwoordelij...

Page 273: ...ische verbindingen assembleer de bijgeleverde onderste behuizing en bevestig de schroeven zoals afgebeeld in de figuur OPMERKING Houd de onderste behuizing vast tijdens het plaatsen of verwijderen van de onderste behuizing Wees voorzichtig met de onderste behuizing ...

Page 274: ...r de PCS behuizing is verwijderd y y Voordat u begint met de elektrische kabelverbindingen of het verwijderen van de behuizing schakelt u de AC stroomonderbreker PV schakelaar en DC stroomonderbreker van de batterij uit Wanneer u een herinstallatie uitvoert schakelt u deze uit en wacht u minimaal 10 minuten voor volledige ontlading binnen dit product y y Wanneer de fotovoltaïsche array wordt bloot...

Page 275: ...d geleverd wordt of er al dan niet stroom van het net is y y Lees de handleiding ATS BOX op de volgende site voor gedetailleerde informatie bij de installatie van de ATS BOX https enwitec eu Verbindingsdiagram L1 L2 L3 N 3Φ Power Meter 3Φ Energy Meter B A L1 L2 L3 N LG ESS PCS 1 2 3 N Grid ATS Comm B A Meter Load Output L1 L2 L3 N Lan Ethernet USB USB or Dongle PV1 PV1 PV2 PV2 PV3 PV3 PV PV1 PV1 P...

Page 276: ...ing niet aan op een aansluiting PV of PV Dit kan leiden tot elektrische schokken of het product kan permanent beschadigd raken OPMERKING y y PV modules moeten een IEC61730 Application Class A classificatie of gelijkwaardig hebben y y Voor DC kabels van PV verbindingen wordt aanbevolen om de leidraad te gebruiken met een doorsnedezone van 4 mm2 6 mm2 y y Wanneer u slechts één PV array op het PCS aa...

Page 277: ...ren 2 PV2 aansluiting Sluit de DC kabels van een PV array aan op PV2 aansluitingen op dit product PV2 PV2 PV array2 PV3 aansluiting Sluit de DC kabels van een PV array aan op PV3 aansluitingen op dit product PV3 PV3 PV array3 ...

Page 278: ... Dit kan leiden tot elektrische schokken of het product kan permanent beschadigd raken y y PV en PV kabels van één PV array moeten aangesloten worden aan hetzelfde PV aansluitingsnummer PV1 en PV1 PV2 en PV2 PV3 en PV3 Een verkeerde aansluiting kan elektrische schokken veroorzaken of het product kan permanent beschadigd zijn ...

Page 279: ...e PV input op het product Dit kan leiden tot elektrische schokken of het product kan permanent beschadigd raken OPMERKING Als er maar één PV arrayverbinding nodig is op het systeem gebruikt u de aansluitingen PV1 en PV1 En plaats veiligheidsdopjes op aansluitingen die niet worden gebruikt PV2 PV2 ...

Page 280: ...lverbindingen y y Alleen gekwalificeerd personeel mag de batterij vervangen Als de batterij moet worden vervangen moet dit een product zijn dat voldoet aan de specificaties van de fabrikant y y Zorg dat u de elektrische polen tot en tot goed aansluit tijdens de installatie Dit kan leiden tot elektrische schokken of het product kan permanent beschadigd raken LET OP Onjuiste batterijpolariteitsaansl...

Page 281: ...ijk voor het kiezen van de juiste componenten voor de installatie c 15 mm Strip 15 mm van beide batterijdraden en zoals afgebeeld in de figuur d Voer voorzichtig de gestripte draden in de overeenstemmende kabelaansluiting De uiteinden van de draad moeten zichtbaar zijn in de veer kabelaansluiting Batterijdraad kabelaansluiting Batterijdraad En sluit de veer Zorg ervoor dat de veer vastzit E Duw he...

Page 282: ...batterij onderaan het product De stekker loskoppelen A Voer de schroevendraaier in één van de vier openingen B Laat de schroevendraaier in de opening Trek de twee aansluitingen uiteen WAARSCHUWING Koppel de stekker nooit onder belasting aan of los De stekkers zijn niet geschikt om de stroom te onderbreken ...

Page 283: ...et de PCS BMS 1 BMS 2 EV Meter ATS BMS1 q RS485_High r RS485_Low o Enable p GND BMS2 m RS485_High n RS485_Low k Enable l GND EV Meter i RS485_A j RS485_B ATS g 12V_ATS h BLACK_ATS e GND_ATS f SW_ATS BOX c EN_ATS d K3_ATS a K14_ATS b GND_ATS Koppel de connector vast los verbinding loskoppeling LET OP Controleer opnieuw de communicatieverbinding Indien de communicatieconnector niet goed aangesloten ...

Page 284: ... AC stroomonderbreker moet de huidige classificaties van 32A hebben y y Dit product kan spanning met een DC component veroorzaken Wanneer een Aardlekschakelaar ALS of Aardlekbewaking ALB wordt gebruikt voor beveiliging bij direct of indirect contact mag alleen een ALS of ALB van type A of type B worden gebruikt aan de toevoerzijde van dit product y y Sluit de aarding van de apparatuur aan voordat ...

Page 285: ...ordt niet meegeleverd in dit productpakket De systeeminstallateur is verantwoordelijk voor het kiezen van de juiste componenten voor de installatie y y De aanbevolen kabeldiameter voor de AC kabelwartel is 16 mm inclusief bekleding C 50 mm 12 mm N PE Strip de AC kabel zoals weergegeven in de afbeelding 1 Strip 50 mm van de AC kabel 2 Strip 12 mm van alle kabels OPMERKING Het gebruik van een geel g...

Page 286: ...ING y y De N opening N neutraal in de contactdrager moet op de juiste manier worden aangesloten op de N terminal neutrale terminal van de AC stroomonderbreker op de verdeelkast Als dit niet op de juiste manier wordt gedaan kan het product ernstig beschadigd raken y y De PE aardingsaansluiting PE Protective Earth in de contactdrager moet op de juiste manier worden aangesloten op de 6 terminal aardi...

Page 287: ...de behuizing 4 5 N m g Sluit de AC kabelstekker aan op de AC netkabelaansluiting onderaan het product De stekker loskoppelen Druk de ontgrendelingsknop met een schroevendraaier omlaag en haal de stekker uit de aansluiting WAARSCHUWING Koppel de stekker nooit onder belasting aan of los De stekkers zijn niet geschikt om de stroom te onderbreken ...

Page 288: ...o over de installatie van de warmtepomp Internetverbinding is vereist om verschillende functies te gebruiken Denk hierbij aan functies zoals netwerkupdate EnerVu bewakingssysteem etc Mogelijk moet u contact opnemen met uw internetserviceprovider ISP om voor dit product verbinding te maken met internet WAARSCHUWING Zorg ervoor dat de AC stroomonderbreker PV schakelaar en DC stroomonderbreker van de...

Page 289: ...twee draden van de kabel van de warmtepomp en voer de gestripte draaduiteinden in de overeenstemmende draadopening op de stekker Controleer de labels BUS A en BUS B aan beide uiteinden van de verbinding om te verbinden met de warmtepomp De BUS A verbinding aan de ESS zijde moet verbonden worden met de BUS A verbinding aan de zijde van de warmtepomp en de BUS B verbinding aan de ESS zijde moet verb...

Page 290: ...etpoort onderaan het product zoals weergegeven in de afbeelding LAN DRM niet ondersteund Elektriciteitsmeter en LAN verbindingsdiagram PV array 1 Load 1 ontkoppe lingsschakelaar Internetrouter hotspot bidirectionele meter Elektriciteitsnet Elektriciteits meter internet Load 2 Load 3 PV array 2 verdeelkast ...

Page 291: ...de afbeelding USB Het product inschakelen Wanneer alle verbindingen tot stand zijn gebracht controleert u de status in de onderstaande volgorde 1 Schakel de AC stroomonderbreker naar de stand AAN 2 Schakel de DC stroomonderbreker van de aangesloten batterij naar de stand AAN 3 Schakel de PV schakelaar van het PCS naar de stand AAN Het product uitschakelen De volgorde van de stappen om het product ...

Page 292: ...he huislading met uitzondering van backup lading Bijkomend controlepunt bij het verbinden van enkele fase ladingen en ladingen met veel stroom zelfs binnen de max bruikbare huisladingscapaciteit Type lading Aanvaardbaar Kleine plug in toestellen zoals TV Computers Radio s Routers Verlichting compact Fluorescerend of LED aanbevolen Koelkasten en diepvriezers microgolf kooktoestellen Onaanvaardbaar ...

Page 293: ...of de fysieke aansluiting en installatie exact en veilig zijn uitgevoerd zoals beschreven in deze handleiding De app LG EnerVu Plus installeren Download LG EnerVu Plus in de Apple App Store of de Google Play Store OR LG EnerVu Plus OPMERKING y y Afhankelijk van het apparaat werkt LG EnerVu Plus mogelijk niet y y De app LG EnerVu Plus is als volgt beschikbaar in de versie van de software Android be...

Page 294: ...oogle Play Store Als u rechtstreeks verbinding met het systeem wilt maken moet de WLAN dongle op het systeem zijn aangesloten Controleer of de meegeleverde WLAN dongle met het systeem is verbonden Rechtstreeks verbinding maken met het ESS a Voer de app LG EnerVu Plus uit op uw mobiele apparaat b Als u voor de eerste keer verbinding met het systeem maakt wordt het scherm voor het selecteren van de ...

Page 295: ...rdt gebracht gaat de WLAN LED groen branden en wordt het WLAN signaal uitgeschakeld d Lees de handleiding en tik op OK om het scherm voor het selecteren van WLAN weer te geven Selecteer de SSID die met LGE_ESS begint Het scherm voor het invoeren van het wachtwoord wordt weergegeven OPMERKING De laatste 2 tekens van de SSID zijn hetzelfde als de laatste 2 tekens van het registratienummer van het sy...

Page 296: ...itenzijde van het PCS is gedrukt OPMERKING Als de verbinding niet tot stand kan worden gebracht schakelt u de optie voor mobiele gegevens op uw mobiele apparaat uit en probeert u het opnieuw Android Als de verbinding tot stand is gebracht wordt het hoofdscherm weergegeven zie afbeelding iOS Als de verbinding tot stand is gebracht voert u de app LG EnerVu Plus uit om het hoofdscherm weer te geven z...

Page 297: ...tellingen installateur om het scherm voor het invoeren van het wachtwoord weer te geven 3 Voer het installateurswachtwoord in en tik op OK om het venster Instellingen installateur te openen Het eerste wachtwoord is het hoofdlettergevoelige registratienummer dat op de buitenkant van het PCS is gedrukt Het wordt aanbevolen om het wachtwoord na de eerste keer openen te wijzigen Zie instellingen Ander...

Page 298: ...ecteer de momenteel geselecteerde waarde voor elke optie om te wijzigen Er wordt een invoermenu op het beeldscherm weergegeven 2 Voer de gewenste waarde in 3 Selecteer Accepteren om de instellingen te voltooien Meter 1 Selecteer de momenteel geselecteerde waarde voor elke optie om te wijzigen Er wordt een invoermenu op het beeldscherm weergegeven 2 Voer de gewenste waarde in 3 Selecteer Accepteren...

Page 299: ...r Accepteren om de instellingen te voltooien Tik op Grid System of System2 om meer instellingsopties voor de PCS te tonen OPMERKING y y Alle waarden op het scherm PCS mogen niet worden bewerkt door de gebruiker Als de waarden door de gebruiker worden gewijzigd kan een storing optreden in het systeem y y Informatienamen die kunnen worden weergegeven staan hieronder Modus Stabiele spanning Vast cosP...

Page 300: ...zich registreren bij de EnerVu service en de apparaten activeren Als de optie Data upload webserver niet is ingesteld op Aan worden de gegevens mogelijk niet geüpload naar de server Instellingen voor bekabeld netwerk Wanneer de optie Verbindingstype in de Verbindingsstatus is ingesteld op Bekabeld Opties voor bekabelde verbinding worden weergegeven Als de optie IP status op het tabblad Bekabelde i...

Page 301: ...ebt ingevuld tikt u op Verbinden om de draadloze netwerkverbinding tot stand te brengen Als de verbinding tot stand is gebracht wordt Verbonden met internet weergegeven op het scherm Als de optie IP status op het tabblad Draadloze instelling is ingesteld op Automatisch wordt er automatisch een IP adres van het local area network LAN toegewezen aan dit product via een bekabelde verbinding Mogelijk ...

Page 302: ...SL services is een DSL modem vereist en voor het gebruik van kabelmodemservices is een kabelmodem vereist Afhankelijk van de toegangsmethode van en de abonnementsovereenkomst met uw internetleverancier is het mogelijk dat u de internetverbindingsfunctie van dit product niet kunt gebruiken of dat uw internetleverancier beperkingen heeft gesteld aan het aantal apparaten dat u gelijktijdig kunt aansl...

Page 303: ...batterij via het elektriciteitsnet Opladen van PV De bedieningstest voor het opladen van de batterij via PV Ontladen De bedieningstest voor het ontladen van de batterij naar het elektriciteitsnet Inverter De bedieningstest voor het omvormen van DC vermogen naar AC vermogen van de PV Het resultaat wordt weergegeven wanneer elke test is voltooid Wanneer er geen probleem met de test is vastgesteld wo...

Page 304: ...twee batterijen geïnstalleerd zijn stel de instelling in op Aan On om twee batterijen te gebruiken Batterijfabrikant Bedrijfsbereik SOC wintermodus Batterij installatie Datum toevoegen en Batterijcapaciteit kunnen handmatig worden ingesteld 1 Selecteer de momenteel geselecteerde waarde voor elke optie om te wijzigen Er wordt een invoermenu op het beeldscherm weergegeven 2 Voer de gewenste waarde i...

Page 305: ...formatie over de systeemregistratie met mobiele app System Log Systeemlogboek Hier ziet u de lijst met moduswijzigingen systeemfouten en het logboek met systeemwaarschuwingen Lees Foutcodes en berichten op pagina 66 voor meer informatie over foutcodes meldingen en oplossingen Tik op Systeemlogboek op Instellingen installateur Hier ziet u de lijst met alle opmerkingen die gedurende een bepaalde per...

Page 306: ...enste temperatuur om te wijzigen als H P DHW Aan is Herstarten Selecteer Herstarten om het systeem opnieuw op te starten Wijziging wachtwoord Selecteer Wijziging wachtwoord in Instellingen installateur Het menu Wijziging wachtwoord wordt weergegeven Voer het nieuwe wachtwoord in de velden Nieuw wachtwoord en Wachtwoordcontrole in Selecteer vervolgens Wachtwoord wijzigen om het wachtwoord te wijzig...

Page 307: ...len is 30 sec ATS Box Versie 10013679 Bender VMD460 5 seconden na het herstel van het defect van de netstroom stopt de PCS de backup modus De stroom zal geleverd worden naar de kritieke lading en de PCS na de tijd ingesteld door de ATS box En dan start de PCS automatisch opnieuw in de normale modus Met de toepassing EnerVu kun je het interval van herstart van het systeem na stroomherstel instellen...

Page 308: ...deze service is het niet mogelijk om onderhoud via de externe service zoals een firmware update op internet in te schakelen Voorbereiding y y U hebt een computer tablet of mobiele telefoon met een geïnstalleerde internetbrowser en internettoegang nodig voor toegang tot het EnerVu webbewakingssysteem y y Dit product moet zijn verbonden met internet Controleer het instellingenmenu Network Netwerk in...

Page 309: ...elt u het selectievakje Ik ga akkoord in en selecteert u ACCEPTEREN De pagina Account maken wordt weergegeven c Vul in het veld Gebruikers ID uw e mailadres in en selecteer BESCHIKBAARHEID CONTROLEREN Vul de velden Wachtwoord Wachtwoord bevestigen en Verjaardag in en selecteer BEVESTIGEN De pagina voor het bevestigen van het e mailadres wordt weergegeven d Er wordt een bevestigingsmail naar uw e m...

Page 310: ...na voor het maken van accounts om uw account te voltooien F Selecteer AANMELDEN om naar de pagina AANMELDEN BIJ UW LG ACCOUNT te openen Voer uw Gebruikers ID en Wachtwoord in en selecteer AANMELDEN G De beschikbare LG accountservices worden op het scherm weergegeven ...

Page 311: ...allateur wordt weergegeven b Selecteer Inschrijven De pagina Inschrijven wordt weergegeven Vul in het veld Email uw e mailadres in en selecteer Controleren Vul vervolgens de velden Voornaam en Achternaam in c Vul de vereiste gegevens in het gedeelte Bedrijfsgegevens in Lees vervolgens de Voorwaarden installateur en het Privacybeleid installateur zorgvuldig door Als u akkoord gaat met alle voorwaar...

Page 312: ...eur B Selecteer het tabblad Gebruikers op de pagina Account Selecteer de knop Nieuwe gebruiker toevoegen om een nieuwe pagina te openen om een gebruiker toe te voegen C Voer de voornaam en achternaam van de nieuwe installateur in Selecteer de optie Functie User Gebruiker of Administrator Beheerder Gebruiker betekent de installateur die niet bevoegd is om gebruikers of dochterondernemingen toe te v...

Page 313: ...lgens voert u het e mailadres en wachtwoord van de installateur in en selecteert u Aanmelden installateur Als de installateur geen account heeft selecteert u Inschrijven en maakt u een nieuwe installateursaccount c Selecteer het tabblad Activering Het venster Een nieuw systeem toevoegen wordt weergegeven d Vul alle informatie in het gedeelte Systeeminformatie in en selecteer OPSLAAN om de informat...

Page 314: ...cteer Controleren De ESS informatie wordt automatisch ingevuld Selecteer OPSLAAN om naar de volgende stap te gaan F Vul alle informatie in het veld Eigenaar in en selecteer OPSLAAN om de informatie op te slaan Selecteer vervolgens Activering onderaan de pagina om het activeringsproces te voltooien ...

Page 315: ...e app LG EnerVu Plus uit op uw mobiele apparaat Het hoofdscherm wordt weergegeven op het scherm Tik op Instellingen installateur Registratie b Vul de velden ID en Wachtwoord van de installateur in en tik op Aanmelden om u aan te melden Het menu Enervu wordt op het beeldscherm weergegeven c Vul alle velden in het menu EnerVu in De velden gemarkeerd met een zijn verplichte velden OPMERKING Het veld ...

Page 316: ...olledige status heeft moet het systeem via een van de volgende methoden worden geactiveerd Methode 1 Voor installateur a Ga in uw browser naar de LG EnerVu pagina op http enervu lg ess com Selecteer Installateur De pagina Aanmelden installateur wordt weergegeven Vervolgens voert u het e mailadres en wachtwoord van de installateur in en selecteert u Aanmelden installateur B Selecteer Activering In ...

Page 317: ...e 2 Voor eigenaar Vraag de systeemeigenaar om een eigenaarsaccount te maken en zich aan te melden op de EnerVu pagina Het scherm voor het invoeren van het registratienummer wordt weergegeven zoals in de afbeelding Noteer het registratienummer van het systeem en voer het nummer in om de activering te voltooien OPMERKING Lees Een nieuw account maken op pagina 56 voor meer informatie over het aanmake...

Page 318: ...op met het servicecentrum P401 Meter Comm Fault Communicatiestoring voor de elektriciteitsmeter Neem contact op met het servicecentrum P403 BMS A Comm Fault Meer dan 30 seconden een communicatiefout met de aangesloten batterij Neem contact op met het servicecentrum P404 PMS Comm Fault Meer dan 60 seconden een communicatiefout met de aangesloten PMS Neem contact op met het servicecentrum P405 SDSP ...

Page 319: ... L2 Over Voltage Het spanningsniveau van het elektriciteitsnet L2 is hoger dan de limiet Automatisch opnieuw starten na het detecteren van de storing P465 Grid L3 Over Voltage Het spanningsniveau van het elektriciteitsnet L3 is hoger dan de limiet Automatisch opnieuw starten na het detecteren van de storing P466 Grid L1 Over Voltage 10min Het gemiddelde spanningsniveau van het elektriciteitsnet L1...

Page 320: ...ormaal is P502 PV Over Temp De IGBT temperatuur van de PV is hoger dan de limiet Automatisch opnieuw starten nadat de temp PV normaal is P503 Batt Over Temp De IGBT temperatuur van de batterij is hoger dan de limiet Automatisch opnieuw starten nadat temp batterij normaal is P504 DC Link Over Voltage Het spanningsniveau van de DC verbinding is hoger dan de limiet Automatisch opnieuw starten nadat d...

Page 321: ...rkte PV C normaal is P516 Batt A Over Current Instant Het stroomsterkteniveau van de batterij A wordt enorm snel hoger dan de limiet Automatisch opnieuw starten nadat Stroomsterkte Batterij A normaal is P517 PVA Over Current Instant Het stroomsterkteniveau van de PV A wordt enorm snel hoger dan de limiet Automatisch opnieuw starten nadat Stroomsterkte van PV A normaal is P518 PVB Over Current Inst...

Page 322: ...pnieuw starten na het detecteren van de storing P529 Batt B Over Current Het stroomsterkteniveau van de batterij B is hoger dan de limiet Automatisch opnieuw starten nadat Stroomsterkte Batterij B normaal is P530 PVC Over Current PVC niveau is hoger dan de limiet Automatisch opnieuw starten nadat Stroomsterkte PV C normaal is P532 Grid Relay1 Elektriciteitsnet functioneert niet L1 1 Automatisch op...

Page 323: ...iefout met de verbonden SDSP gedurende meer Automatisch opnieuw starten na het detecteren van de storing P548 INV L1 Over Voltage Het spanningsniveau van Omvormer L1 is hoger dan de limiet Automatisch opnieuw starten na het detecteren van de storing P549 INV L2 Over Voltage Het spanningsniveau van Omvormer L2 is hoger dan de limiet Automatisch opnieuw starten na het detecteren van de storing P550 ...

Page 324: ...n is onder Maximum bruikbare capaciteit Foutcode Batterij y y Elke batterij is aangeduid met 1 2 elke batterij deelt een codefout Code Bericht Beschrijving Oplossing B184 Under SOC Warning SOC spanningsniveau van de batterijcel is lager dan de limiet Automatisch opnieuw starten na het detecteren van de storing B185 Over SOC Warning SOC spanningsniveau van de batterijcel is hoger dan de limiet Auto...

Page 325: ...detecteren van de storing B608 Over Discharge Current Fault Het stroomsterkteniveau van de batterij is lager dan de limiet Automatisch opnieuw starten na het detecteren van de storing B609 Over Charge Current Fault Het stroomsterkteniveau van de batterij is hoger dan de limiet Automatisch opnieuw starten na het detecteren van de storing B610 Temperature Deviation Fault De temperatuurverschillen tu...

Page 326: ... B627 Under Temperature fault De temperatuur van de batterij is lager dan de limiet Neem contact op met het servicecentrum B628 Over Temperature fault De temperatuur van de batterij is hoger dan de limiet Neem contact op met het servicecentrum B630 Cell Under Voltage Fault Het celspanningsniveau van de batterijcel is lager dan de limiet Neem contact op met het servicecentrum B631 Cell Over Voltage...

Page 327: ...arege Omgekeerde Polariteit Batterij poging tot vooraf laden Automatisch opnieuw starten na het detecteren van de storing y y Firmwareversie foutcodes en storingsvoorwaarden die in de lijsten staan kunnen op het beeldscherm worden bekeken En deze kunnen ook via de server worden geopend Indien u technische problemen ondervindt of vragen hebt kunt u contact opnemen met een installatiebedrijf of met ...

Page 328: ...raken Zorg dat het product niet langdurig in aanraking komt met rubberen of plastic producten Wanneer u het luchtkanaal reinigt moet u alle systemen afsluiten zoals PCS de PV module de batterij en de AC stroomonderbreker Reinig daarna het filter met een zachte borstel zoals weergegeven in de afbeelding Regelmatig inspecteren Het wordt aanbevolen de besturingsstatus en de verbindingsstatus eenmaal ...

Page 329: ...sbereik 319 458 V 184 264 5 V Frequentie bereik 50Hz 47 5 Hz 51 5 Hz Nominaal uitgangsvermogen 8 kVA 10 kVA Nominale Uitgangsstroom 11 5 A 14 4 A THD Stroomfactor 5 0 8 Snelle ingangsstroom piek en duur 70 Aac 0 02 ms Max uitgang foutstroom 80 Aac 20 ms Maximale uitgang overbelastingsbeveiliging 55 6 Apeak Backup uitgang LG ESS Home 8 LG ESS Home 10 Maximum bruikbare huisladingscapaciteit in backu...

Page 330: ...ik Laden 400 450 VDC Ontladen 350 430 VDC Laden 400 450 VDC Ontladen 350 430 VDC 1 Waarde voor baterrijcel alleen mate van ontladen 95 capaciteit kan beperkt zijn omwille van systeembeveiliging 2 De capaciteit kan afnemen naarmate de batterij ouder wordt Efficiëntie PCS Maximale efficiëntie van PV naar elektriciteitsnet 97 7 Algemene gegevens Afmetingen b x h x d mm 450 599 210 PCS 746 688 206 LGH...

Page 331: ... blootgesteld vraagt u de installateur om advies y y Ontwerp en specificaties kunnen zonder voorafgaande kennisgeving worden gewijzigd Kantoor voor contact omtrent de naleving van dit product LG Electronics European Shared Service Center B V Krijgsman 1 1186 DM Amstelveen Nederland www lg com global business ess VEREENVOUDIGDE EU VERKLARING VAN OVEREENSTEMMING Hierbij verklaart LG Electronics dat ...

Page 332: ...tart 50 cosphi P Start 1 cosphi P End 0 9 cosphi P End 0 9 Naam Beschrijving Standaardwaarde Beschikbare waarde Eenheid cosphi P Start cosphi op startpunt 1 0 9 1 cosphi P Einde cosphi op eindpunt 0 95 0 9 1 cosphi P stroom start Actieve stroom op startpunt P Pmax 50 20 100 cosphi P stroom einde Actieve stroom op eindpunt P Pmax 100 20 100 ...

Page 333: ...unt a U Un 90 80 120 Q U Xb Elektriciteitsnet spanningspunt b U Un 92 80 120 Q U Xc Elektriciteitsnet spanningspunt c U Un 108 80 120 Q U Xd Elektriciteitsnet spanningspunt d U Un 110 80 120 Q U Ya Reactieve stroom punt a Q Sr 43 6 43 6 43 6 Q U Yb Reactieve stroom punt b Q Sr 0 43 6 43 6 Q U Yc Reactieve stroom punt c Q Sr 0 43 6 43 6 Q U Yd Reactieve stroom punt d Q Sr 43 6 43 6 43 6 Q U Lock in...

Page 334: ...ing Standaardwaarde Beschikbare waarde Eenheid P f Actieve stroom Actieve stroomstijging bij overfrequentie 40 0 100 P f Startfrequentie P f functie startfrequentie 50 2 50 51 5 Hz P f Frequentie terugzetten P f functie terugzetten frequentie 50 18 50 51 5 Hz P f wachttijd Wachttijd van actieve stroomstijging na het terugzetten van de frequentie 1 60 sec ...

Page 335: ...tive Power 100 0 Naam Beschrijving Standaardwaarde Beschikbare waarde Eenheid P U Actieve stroom Actieve stroomstijging bij overspanning 100 0 100 P U Startspanning P U functie startspanning U Un 110 100 120 P U eindspanning P U functie eindspanning U Un 112 100 120 P U wachttijd Wachttijd van actieve stroomstijging 1 60 sec ...

Page 336: ......

Reviews: