background image

20

ENGLISH

Installing on a Wall

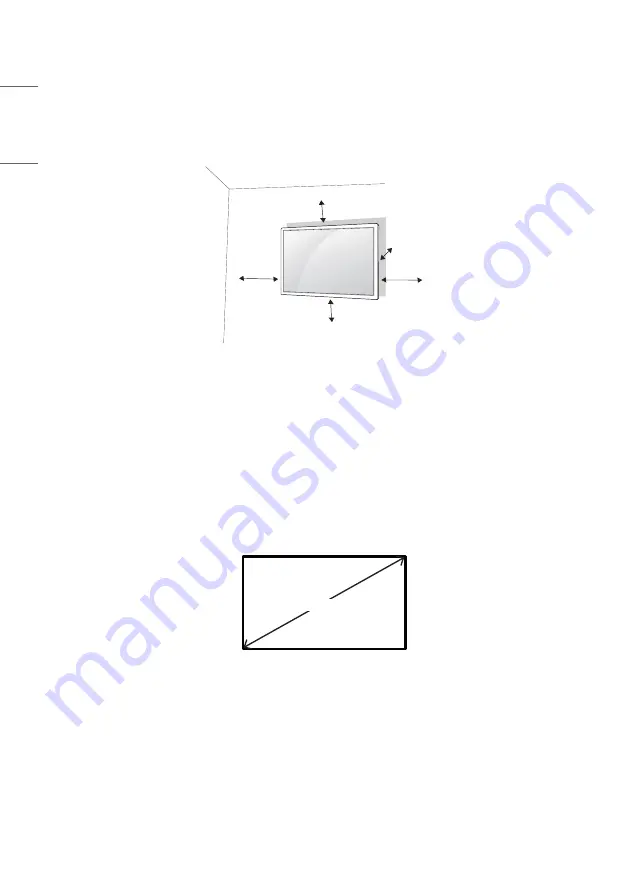
For proper ventilation, allow a clearance of 100 mm on each side and from the wall. Detailed installation instructions 

are available from your dealer, see the optional Tilt Wall Mounting Bracket Installation and Setup Guide.

100 mm

100 mm

100 mm

100 mm

100 mm

To install your monitor on a wall, attach a wall mounting bracket (optional part) to the back of the monitor.
Make sure that the wall mounting bracket is securely fixed to the monitor and to the wall.

Use only screws and wall mounting brackets that conform to VESA standards.

Screws which are longer than standard length may damage the inside of the monitor.

A non-VESA standard screw may damage the product and cause the monitor to fall. LG Electronics is not liable for 

any accidents related to the use of non-standard screws.

Please use VESA standard as below.


785 mm and above

* Fixing screws: Diameter 8.0 mm x Pitch 1.25 mm x Length 14 mm

785 mm

Summary of Contents for 75XS4G

Page 1: ...com Copyright 2020 LG Electronics Inc All Rights Reserved 75XS4G OWNER S MANUAL LG Digital Signage MONITOR SIGNAGE Please read this manual carefully before operating your set and retain it for future reference ...

Page 2: ...ecautions for Experiencing Image Retention 13 Product Disposal 13 LICENSES 14 ASSEMBLY AND PREPARATION 15 Parts and Buttons 16 Portrait Layout 17 Attaching and removing the LG Logo Bracket 18 Installing on a Wall 20 Safety and Precaution Guide for Installation 22 REMOTE CONTROL 23 MAKING CONNECTIONS 25 Connecting to a PC 25 External Device Connection 25 Connecting Multiple Monitors 27 Using the In...

Page 3: ...erence SAFETY PRECAUTION Please read these safety precautions carefully before using the product WARNING If you ignore the warning message you may be seriously injured or there is a possibility of accident or death CAUTION If you ignore the caution message you may be slightly injured or the product may be damaged WARNING Indoor Use Only ...

Page 4: ...rmly so it cannot come loose Poor connection may cause a fire or electric shock In the presence of thunder and lightning never touch the power cord and signal cable because it can be very dangerous It can cause electric shock Be careful not to step or place heavy objects electronic appliances clothing etc on the power cord or AC adapter Additionally do not bend or pull out the power cord or AC ada...

Page 5: ...he AC power source even if the unit is turned off Power consumption will be 0 only when the power plug is unplugged Use the appliance coupler as the disconnect device CAUTION If the outlet pins of the power plug or AC adapter is covered with dust be sure to wipe them and keep them clean Overheating due to layers of dust may cause a fire or electric shock If the outlet pins of the power plug or AC ...

Page 6: ... panel You may be electrocuted or the product can be damaged Use the correct number of people according to the weight of the product Under 25Kg per person use lifting equipment when exceeding 100 Kg If use the damaged product again contact the service center because it can cause electric shock or fire Do not hold it upside down while holding only the stand It is for stand supported models only Thi...

Page 7: ...function may occur Do not install this product by yourself as you may injure yourself or cause damage to the product Please contact service engineer authorized by service center Do not install this product on a wall if it could be exposed to oil or oil mist This may damage the product and cause it to fall Do not leave the power or signal cable etc on the pathway This could cause a trip or fall whi...

Page 8: ...internal heat buildup Do not cover the product with a tablecloth or a curtain or other materials e g plastic while plugged in Do not block the ventilation hole of the product The product can be deformed or fire can break out due to overheating inside the product Do not install the product in an area with poor ventilation e g on a bookshelf in a closet or outside and avoid placing on cushions or ca...

Page 9: ...tric shock may occur or damage to the screen if its scratched When you want to clean the front frame spray water onto a soft cloth 2 to 4 times and wipe in one direction only Too much moisture may cause staining CAUTION When cleaning the product or the screen unplug the power cord and wipe it gently with a soft cloth Do not spray water or other liquids directly on the product Especially do not cle...

Page 10: ...hock Do not drop an object or impact on the product or screen It can cause injury to human problem to product and damage the screen If you can smell smoke or other odors or hear a strange sound unplug the power cord and contact the service center If you continue to use the product without taking proper measures it may cause electrical shock or fire Do not attempt to disassemble repair or modify th...

Page 11: ...uct Also do not throw toys or objects at the product or screen It can cause injury to human problem to product and damage the screen All the power sources must be disconnected by removing the power cables to remove all power from the unit CAUTION This panel is an advanced product that contains millions of pixels You may occasionally see pixel spots when viewing the screen Since these deactivated p...

Page 12: ... Used batteries which include rechargeable batteries should be recycled separately from waste Please dispose used batteries and rechargeable batteries at a local recycling center or a retail store that handles batteries CAUTION Do not short circuit and disassemble of batteries It may cause electrical shock or fire The remote control may not function properly in sunlight or under a strong lamp Move...

Page 13: ...tention Most third party products have the same issue The resulting damage is not covered by the product warranty Use a screen saver when using the monitor for a prolonged period of time Product Disposal Do not dispose of this product with general household waste Disposal of this product must be carried out in accordance to the regulations of your local authority ...

Page 14: ...actured under license from Dolby Laboratories Dolby Dolby Vision Dolby Audio Dolby Atmos and the double D symbol are trademarks of Dolby Laboratories For DTS patents see http patents dts com Manufactured under license from DTS Licensing Limited DTS the Symbol DTS and the Symbol together DTS 2 0 Channel DTS 2 0 Digital Out DTS HD and DTS Virtual X are registered trademarks or trademarks of DTS Inc ...

Page 15: ...sories provided with your product may vary depending on the model or region Product specifications or contents in this manual may be changed without prior notice due to upgrade of product functions SuperSign Software Manual Visit the LG Electronics website http partner lge com and download the latest software for your model The warranty will not cover any damage caused by using the product in an e...

Page 16: ...ection Press 2 Power Off 3 Press and Hold Volume Control Menu Control 2 Menu Control 2 1 When the monitor is turned on press the button one time 2 You can use the function when you control menu 3 All running apps will close Quick Menu Turns the power off Accesses the main menu Changes the input source Close the quick menu ...

Page 17: ...17 ENGLISH Portrait Layout When installing in a portrait layout rotate the monitor counterclockwise 90 degrees when facing the screen ...

Page 18: ... floor and then put the monitor on it with the screen face down Using a screwdriver remove the screw that secures the LG Logo Bracket to the bottom rear of the monitor LG Logo Bracket 2 After removing the screw remove the LG Logo Bracket When re attaching the LG Logo Bracket repeat the process in reverse order ...

Page 19: ...put the monitor on it with the screen face down Using a screwdriver remove the screw that secures the LG Logo Bracket to the bottom rear of the monitor LG Logo Bracket 2 After removing the screw remove the LG Logo Bracket Align with the hole on the right side to attach the LG Logo Bracket with a screw ...

Page 20: ... to the back of the monitor Make sure that the wall mounting bracket is securely fixed to the monitor and to the wall 1 Use only screws and wall mounting brackets that conform to VESA standards 2 Screws which are longer than standard length may damage the inside of the monitor 3 A non VESA standard screw may damage the product and cause the monitor to fall LG Electronics is not liable for any acci...

Page 21: ...at meet the VESA standard Any damage or injuries caused by misuse or use of improper accessories are not covered by the warranty To prevent injury this apparatus must be securely attached to the wall in accordance with the installation instructions This pertains only to Australia and New Zealand NOTE The wall mount kit includes the installation guide and all necessary parts The wall mounting brack...

Page 22: ...a film with UV blocking properties to the window glass Protect the display with cloth or a box when storing the device after it has been powered off This can prevent faults such as black spots creases and yellowing Temperature Make a cooling system for the enclosure so that the operating temperature of the product can be maintained 0 C 40 C without Direct Sunlight 0 C 30 C Direct Sunlight A 100 mm...

Page 23: ...rtain models The product s internal and external batteries should not be exposed to excessive heat such as direct sunlight fire or the like POWER Turns the monitor on or off Turns the monitor on Turns the monitor off Adjusts the brightness of the picture to reduce energy consumption INPUT Selects the input mode Used for viewing 3D video This function is not supported Number and Alphabet buttons En...

Page 24: ...rns to the previous level Closes the menu Allows you to control various multimedia devices to enjoy multimedia simply by using the remote control through the SimpLink menu You can choose to turn TILE Mode on off Control buttons Controls media playback When the Picture ID number matches the Set ID number you can control whichever monitor you want in multi display format Individually control the mon...

Page 25: ...C Some of the cables are not provided This monitor supports the feature a feature that enables a PC to recognize devices attached by the user without device configuration or user intervention when powering up External Device Connection Connect a HD receiver DVD or VCR player to the monitor and select an appropriate input mode Some of the cables are not provided For the best picture and sound quali...

Page 26: ... your PC settings Some PCs require you to manually change the default audio output to HDMI If you want to use HDMI PC mode you must set your PC DTV to PC mode You may experience compatibility issues if you use HDMI PC mode Make sure the power cable is disconnected If you connect a gaming device to the monitor use the cable provided with the gaming device It is recommended to use the speakers that ...

Page 27: ...In connector of the other product DP OUT DP IN DP OUT DP IN DP OUT DP IN DP OUT HDMI IN 1 DP OUT DP IN DP OUT DP IN DP OUT HDMI IN 2 DP OUT DP IN DP OUT DP IN LAN OUT LAN IN LAN OUT LAN IN LAN OUT LAN IN NOTE If the signal cable between the product and your PC is too long make sure to use the Booster or optical cable DP Cable Use a DP cable that is certified to DP 1 1a standard or higher Using the...

Page 28: ...ble connection status is unstable Check the signal cable Access the input menu to check the input signal The signal from the PC Graphics card is out of the vertical or horizontal frequency range of the product Adjust the frequency range by referring to the specifications in this manual The position of the screen is incorrect Check if the graphics card resolution and frequency are supported by the ...

Page 29: ...s card Black spots or bright spots appear on the screen Some pixels red green blue black are visible on the screen due to the unique characteristics of the display panel This is not a malfunction of the product The screen s brightness seems dark Adjust brightness and contrast again Backlight may need repair If the internal temperature of the enclosure rises the screen s brightness may darken Clean...

Page 30: ...ains visible This phenomenon is referred to as image sticking Image sticking does not occur when using constantly changing images but may occur when using a fixed image for an extended period of time Therefore it is recommended that you use the instructions below to decrease the likelihood of image sticking occurring when using a fixed image It is recommended that you change the screen at least on...

Page 31: ...yPort 3840 2160 60 Hz This may not be supported on some OS or graphics card types Horizontal frequency DisplayPort 30 kHz to 83 kHz HDMI 1 HDMI 2 30 kHz to 136 kHz Vertical frequency HDMI 1 HDMI 2 DisplayPort 58 Hz to 62 Hz Synchronization Separate Sync Digital Input Output ports Embedded battery Applied Power Rated power AC 100 240 V 50 60 Hz 9 3 A Power consumption On Mode 750 W Typ Sleep Mode 0...

Page 32: ... device and the body IEEE 802 11ac is not available in all countries Only Nigeria Connection and use of this communications equipment is permitted by the Nigerian Communications Commission Only HongKong Wireless module LGSBWAC72 Specifications Wireless LAN IEEE 802 11a b g n ac Frequency range MHz Output power Max dBm 2400 to 2483 5 5150 to 5350 5725 to 5850 14 16 5 11 5 Bluetooth Frequency range ...

Page 33: ...81 60 02 1680 x 1050 65 29 59 954 1920 x 1080 67 5 60 3840 x 2160 67 5 30 3840 x 2160 135 60 HDMI 1 HDMI 2 DisplayPort DTV Support mode Resolution Horizontal frequency kHz Vertical frequency Hz 480 60p 31 5 60 576 50p 31 25 50 720 50p 37 5 50 720 60p 45 60 1080 50i 28 1 50 1080 60i 33 75 60 1080 50p 56 25 50 1080 60p 67 432 59 94 1080 60p 67 5 60 2160 30p 67 5 30 2160 50p 112 5 50 2160 60p 135 60 ...

Page 34: ...isplay functions by the screen image changing dozens of times every second like a fluorescent lamp The vertical frequency or refresh rate is the number of image displays per second The unit is Hz Horizontal frequency The horizontal interval is the time taken to display one horizontal line When 1 is divided by the horizontal interval the number of horizontal lines displayed every second can be tabu...

Page 35: ...oise is normal when powering ON or OFF this device The model and serial number of the product are located on the back and on one side of the product Record them below in case you ever need service MODEL SERIAL NO ...

Reviews: