background image

55

ENG

ENGLISH

MAKING CONNECTIONS

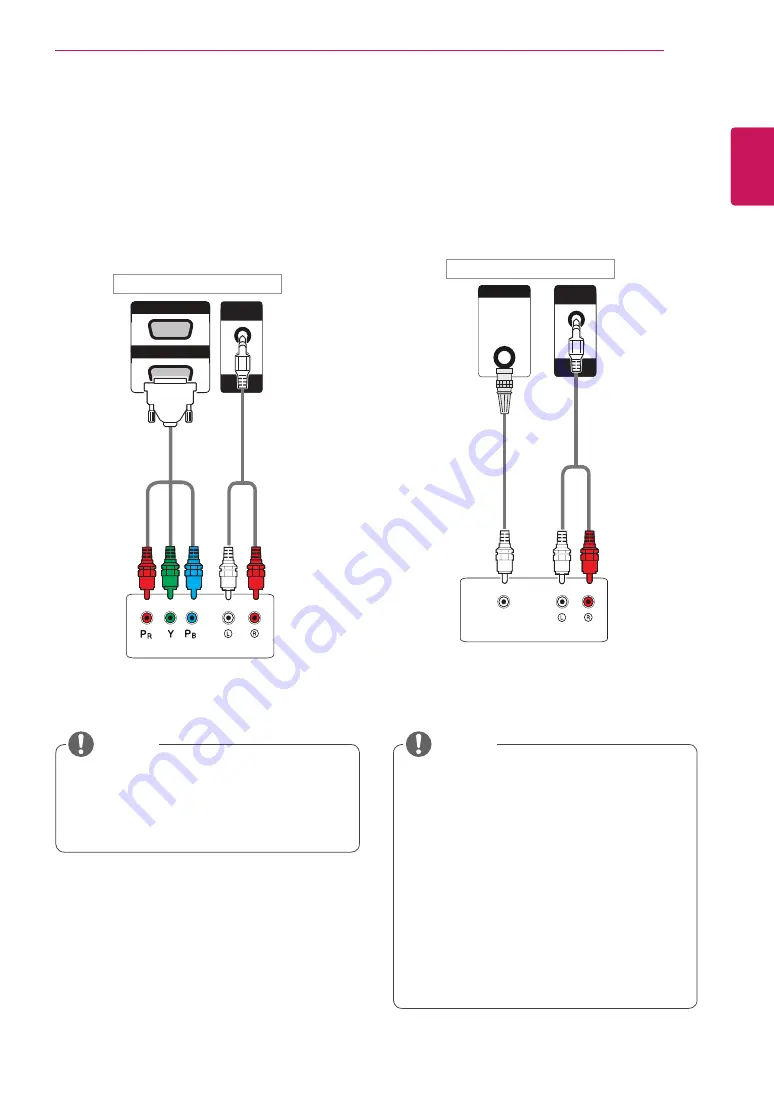
AV(CVBS) connection

Transmits the analog video and audio signals from 
an external device to the Monitor set. Connect 
the external device and the Monitor set with 
the Composite cable as shown in the following 
illustration.

Component connection

Transmits the analog video and audio signals from 
an external device to the Monitor set. Connect 
the external device and the Monitor set with the 
RGB-Component cable as shown in the following 
illustration.


y

When connecting to the Component port 
using the shared interface, the port must 
match up to the input source. Otherwise, 
noise may occur.

NOTE

Back of the product.

(not included)

(not included)

Back of the product.

(not included)

(not included)

NOTE


y

If input signals are received through the AV 
cable, multiple monitors cannot be connected 
via the RGB OUT port.


y

Input signal may be degraded or lost when 
multiple monitors are connected.


y

For Component, in general, up to 3 monitors 
can be connected via the Component Out 
port (RGB Shared) if the signal is stable and 
there is no cable loss.


y

If you want to connect more than this number 
of monitors, we recommended that you use a 
distributor.

VIDEO OUT

AUDIO

IN

REMOTE

CONTROL IN

COMPOSITE

RGB

/COMPONENT OUT

RGB

/COMPONENT IN

AUDIO

IN

REMOTE

CONTROL IN

VIDEO OUT

AUDIO

IN

REMOTE

CONTROL IN

COMPOSITE

RGB

/COMPONENT OUT

RGB

/COMPONENT IN

AUDIO

IN

REMOTE

CONTROL IN

Summary of Contents for 55WV70BS

Page 1: ...www lg com OWNER S MANUAL MONITOR SIGNAGE 55WV70MS 55WV70BS Please read this manual carefully before operating your set and retain it for future reference MONITOR SIGNAGE MODELS ...

Page 2: ... image mode 19 Customizing image options 20 Customizing PC display options 20 Adjusting the sound 20 Selecting an sound mode 21 Customizing sound options 21 Using additional options 21 Adjusting aspect ratio 23 Using the input list 24 ENTERTAINMENT 24 Connecting to a wired network 25 Network Status 26 Connecting USB storage devices 27 Browsing files 29 Viewing movies 32 Viewing photos 35 Listening...

Page 3: ...4 Connecting the cable 64 RS 232C Configurations 64 Communication Parameter 65 Command Reference List 67 Transmission Receiving Protocol y y Product damage from moving or changing the installation location is not covered by warranty y y The warranty will not cover any damages caused by using the product in an excessively dusty environment NOTE ...

Page 4: ...ed device that has passed rigorous testing to verify that it plays DivX video Visit divx com for more information and software tools to convert your files into DivX video ABOUT DIVX VIDEO ON DEMAND This DivX Certified device must be registered in order to play purchased DivX Video on Demand VOD movies To obtain your registration code locate the DivX VOD section in your device setup menu Go to vod ...

Page 5: ...tems are not covered by the warranty CAUTION y y The accessories supplied with your product may vary depending on the model y y Product specifications or contents in this manual may be changed without prior notice due to upgrade of product functions NOTE P A G E INPUT ENERGY SAVING MARK ARC ON OFF ABC DEF GHI JKL MNO PQRS TUV 1 a A WXYZ CLEAR MONITOR PSM AUTO MUTE BRIGHT NESS MENU POWER OK S MENU ...

Page 6: ...6 ENG ENGLISH ASSEMBLING AND PREPARING Parts USB DP LAN COMPOSITE DVI IN DVI OUT DVI SPEAKER RGB COMPONENT OUT RGB COMPONENT IN AUDIO IN REMOTE CONTROL IN Connection panel ...

Page 7: ...lling in a Portrait Layout rotate the monitor clockwise 90 degrees when facing the screen Remove L brackets before Installation Remove the L brackets from each corner of the monitor before installing it y y Keep the removed L brackets and use them when moving the monitor later NOTE ...

Page 8: ...duct lay a cushion on a flat floor Put the product on it with the panel of the product facing down If there is not a cushion available ensure the floor is clean and then lay the product down carefully with the panel facing either upward or downward At this time be careful for objects not to fall on the panel Cushion Panel Panel Panel If the product is tilted onto the bezel the bottom of the panel ...

Page 9: ...ion instructions This only pertains to Australia and New Zealand CAUTION NOTE Do not install the product in a place with no ventilation e g on a bookshelf or in a closet or on a carpet or cushion If there is no other option but to mount the product on the wall make sure that sufficient ventilation is provided before installation Failure to do so may result in a fire due to the increase in the inte...

Page 10: ...MBLING AND PREPARING EXTERNAL EQUIPMENT SETUP IR RECEIVER This allows a remote control sensor to be placed in a custom location Then that display can control other displays via an RS 232C cable AUDIO IN REMOTE CONTROL IN ...

Page 11: ...e of 2 x 2 tiling Using the screws for attaching the VESA wall mount mount the set to the wall mount plate or the wall The wall mount plate is shaded in gray in the illustration to help you see it Screws for attaching the VESA wall mount Rear view of the set with the wall mount plate ...

Page 12: ... by the wall mount plate using a VESA wall mount Each set must be firmly mounted to the wall mount plate or the wall y y You may mount the set without using the tiling guide this does not affect the performance of the device NOTE 1 Join other sets using screws for fixing the VESA wall mount in the same way as above 2 After joining the sets use the tiling guide to adjust the gap between the sets 3 ...

Page 13: ...damage the remote control y y Make sure to point the remote control to the remote control sensor on the Monitor set CAUTION P A G E INPUT ENERGY SAVING MARK ARC ON OFF ABC DEF GHI JKL MNO PQRS TUV 1 a A WXYZ CLEAR OK S MENU MONITOR PSM AUTO MUTE BRIGHT NESS MENU POWER I POWER Turns the Monitor set on or off Monitor On Off Turn off the monitor and then turn it back on 1 a A Button Toggles between n...

Page 14: ...uttons Scrolls through menus or options OK Selects menus or options and confirms your input BACK Allows the user to move back one step in user interaction function USB Menu control buttons Controls media playback ID ON OFF When the number of Picture ID is equal to Set ID you can control the monitor which you want in the multi display condition AUTO Automatically adjusts picture position and minimi...

Page 15: ...s the blue input label button on the remote control 2 You can assign an input label for every input except USB Input Label Close Component AV RGB HDMI DVI D Display Port y y External inputs supported AV Component RGB HDMI DVI D Display Port y y Labels available VCR DVD Set top box Satellite Game PC Blue ray HD DVD y y The input labels are displayed on the Input Label screen or at the top left of t...

Page 16: ...rite core such as D sub 15 pin cable and DVI HDMI cable provided with the product y y If you turn the Monitor set on when the set becomes cold the screen may flicker This is normal y y Some red green or blue spots may appear on the screen This is normal y y Do not press the screen with your finger for a long time as this may result in temporary distortion on the screen y y Avoid displaying a fixed...

Page 17: ...in the following illustrations Select HDMI input y y Use a High Speed HDMI Cable y y Please check the PC environment if you cannot hear the sound in HDMI mode Some PCs require you to manually change the default audio output to HDMI y y If you want to use HDMI PC mode you must set the input label to PC mode y y When HDMI PC is used a compatibility problem could occur NOTE AUDIO IN REMOTE CONTROL IN...

Page 18: ... signals from your PC to the Monitor Connect the PC and the Monitor with the Display Port cable as shown in the following illustrations Select Display Port input source y y Sound may not be available depending on the DP version of your PC NOTE PC IN DVI DP AUDIO IN REMOTE CONTROL IN Back of the product not included Back of the product IN DVI DP AUDIO IN REMOTE CONTROL IN PC ...

Page 19: ...Optimizes the video image for high and dynamic actions by emphasizing primary colors such as white grass or sky blue Game Optimizes the video image for a fast gaming screen such as PCs or games 5 When you are finished press EXIT When you return to the previous menu press BACK Option Description Backlight Adjusts the brightness of the screen by controlling the LCD backlight If you decrease the brig...

Page 20: ...tions when the picture is not clear especially when characters are shaky after the auto configuration Reset Restores the options to the default setting 5 When you are finished press EXIT When you return to the previous menu press BACK Adjusting the sound Selecting an sound mode Play the sound in its optimized settings by selecting one of the preset sound modes 1 Press MENU to access the main menus...

Page 21: ...sets the sound mode to the default setting 6 When you are finished press EXIT When you return to the previous menu press BACK Using additional options Adjusting aspect ratio Resize the image to view the image at its optimal size by pressing ARC while you are watching Monitor set y y If a fixed image displays on the screen for a long period of time it could be imprinted and become a permanent disfi...

Page 22: ...want to enlarge the picture in correct proportion Note When enlarging or reducing the picture the image may become distorted 16 9 This selection will allow you to adjust the picture horizontally in linear proportion to fill the entire screen useful for viewing 4 3 formatted DVDs Just Scan This Selection will allow you view the picture of best quality without loss of original picture in high resolu...

Page 23: ...ource Description AV Watch video from a VCR or other external devices Component Watch the content from a DVD or other external devices or through a digital set top box RGB View a PC display on the screen DVI D View a PC display on the screen HDMI Watch contents from a PC DVD of Digital set top box other high definition devices Display Port Watch contents in a PC DVD of Digital set top box other hi...

Page 24: ...gs resets the current network settings 5 Select IP Auto Setting or IP Manual Setting If selecting IP Manual Setting press the Navigation and Number buttons IP address es will need to be input manually IP Auto Setting Select this if there is a DHCP server Router on the local area net work LAN via wired connection the display will automatically be allocated an IP address If you re using a broadband ...

Page 25: ...a wired connection to this display If your internet service does not allow for such a connection you will not be able to connect the display y y A DSL modem is required to use DSL service and a cable modem is required to use cable modem service Depending on the access method of and subscriber agreement with your ISP you may not be able to use the internet connection feature contained in this displ...

Page 26: ...e system provided with the Windows op erating system In case of a storage device formatted as a different utility program which is not supported by Windows it may not be recognized y y Please connect power to a USB storage device over 0 5 A which requires an external power supply If not the device may not be recognized y y Please connect a USB storage device with the cable offered by the device ma...

Page 27: ...th a Energy Saving function does not work turn the hard disk off and on again to make it work properly y y USB storage devices below USB 2 0 are supported as well But they may not work properly in the movie list y y Maximum of 999 folders or files can be rec ognized under one folder y y A USB 3 0 storage device may not work Browsing files Access the photo music or movie lists and browse files 1 Co...

Page 28: ...peg jpg jpe supported file format SOF0 baseline SOF1 Extend Sequential SOF2 Progressive photo size Min 64 x 64 Max Normal Type 15360 W x 8640 H Progressive Type 1920 W x 1440 H Music MP3 Bit rate 32 to 320 y y Sampling rate MPEG1 Layer3 32 kHz 44 1 kHz 48 kHz y y Sampling rate MPEG2 Layer3 16 kHz 22 05 kHz 24 kHz y y Sampling rate MPEG2 5 Layer3 8 kHz 11 025 kHz 12 kHz Type Supported file format C...

Page 29: ...lowing buttons Button Description r Stops the playback s Plays a video t Pauses or resumes the playback v Scans backward in a file w Scans forward in a file MENU Show the Option menu HIDE Hide the menu on the full sized screen EXIT Return to Movie List or Skips to specific points in a file dur ing playback The time of a specific point will appear on the status bar In some files this function may n...

Page 30: ...les other than the specified types and formats may not work properly y y Max bitrate of playable movie file is 20 Mbps only Motion JPEG 10 Mbps y y We do not guarantee smooth playback of profiles encoded level 4 1 or higher in H 264 AVC y y DTS Audio codec is not supported y y A movie file more than 30 GB in file size is not supported for playback y y A DivX movie file and its subtitle file must b...

Page 31: ... for SMI subtitle and can select the language within the subtitle Code Page Can select the font for subtitle When set to default same font as general menu will be used Sync Adjusts the time synchronization of the subtitle from 10 secs to 10 secs by steps of 0 5 secs during movie play Position Changes the position of the subtitle either up or down during movie play Size Selects your desired Subtitl...

Page 32: ...oll to a folder you want and press OK 4 Press the Navigation buttons to scroll to a file you want and press OK 5 View photos Menu Description View Marked Display the selected photo file Mark All Mark all photo files on the screen Unmark All Deselect all marked photo files Exit Mark Mode Exit the Mark Mode y y Non supported files are displayed the pre view image by icon only y y Abnormal files are ...

Page 33: ...music on or off To set the background music folder select Option You can adjust Option by MENU button on the remote control Rotate Rotates photos clockwise 90 180 270 360 View the photo by zoom in 2 4 times Number of selected photos Options Using photo options Use the following options while viewing photos y y The supported photo size is limited You cannot rotate a photo if the resolution of the r...

Page 34: ...ption Description Sliding Pushes the current slide out of view as it plays to the next slide Stairs Pushes the current slide in a staircase shape as it plays to the next slide Door Open Close Pushes the current slide like opening or closing the door as it plays to the next slide Shutter Pushes the current slide like drawing or pulling down the blind as it plays to the next slide Fade In The curren...

Page 35: ...roll to a folder you want and press OK 4 Press the Navigation buttons to scroll to a file you want and press OK Menu Description Play Marked Display the selected music file Mark All Mark all music files on the screen Unmark All Deselect all marked music files Exit Mark Mode Exit the Mark Mode Page 1 1 Music List Drive1 Page 1 1 001 B01 mp3 00 00 002 B02 mp3 00 00 003 B03 mp3 00 00 004 B04 mp3 00 0...

Page 36: ...button while the Music player is displayed only the music will be stopped and the player will not return to normal viewing When you press the EXIT button while the music is stopped or while the music player is hidden the player will return to normal viewing or When using the or button during playback a cursor indicating the position can be played Tips for playing music files y y This unit cannot s...

Page 37: ...laying media files from Contents List only the BACK EXIT or Volume button are available Selecting the BACK or EXIT button stops playing media files and returns to the screen view mode y y If there is the AutoPlay folder in the USB device and its files are in supported formats they can be played back automatically when the USB device is connected to the monitor NOTE Viewing the Contents List Plays ...

Page 38: ...other device you cannot play the rented or purchased DivX file Make sure to use the DivX registration code assigned to your product y y The video or audio files that are not con verted by the standard DivX codec may be corrupted or not be played y y The DivX VOD code allows you to activate up to 6 devices under one account NOTE DivX VOD Deregistration You should deregister your device with 8 digit...

Page 39: ...IP PBP Pre Mode Position Size 4 Select a file you want and then press OK 5 Select the PIP or PBP icon from the play list 01 02 30 02 30 25 Option MENU Hide Exit Movie List Photo List 6 Select either Main or Sub for sound You must to select the output sound before running the PIP or PBP function 7 The sub screen is displayed on the main screen Select the sound path Main Sub Movie List Music List Ph...

Page 40: ...IT When you return to the previous menu press BACK P A G E MARK ARC OK S MENU PSM AUTO MUTE BRIGHT NESS MENU ID BACK TILE ON OFF EXIT OPTION PICTURE NETWORK AUDIO TIME MY MEDIA PICTURE See p 41 Adjusts the image size quality or effect AUDIO See p 44 Adjusts the sound quality effect or volume level NETWORK See p 52 Sets up the network setting OPTION See p 46 Customizes the general settings TIME See...

Page 41: ...y Brightness Control On Enables Easy Brightness Control Smart Energy Saving Adjusts the backlight and contrast depending on the screen brightness Level On Enables the Smart Energy Saving function to save power consumption as much as the value set in the smart energy saving rate Off Disables the Smart Energy Saving function NOTE y y Easy Brightness Control is disabled if the current time is not set...

Page 42: ...cription Picture Mode Selects one of the preset image or customizes options in each mode for the best Monitor set screen performance You are also able to customize advanced options of each mode The available preset picture modes vary depending on the Monitor set Mode Vivid Adjusts the video image for the retail environment by enhancing the contrast brightness Color and sharpness Standard Adjusts t...

Page 43: ...mising video quality This function can be used only under Component Digital Noise Reduction Off High Medium Low This option reduces the noise produced while creating digital video signals Gamma High Medium Low Set your own gamma value On the monitor high gamma values display whitish images and low gamma values display high contrast images Black Level High Low Low The picture of the screen gets dar...

Page 44: ...o enjoy the original sound when listening to the music Cinema Select this option to enjoy sublime sound Sport Select this option to watch sports broadcasting Game To enjoy dynamic sound when playing a game Option Infinite Sound LG s Infinity Sound option provides 5 1 channel stereo sound from two speakers Treble Controls the dominant sounds in the output When you turn up the treble it will increas...

Page 45: ... will be set to off Power on delay When connecting multiple monitors and turning the power on the monitors are turned on individually to prevent overload Auto off If Auto off is active and there is no input signal the set switches to off mode automatically after 15 minutes Automatic Standby If you do not use the monitor for more than 4 hours it will be in standby mode automatically y y Once the on...

Page 46: ...ail Over If there is no input signal it automatically switches to another input with signal Setting Off Stops auto switch of the input source Auto Switches to another input source with video signal if no video signal comes from the current input source Manual Selects the priority of input source for auto switch When several input sources are found the input source with a higher priority will be se...

Page 47: ... automatically The displayed image may be unstable for a few seconds while the configuration is in progress Position Moving the screen position horizontally and vertically Size Adjust the horizontal and vertical size of the screen taking into account the size of the bezel Natural The image is omitted by the distance between the screens to be naturally shown Reset Function to initialize and release...

Page 48: ...erature at which the fan is switched on Current Temperature Current temperature inside the set USB Content Recovery Replays the content in a USB when the power is back on if it is turned off during playing a content This function operates the same when a USB is disconnected and connected again Product Service Info Displays the model name software version serial number IP address MAC address and ho...

Page 49: ... 4 ID 1 ID 2 ID 4 ID 5 ID 3 ID 6 ID 7 ID 8 ID 9 3X3 When using 9 monitors ID 1 ID 2 ID 5 ID 6 ID 3 ID 7 ID 9 ID 10 ID 11 ID 4 ID 8 ID 12 ID 13 ID 14 ID 15 ID 16 ID 1 ID 2 ID 6 ID 7 ID 3 ID 8 ID 11 ID 12 ID 13 ID 4 ID 5 ID 9 ID 10 ID 14 ID 15 ID 16 ID 21 ID 17 ID 22 ID 18 ID 23 ID 19 ID 24 ID 20 ID 25 Off When the Tile Mode option is disabled 1X2 When using 2 monitors 2X2 When using 4 monitors 5X5 ...

Page 50: ...pect Ratio option in the PICTURE menu is disabled Fixed as 16 9 y y While running the PBP function the Tile Mode function does not work y y You must select the output sound before running the PIP or PBP functions Select either Main or Sub y y If you fail to select Main or Sub from the sound selection box and if the OSD disappears after either a period of time or when the Exit or Back key is presse...

Page 51: ...llation Manual for more information on Total Set ID assignment P A G E INPUT ENERGY SAVING MARK ARC ON OFF ABC DEF GHI JKL MNO PQRS TUV 1 a A WXYZ CLEAR OK S MENU MONITOR PSM AUTO MUTE BRIGHT NESS MENU ID BACK TILE ON OFF EXIT POWER P A G E INPUT ENERGY SAVING MARK ARC ON OFF ABC DEF GHI JKL MNO PQRS TUV 1 a A WXYZ CLEAR OK S MENU MONITOR PSM AUTO MUTE BRIGHT NESS MENU ID BACK TILE ON OFF EXIT POW...

Page 52: ...d by the server Rejected When network connection with SuperSign server has been made but access to server has been rejected by the server Internet is connected When network connection with SuperSign server has been made and access to server has also been approved by the server NETWORK settings 1 Press MENU to access the main menus 2 Press the Navigation buttons to scroll to NETWORK and press OK 3 ...

Page 53: ... 2 Check the connection type of the external device 3 Go to the appropriate illustration and check the connection details y y If you connect a gaming device to the Monitor set use the cable supplied with the gaming device NOTE HDMI DVI AV Component HDMI DVI RGB LAN Display Port HDMI DVI AV Component AV Component HDMI DVI AV Component HDMI AV Component Memory storage HD Receiver DVD VCR USB PC Camc...

Page 54: ...ration y y Use a High Speed HDMI Cable y y High Speed HDMI Cables are tested to carry an HD signal up to 1080p and higher NOTE DVI connection Transmits the digital video signal from an external device to the Monitor set Connect the external device and the Monitor set with the DVI cable as shown in the following illustration To transmit an audio signal connect an optional audio cable DVI DVI IN RGB...

Page 55: ...Otherwise noise may occur NOTE Back of the product not included not included Back of the product not included not included NOTE y y If input signals are received through the AV cable multiple monitors cannot be connected via the RGB OUT port y y Input signal may be degraded or lost when multiple monitors are connected y y For Component in general up to 3 monitors can be connected via the Component...

Page 56: ... Monitor Set Network PC LAN Switch Monitor Set Network PC LAN B Using the Internet Connecting to a USB Connect a USB storage device such as a USB flash memory external hard drive MP3 player or a USB memory card reader to the Monitor set and access the USB menu to use various multimedia files or ...

Page 57: ...B COMPONENT OUT RGB COMPONENT IN RGB COMPONENT OUT RGB COMPONENT IN RGB COMPONENT OUT RGB COMPONENT IN DVI Cable Max 3m Monitor SET 1 Monitor SET 2 Monitor SET 3 Monitor SET 4 y y When multiple monitors are connected in RGB input it is recommended to use a distributor to avoid signal degradation and cable loss y y For DVI in general up to 12 monitors can be connected via the DVI Out port at the re...

Page 58: ... the vertical or horizontal frequency range of the product Adjust the frequency range by referring to the Specifications in this manual Maximum resolution RGB 1920 x 1080 60 Hz HDMI DVI DP 1920 x 1080 60 Hz Does the No signal message appear y y The signal cable between PC and product is not connected Check the signal cable y y Press the INPUT menu in the remote Control to check the input signal Un...

Page 59: ...ct PICTURE Screen Size in OSD menu Horizontal noise appears or the characters look blurred y y D Sub analog signal Press the AUTO button in the remote control to automatically select an optimal screen status that fits into the current mode If adjustment is not satisfactory select PICTURE Screen Phase in OSD menu The screen is displayed abnormally y y The proper input signal is not connected to the...

Page 60: ... colored y y Check the connection status of the signal cable Or re insert the PC video card Do black spots appear on the screen y y Several pixels red green white or black color may appear on the screen which can be attributable to the unique characteristics of the LCD panel It is not a malfunction of the LCD The operation does not work normally Problem Resolution The power suddenly turned off y y...

Page 61: ...o 83 kHz Vertical Frequency RGB 56 Hz to 60 Hz HDMI DVI DP 56 Hz to 60 Hz Synchronization Type Separate Sync Composite AV Sync Digital SOG Input Connector 15 pin D Sub type RGB Component HDMI DVI DP digital Composite AV RS 232C LAN USB Power Rated Voltage AC 100 240 V 50 60 Hz 3 3 A Power Consumption 55WV70MS On Mode 210 W Typ Smart Energy Saving Mode 120 W Typ Off Mode 0 5 W Sleep Mode 0 7 W 55WV...

Page 62: ...input label option in RGB and HDMI DVI input mode 640 x 480 60 Hz 1280 x 720 60 Hz 1920 x 1080 60 Hz and DTV resolutions 480p 720p 1080p NOTE y y Vertical frequency To enable the user to watch the product display screen image should be changed tens of times every second like a fluorescent lamp The vertical frequency or refresh rate is the times of image display per second The unit is Hz y y Horizo...

Page 63: ...TTON 02 Volume R C BUTTON 03 Volume R C BUTTON 09 MUTE R C BUTTON E0 Bright Page UP R C BUTTON E1 Bright Page Down R C BUTTON 10 to 19 Number Key 0 to 9 R C BUTTON 72 Red Key ID ON R C BUTTON 71 Green Key ID OFF R C BUTTON 63 Yellow Key R C BUTTON 61 Blue Key R C BUTTON 7B TILE R C BUTTON 76 ARC 4 3 R C BUTTON 77 ARC 16 9 R C BUTTON AF ARC ZOOM R C BUTTON 79 ARC MARK R C BUTTON 99 Auto Config R C ...

Page 64: ...uct You can turn the product on off select an input source or adjust the OSD menu from your PC Communication Parameter Monitor Set 1 Monitor Set 2 Monitor Set 3 Monitor Set 4 PC RS 232C Cable y y Baud Rate 9600 BPS y y Data Length 8 bit y y Parity Bit None y y Stop Bit 1bit y y Flow Control None y y Communication Code ASCII code y y Use a crossed reverse cable y y When using 3 wire connections non...

Page 65: ... y Refer to Sound mode 18 Treble k r 00 to 64 19 Bass k s 00 to 64 20 Speaker d v 00 to 01 21 Volume Mute k e 00 to 01 22 Volume Control k f 00 to 64 23 Time 1 Years Months Days f a Refer to Time 1 24 Time 2 Hours Minutes Seconds f x Refer to Time 2 25 Off Timer Repeat mode Time f e Refer to Off Timer 26 On Timer Repeat Mode Time f d Refer to On Timer 27 On Timer Input f u Refer to On Timer Input ...

Page 66: ...ersion f z FF 57 White Balance Red Gain j m 00 to FE 58 White Balance Green Gain j n 00 to FE 59 White Balance Blue Gain j o 00 to FE 60 Backlight m g 00 to 64 61 PC Power Control d t 00 to 01 62 PC Power d s 00 to 01 63 Easy Brightness Control Mode s m 00 to 01 64 Easy Brightness Control Schedule s s Refer to Easy Brightness Control Schedule 65 Status check s v Refer to Status check 66 BLU Mainte...

Page 67: ... to the set Cr Carriage Return ASCII code 0 x 0D ASCII code space 0 x 20 Acknowledgement Command2 Set ID OK NG Data x When the product receives data normally it sends an acknowledgement ACK in the format above If data is in read mode it indicates the data that shows the current status If data is in read mode it simply indicates the data that is sent from the PC If a command is sent with Set ID 00 ...

Page 68: ...urned properly There may be a certain time of delay between the Transmission and Acknowledgement signals 02 Input Select Command x b To select the Input Source for display Transmission x b Set ID Data Cr Data 20 Input AV 40 Component 60 RGB 70 DVI D PC 80 DVI D DTV 90 HDMI HDMI1 DTV A0 HDMI HDMI1 PC C0 Display Port DTV D0 Display Port PC 91 HDMI2 SDI DTV A1 HDMI2 SDI PC B0 SuperSign Acknowledgemen...

Page 69: ... Color 0 to 100 Acknowledgement i Set ID OK NG Data x 10 Tint Command k j To adjust the screen tint This function is available only in AV Component input Transmission k j Set ID Data Cr Data 00 to 64 Tint R50 to G50 Acknowledgement j Set ID OK NG Data x 11 Color Temperature Command x u To adjust the screen Color Temperature Transmission x u Set ID Data Cr Data 00 to 64 Warm 50 to Cool 50 Acknowled...

Page 70: ...ut Transmission f s Set ID Data Cr Data 00 64 Min 50 Reduce Max 50 Expand Acknowledgement s Set ID OK NG Data x 15 Auto Configuration Command j u To adjust the picture position and minimize image shaking automatically Only available for RGB PC input Transmission j u Set ID Data Cr Data 01 Set Acknowledgement u Set ID OK NG Data x 16 Balance Command k t To adjust the sound balance Transmission k t ...

Page 71: ... values Transmission f x Set ID Data1 Data2 Data3 Cr Data1 00 to 17 00 to 23 hours Data2 00 to 3B 00 to 59 minutes Data3 00 to 3B 00 to 59 seconds Enter fx Set ID ff for checking Time 2 Hour Minute Second values This command won t work if Time 1 Year Month Day has not been set in advance Acknowledgement x Set ID OK NG Data1 Data2 Data3 x 19 Bass Command k s To adjust the Bass values Transmission k...

Page 72: ...is function is supported only when 1 Year Month Day and 2 Hour Minute Second are set Acknowledgement e Set ID OK NG Data1 Data2 Data3 x 26 On Timer Repeat Mode Time Command f d To set the On Timer Repeat mode Time function Transmission f d Set ID Data1 Data2 Data3 Cr Data1 1 F1 to F7 Read data F1 Read the 1st On Time data F2 Read the 2nd On Time data F3 Read the 3rd On Time data F4 Read the 4th On...

Page 73: ... each schedule input down one row and save the 1st schedule input in RGB mode Example 2 fu 01 f1 ff Read the 1st schedule input Example 3 fu 01 f3 20 Change the 3rd data schedule input to the current On Time and AV input If there is no third schedule the text NG will be displayed and the operation fails This function is supported only when 1 Year Month Day 2 Hour Minute Second On Time Repeat Mode ...

Page 74: ...or Standby Light Command f o To set the Power Indicator Standby Light function Transmission f o Set ID Data Cr Data 00 Off 01 On It may not be supported depending on the model Acknowledgement o Set ID OK NG Data x 34 Power Indicator Power Light Command f p To set the Power Indicator Power Light function Transmission f p Set ID Data Cr Data 00 Off 01 On It may not be supported depending on the mode...

Page 75: ...11 means Tile Mode Off It may not be supported depending on the model Acknowledgement d Set ID OK NG Data x 40 Tile Mode Check Command d z To check Tile Mode status Transmission d z Set ID Data Cr Data FF Check Tile Mode status It may not be supported depending on the model Acknowledgement z Set ID OK NG Data1 Data2 Data3 x Data1 00 Tile Mode Off 01 Tile Mode On Data2 00 to 0F Tile Row Data3 00 to...

Page 76: ...et Tile V Position to 0x00 before setting Tile V Size This function is available only when the Natural option of the Tile Mode is set to Off while the Tile Mode set to On Transmission d h Set ID Data Cr Data 00 to 32 0 to 50 It may not be supported depending on the model Acknowledgement h Set ID OK NG Data x 46 Natural Mode In Tile Mode Command d j To display the image naturally the part of the im...

Page 77: ...n Transmission k m Set ID Data Cr Data 00 Off Lock Off 01 On Lock On Display will not be turned on by power on key of remote controller and front panel control keys if key is locked on in standby mode Acknowledgement m Set ID OK NG Data x It may not be supported depending on the model 52 Key Command m c To send a key code of the IR remote control Transmission m c Set ID Data Cr Data IR_KEY_CODE Ac...

Page 78: ...ain Transmission j m Set ID Data Cr Data 00 to FE Red Gain 0 to 254 Acknowledgement m Set ID OK NG Data x 58 White Balance Green Gain Command j n To set the White Balance Green Gain Transmission j n Set ID Data Cr Data 00 to FE Green Gain 0 to 254 Acknowledgement n Set ID OK NG Data x 59 White Balance Blue Gain Command j o To set the White Balance Blue Gain Transmission j o Set ID Data Cr Data 00 ...

Page 79: ...Schedule Command s s Sets the Easy Brightness Control Schedule Transmission s s Set ID Data1 Data2 Data3 Cr Data1 1 F1 F6 Data Reading Functions F1 Reads the data of the 1st Easy Brightness Control F2 Reads the data of the 2nd Easy Brightness Control F3 Reads the data of the 3rd Easy Brightness Control F4 Reads the data of the 4th Easy Brightness Control F5 Reads the data of the 5th Easy Brightnes...

Page 80: ...tom fail Main fail 06 Top fail Bottom normal Main fail 07 All temperature sensors normal When the Data is 08 Acknowledgement v SetID OK NG Data Data1 Data2 Data3 x Data1 Temperature of the top sensor area when the set is powered off Data2 Temperature of the bottom sensor area when the set is powered off Data3 Temperature of the main sensor area when the set is powered off When the Data is 09 Ackno...

Page 81: ...d on the back and one side of the SET Record it below should you ever need service MODEL SERIAL Temporary noise is normal when powering ON or OFF this device As an ENERGY STAR Partner LGE U S A Inc has determined that this product meets the ENERGY STAR guidelines for energy efficiency ENERGY STAR is a set of power saving guidelines issued by the U S Environmental Protection Agency EPA ...

Reviews: