background image

84

ENGLISH

CONTROLLING MULTIPLE PRODUCTS


This only applies to certain models.

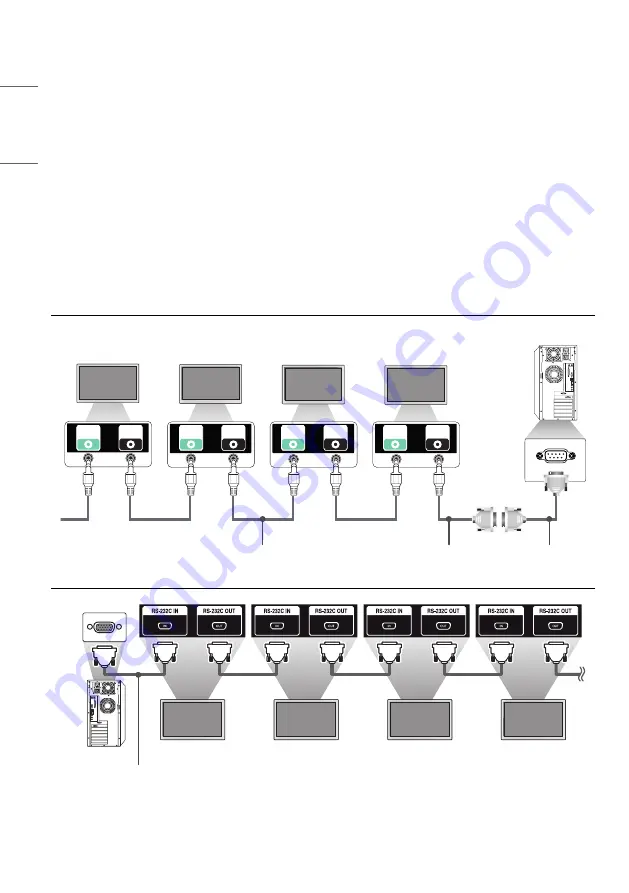
Use this method to connect several products to a single PC. You can control several products at a time by connecting 

them to a single PC.
In the Option menu, the Set ID must be between 1 and 1000 without being duplicated.

Connecting cables


Images may differ according to the model.

Connect the RS-232C cable as shown in the picture.
The RS-232C protocol is used for communication between the PC and product. You can turn the product on/off, select 

an input source and adjust the OSD menu from your PC.

Monitor 4

Monitor 3

Monitor 2 

Monitor 1

PC

 RS-232C

IN

 RS-232C

OUT

 RS-232C

IN

 RS-232C

OUT

 RS-232C

IN

 RS-232C

OUT

 RS-232C

IN

 RS-232C

OUT

4P Cable (sold separately)

RS-232C Gender

RS-232C Cable 
(sold separately)

RS-232C Cable (sold separately)

PC

Monitor 1

Monitor 2

Monitor 3

Monitor 4

Summary of Contents for 43UL3J-E.AEU

Page 1: ...USER GUIDE LG Digital Signage MONITOR SIGNAGE www lg com webOS 6 0 Please read the user manual before using this product to ensure safe and convenient use ...

Page 2: ... Precautions for Experiencing Image Retention 15 Product Disposal 15 USING THE REMOTE CONTROL 16 MAKING CONNECTIONS 19 Connecting to a PC 19 External Device Connection 19 Connecting Multiple Monitors 21 SETTINGS 23 Home 23 Global Buttons Dashboard Content Manager Gallery Mode Ez Setting 24 Video Wall On Off Scheduler SI Server Setting Server Setting Fail Over Status Mailing Play via URL Setting Da...

Page 3: ... Sound 57 Sound Mode Sound Out Audio Out AV Sync Adjustment Digital Audio Input Digital Sound Output Admin 61 Lock Mode Change Password Enterprise Settings Factory Reset CONTENT MANAGER 63 Web Login 63 Content Manager 63 Player Scheduler Editor Group Manager 2 0 71 Gallery Mode 74 Screen Share 75 How to Use Screen Share LG Presenter 76 How to use LG Presenter MANAGEMENT TOOLS 77 Control Manager 77...

Page 4: ...ng such distribution such as the cost of media shipping and handling upon email request to opensource lge com This offer is valid for a period of three years after our last shipment of this product This offer is valid to anyone in receipt of this information TO CONTROL AN EXTERNAL PC USING TOUCH SCREEN 79 Connecting to a PC 79 Prioritized Tasks on the Touch Screen 79 SMART CALIBRATION 80 How to Ru...

Page 5: ...se the product safely and for its intended purpose WARNING If you ignore the warning message you may be seriously injured or there is a possibility of accident or death CAUTION If you ignore the caution message you may be slightly injured or the product may be damaged Model corresponding to sentence color COMMON ENCLOSURE LED ...

Page 6: ...rmly so it cannot come loose Poor connection may cause a fire or electric shock In the presence of thunder and lightning never touch the power cord and signal cable because it can be very dangerous It can cause electric shock Be careful not to step or place heavy objects electronic appliances clothing etc on the power cord or AC adapter Additionally do not bend or pull out the power cord or AC ada...

Page 7: ...he AC power source even if the unit is turned off Power consumption will be 0 only when the power plug is unplugged Use the appliance coupler as the disconnect device CAUTION If the outlet pins of the power plug or AC adapter is covered with dust be sure to wipe them and keep them clean Overheating due to layers of dust may cause a fire or electric shock If the outlet pins of the power plug or AC ...

Page 8: ... panel You may be electrocuted or the product can be damaged Use the correct number of people according to the weight of the product Under 25 Kg per person use lifting equipment when exceeding 100 Kg If use the damaged product again contact the service center because it can cause electric shock or fire Do not hold it upside down while holding only the stand It is for stand supported models only Th...

Page 9: ...center Do not install this product on a wall if it could be exposed to oil or oil mist This may damage the product and cause it to fall Do not leave the power or signal cable etc on the pathway This could cause a trip or fall which could cause an electrical shock fire product breakdown or injury Do not let the product drop when connecting it to an external device connected with a short cable This ...

Page 10: ...de the product Do not install the product in an area with poor ventilation e g on a bookshelf in a closet or outside and avoid placing on cushions or carpets The product could catch fire due to overheating inside the product Install the product on a flat and stable place that is large enough to support the product If the product is dropped you may be injured or the product may be broken When insta...

Page 11: ...irection only Not for LED models Too much moisture may cause staining Do not physically come in contact with the screen of the LED Package This may cause damage to the product To clean the product use an air gun to lightly remove dust from the front frame and the screen If there are foreign substances in between the LEDs on the screen it may cause a defect on the screen CAUTION When cleaning the p...

Page 12: ...hock Do not drop an object or impact on the product or screen It can cause injury to human problem to product and damage the screen If you can smell smoke or other odors or hear a strange sound unplug the power cord and contact the service center If you continue to use the product without taking proper measures it may cause electrical shock or fire Do not attempt to disassemble repair or modify th...

Page 13: ...ct Also do not throw toys or objects at the product or screen It can cause injury to human problem to product and damage the screen All the power sources must be disconnected by removing the power cables to remove all power from the unit CAUTION This panel is an advanced product that contains millions of pixels You may occasionally see pixel spots when viewing the screen Since these deactivated pi...

Page 14: ... Used batteries which include rechargeable batteries should be recycled separately from waste Please dispose used batteries and rechargeable batteries at a local recycling center or a retail store that handles batteries CAUTION Do not short circuit and disassemble of batteries It may cause electrical shock or fire The remote control may not function properly in sunlight or under a strong lamp Move...

Page 15: ...tention Most third party products have the same issue The resulting damage is not covered by the product warranty Use a screen saver when using the monitor for a prolonged period of time Product Disposal Do not dispose of this product with general household waste Disposal of this product must be carried out in accordance to the regulations of your local authority ...

Page 16: ...close the battery cover To remove the batteries perform the installation actions in reverse The illustrations may differ from the actual accessories CAUTION Do not mix old and new batteries as this may damage the remote control Be sure to point the remote control toward the remote control sensor on the monitor Some features of the remote control may not be supported in certain models The product s...

Page 17: ...ers numerical or alphabetical characters depending upon the setting Toggles between numerical and alphabetical This function is not supported Deletes the entered numerical or alphabetical character Volume Up Down Button Adjusts the volume level Selects the screen size Automatically adjusts picture position and minimizes image instability This is supported only for the RGB input MUTE Mutes all soun...

Page 18: ...rns to the previous level Closes the menu Allows you to control various multimedia devices to enjoy multimedia simply by using the remote control through the SimpLink menu You can choose to turn TILE Mode on off Control Buttons Controls media playback When the Picture ID number matches the Set ID number you can control whichever monitor you want in multi display format Individually control the mon...

Page 19: ...C Some of the cables are not provided This monitor supports the feature a feature that enables a PC to recognize devices attached by the user without device configuration or user intervention when powering up External Device Connection Connect a HD receiver DVD or VCR player to the monitor and select an appropriate input mode Some of the cables are not provided For the best picture and sound quali...

Page 20: ...able with Ethernet If you cannot hear any sound in HDMI mode please check your PC settings Some PCs require you to manually change the default audio output to HDMI If you want to use HDMI PC mode you must set your PC DTV to PC mode You may experience compatibility issues if you use HDMI PC mode Make sure the power cable is disconnected If you connect a gaming device to the monitor use the cable pr...

Page 21: ...IN DP OUT DP IN DP OUT DP IN DP OUT HDMI IN 1 DP OUT DP IN DP OUT DP IN DP OUT HDMI IN 2 DP OUT DP IN DP OUT DP IN DP OUT DP IN DP OUT DP IN DP OUT LAN OUT LAN IN LAN OUT LAN IN LAN OUT LAN IN DVI IN NOTE If the signal cable between the product and your PC is too long make sure to use the Booster or optical cable DP Cable Use a DP cable that is certified to DP 1 1a standard or higher Daisy chainin...

Page 22: ...oftware related content may be changed without prior notice due to upgrades of the product functions Some features described in the User Manual may not be supported in certain models and countries SNMP 2 0 is supported ...

Page 23: ...reen In the Dashboard you can manually change settings by selecting the corresponding items Manual Download Downloads a manual by scanning a QR code NOTE If the dashboard is locked the focus does not move Some QR code apps on mobile devices may not work You can access the page to download manuals by visiting the provided address Content Manager Player Play a variety of content including images vid...

Page 24: ...he image excluding the area that overlaps with the monitor s bezel so that the image displayed has a more natural feel to it Frame Control Adjust the sets that run Scan Inversion and frame deviation When running Scan Inversion please run Frame Control for the sets that do not run Scan Inversion Scan Inversion Reduce screen deviation between adjoining video walls by changing screen scanning method ...

Page 25: ...ting SI Server Setting SI Server Setting Set up to connect your signage to an external SI server Set up a server environment for SI app installation Ez Setting SI Server Setting Developer Mode Beanviser This feature provides great convenience to the app developers Set up to install and activate the Developer mode and BEANVISER app NOTE To use these features an account ID PASSWORD for webOS Signage...

Page 26: ...ntervals this feature will play back the file OLED model is not supported Capture time Interval The time interval can be set to 30 min 1 hour 2 hours and 3 hours Media Storage When the automatic input switches due to the image and video file being uploaded the feature will play back the file Backup media select Using the settings button you can upload a single file in the internal external memory ...

Page 27: ... information provided by the chip provider is abnormal 3 LAN Status WiFi Status An email is sent when the network s connection status is changed The maximum number of network status changes that can be saved is limited to 50 The saved value is reset once the power turns off 4 No Signal Check Checks whether there is a signal If there are no signals for more than 10 seconds an email is sent 5 Schedu...

Page 28: ...Setting is not set to Set Automatically website navigation may be difficult Check General Time Setting Set Automatically Setting Data Cloning Ez Setting Settings Data Cloning This feature is used to copy and import the settings of the device to other devices Export Setting Data Export the settings of the device to another device Import Setting Data Import the settings of another device into the de...

Page 29: ...s displayed and you can continue to install the LG ConnectedCare solution If the account number is not registered Unknown is displayed as the account name and you cannot continue to install the solution Enable Disable Sets whether to Enable Disable the LG ConnectedCare solution Account Displays user s currently connected account number and name Version Displays the version of the LG ConnectedCare ...

Page 30: ... you enter multi screen mode without having set any screen layout the screen layout selection menu appears When the screen layout selection menu is not displayed on the screen go to the screen layout menu bar by pressing the up arrow key on your remote control and select your desired screen layout If you want to close the screen layout menu press the back key Closing Screen Layout Menu From the sc...

Page 31: ...os on Split Screens Press the button on the upper right of each split screen select Video File and then select a storage device to view the list of videos in the selected device Next select your desired video from the list to play it NOTE Videos created with HEVC MPEG 2 H 264 or VP9 codecs can be played on split screens When using PIP mode the following combinations cannot be used Main Sub HEVC HE...

Page 32: ...of the product The leveler and angle indicator on the left side of the screen show the degree of left or right tilt The leveler and angle indicator on the right side of the screen show the degree of front or back tilt NOTE When the product is tilted more than 5 degrees in any direction a flashing arrow indicates the direction to adjust the product to make it level The reference point of the horizo...

Page 33: ...es according to the settings in the SI SERVER SETTING menu in Ez Setting Play via URL Play via URL operates according to the settings in the Play via URL menu in Ez Setting Auto Power Off Switch the power off automatically When this feature is turned on the No Signal Power Off 15 Min and No IR Power Off 4 hour features will be turned on Edit Input Name Change the name of each external input Presen...

Page 34: ...on You can control each product separately by using the Set ID you assigned to each product Auto Set ID Automatically assigns a unique Set ID number to each product when several products are connected for display Reset Set ID Reset the Set ID of the product to 1 Time Setting General Time Setting This feature enables you to view and change the time and date on the device Set Automatically Set Time ...

Page 35: ...hours If you set this feature to Off the 4 Hours Off feature is disabled It is recommended that you set this feature to Off if you intend to use the product for long periods of time as the feature turns the power of the product off DPM Standby Mode Set the Display Power Management DPM mode If this feature is not set to Off the monitor will enter DPM mode when there is no input signal If you set th...

Page 36: ...r Input button or the monitor s On button Power On Delay 0 250 This feature prevents overload by implementing a power on delay when multiple monitor sets turn on You can set the delay interval in the range of 0 to 250 seconds Power On Status Select the operating status of the monitor when the main power has turned on You can choose from among PWR Power On STD Standby and LST Last Status PWR Power ...

Page 37: ...hout any adjustments on most networks A small number of networks may require the display settings to be adjusted For detailed information contact your Internet provider or consult your router manual 802 1X EAP Authentication based on IEEE 802 1X is available for wired connection Select the desired EAP type and Phase 2 Authentication enter the ID Password registered with the authentication server a...

Page 38: ...e daisy chain must be connected to the network through a port that is not used for the daisy chain connection SoftAP If you set up a SoftAP you can connect many devices via a Wi Fi connection without a wireless router and use wireless Internet The SoftAP and Screen Share features cannot be used at the same time On models that support Wi Fi dongles the SoftAP menu is enabled only when a Wi Fi dongl...

Page 39: ...ur network status with the ping test Port Control Unused ports can be blocked for network security Connection Domain Change domain for checking network connection NOTE A reboot is recommended for the settings to be applied properly ...

Page 40: ...tion You may experience undesired results if the network connection speed does not meet the requirements of the content being accessed Some INTERNET connection operations may not be possible due to certain restrictions set by the Internet service provider ISP supplying your Internet connection Any fees charged by an ISP including without limitation connection charges are your responsibility NOTE I...

Page 41: ... activated Ask the router manufacturer whether the router supports wireless connection To connect to a wireless router verify the SSID and security settings of the wireless router Please refer to the user guide of the corresponding router regarding SSID and security settings of the wireless router The monitor may not work properly if network devices wired wireless router or hub etc are incorrectly...

Page 42: ...g detection It only applies in the Orbiter mode When the still image remains for the StandBy time the afterimage prevention function works for the Duration time On without moving detection It only applies in the Orbiter mode When you tap the DONE button the afterimage prevention function immediately applies and operates continuously Schedule Enable the ISM feature from start time to end time on th...

Page 43: ... when User Image is selected Action Cycle You can select from among 1 10 min 20 min 30 min 60 min 90 min 120 min 180 min 240 min This option is only available when Orbiter is selected Orbiter The screen location moves at every set interval User Video Download In order to download a video there must be a video file in the ISM folder on your USB storage device Delete the existing contents stored on ...

Page 44: ...the prefix of the URL URL Suffix URL Suffix Set the suffix of the URL Play via URL URL Enter the part of the URL that excludes the prefix and suffix URL string length is limited to 15 characters Check button The button used to complete and apply the Beacon settings NOTE Some models do not support background screening services in iOS A reboot is recommended for the settings to be applied properly T...

Page 45: ...ding on the model it can be displayed as PC OPS Control Depending on the supported interface the sub menu of Control Interface Selection may be different The PC products that support the power control are MP500 MP700 and you have to purchase them separately if necessary If you change Control Interface Selection the RS232C SYNC feature of Sync Mode may be restricted Background Image This feature en...

Page 46: ... unique ID for synchronizing with the application Crestron Version 2 The connection status of the server type shall be indicated by pictures and phrases Disconnected Connecting Connected Type You can select the server type you want to connect to Off Control System Virtual Control Fusion XiO CONNECT If you press the button once a set tries to connect to the server and the button phrase is changed i...

Page 47: ...r deleted through the menu All certificates stored at the time of Factory Reset are deleted Setting PM Mode to Network Ready is recommended LED Controller Allows a specific LED display manufacturer to remotely control some features of the linked display USB2 to HDBaseT This function transfers the data received from the USB2 terminal of the display to HDBaseT On Transfer the data of the device conn...

Page 48: ...ation Allow an expert or anyone who loves picture quality to manually tune to the best picture quality NOTE The type of Picture Mode you can select may vary depending on the model or input signal Expert is an option that allows a picture quality expert to fine tune the picture quality using a specific image Thus it may not be effective for a normal picture HDR This feature enables you to choose th...

Page 49: ...or temperature the warmer the colors on the screen will feel Advanced Controls Expert Controls Customize the advanced options Dynamic Contrast Optimize the difference between the light and dark parts of the screen according to the brightness of the image Super Resolution Sharpen the areas of the screen that are blurry or barely distinguishable Color Gamut Select the range of colors available Dynam...

Page 50: ...ook Motion Eye Care Reduce eye fatigue by adjusting brightness levels and lessening blurriness based on the displayed image LED Local Dimming Make the light areas of the screen lighter and the dark areas darker for maximum contrast Setting this feature to Off may increase the monitor s power consumption TruMotion Reduce image shaking and image sticking that can occur with moving images If you set ...

Page 51: ...is enabled the PIP mode of the multi screen is unavailable NOTE Depending on the model the automatic screen rotation feature may not be supported External Input Rotation This feature rotates the screen clockwise You can set this feature to Off 90 180 270 Setting External Input Rotation to On 90 or 270 resizes the video to be Full Wide for the ARC If External Input Rotation is enabled during WiDi o...

Page 52: ...ng HDMI input port 1 2 is best suited for high definition videos that are 4K 60 Hz 4 4 4 4 2 2 However video or audio may not be supported depending on the specifications of the external device If this is the case please connect the device to a different HDMI port This feature may not be available on some models OLED Panel Settings Clear Panel Noise Correct issues that may arise when the screen is...

Page 53: ...nced settings 2 Detail Settings Select Master or Slave When Master is selected Enter the number of rows and columns for the entire multi screen When Slave is selected Enter the multi tile ID number for the individual set 3 Screen Protection Mode This feature enables you to set the content correction level and to set whether to use the Screen Switch feature 4 Content Luminance Compensation Select a...

Page 54: ...tion Mode feature in Video Wall the screens must be connected to the same network through a LAN However some operations may not be available when the screens are connected to LAN Daisy Chain In this case we recommend using a router or network switch If Screen Protection Mode Settings is all set and in operation and the settings are changed or the Screen Protection Mode function is discontinued the...

Page 55: ...monitor Brightness Range Adjustment Sets the min max values of the brightness range for the backlights adjusted by the illumination sensors Min Backlight Sets the min value of the backlights Max Backlight Sets the max value of the backlights Brightness Scheduling Adjust the backlight at specified times You can set this feature to On Off Add schedule by setting the schedule time and backlight all r...

Page 56: ...lor is set to the default value On Enables the Color Calibration feature The screen color is set to match the actual color temperature NOTE The screen color may change if you enable or disable the feature If the Picture Mode is Calibration this feature will not be available LED Local Dimming Make the light areas of the screen lighter and the dark areas darker for maximum contrast NOTE Return to de...

Page 57: ...es Cinema Optimize sound for watching movies Clear Voice IV Enhance voices so they can be heard more clearly Sports Optimize sound for watching sports Music Optimize sound for listening to music Game Optimize sound for playing video games Balance Balance Adjust the output volume for the left speaker and the right speaker Equalizer Equalizer Manually adjust sound by using the equalizer Reset Reset ...

Page 58: ...aker audio devices connected to the digital audio output port NOTE Some recently connected devices may automatically attempt to reconnect to the Signage monitor when it is turned on It is recommended that you set LG audio devices that support LG Sound Sync to LG TV mode or LG Sound Sync mode before connecting Press Device Selection to view the devices that are or that can be connected and connect ...

Page 59: ...nd audio AV Sync Adjustment You can set AV Sync Adjustment feature to On Off Main Speaker 0 60 Adjust the sync of sound from the main speakers The larger the number is the slower the voice output is than the default value Optical adjusts sync for the sound from digital optical audio output A greater number means slower audio output compared to the default Bypass Output the broadcast signals or the...

Page 60: ...gital HDMI ARC Sound effect output may not work if using Pass Through The codec which is being output to the device may differ from the codec of the input signal Audio Input Digital Sound Output Auto Dolby Digital Plus Dolby Digital Dolby Digital Dolby Digital AAC Media Dolby Digital AAC Dolby Digital HE AAC Dolby Digital DTS HD DTS Express DTS DTS MPEG PCM PCM All PCM ...

Page 61: ...ol If you set this feature to On Power Key Only you can only use the power key If you set this feature to On Block All you cannot use your remote control However Power On feature is available Press and hold the Settings key for at least 10 seconds and enter password to access the settings menu in IR Operation Lock Local Key Lock This feature enables you to configure the Local Key Operation Lock fe...

Page 62: ...rd 3 Enter the same password again in the Confirm Password field for confirmation Enterprise Settings Enter your company account code to apply the corresponding enterprise settings When your code has been entered the monitor set gets reset thereby applying the corresponding enterprise settings This feature does not get activated if a code has already been entered Factory Reset Initializes all sett...

Page 63: ...6 or later recommended Content Manager Player Player The Content Manager app s player feature enables you to play manage contents of video image template SuperSign and playlist in an integrated way The OLED models do not support the playback and management of image content and template content Continuous Play 1 Select your desired type of content from the tab on the left and then select your desir...

Page 64: ...ng a playlist you cannot include characters that cannot be used in file names on Windows such as and in the names of the files in the playlist In addition if the playlist contains content files whose names include such characters you cannot move or copy the playlist 1 Select the Playlist tap from the tab on the left and click Create Playlist in the upper right hand of the screen 2 Select the conte...

Page 65: ...nt files whose names include such characters you cannot move or copy the playlist 5 Watch the playlist or external input you selected play back at its scheduled time Importing a Schedule 1 Click Import in the upper right hand corner of the screen 2 Select the external storage device from which you wish to import a schedule 3 Select the schedule you wish to import to your monitor You can only choos...

Page 66: ... time overlaps the previously created schedule is deleted When a schedule that has not been set repeatedly is completed the schedule is automatically deleted Schedule does not work while Scheduling list app is running Editor Editor The Content Manager app s editor feature enables you to add your desired templates 1 Select the template of your desired format You can choose between Landscape mode an...

Page 67: ... H 264 AVC MPEG 4 Audio AAC AMR NB AMR WB mkv Video MPEG 2 MPEG 4 H 264 AVC VP8 VP9 HEVC Audio Dolby Digital Dolby Digital Plus AAC PCM MPEG 1 Layer I II MPEG 1 Layer III MP3 ts trp tp mts Video H 264 AVC MPEG 2 HEVC Audio MPEG 1 Layer I II MPEG 1 Layer III MP3 Dolby Digital Dolby Digital Plus AAC PCM Dolby AC 4 mpg mpeg dat Video MPEG 1 MPEG 2 Audio MPEG 1 Layer I II MPEG 1 Layer III MP3 vob Vide...

Page 68: ... 2160 4096 X 2160 Some HEVC encoded ULTRA HD videos other than the content officially provided by LG Electronics may not be played Some codecs can be supported after a software upgrade Extension Codec mkv mp4 ts Video H 265 AVC HEVC Audio Dolby Digital Dolby Digital Plus AAC Only Window Media Audio V7 and later are supported The AAC Main Profile is not supported Video files created by some encoder...

Page 69: ...o only use USB storage devices that store normal music image and or movie files Storage devices formatted with utility programs that are not supported by Windows may not be recognized Please connect power to a USB storage device over 0 5 A which requires an external power supply Otherwise the device may not be recognized Please connect a USB storage device with the cable offered by the device make...

Page 70: ...r USB memory Any device with more than the recommended capacity may not work properly If a USB external hard disk with an Energy Saving feature does not work turn the hard disk off and on again to make it work properly USB storage devices USB 2 0 or below are also supported However they may not work properly in the videos list A maximum of 999 folders or files can be recognized under one folder Wh...

Page 71: ...ster mode Slave Play Schedule and Playlists distributed in Master mode Remove monitor sets for their groups Monitor sets that have been added to a group are automatically switched to Slave mode Conversely when a monitor set has been deleted from a group it is automatically initialized and switched to Master mode If a new Slave has been added to an existing group or if the Data Cloning or the distr...

Page 72: ... in the group that are not Data Cloning or content synchronized Data Cloning or Synchronıze button will be activated 6 You can re copy the master device s setting data to the group by using Data Cloning 7 You can re distribute the content distributed to the group by using Synchronıze Deleting a Group 1 Click Delete Group 2 Select the group you wish to delete and click Delete 3 Check that the group...

Page 73: ...d CAUTION You can create up to 25 groups You can add up to 12 slave devices to a group You can distribute the schedules stored on external devices after executing Content Manager s import operation Make sure to delete all schedules stored on the slave sets before distributing any schedules A list of devices you can add to your desired group appears only when the following conditions have been met ...

Page 74: ...e preview image that appears at the bottom of the screen to play You can also go to MY THEMES at the top right of the screen and set the order of the themes to play Within the theme player you can go to the theme selection list through GO TO LIST and turn on or off the background music through THEME SOUND A total of 5 themes Sunny Day Rainy Day Art Gallery Art Photos and Colorful Spring are availa...

Page 75: ...ct according to the instructions provided by the guide that can be accessed through the CONNECTION GUIDE button in the upper right 2 Once the connection is established Screen Share between the user device and the monitor is enabled NOTE For the information on how to use Intel WiDi visit PC laptop manufacturer webpage This feature only works properly with WiDi 3 5 or later versions This feature onl...

Page 76: ... may appear indicating that the connection is unsafe This is not a security issue and you can proceed as usual Since some UIs related to screen sharing are provided by the PC browser the displayed language or the action may be different The handover feature is used to share another client s screen when one client is already connected It requests the currently connected client to hand over the scre...

Page 77: ... Setting Enable disable Set Automatically feature and displays changes the time set for the product Network Set the name and IP address of your Signage monitor Tile Mode Display the tile mode settings of the product Fail Over Turns the Fail Over feature on or off and sets related items Play via URL Turn Play via URL on or off and set URLs S W Update Update the firmware of the product Charts Output...

Page 78: ...RS 232C OUT RS 232C IN RS 232C OUT RS 232C IN RS 232C OUT RS 232C IN 2 Press the red Picture ID On button on the remote control 3 Make sure that the Picture ID you set is identical to the Set ID of the monitory you wish to control A set with a Set ID that is different from the Picture ID cannot be controlled by IR signals NOTE If Picture ID has been set to 2 only the upper right monitor which has ...

Page 79: ...splayed Pop up message displayed Only one of the states is shown Screen of the product 2 Equipped with OPS External input configured for OPS All states are shown OPS 3 Connected to a PC with a USB C cable External input configured for USB C All states are shown PC connected with USB C 4 External input configured except for OPS USB C PC connected to the front of the product with a touch cable All s...

Page 80: ...get Set the optimal color value of the installed set as the target Please set the target to 3 000K in the broadcasting station environment Reference RGB Saves and resets the currently set Manual Calibration value during Smart Calibration 3 With START SMART CALIBRATION you can correct the color brightness 4 If you set the Schedule Setting menu calibration is performed automatically on a regular bas...

Page 81: ... can manually adjust the color of the selected location Screen Split Set the manual adjustment area Calibration Position Select the manual adjustment location Screen Split 4 Calibration Position 3 Screen Split 9 Calibration Position 5 ...

Page 82: ...ton 13 Number Key 3 Remote control button 14 Number Key 4 Remote control button 15 Number Key 5 Remote control button 16 Number Key 6 Remote control button 17 Number Key 7 Remote control button 18 Number Key 8 Remote control button 19 Number Key 9 Remote control button 02 Vol Remote control button 03 Vol Remote control button E0 Brightness Page Up Remote control button E1 Brightness Page Down Remo...

Page 83: ...l button 44 OK Remote control button 28 BACK Remote control button 7B Tile Remote control button 5B Exit Remote control button 72 Picture ID On red Remote control button 71 Picture ID Off green Remote control button 63 Yellow Remote control button 61 Blue Remote control button 5F W Bal Remote control button 3F S Menu Remote control button 7C Home Remote control button 97 Swap Remote control button...

Page 84: ... differ according to the model Connect the RS 232C cable as shown in the picture The RS 232C protocol is used for communication between the PC and product You can turn the product on off select an input source and adjust the OSD menu from your PC Monitor 4 Monitor 3 Monitor 2 Monitor 1 PC RS 232C IN RS 232C OUT RS 232C IN RS 232C OUT RS 232C IN RS 232C OUT RS 232C IN RS 232C OUT 4P Cable sold sepa...

Page 85: ... chain cannot be used Be sure to only use the provided gender to connect properly When you have daisy chained multiple Signage products to control them simultaneously if you attempt to turn on off the master device in a continuous manner some products may not turn on In this case you can turn those monitors on by pressing the MONITOR ON button not the Power button ID BACK TILE ON OFF EXIT Power MO...

Page 86: ...10 Tint k j 00 to 64 11 Color Temperature x u 70 to D2 12 Balance k t 00 to 64 13 Sound Mode d y See Sound Mode 14 Mute on k e 00 to 01 15 Volume Control k f 00 to 64 16 Current Time 1 year month day f a See Current Time 1 17 Current Time 2 hour minute second f x See Current Time 2 18 No Signal Power Off 15 Min f g 00 to 01 19 No IR Power Off 4hour m n 00 to 01 20 Language f i See Language 21 Defa...

Page 87: ...d 00 to FF 36 Check Tile Mode d z FF 37 Tile ID d i See Tile ID 38 Natural Mode d j 00 to 01 39 DPM Standby Mode f j See DPM Standby Mode 40 Remote Control Local Key Lock k m 00 to 01 41 Power On Delay f h 00 to FA 42 Select Fail Over Mode m i 00 to 02 43 Select Fail Over Input m j See Select Fail Over Input 44 Remote Control Key Lock t p 00 to 02 45 Local Key Lock t o 00 to 02 46 Status Check s v...

Page 88: ...See Brightness Scheduling 61 Multi Screen Mode Input x c See Multi screen Mode Input 62 Aspect Ratio Multi screen x d See Aspect Ratio Multi screen 63 Screen Off Multi screen x e See Screen Off Multi screen 64 Screen Off Always s n 0d 00 to 01 65 Stop Video k x 00 to 01 66 Wireless Wake On LAN Networked Standby Mode s n 90 00 to 01 67 OSD Lock k l 00 to 01 68 HDMI IT Content s n 99 00 to 01 69 Hol...

Page 89: ... n 0b 00 to 01 84 Check Fan Failure d w FF 85 Apply to all inputs s n 52 01 86 Timer Power On f d See Timer Power On 87 Timer Power Off f e See Timer Power Off 88 LCIN008 Control s n b8 See LCIN008 Control 89 Transfer Control s n cb See Transfer Control 90 Multichannel s n 76 01 to 09 91 Change SetID j x See Change SetID 92 Gamma s n ad 00 to 03 93 Black Level s n ae 00 to 02 94 UHD Deep Color s n...

Page 90: ...e HDR Picture Mode 106 Dynamic Tone Mapping s n c5 00 to 01 107 LED Local Dimming s n c6 00 to 03 108 USB2 to HDBaseT s n c3 00 to 01 109 Change Password s n a7 See Change Password 110 Brightness Range Adjustment s n ab See Brightness Range Adjustment 111 Color Calibration s n d6 00 to 01 112 Quiet Mode s n c7 00 to 01 113 Quick Start s n 0e 00 to 01 Note Commands may not work when there is no ext...

Page 91: ...y increase depending on the command Cr Carriage Return This parameter corresponds to 0 x 0D in ASCII code White Space This parameter corresponds to 0 x 20 in ASCII code Acknowledgment Command2 Set ID OK NG Data x The product transmits an ACK acknowledgment based on this format when receiving normal data At this point if the data is FF it indicates the present status data If the data is in data wri...

Page 92: ...V A8 OPS PC 99 HDMI2 OPS DTV A9 HDMI2 OPS PC C0 DISPLAYPORT DTV D0 DISPLAYPORT PC C1 DISPLAYPORT USB C DTV D1 DISPLAYPORT USB C PC C2 HDMI3 DTV D2 HDMI3 PC C3 HDBaseT DTV D3 HDBaseT PC E0 SuperSign webOS Player E1 Others E2 Multi Screen E3 Play via URL Acknowledgment b Set ID OK NG Data x Some input signals may not be available for all models If it is not distributed from SuperSign W webOS Player ...

Page 93: ... contrast Transmission k g Set ID Data Cr Data 00 64 Contrast 0 100 Acknowledgment g Set ID OK NG Data x 07 Brightness Command k h Adjusts the screen brightness Transmission k h Set ID Data Cr Data 00 64 Brightness 0 100 Acknowledgment h Set ID OK NG Data x 08 Sharpness Command k k Adjusts the screen sharpness Transmission k k Set ID Data Cr Data 00 32 Sharpness 0 50 Acknowledgment k Set ID OK NG ...

Page 94: ...y not be available for all models 13 Sound Mode Command d y Selects a sound mode Transmission d y Set ID Data Cr Data 01 Standard 02 Music 03 Cinema 04 Sports 05 Game 07 News Clear Voice IV Acknowledgment y Set ID OK NG Data x This feature may not be available for all models 14 Mute on Command k e Mutes unmutes audio Transmission k e Set ID Data Cr Data 00 Mute Volume off 01 Mute off Volume on Ack...

Page 95: ...Enter fx Set ID ff to view the Time 2 hour minute second settings This feature is only available when Clock 1 year month day has been set Acknowledgment x Set ID OK NG Data1 Data2 Data3 x 18 No Signal Power Off 15Min Command f g Sets the monitor to enter Automatic Standby mode if there is no signal for 15 minutes Transmission f g Set ID Data Cr Data 00 Off 01 On Acknowledgment g Set ID OK NG Data ...

Page 96: ...c Set ID Data Cr Data IR_KEY_CODE Acknowledgment c Set ID OK NG Data x For key codes see IR Codes Some key codes may not be supported depending on the model 24 Time Elapsed Command d l Displays the time that has elapsed after your monitor has turned on Transmission d l Set ID Data Cr Data FF Read status Acknowledgment l Set ID OK NG Data x The data received is displayed in hexadecimal 25 Product S...

Page 97: ...a Cr Data 00 FE Blue Gain 0 254 FF Checks blue gain value Acknowledgment o Set ID OK NG Data x 30 White Balance Red Offset Command s x Adjusts the red offset value for white balance Transmission s x Set ID Data Cr Data 00 7F Red Offset 0 127 FF Checks red offset value Acknowledgment x Set ID OK NG Data x 31 White Balance Green Offset Command s y Adjusts the green offset value for white balance Tra...

Page 98: ... Checks the tile mode Transmission d z Set ID Data Cr Data FF Check Tile Mode Acknowledgment z Set ID OK NG Data1 Data2 Data3 x Data1 00 Tile Mode off 01 Tile Mode on Data2 00 0F Tile column Data3 00 0F Tile row This feature may not be available for all models 37 Tile ID Command d i Sets the tile ID value of the product Transmission d i Set ID Data Cr Data 01 E1 Tile ID 1 225 FF Checks the Tile ID...

Page 99: ...250 sec Acknowledgment h Set ID OK NG Data x The maximum value may differ depending on the model 42 Fail Over Mode Command m i Selects the Fail Over mode Transmission m i Set ID Data Cr Data 00 Off 01 Auto 02 User Setting Acknowledgment i Set ID OK NG Data x 43 Fail Over Input Select Command m j Selects an input source for fail over This feature is only available when Fail Over is set to Custom Tr...

Page 100: ...oduct Acknowledgment v Set ID OK NG Data Data1 x Data 02 when a signal is found Data1 00 No signal 01 Signal present Data 03 when the monitor is currently in PM mode Data1 00 Screen is on 01 Screen is off 02 Screen Off Always is activated 03 Sustain Aspect Ratio is activated 04 Screen Off Backlight On is activated Data 07 when checking whether the Top Bottom and Main temperature sensors are workin...

Page 101: ...read the start end times enter FF for parameters Data2 through Data5 Example 1 sd 01 01 ff ff ff ff Checks the start time Example 2 sd 01 02 ff ff ff ff Checks the end time This feature only works when Clock 1 year month day and Clock 2 hour minute second have been set Acknowledgment d Set ID OK NG Data1 Data2 Data3 Data4 Data5 x This feature may not be available for all models 48 PM Mode Command ...

Page 102: ...41 255255254000 010177222001 IP 10 177 223 241 subnet 255 255 254 0 gateway 10 177 222 1 3 Network read sn 01 80 ff 4 DNS setting sn 01 81 156147035018 DNS 156 147 35 18 5 Applying the settings sn 01 82 80 applies the saved IP mode auto manual subnet mask and gateway sn 01 82 81 applies the saved DSN Each IP address contains 12 decimal digits Acknowledgment n Set ID OK NG Data1 Data x This feature...

Page 103: ... Acknowledgment n Set ID OK NG 8 4 Data x This feature may not be available for all models 57 External Input Rotation Command s n 85 Sets the External Input Rotation feature Transmission s n Set ID 8 5 Data Cr Data 00 Off 01 90 degrees 02 270 degrees 03 180 degrees Acknowledgment n Set ID OK NG 8 5 Data x This feature may not be available for all models 58 Beacon Command s n 88 Turns on off Beacon...

Page 104: ...K will be acknowledged ACK even if there is no saved list ex1 ss 01 f1 ff ff Reads the 1st index data in Brightness Schedule ex2 ss 01 ff Reads all index data in Brightness Schedule ex3 ss 01 e1 ff ff Deletes the 1st index data in Brightness Schedule ex4 ss 01 07 1E 46 Adds a schedule whose time is 07 30 and whose backlight is 70 Acknowledgement s Set ID OK NG Data1 Data2 Data3 x This feature may ...

Page 105: ...the monitor enters Screen Off mode regardless of whether or not you have activated PM mode Transmission s n Set ID 0 d Data Cr Data 00 Off 01 On Acknowledgment n Set ID OK NG 0 d Data x This feature may not be available for all models 65 Stop Video Command k x Controls Stop Video Transmission k x Set ID Data Cr Data 00 The Stop Video feature is on 01 The Stop Video feature is off This feature only...

Page 106: ...lready been set for Data 5 every year or every month 2 Checking a Schedule Data1 Select the desired schedule F1 Reads the 1st schedule F2 Reads the 2nd schedule F3 Reads the 3rd schedule F4 Reads the 4th schedule F5 Reads the 5th schedule F6 Reads the 6th schedule F7 Reads the 7th schedule Data2 FF 3 Deleting a Schedule E0 Deletes all holiday schedules E1 Deletes the 1st holiday schedule E2 Delete...

Page 107: ...models 72 USB Lock Command s n 9e Sets USB Lock Transmission s n Set ID 9 e Data Cr Data 00 USB Unlock 01 USB Lock Acknowledgment n Set ID OK NG 9 e Data x This feature may not be available for all models 73 Wi Fi Lock Command s n 9f Sets Wi Fi Lock Transmission s n Set ID 9 f Data Cr Data 00 Wi Fi Unlock 01 Wi Fi Lock Acknowledgment n Set ID OK NG 9 f Data x This feature may not be available for ...

Page 108: ...pp Play via URL Data 1 04 SI App Play via URL Acknowledgment 1 n Set ID OK NG a 1 Data1 x 2 n Set ID OK NG a 1 Data1 Data2 x This feature may not be available for all models 76 Digital Audio Input Command s n a2 Sets Digital Audio Input Transmission s n Set ID a 2 Data Cr Data 00 Digital 01 Analog Acknowledgment n Set ID OK NG a 2 Data x This feature may not be available for all models 77 Booting ...

Page 109: ...Data 00 Off 01 On Acknowledgment n Set ID OK NG a 9 Data x This feature may not be available for all models 82 Audio Out Command s n aa Sets Audio Out to Off Variable Fixed Transmission s n Set ID a a Data Cr Data 00 Off 01 Variable 02 Fixed Acknowledgment n Set ID OK NG a a Data x This feature may not be available for all models 83 DPM Standby Mode Wake Up Control Command s n 0b Controls the DPM ...

Page 110: ...eletes all indexes E0 Delete all Timer Power On s E1 EF Delete the 1st to 15th times for Timer Power On B1 B6 Delete the 16th 21st times for Timer Power On 3 01h to 0ch Timer Power On days setting 02 Repeat Daily 03 Repeat from Monday to Friday 04 Repeat from Monday to Saturday 05 Repeat from Saturday to Sunday 06 Repeat on Sunday 07 Repeat on Monday 08 Repeat on Tuesday 09 Repeat on Wednesday 0A ...

Page 111: ...ff Example 2 fe 01 e1 ff ff Reads the 1st index data in Timer Power Off Example 3 fe 01 04 02 03 Sets the Timer Power Off as Monday Saturday 02 03 This feature only works when Clock 1 year month day and Clock 2 hour minute second have been set Acknowledgment e Set ID OK NG Data1 Data2 Data3 x 88 LCIN008 Control Command s n b8 It controls the LCIN008 device Transmission s n Set ID b 8 Data1 Data2 C...

Page 112: ... 4 03 High2 BT 1886 Acknowledgment n Set ID OK NG a d Data x This feature may not be available for all models 93 Black Level Command s n ae It sets the Black Level mode Transmission s n Set ID a e Data Cr Data 00 Low 01 High 02 Auto Acknowledgment n Set ID OK NG a e Data x This feature may not be available for all models 94 UHD Deep Color Command s n af It sets the UHD Deep Color mode for each inp...

Page 113: ...trols Transmission s n Set ID c 1 Data Cr Data 00 Off 01 On Acknowledgment n Set ID OK NG c 1 Data x This feature may not be available for all models 99 Scan Inversion Command s n 87 It controls the on off status of Scan Inversion Transmission s n Set ID 8 7 Data Cr Data 00 Off 01 On Acknowledgment n Set ID OK NG 8 7 Data x This feature may not be available for all models If you change the values ...

Page 114: ...00 Off 01 On Acknowledgment z Set ID OK NG Data x This feature may not be available for all models 104 Stereo Mode Command s n c2 Controls Stereo Mode Transmission s n Set ID c 2 Data Cr Data 00 Left Right 01 Left Left 02 Right Right Acknowledgment n Set ID OK NG c 2 Data x This feature may not be available for all models 105 HDR Picture Mode Command s n c4 Selects a HDR Picture Mode Transmission ...

Page 115: ...ness control Data 1 00 64 Range control Acknowledgement n Set ID OK NG a b Data1 Data2 x This feature may not be available for all models Data2 only supports Hex values that are multiples of 5 The range of minimum brightness value cannot exceed the range of maximum brightness and the range of maximum brightness value cannot be less than the range of minimum brightness 111 Color Calibration Command...

Page 116: ... the product is connected Check if the driver of PC graphics card has been installed Check if the plug and play function is supported by the PC graphics card user manual Issues Related to Screen Video A message saying No signal or Invalid Format appears The signal cable is not connected between the PC and the product or the cable connection status is unstable Check the signal cable Access the inpu...

Page 117: ...pported before the graphics card driver is configured This is not a problem of the product it is due to the design of the graphics card s BIOS configuration screen aspect ratio To access the PC BIOS configuration screen please connect a standard aspect ratio 4 3 or 16 9 monitor then perform the BIOS configuration Images are flickering or fluttering on the screen If you turn the monitor on when it ...

Page 118: ...roduct The screen s brightness seems dark Adjust brightness and contrast again Backlight may need repair If the internal temperature of the enclosure rises the screen s brightness may darken Clean the heat exchanger or filter in the enclosure periodically Issues Related to Sound There is no sound output See if the audio cable is connected properly Adjust the volume of the product or external devic...

Page 119: ...n time set for the screen size and to display the video content with a small number of fixed characters or logos Recommended daily operation time 55 inches 18 hours 65 inches 12 hours A few horizontal lines may appear on the screens while running the Clear Panel Noise feature This is normal so there is no need for concern If the power is turned on or a power failure occurs while the Clear Panel No...

Page 120: ... with nail or fingertip If holding the tip of the touch pen or near the tip of the touch pen If using the touch pen while pressing it with strong force on the screen The location of a touch does not correspond to the touch coordinates This may occur when the touch screen is not calibrated properly Change your tablet PC settings A touch is applied to a monitor other than the one I intended This may...

Page 121: ...mains visible This phenomenon is referred to as image sticking Image sticking does not occur when using constantly changing images but may occur when using a fixed image for an extended period of time Therefore it is recommended that you use the instructions below to decrease the likelihood of image sticking occurring when using a fixed image It is recommended that you change the screen at least o...

Page 122: ......

Reviews: